Video Cropper for Mac: How to Crop Videos on Mac (Big Sur Included)
Looking for a free video cropper for Mac?
Want to learn how to crop a video using iMovie on Mac?
Or do you want to know how to crop a video on Mac OS Big Sur using a lesser-known tool that comes pre-installed on it?
In this article, we’ll show you all the best free ways to crop a video on your Mac computer. Here’s everything we’ll cover, please feel free to jump around and make it a choose-your-own-adventure article:
How to crop a video using iMovie on Mac
How to crop a video using Mac OS Big Sur’s built-in video cropping tool
How to crop a video on Mac using Quicktime Pro
How to crop a video on Mac the easy way
How to Crop a Video using iMovie on Mac [Built-in Video Cropper for Mac]
You can use iMovie, a free desktop video editing software exclusive to Mac OS, to crop your videos. The freeware comes pre-installed on your Mac OS, but if you don’t already have it installed, you can download it here.
Cropping a video using iMovie involves several steps so be sure to check out our article that gives you step-by-step instructions and pictures on how to crop a video on iMovie.
How to Crop a Video on Mac OS Big Sur using a Built-in Video Cropper
You can use Photos, an app that comes pre-installed on Mac OS Big Sur, to crop a video. Here are the steps to crop a video using Photos’ video cropping tool:
Step 1: First, select the video you want to crop and double-click it to reveal a toolbar in the top right corner of the app. Now click on the Edit button in the toolbar.

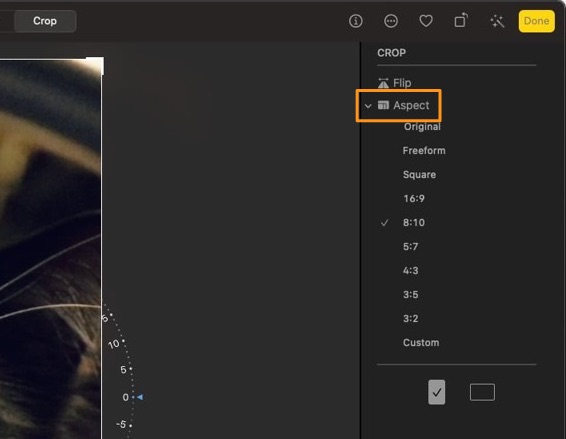
Step 2: Now click on the Crop tab at the top. An adjustable cropping box will be applied to the video.

Step 3: You can adjust the cropping box to crop your video to the aspect ratio of your choice. Click on the Aspect dropdown button to reveal various aspect ratios. Or you can adjust the cropping box in any dimensions using the Custom option.
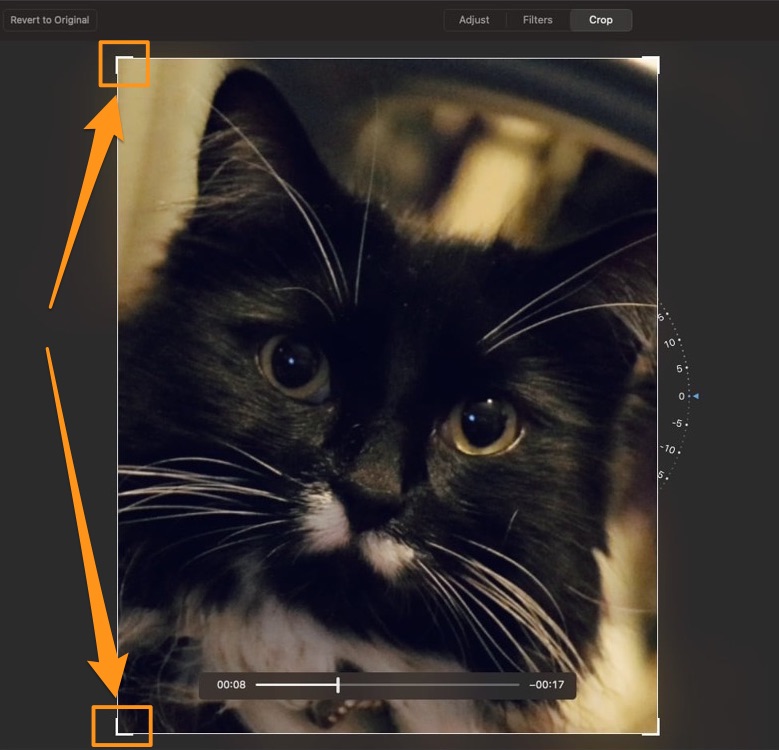
Step 4: To adjust the cropping box and select the area you’d like to keep, simply click and drag one of the handles around the corners.
How to Crop a Video in VLC
You can use VLC for Mac OS X to crop your videos. It’s a little daunting to crop videos using VLC as you’d have to use pixels to select and crop the area you want to keep. Take a look at our article that shows you how to crop a video using VLC for Mac.
How to Crop a Video using QuickTime Pro [Built-in Video Cropper for Mac]
Yes, you can use QuickTime player to crop videos on your Mac computer. But not with the basic version, you’re going to have to upgrade it to the pro version to gain access to the video cropping functionality.
And you’d only be able to upgrade it to pro if you already have QuickTime 7 installed on your Mac computer. Here’s our article that shows you how to crop a video using QuickTime Pro.
How to Crop a Video on Mac in 3 Simple Steps: The Easiest Way
Animaker’s video cropper allows you to easily crop your videos directly from your browser on your Mac computer. It’s a lightweight app that lets you crop your videos in just 3 simple steps.
Here are the steps to crop a video on Mac using Animaker:
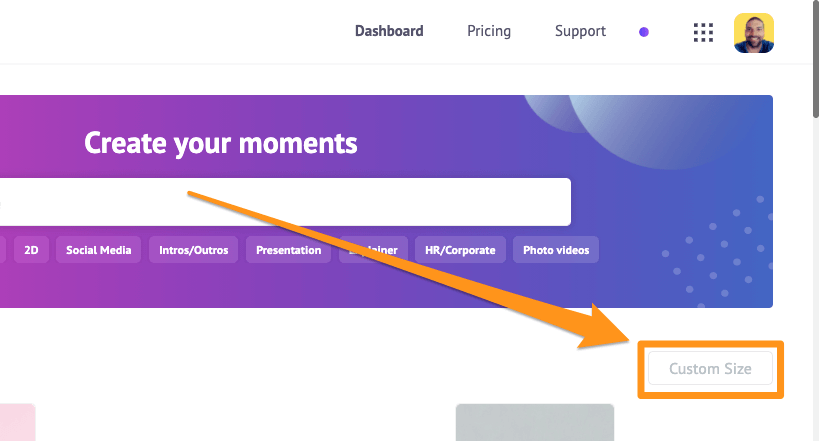
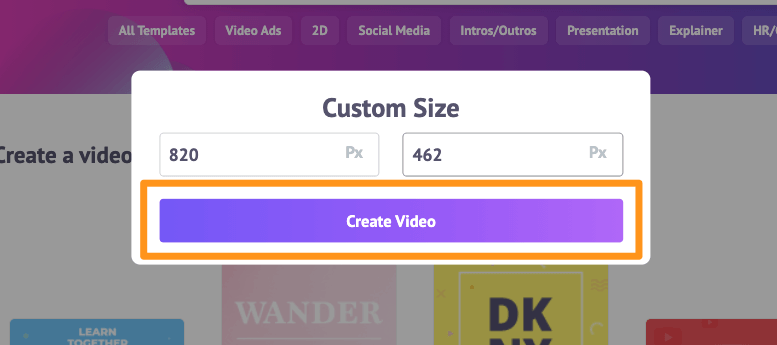
Step 1: Signup for a free account or log into your account. Now from the dashboard, pick the dimensions or a social media platform you want to crop your video for. You can pick the Horizontal (16:9), Square (1:1), or Vertical (9:16) preset from the Create a video section in your dashboard. Or you can use the Custom Size button to crop your video to custom dimensions.

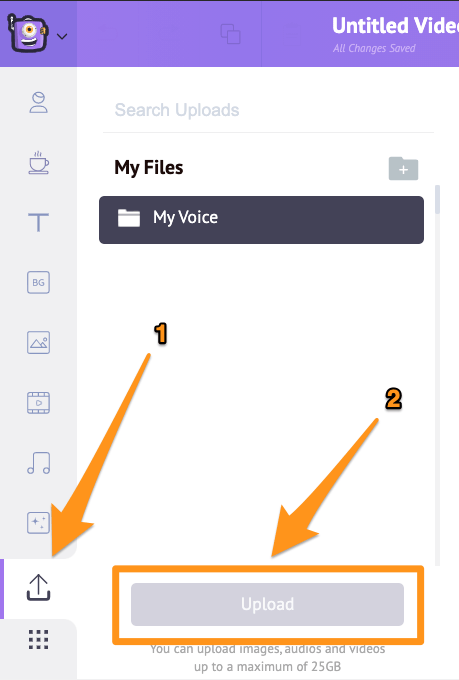
Step 2: Upload the video you want to crop. Click on the Upload tab in the main navigation bar and then click on the Upload button at the bottom of the tab window.
Once the video’s been uploaded, click on the video to use it in your video project.

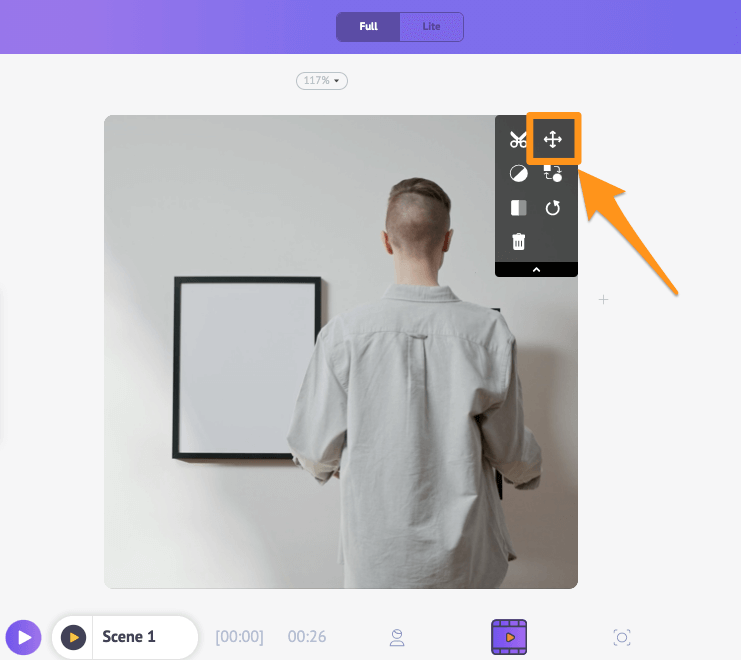
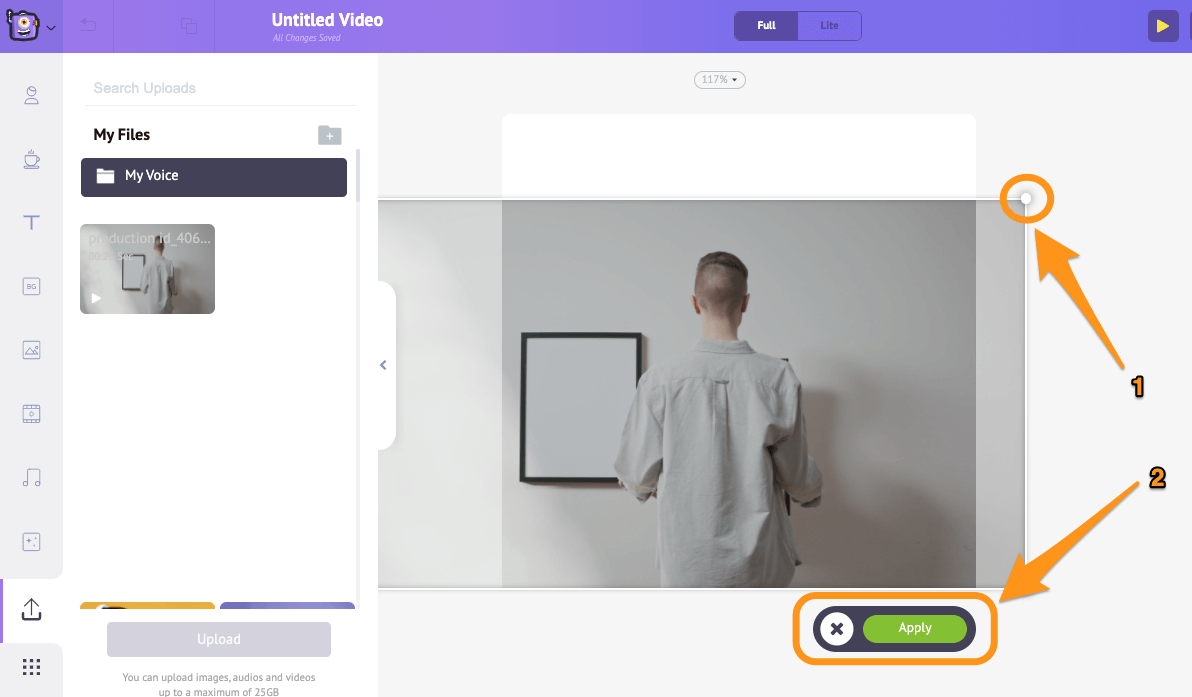
After the video’s been set to the canvas of your chosen dimensions, you can crop or adjust the video to select the part you want to keep. To crop your video, click on the Crop button in the top right corner of the canvas. Now click and drag one of the handles around the corners to resize or scale it and then reposition it so it fits the dimensions. Once you’re done cropping your video, click on the green button that says Apply in the bottom right corner to save the changes.
Step 3: You can now download your cropped video to your computer by clicking on the Publish button and then selecting Download Video from the resulting dropdown menu. Or you can share the video directly to various social media platforms from inside the app.

Love how simple it is to crop a video using Animaker? Apart from letting you crop your videos, Animaker’s video editing software offers various other video editing tools.
You can use Animaker’s video editor to:
Adjust video brightness, contrast, etc.
And the list goes on… Be sure to check out these tools and learn why it’s the go-to video editor for marketers and content creators.
If you do not have any video editing experience or haven’t used any professional video editing software before, and you want to make your videos look professional and do it all by yourself, then Animaker’s video editing suite is what you need.
Our online video editing suite offers simple video editing tools that anyone can use to edit their videos. It doesn’t require any video editing experience. In fact, it’s been made specifically for non-designers, marketers, and anyone who wants to quickly edit videos for their social media channels or website.

With Animaker’s video editing software, you don’t ever have to deal with hard-to-navigate interfaces or go through several steps to perform a simple action. Check out our online video editor today for an enjoyable, hassle-free video editing experience.
Got any questions about cropping your videos on your Mac computer? Any interesting video cropper for Mac that we seem to have left out? Please let us know about them in the comment section below.


