How To Upload YouTube Shorts from PC and Mobile? [A Step by step guide]
YouTube is undoubtedly among the most popular social media platforms used by millions of cybernauts across the globe. Launched in 2005, YouTube has stood the test of time and has proved to be the best platform for capable creators that want to build a massive community of followers.
In 2020, YouTube announced the launch of "Shorts" to enable content creators to post bite-sized videos. This was done majorly to attract and engage new audiences who have flocked to TikTok as their go-to entertainment platform.
While this ensures properly engaging the newer audience, it also creates some excitement among existing users as they haven’t seen any major feature update on the channel that has traditionally been more friendly to longer videos.
Now we know you have a lot of questions about YouTube Shorts. So far we have covered multiple topics like
- How long can YouTube shorts be?
- How to create YouTube shorts on your smartphone?
And in this article, we’ll be covering
- How to upload YouTube Shorts from a PC? &
- How to upload YouTube Shorts from Mobile?
- Uploading pre-made videos
- Recording and uploading live
Before we jump into learning how to upload, you must keep these points in mind:
- Video dimensions: The video must be Square or Vertical.
- Video duration: It must be between 15 and 60 seconds. Click here to know how long youtube Shorts can be.
- Video Title: The title or description must have the hashtag #Shorts. This would help your Shorts to get a better reach and increases the probability of the video appearing in YouTube recommendations.
Now let’s jump into the topic,
-
How to upload YouTube Shorts from a PC?
Got an interesting video idea that can be posted as shorts from your PC? Well, let’s see how in just four simple steps:
Step 1: Log in
Log in to your YouTube account from your computer. This opens the YouTube channel homepage.
Step 2: Upload the video
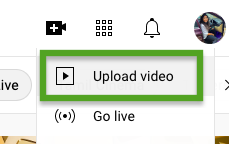
Select the 'create' option (video camera button at the top right corner of the channel dashboard)
![]()
Once you click that, you will get two options. ‘Upload video’ and ‘Go Live’. Among these, select the 'upload video' option.
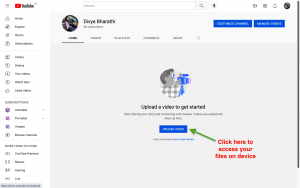
On clicking that, you will reach the 'upload videos' screen. Click on the “Upload Video” button.
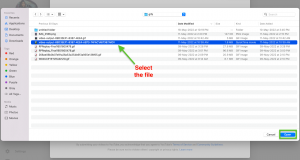
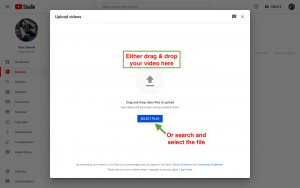
Here, you can upload your video by either clicking on the ‘select files’ button or by dragging and dropping the desired video file.
Step 3: Add video details
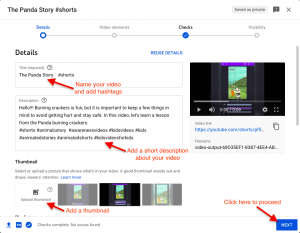
Once the video is uploaded, the video editing screen appears. Fill in the following video details to publish the video.
Details:
You can add the title for the Shorts video along with a description. Remember to add #Shorts to the title and description.
Scroll down and choose the thumbnail of your Shorts video. You can choose one from the given set of pictures or upload one from your device.
Video elements:
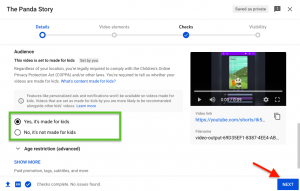
You will then get to the 'video elements' screen, where you need to select the audience for your Shorts. If your video is kid-friendly, select “Yes, it's made for kids”. Else, select “No, it’s not made for kids” and click on the Next button.
Checks:
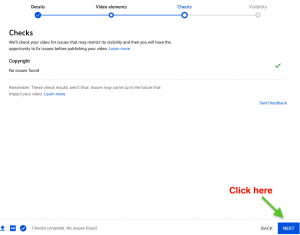
You will reach the 'checks' screen. This tool of YouTube helps the creator to know if the video contains any copyrighted material and if it complies with advertising guidelines. Click on the “Next button”.
Visibility:
Next, you will get to the 'visibility' screen which is the final step of the uploading process. Here, you will have to choose if you want the video to be private, unlisted, or public.
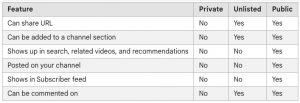
- Private videos - These videos can be seen only by you and those you invite while uploading the video. You can invite people to view the private videos by entering their email IDs. You cannot share the video link of private videos.
- Unlisted Videos - These videos can be seen by you and anyone with the video link. Unlike Private videos, you can share the video links of unlisted videos with others.
- Public - Select public if you want to make the video visible to everyone.
Here’s some more information about private, unlisted, and public videos.
Source: https://support.google.com/youtube/answer/157177?hl=en&co=GENIE.Platform%3DDesktop
Step 4: Publish your video
Once all details are filled, the last step is to publish the video by clicking on the Publish button.
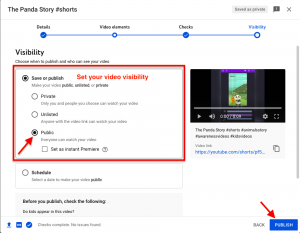
If you do not want to publish the video immediately, you can also schedule by entering the date and time of publishing.
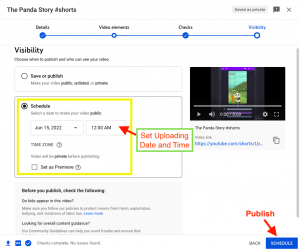
And there you go! That's how you upload a YouTube Shorts video from a computer. After you publish your Shorts, you can share them on your social media handles and promote them.
2. How to upload YouTube Shorts from Mobile?
Now that we know the way to upload YouTube Shorts from PC, let's see How to upload YouTube Shorts from your mobile device. You can either choose to upload a pre-recorded video from your device or record a video using the integrated YouTube Camera.
Let's understand the step-by-step process of uploading your Shorts from your mobile.
1. Uploading a pre-made video:
The pre-made video stored on your mobile device can be uploaded to YouTube Shorts in just three simple steps.
Step 1: Upload your video
Get into the YouTube app from your mobile device. Click the Create icon(+) at the bottom of the page.
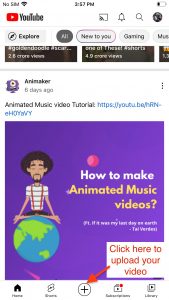
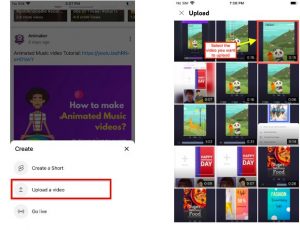
Now, in the list of options, select 'upload a video.' This will show you the videos in your gallery. Then select the video you want to upload.
Step 2: Add Music & Text
Since it’s a pre-made video, it might already have a music track and the necessary text. However, if you have not added a music track or text to your video, you can make use of the music and text icons at the bottom-left corner of the app.
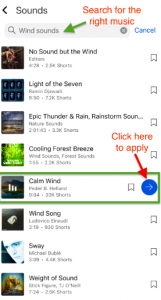
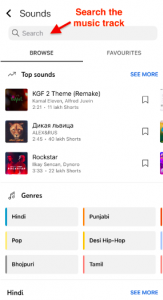
To add music, select the music option. YouTube offers a plethora of tracks for you to choose from. Use the search bar to find the desired music track easily.

Select a music track and click on the arrow button straight to it. This will insert the music into your video.
Keep in mind that if you have already added music to your video, then your video length can be up to 60 seconds. However, if you want to choose a music track from YouTube’s music library, the duration of the video will be limited to 15 seconds.
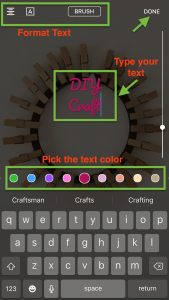
To add text, click on the Text icon below. You can choose the text color from the color palette shown on the screen and also format the text using the options available on the top.

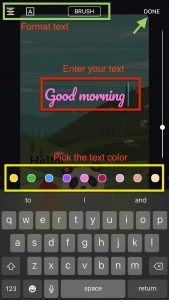
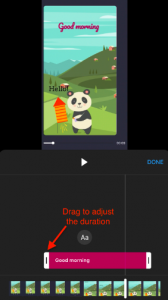
As you add assets to the video, you will notice it appear on the timeline below. By clicking on the respective asset in the timeline, you can adjust the duration of that particular asset by dragging the two end bars.
Step 3: Publish Your Video
Finally, click on the Next button in the top right corner to name your video and add a caption or a short description of your video. Now add relevant hashtags to your video. Do not forget to add #Shorts in both Title and description. This will help your video to be recommended under the Shorts section.
Set the visibility of your video. There are three options for you to choose from:
- Private- Only those who were invited can access the video.
- Unlisted- The video can be shared using a link. Only the ones with the link can view the video.
- Public- Anyone can view the video.
Here comes the final step. Hit the UPLOAD button on the top right corner. In no time, your Shorts video gets posted on YouTube.
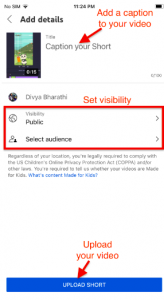
You have successfully uploaded a pre-made video as Shorts from your mobile phone!
2. Record a Video and Upload
Apart from uploading a pre-recorded video, you can even record the video live and upload it on YouTube. Let's see how to do that now.
Step 1: Create Shorts
Firstly, get into the YouTube App. On the very first screen, you will find an ADD (+) button at the bottom center. Click on the ADD button and select the Create a Short option.
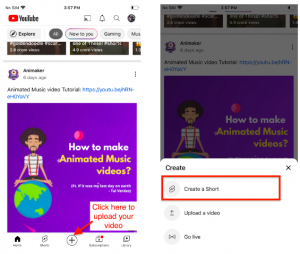
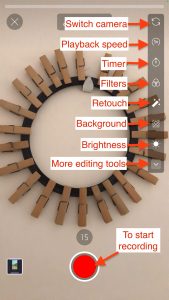
The right toolbar appears with a list of tools for you to make use of, such as filters, switch camera, background, retouch, and more. Explore these tools and refine your video.
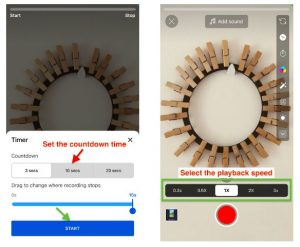
Before you start recording, you can fix the speed of the video and also set a countdown timer for the video’s start.
Step 2: Record a video
Once you are ready to start recording, press and hold the Record button. For YouTube Shorts, make sure to keep your video in portrait mode. To make a pause, stop pressing the record button.
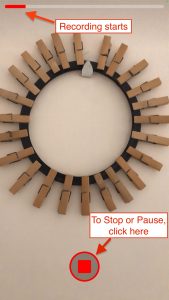
- Upon completion of the recording, click on the Tick button in the bottom right corner to proceed.

Step 3: Edit your video
- Once you are done recording, you can add text and music to your video. You can also make use of the right toolbar to add filters and brightness, retouch the video, etc. By clicking on the music option, you can browse the right music and add it to your video. Keep in mind that selecting music from YouTube’s music library will limit your video duration to 15 seconds.
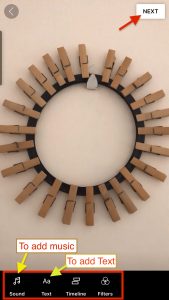
To add text, click on the text button and start typing. You can change the font and alignment on the top and pick a text color from the color palette.
Step 4: Publish your video
Finally, add a caption to your shorts and set the conditions before uploading. Add #Shorts in the title and the description so that your video gets a higher chance of being recommended under the Shorts section.
Then set the visibility of your video. Here are different options for visibility.
- Private - The video is visible only to those who have been invited.
- Unlisted - Here, the owner of the video can share it as a link. Anyone with the link can view the video.
- Public - By choosing this option, you can allow any YouTube user to watch the video.
Once all is done, click on the UPLOAD SHORT button at the bottom.
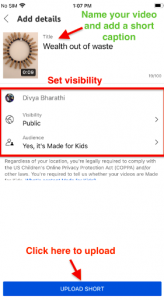
This is how you successfully upload a youtube Shorts video!
Now that you have complete knowledge about uploading YouTube Shorts, you are ready to go! If you have not tried Animaker yet, create a free account and get ready to create awesome 4K videos!
Animaker is also available for iOS users now. Animaker iOS app is an easy-to-use application that is packed with all the video editing tools required to create a studio-quality video.
Download the app now and create a youtube shorts video on iPhone by reading the link.
Make use of the comments section to shoot your questions. We are eager to know your thoughts.
