How to translate subtitles in less than a minute! [3 different methods]
Subtitles are a great way to make your videos accessible & reach a wider audience. This is because they help improve your videos' overall quality by providing additional context and clarity.
If you’re looking to translate your subtitle into multiple languages, you can do it manually or use online subtitle translator tools that will help you automatically translate your subtitles into 100+ languages.
This article will show you how to translate subtitles easily and efficiently.
1. How to translate subtitles with an online tool?
2. How to translate subtitles on YouTube?
3. How to translate subtitles on Notepad?
1. How to translate subtitles with an online tool? [Animaker Subtitles]
There are a number of benefits ways for translating subtitles. There are a number of benefits to using an online subtitle tool like Animaker Subtitles. Firstly, it’s a quick and easy way to get your subtitles translated into 100+ languages and reach a wider audience. And secondly, with AI & Machine learning, Animaker Subtitles provide accurate and fast translations for your subtitles.
So, let’s see how you can translate subtitles using Animaker Subtitles. But before that, learn how to make subtitles by reading this article - How to make subtitles (The Ultimate Guide)
Now that you know how to create your own subtitles using Animaker Subtitles, let’s check out how to translate subtitles.
With Animaker Subtitles, just like how there are different ways to make subtitles, there are a few different ways to translate subtitles as well. Let’s check out how -
Automatic Translation - With the power of AI & Machine learning, adding & translating subtitles for your video is pretty simple. You can save a lot of time by avoiding the manual translation of subtitles. Let’s see how you can automatically translate subtitles using Animaker Subtitles.
- To get started, create a new subtitle file from the dashboard by clicking on Create> Create Subtitles.

- Upload your video from your computer. Alternatively, you can also select a video from my exports or select one from your library.

- Once you have uploaded the video, click on “Auto Subtitle” option
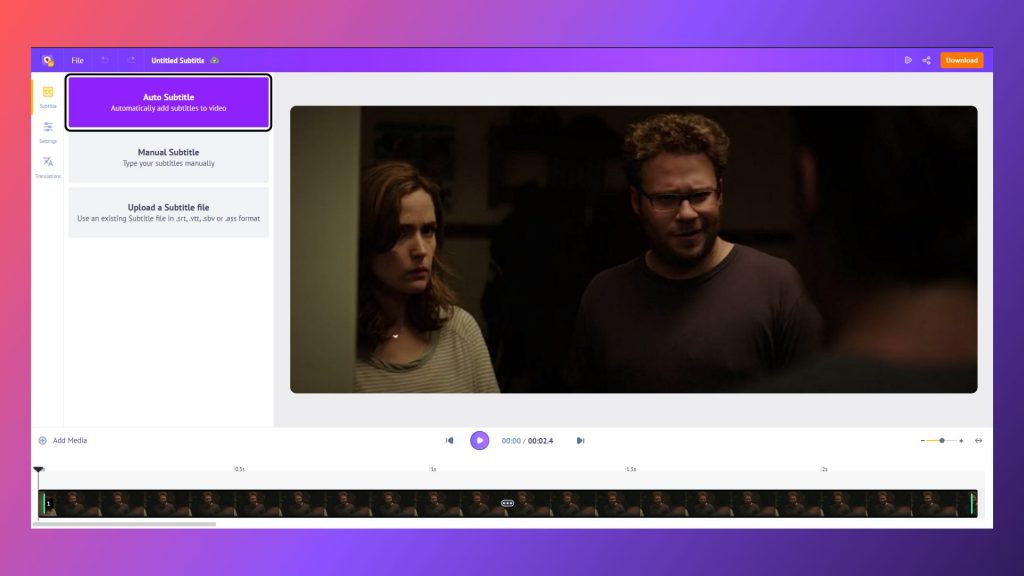
- Once you click on the “Auto Subtitle” button, it will take some time to add transcription & time stamps for your video automatically. Once done, go ahead and click on “Translations” on the left menu.
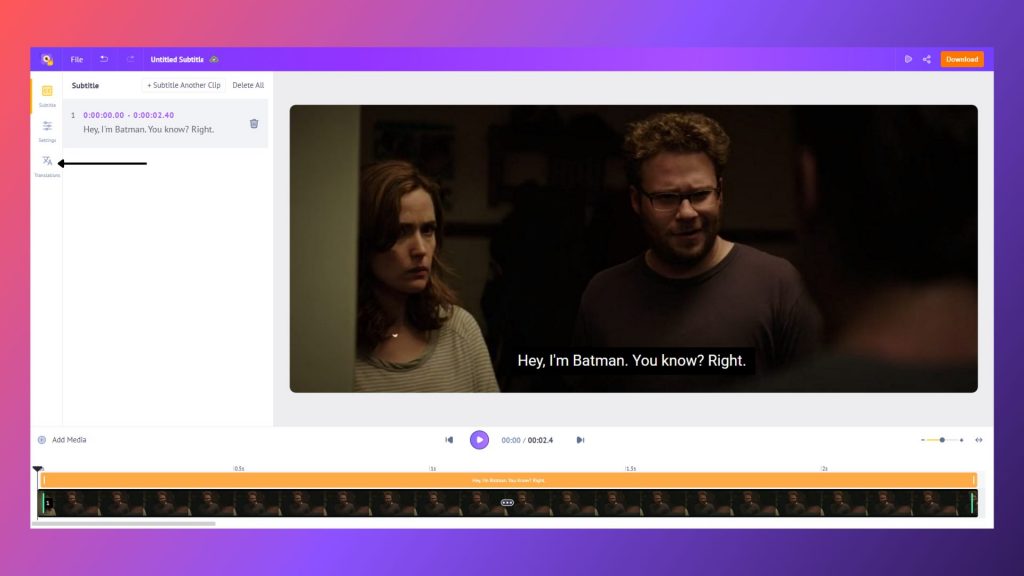
- In the subtitles tab, click on “Add a new language”
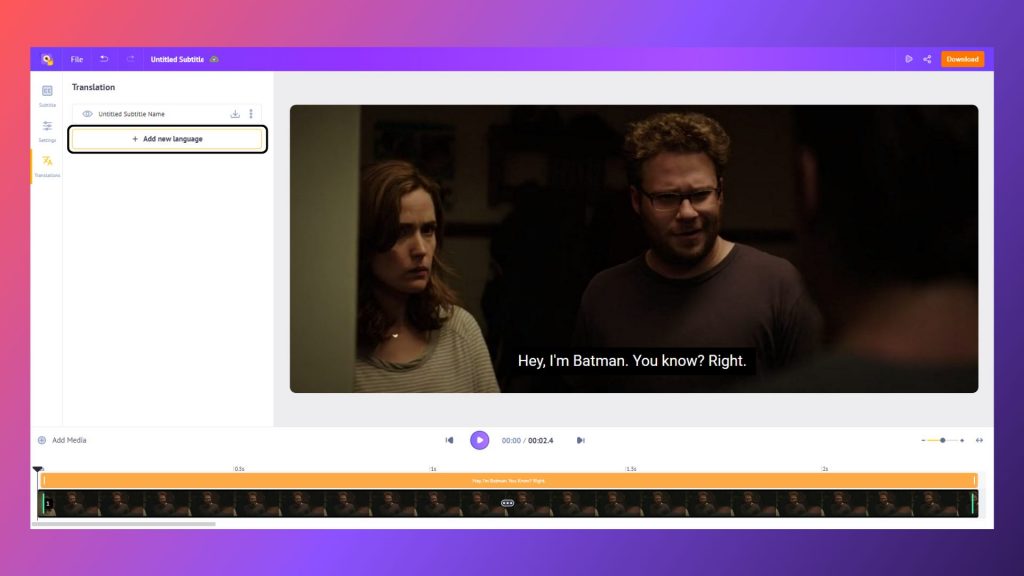
- In this tab, there’ll be three options -
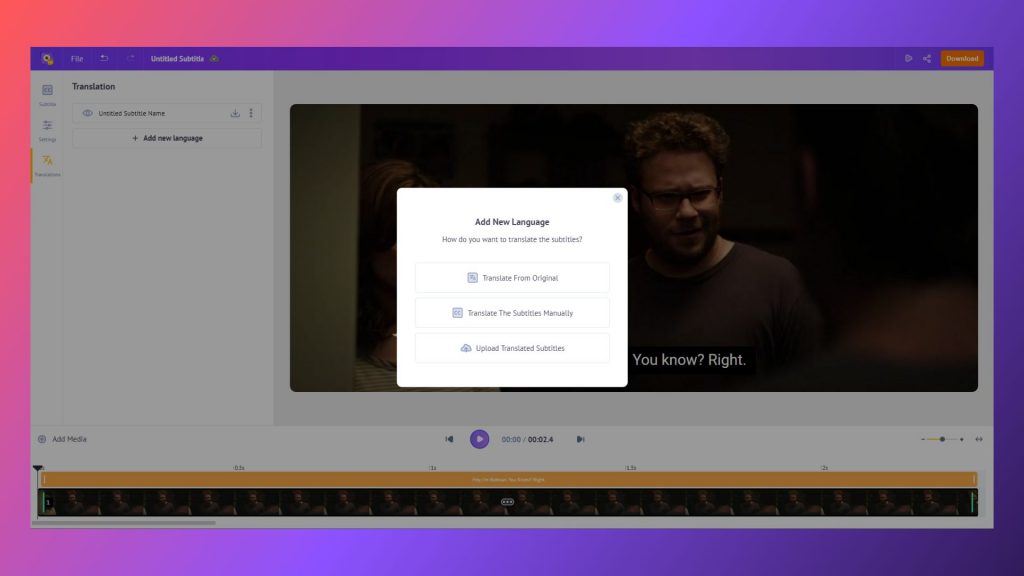
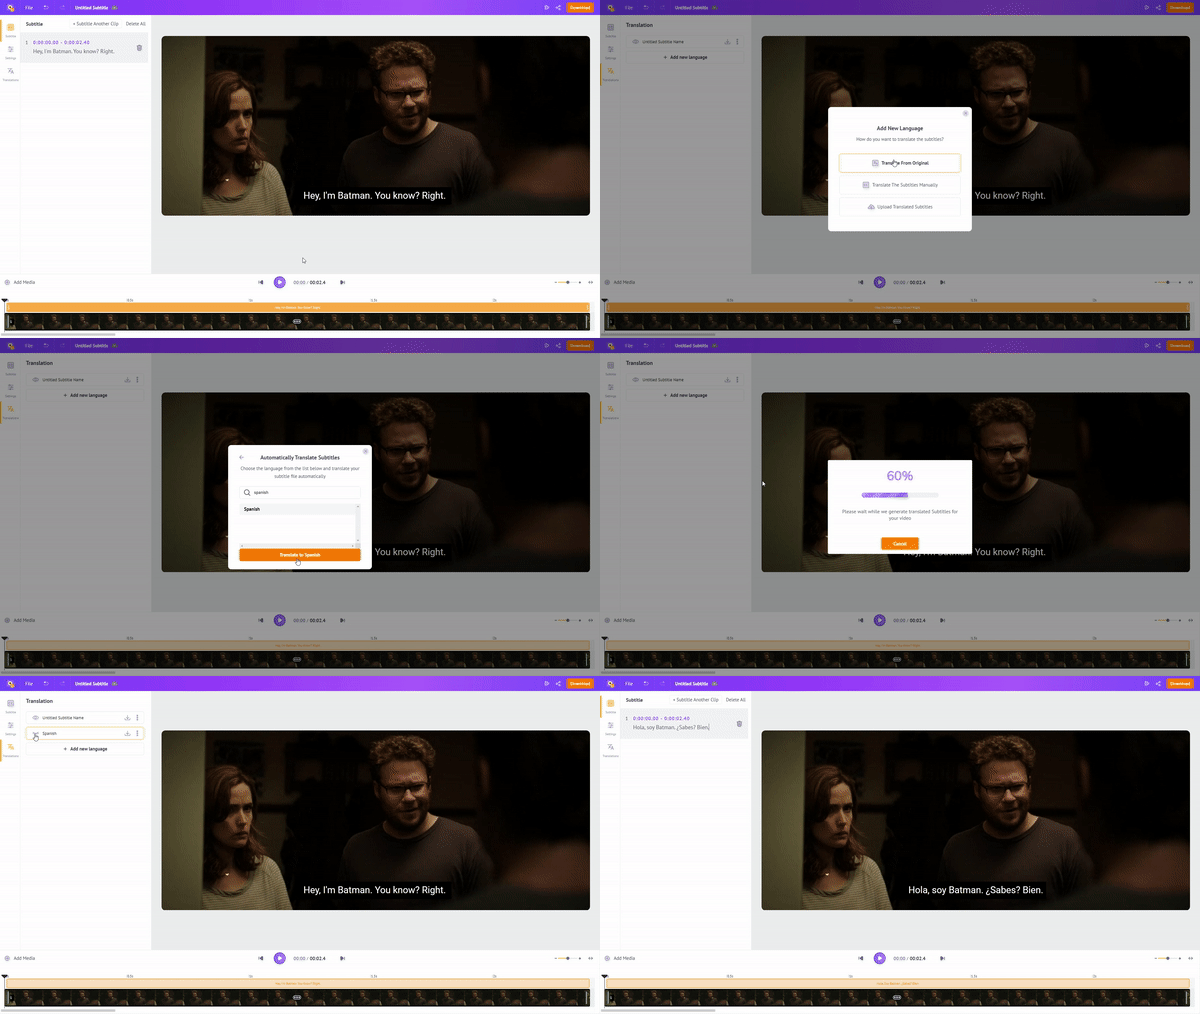
A. Translate from Original - If you select this option, you can simply select the language you want to translate. In a few seconds, you will have your subtitles translated automatically and ready to use.
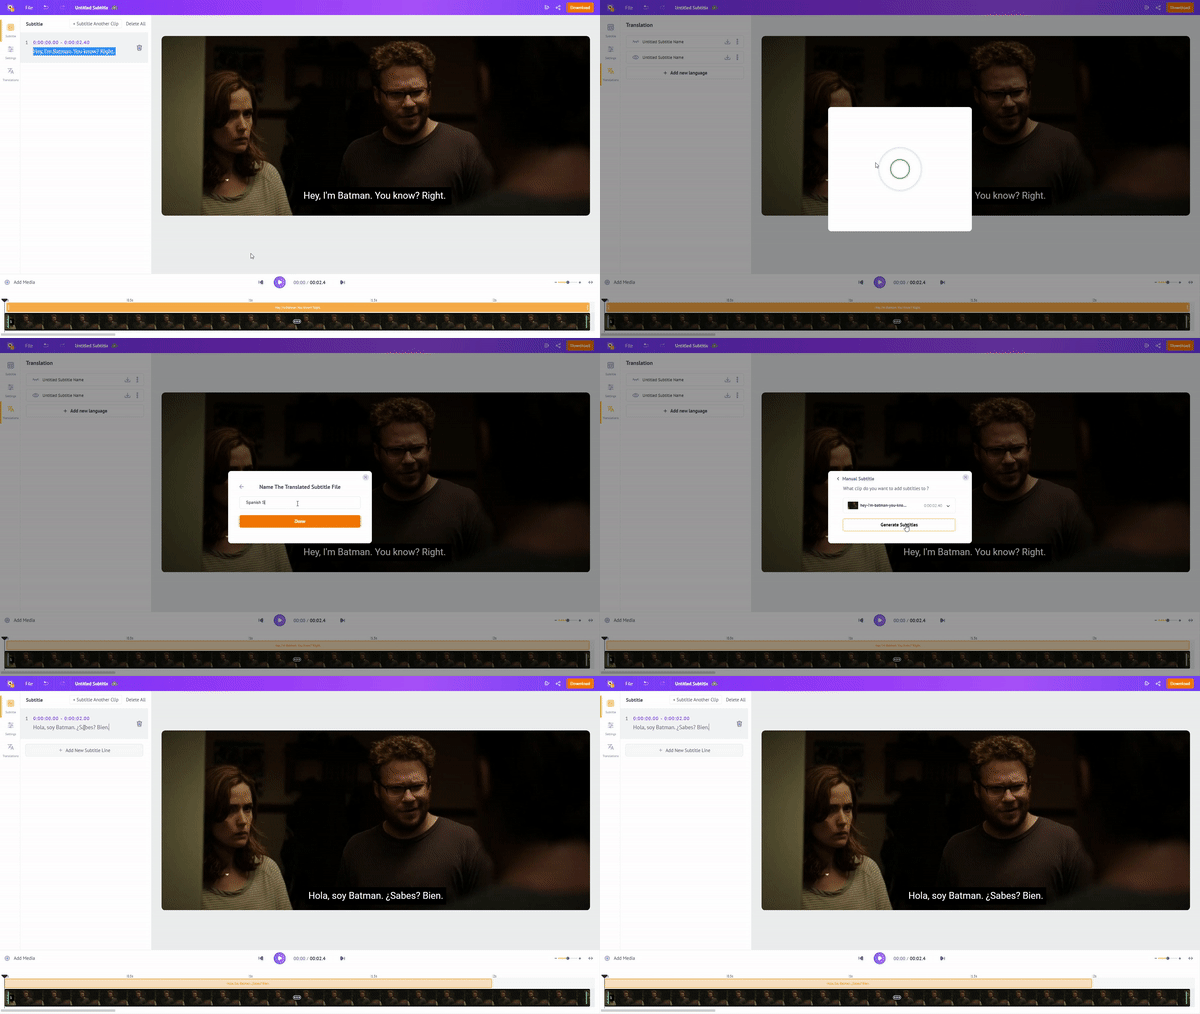
B. Translate the subtitles manually - If you want to get the maximum accuracy, then this option is right for you. So let’s see how to translate subtitles using Animaker Subtitles manually.
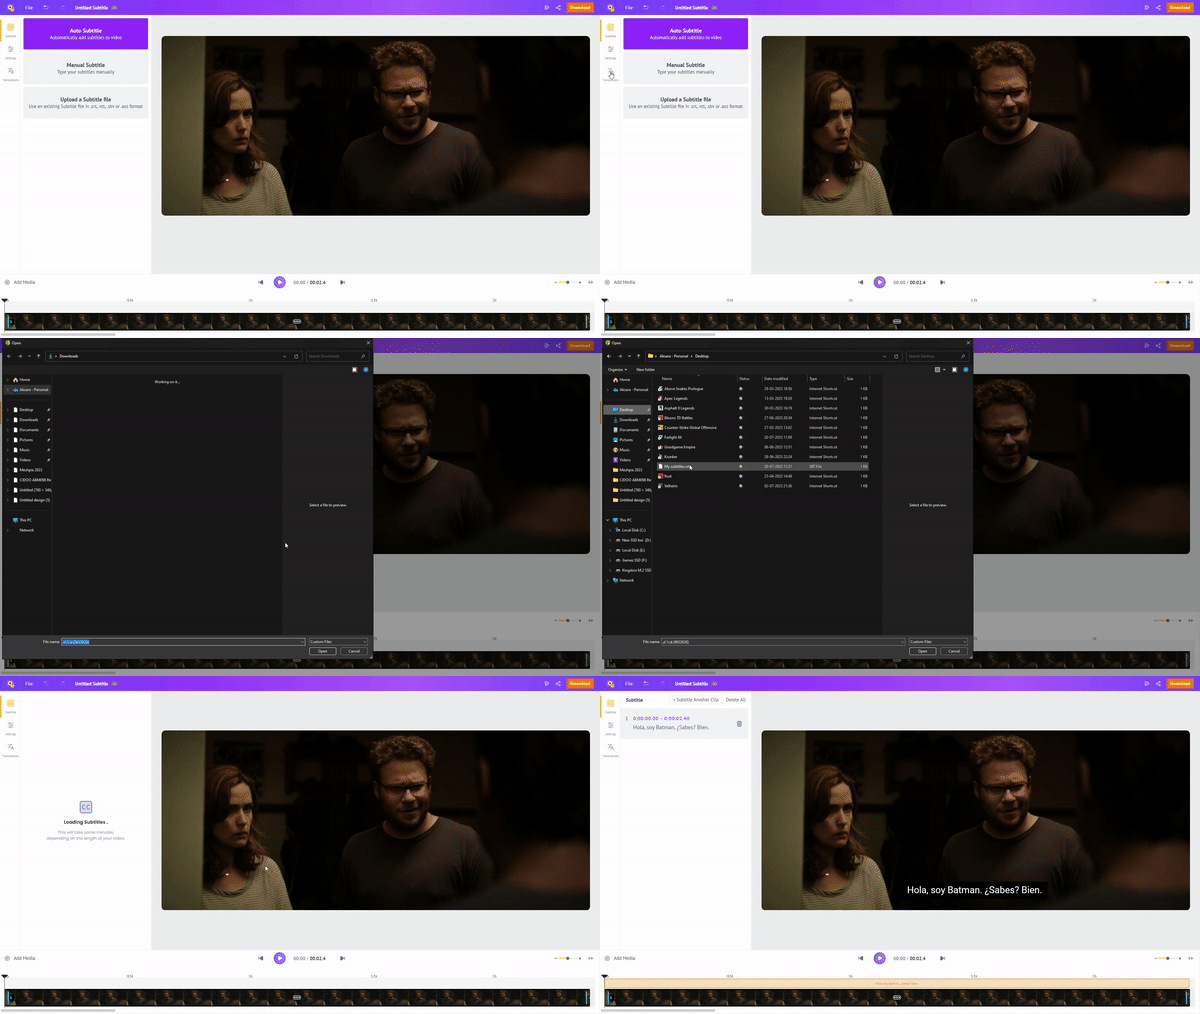
C. Upload Translated subtitles - If you have a file with pre-translated subtitles, you can use this option to upload your subtitles and easily add subtitles to your video.
As simple as that, you have your translated subtitles now. All you have to do is download your subtitles by clicking on Download > Download subtitle file.
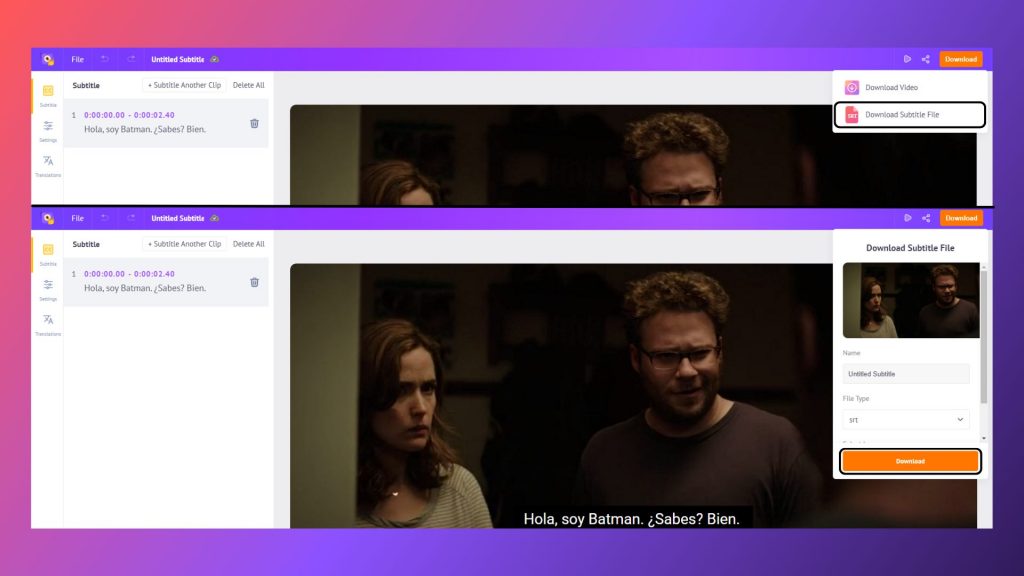
Alternatively, if you want the video with subtitles hardcoded in it, you can simply select the first option, Download Video.
Now, let’s see how we can translate subtitles on YouTube.
2. How to translate subtitles on YouTube?
When it comes to translating subtitles on YouTube, there are two ways you can do it -
(1) From the Youtube Player (As a Viewer) - If you are watching a video, you can do this using the YouTube Player itself. Follow the below steps to translate subtitles on YouTube.
- First, find a video you want to translate subtitles.
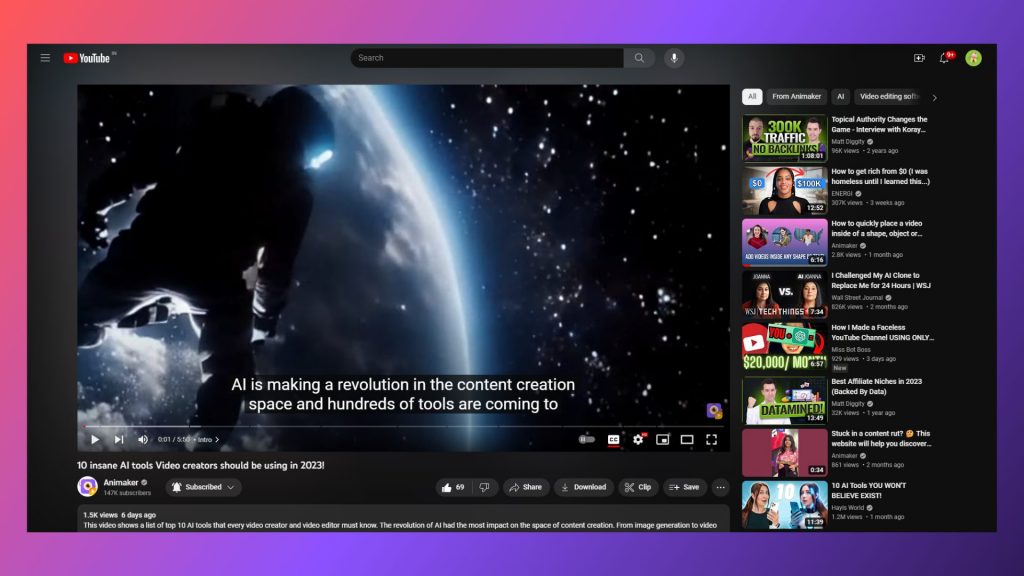
- Select the option “Subtitles/CC.”

- In the YouTube player, find the gear icon in the bottom right corner and click on subtitles.

- Click on the “Auto-Translate” tab.
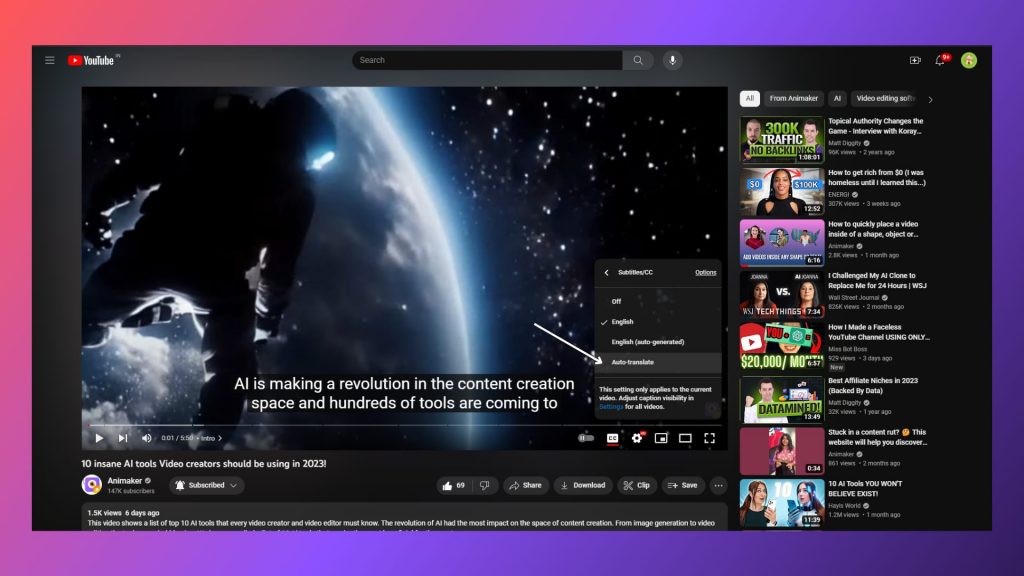
- Select the language you want to translate to.

Next up, let’s check out how you can make use of YouTube’s feature to translate subtitles manually.
(2) From the Youtube Studio (As a YouTube Channel Manager) - This is a process that involves a few steps but allows you to have more control over the translation. To manually translate the subtitles on YouTube, follow the below steps.
- Head over to YouTube Studio and select the video you want to add translated subtitles for.

- In the video menu, on the left side, click on the “Subtitles” option.
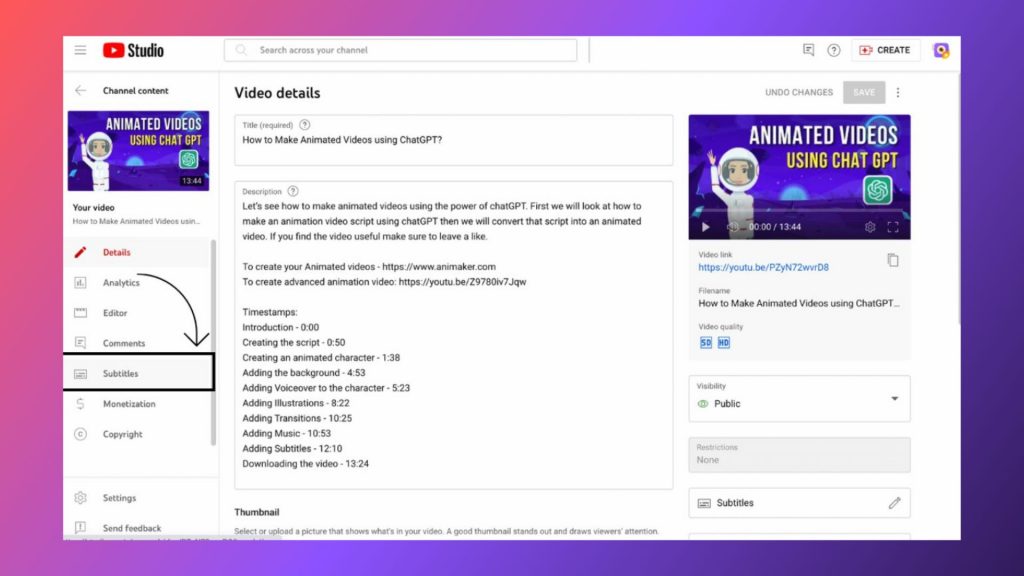
- In the Subtitles option screen, click on “Add language” and select the language you want to add subtitles.
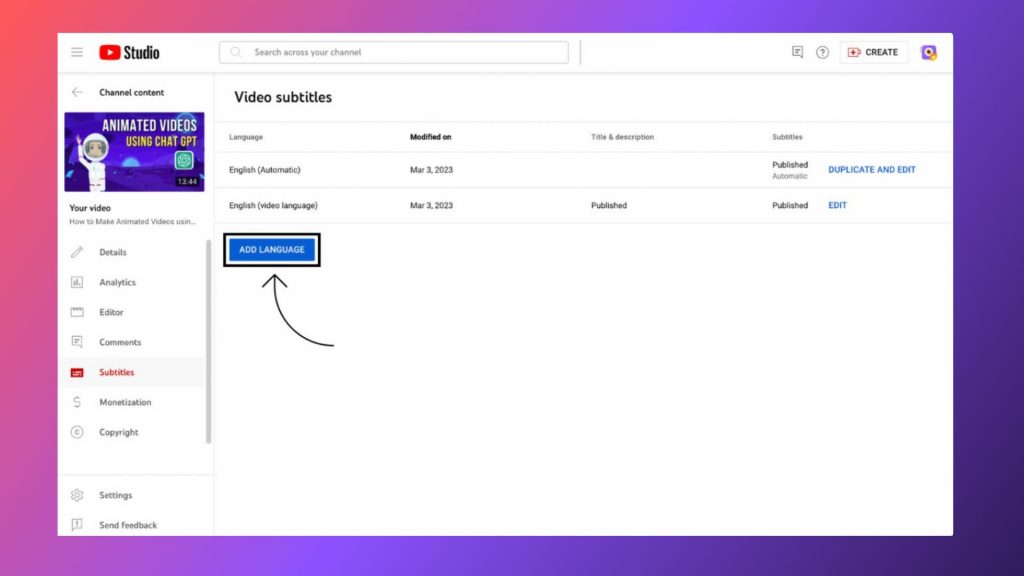
- Once you click on “add” and select the language, you will see the different options to add subtitles. Click on the language you want to translate to. Once you select, you will see a screen like this -
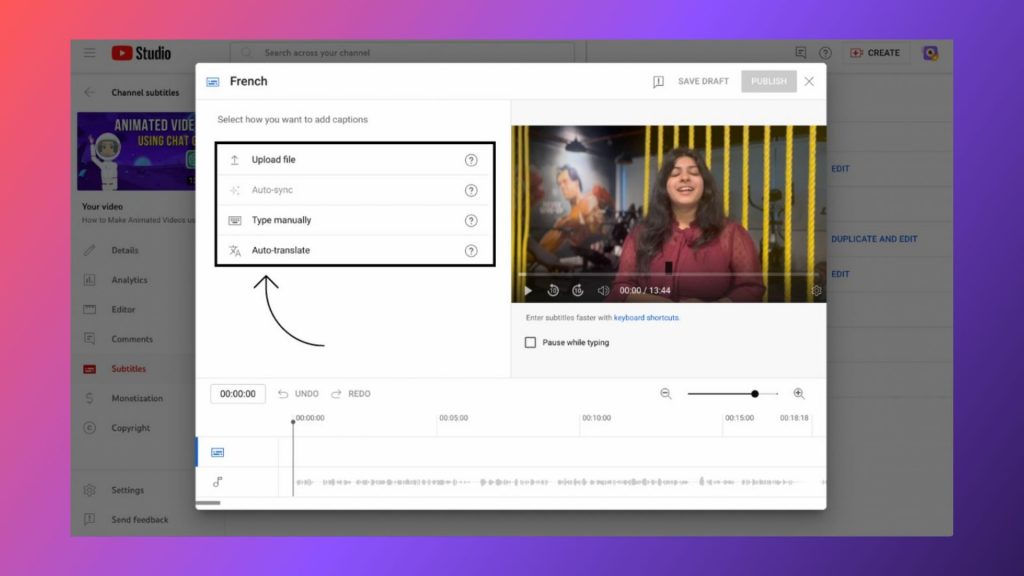
Here, you can choose the desired option and add the translated subtitle to your YouTube video.
i) Upload file: If you have a subtitle file in hand, you can simply upload the file here or any other translated subtitle file from your computer.
ii) Type manually: If you want accuracy, then you can manually add timestamps for your subtitle and add the text accordingly.
iii) Auto Translate: To use the Auto-Translate feature, you must add subtitles to your video in your native language. Once you have done this, the auto-translation will be available, and will use YouTube’s speech recognition feature to create subtitles for your video in other languages automatically.
In this next section, we will be checking out how to translate subtitles on Notepad using Google Translate.
3. How to translate subtitles on Notepad? [using Google Translate]
Creating and translating subtitles using Notepad is super simple and straightforward.
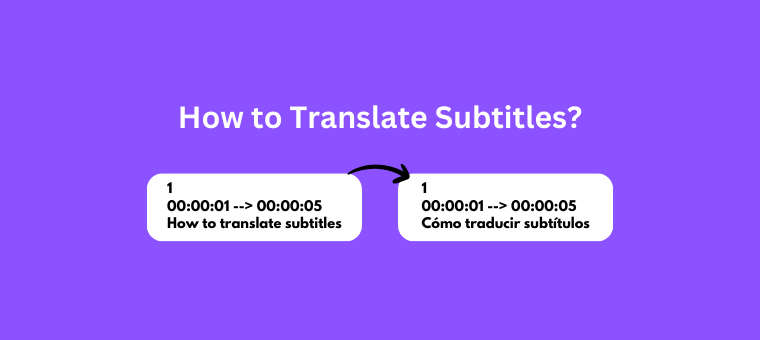
Subtitles are nothing but formatted text, so while creating a subtitle, you just have to follow the format as in the image below, then you are good to go.
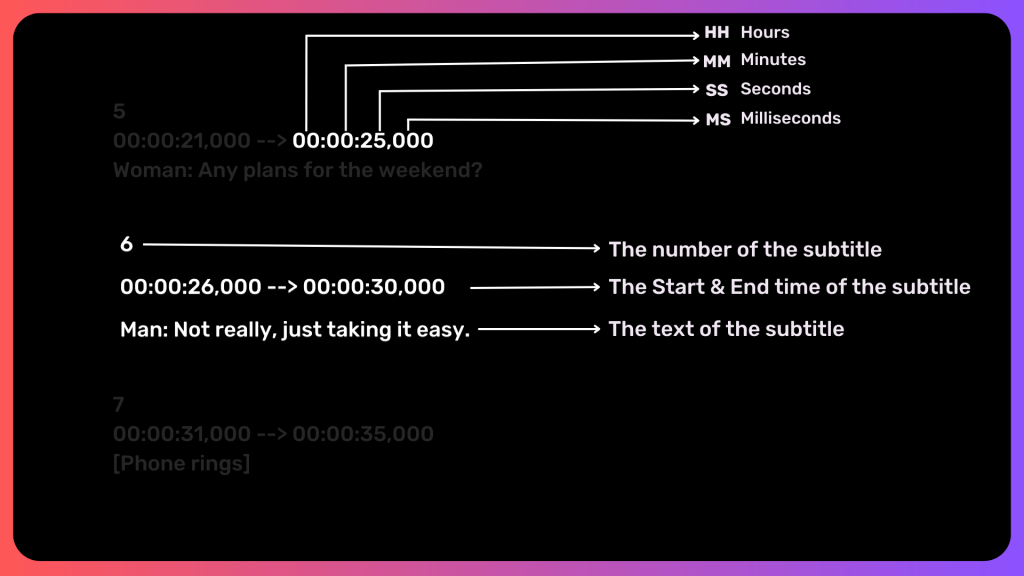
If you want to learn more about how to create subtitles manually using Notepad, check out this article, and you’ll be set - How to create an SRT file? [The easy way]
Now that you know the basics of creating a subtitle using Notepad, translating subtitles manually is pretty simple. You can make use of free services like Google Translate or DeepL translator to get the translated version of the subtitles. Then, create a new subtitle file & transcript it according to the time stamps.
Here’s how a translated version of a subtitle would look -
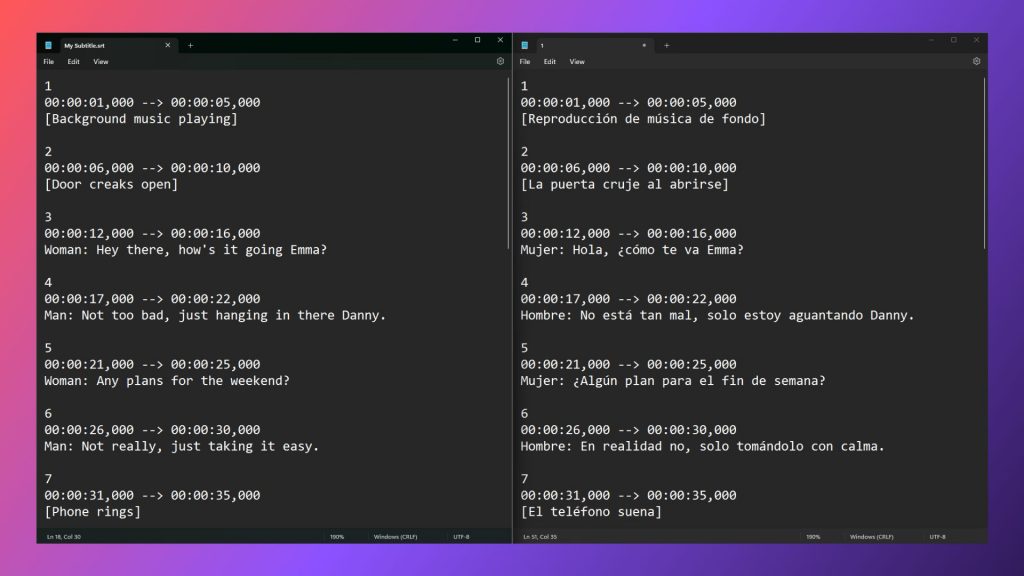
Wasn’t that pretty simple? Translating subtitles has its own advantages that enhance the viewing experience and broaden the reach of your content. Here are some reasons why translating subtitles is beneficial -
Global Accessibility - Subtitles make your content more accessible to people who speak other languages, which can help you reach a wider audience and ensure that your message is conveyed accurately.
Increased Viewership - Studies have shown that videos with subtitles are being watched more than the ones without subtitles. This is because subtitles make it easier for people to understand the content, even if the viewer’s native language is different.
Cultural Understanding - Subtitles can help people from different cultural backgrounds understand each other better. This is mainly because they provide a literal translation of the dialogue and the context, and help to understand the overall message better.
Improved Search Engine ranking - Apart from the perspective of the audience, subtitles can also help your videos rank better on search engine results pages (SERPs). This is mainly because Google and other search engines index the text of subtitles, which in turn can help your videos rank higher for the relevant search terms.
In conclusion, translating subtitles can be a great way to reach an audience, increase your viewership and improve your search engine ranking. By following the tips in the article, you can ensure that your translated subtitles are effective and help you reach your target audience.
Animaker Subtitles makes it easy for all subtitle tasks, from Subtitle creation, Subtitle Animation, Subtitle Translation, and many more.
If you have any questions, feel free to drop them in the comments section below.
