Remove Audio from Video in QuickTime (Step by Step)
Looking to remove audio from video in QuickTime player on your Mac computer?
Whether you’re using QuickTime 10 or an earlier version, we’ve got you covered.
Also, as a bonus, we’ll show you an easier way to remove audio from a video on your Mac computer.
In this article, we’ll show you how to remove audio from video using QuickTime player, step by step. Here’s everything we’ll cover, feel free to jump around:
How to remove audio from your video using QuickTime 10
How to remove audio from your video using an earlier version of QuickTime
How to remove audio from your video on Mac the easy way
How to Remove Audio from Video using QuickTime 10
QuickTime 10 is the latest version of QuickTime Player. QuickTime Player is a free tool that comes preinstalled on Mac OS. Here are the steps to remove audio from video using QuickTime 10:
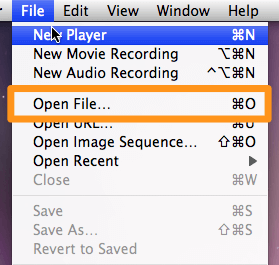
- First, open QuickTime, then, open the video you want to mute. Go to File > Open File.
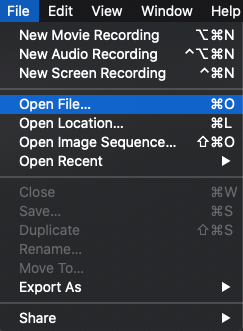
- Once the video is opened in QuickTime, click on the Edit menu at the top and select Remove Audio from the resulting dropdown menu.
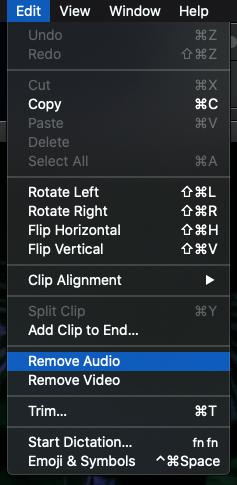
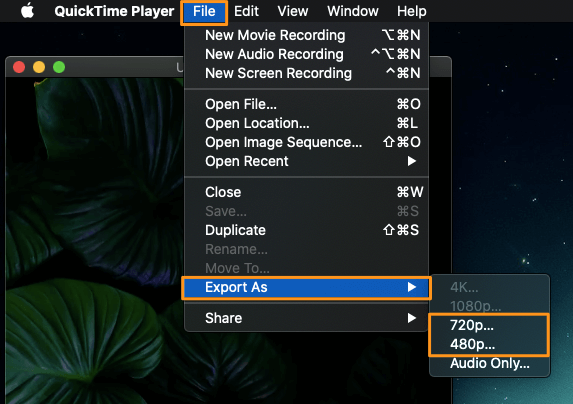
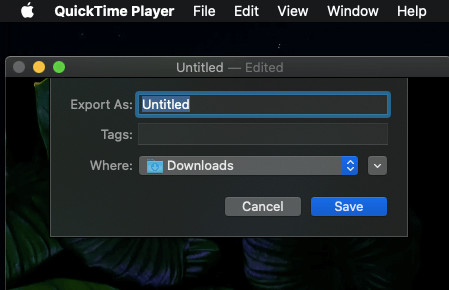
- To save the muted video, click on the File menu from the menu bar at the top and select Export As from the dropdown menu. Then enter a name for your video using the Export as input field and pick where you want to save the video.
- Finally, click on the Save button to save your muted video.
How to Mute Your Video using an Earlier Version of QuickTime
If you’re using an earlier version of QuickTime, here are the steps to remove audio from your video:
- Open QuickTime player on your Mac computer and then open the video you want to mute using QuickTime. Go to File > Open File.
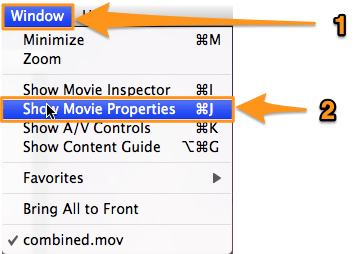
- Now click on the Window menu from the menu bar at the top and select Show Movie Properties from the dropdown menu.
- You can see that all the audio tracks associated with that video are listed in the Movie Properties window. Now simply find the audio track you want to remove from the video and untick the checkbox beside it in the Enabled section. This will remove that audio track from your video.

How to Remove Audio from a Video On Your Mac Computer: The Easy Way
If you’re a Mac user, you can use Animaker’s video muter to easily mute videos for free! All it takes is 3 simple steps to remove audio or sound and download your videos using our super-simple video muting tool.
For those who are unaware of Animaker, it is an all-in-one DIY video making app designed to help non-designers make professional-quality videos from the comfort of their browser.
Our video muting tool works on Chrome, Firefox, Safari, etc., and if you use one of these browsers, you can easily mute your videos on your Mac computer.
If you’re looking to quickly mute your videos for Instagram, YouTube, or Facebook, then Animaker’s video muter is the best tool for the job. Also, you can mute videos in MP4, MPG, WebM, MOV, and more formats.
Sign Up/Sign In and Pick the Dimensions
First, sign in to your account or create a free one. Then pick the dimensions or the social platform you want to publish your video on; the aspect ratio you’d want your video to be in. You can pick Square, Landscape, or Vertical from the Create a video section in your dashboard. You can also use the Custom Size button to pick the custom dimensions of your choice.


Upload the Video and Remove the Audio From It
Upload the video you want to mute or remove audio from. Animaker allows you to upload videos up to 20 GB in size. Click on the Upload tab in the main menu bar and then click on the Upload button at the bottom of the tab window.
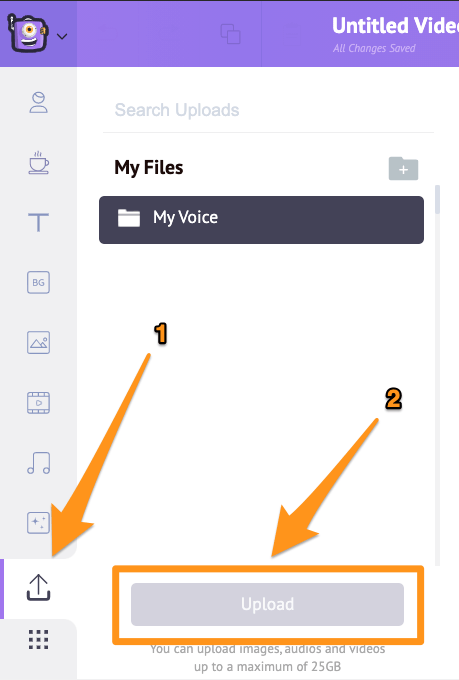
Now click on the video to add it to your project.

Then, click on the scissor button in the top right corner of the canvas.
![]()
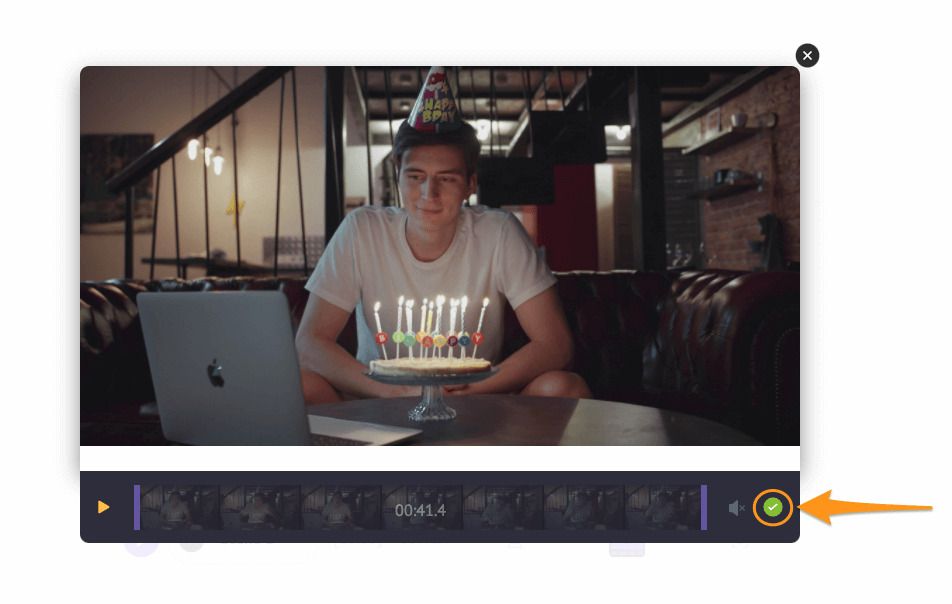
Now in the popup window that appears next, find an audio button (the yellow speaker icon) in the bottom right corner.
![]()
Click on the speaker icon to mute or remove audio from your video. Once you click on the icon, you’ll notice that it’ll display the mute icon to indicate that the sound has been removed. Now click on the round green button in the bottom right corner to save the changes.
Optionally, you can also add a voiceover, or add background music to your video. If you want to add a voiceover, you’ve got three ways to do that: you can record your own voiceover, upload a voiceover file, or generate voiceover using text. To add a voiceover, click on the Video Timeline icon, then click on the Voiceover icon in the bottom left corner of the app screen, and pick an option from the dropdown menu.

To add background music to your video, simply head to the Music tab and pick a background music track from our huge, free music library.

Preview and Download
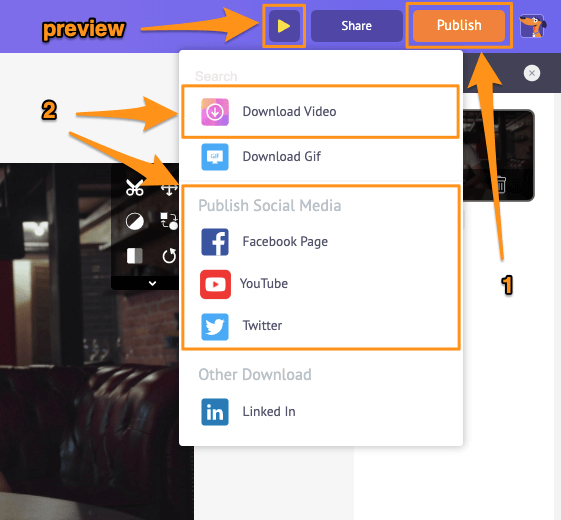
You can preview the video by clicking on the play button beside the Share button. You can then download the video to your computer by clicking on the Publish button and then selecting Download Video from the dropdown menu. Or share it directly to various social media platforms from within the app.
Apart from letting you remove audio from your videos, Animaker offers other essential video editing tools you’d need to edit your videos for your social media channels and website.
You can use Animaker’s video editor to:
- Trim videos
- Rotate videos
- Flip videos
- Remove audio from videos
- Adjust video brightness, contrast, etc.
- Add filters to videos
- Merge or combine videos
And the list goes on… feel free to check out these tools and learn why it’s the go-to video editor for marketers and content creators.
Got any questions about muting your videos in QuickTime? Any interesting tips or tools to mute videos on Mac that we seem to have left out? Please let us know about them in the comment section below.


