How to make subtitles - The Ultimate Guide
Are you tired of your audience struggling to understand your video? Or perhaps, you are a content creator who’s looking to expand your audience by making your content more accessible to everyone!
We understand your struggle!
There are many proven strategies to do this, and Subtitles are one among that!
How, do you ask?
Well, adding subtitles to your video is the easiest way to improve your reach and engagement.
Online video content consumption has skyrocketed in the current world. Precisely, the demand for more accessible and easy-to-understand video content has risen.
Subtitles make your video easier to comprehend and more accessible. In fact, it has come to a stage where they have become an indispensable part of our multimedia experience.
Subtitles can make a world of difference, but many people don't know where to start and how to start when it comes to creating them. That’s why we’ve put together this guide to teach you how to make subtitles in three different ways.
Whether you prefer the precision of creating a subtitle file yourself (or) the ease of uploading the transcription (or) even the efficiency of AI-Powered automatic subtitles, we’ve got you covered.
With these techniques, you can create subtitles that not only make your content more accessible but also help in improving your engagement.
So, let’s get started and unlock the power of subtitles! Here’s what we will be learning in this blog:
1 - How to add subtitles to a video using Animaker? (In Under A Minute)
2 - How to make subtitles using YouTube's subtitle tool? (In Under 10 Minutes)
3 - How to make subtitles from scratch? (In Under 30 Minutes)
First, let’s equip you with the basics before you learn how to make subtitles.
How to make subtitles?
In this part of the blog, we will discuss three different ways to create subtitles for your video and don’t worry about how to create subtitles. Because whether you have experience or not, we will guide you through three different ways to create a subtitle.
(1) How to add subtitles to a video using Animaker? (In Under A Minute)
There are numerous Subtitle makers out there that can help you add subtitles to your video.
But we always root on providing you with the best!
So, for this section of the blog, we will be using a free tool called Animaker. Animaker is a free online video-making platform that helps you create videos in a jiffy.
It is loaded with numerous features that allows you to create studio-quality videos even if you have zero video-creating skills.
Animaker recently launched a free Subtitle generator, an all-in-one suite for your subtitle needs. While online tools allow you to add subtitles with ease, they are basic-looking ones that don’t grab the attention of your audience and hook them to your video.
With this tool, you can easily create eye-catching subtitles and add them to your video. The best part is, there are three different ways through which you can add subtitles using Animaker’s Subtitle generator.
D. How to Translate Subtitles (Bonus)
Without any further delay, let’s learn how to make subtitles using Animaker!
A. Auto Subtitle
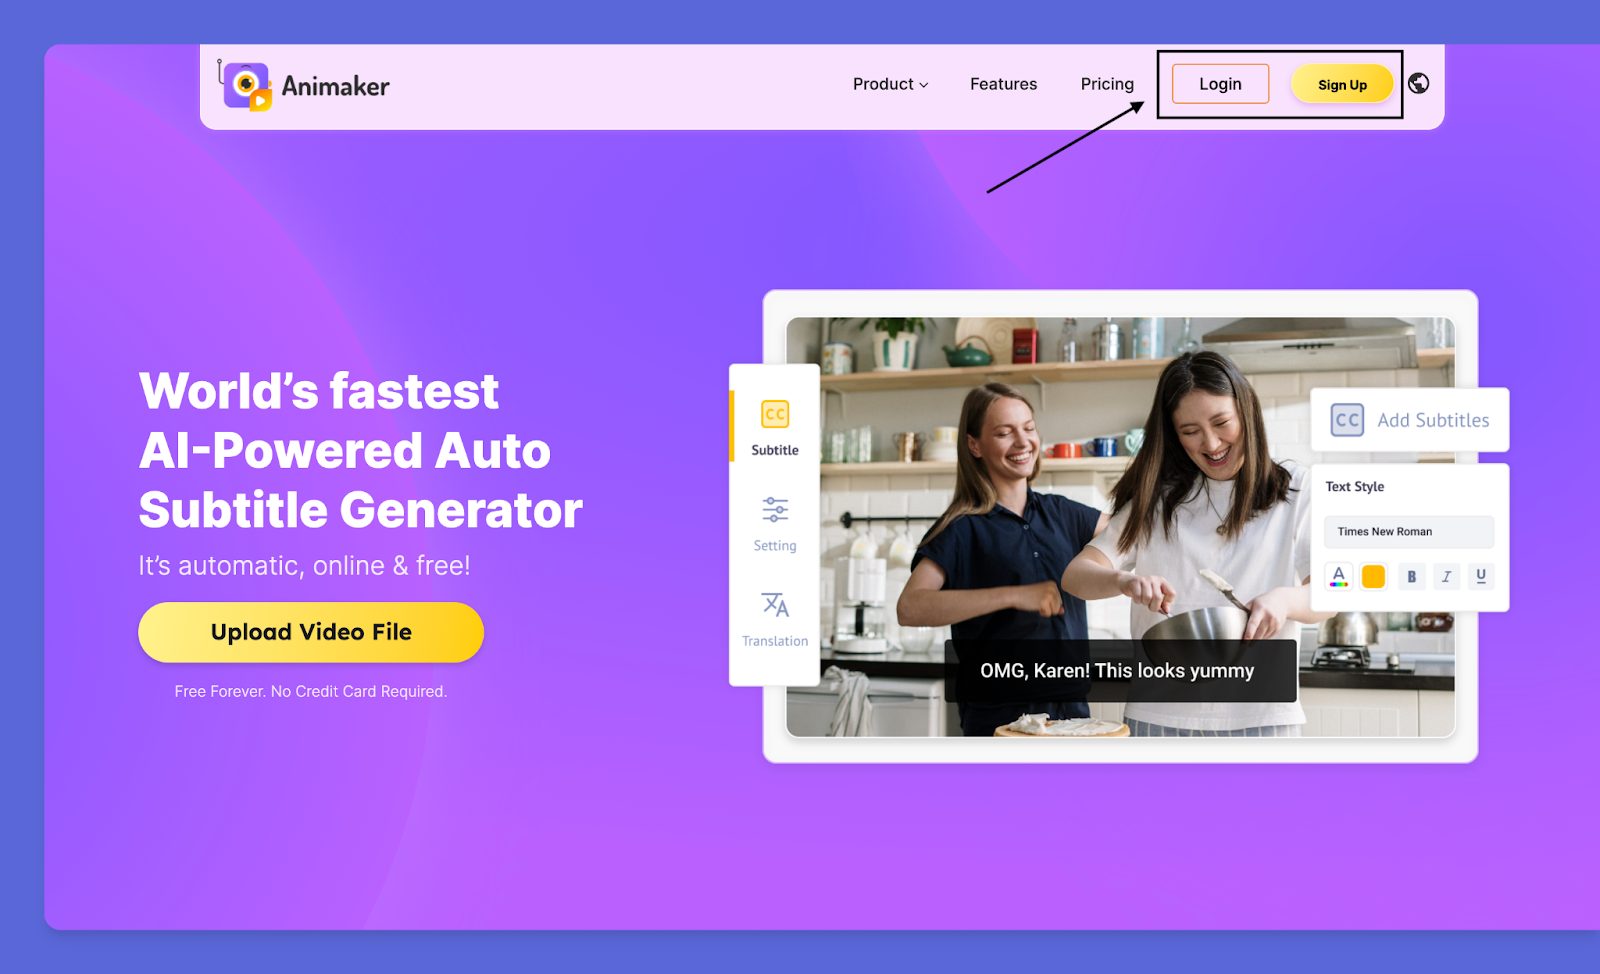
Step 1. Head over to Animaker’s Subtitle generator and signup for your own account or log in.
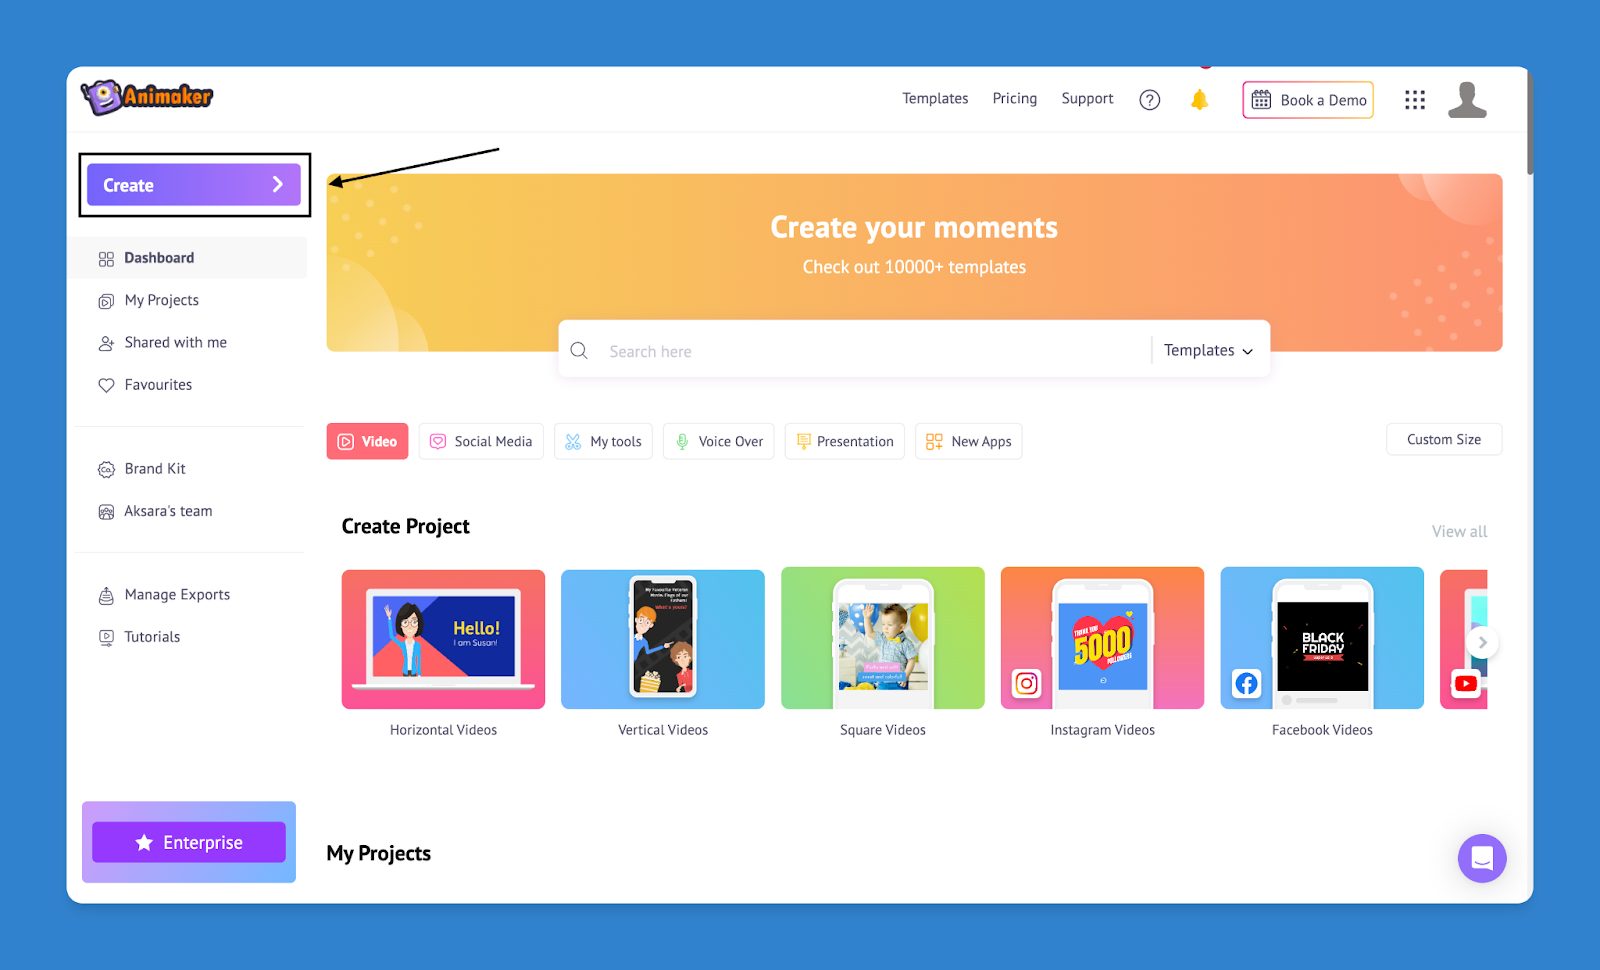
Step 2. Once you are in the dashboard, click on Create and Create Subtitle.
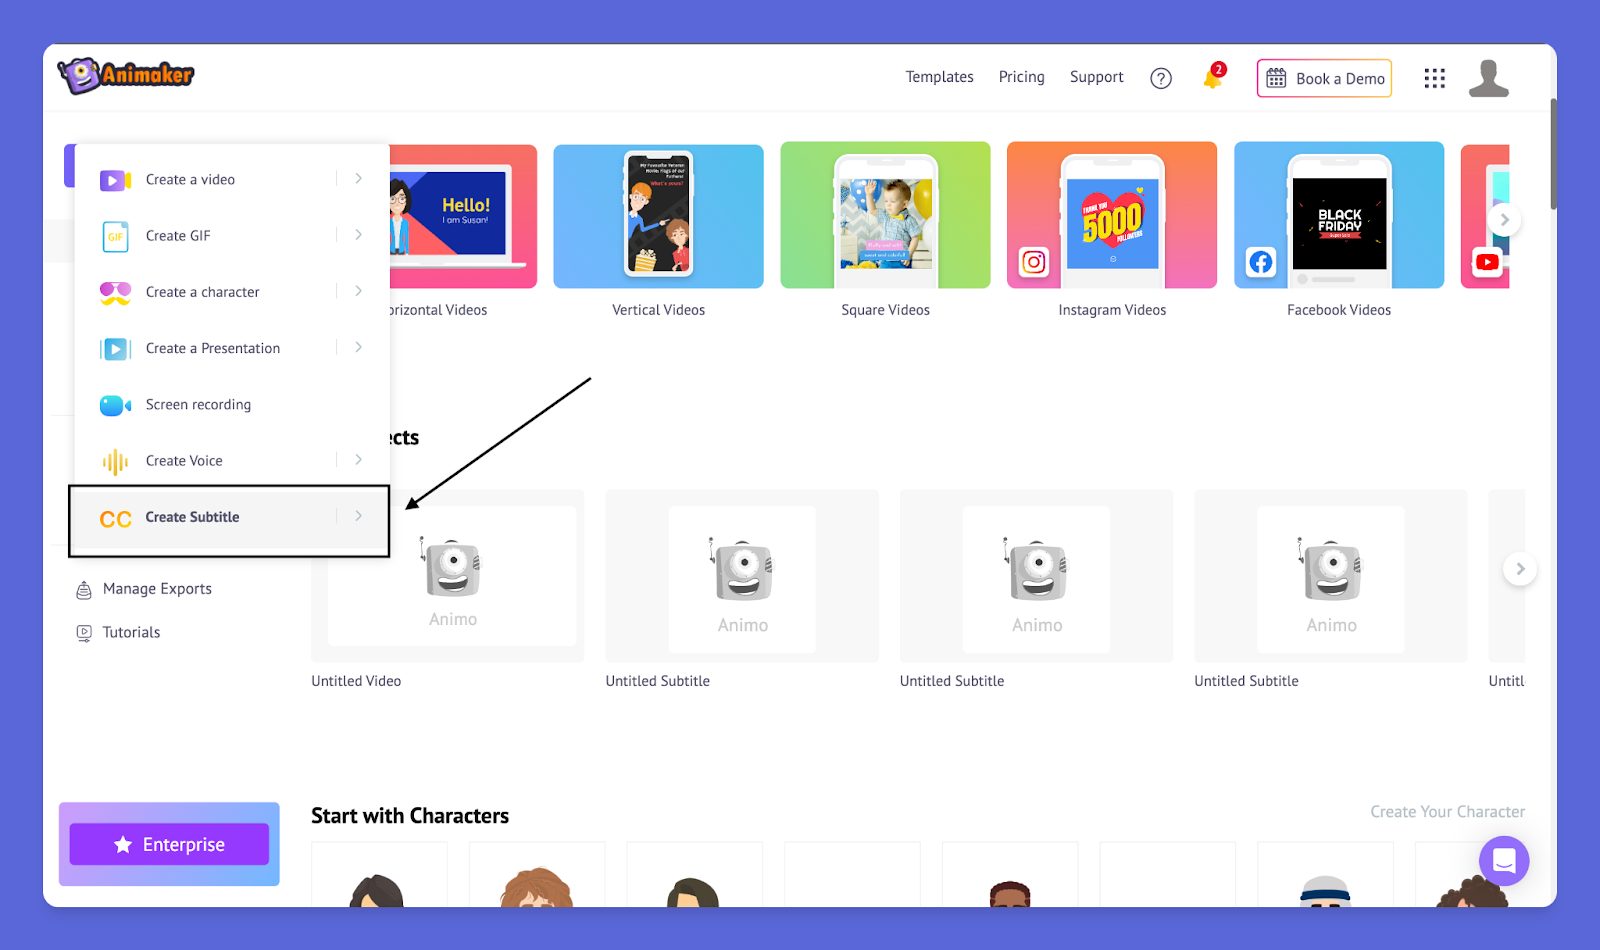
Step 3. Upon clicking on Create Subtitle, the Subtitle Maker will open up. There will be a pop prompt with three options - Upload, My Exports, & My Library. Click on Upload and upload the video you want to add subtitles for. If you have already uploaded them to Animaker, then choose the My Library option.
Additionally, if you have previously used Animaker and exported a video, you can find the exported video in the ‘My Exports’ tab. This can be useful if you are looking to subtitle a video that you exported previously.

Step 4. Once you have added your video to Subtitle Maker, there will be three ways to add subtitles to your video - Auto Subtitle, Manual Subtitle, and Upload a Subtitle. For this step, we will be using the Auto Subtitle Feature. Simply click on that option. The automatic AI subtitle feature will begin, and subtitles will be added to your video.

Step 5. Once the process is completed, the subtitles will be added to your video and you can see the transcribed subtitles along with the timestamps on the left side.

B. Manual Subtitle
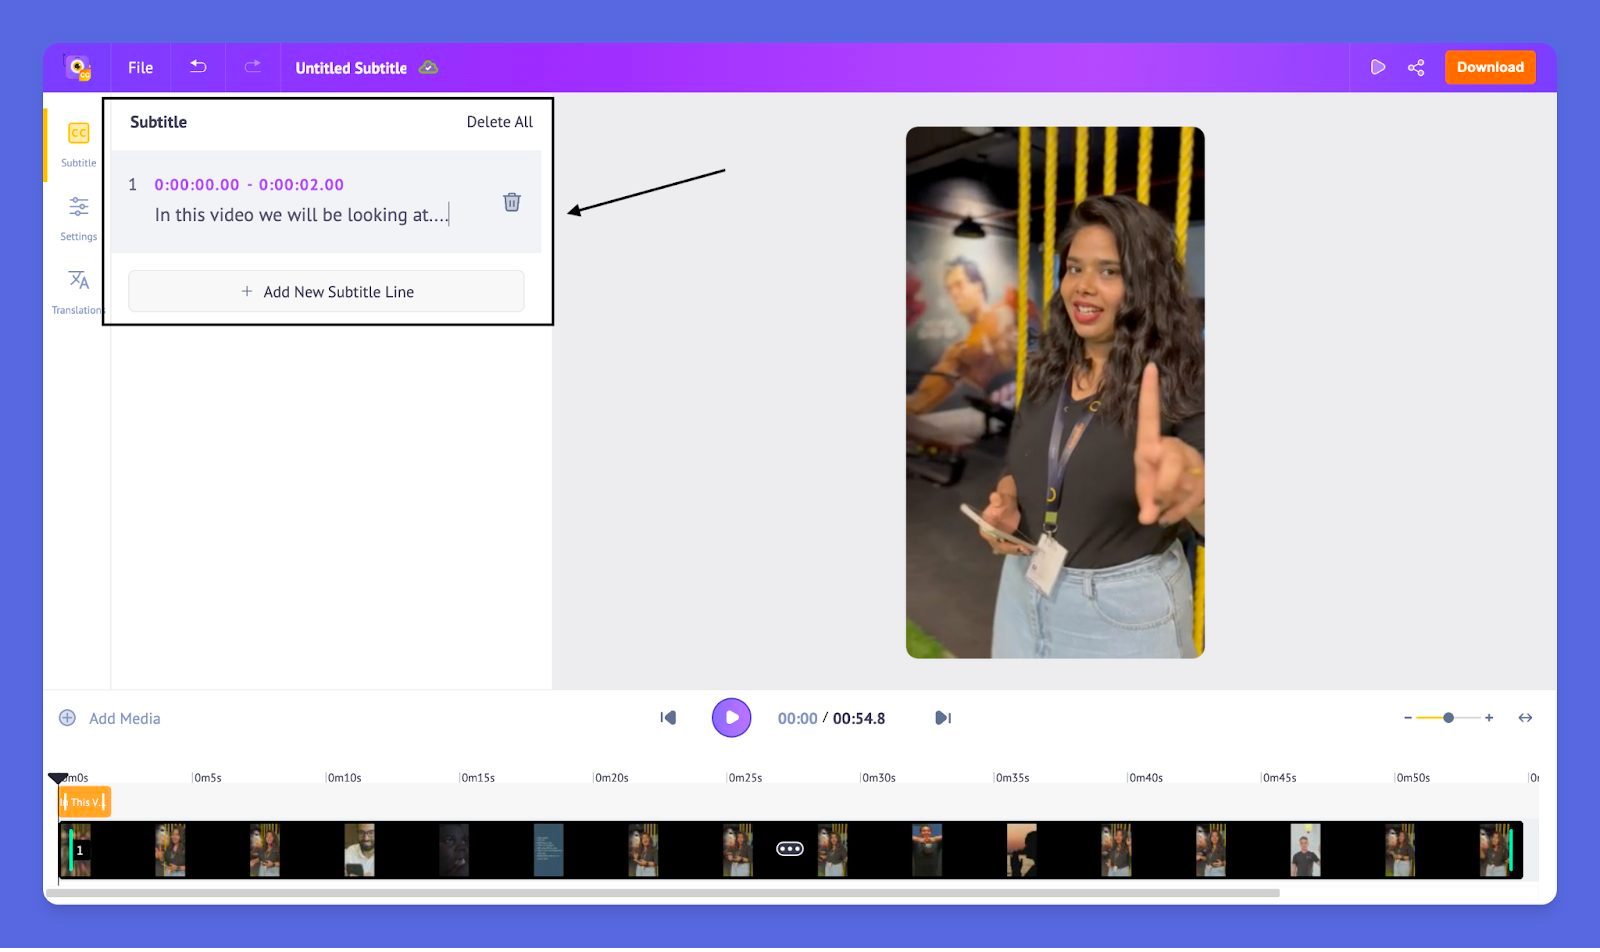
Step 1. Follow the first three steps as mentioned above and choose the option - Manual Subtitle.

Step 2. Once you select the Manual Subtitle option, a tab will appear where you can enter the text for the subtitle and the time stamps too. By default, the duration of each subtitle is about two seconds. You can customize the duration according to your convenience.

Step 3. Do the same for the whole video, and you’re done!
C. Upload a Subtitle file
Currently, Animaker supports SubRip (.srt), Advanced Substation Alpha (.ass), and WebVTT (.vtt) formats if you are planning to upload the subtitle to the video. Now, let’s jump into the “how-to” part.
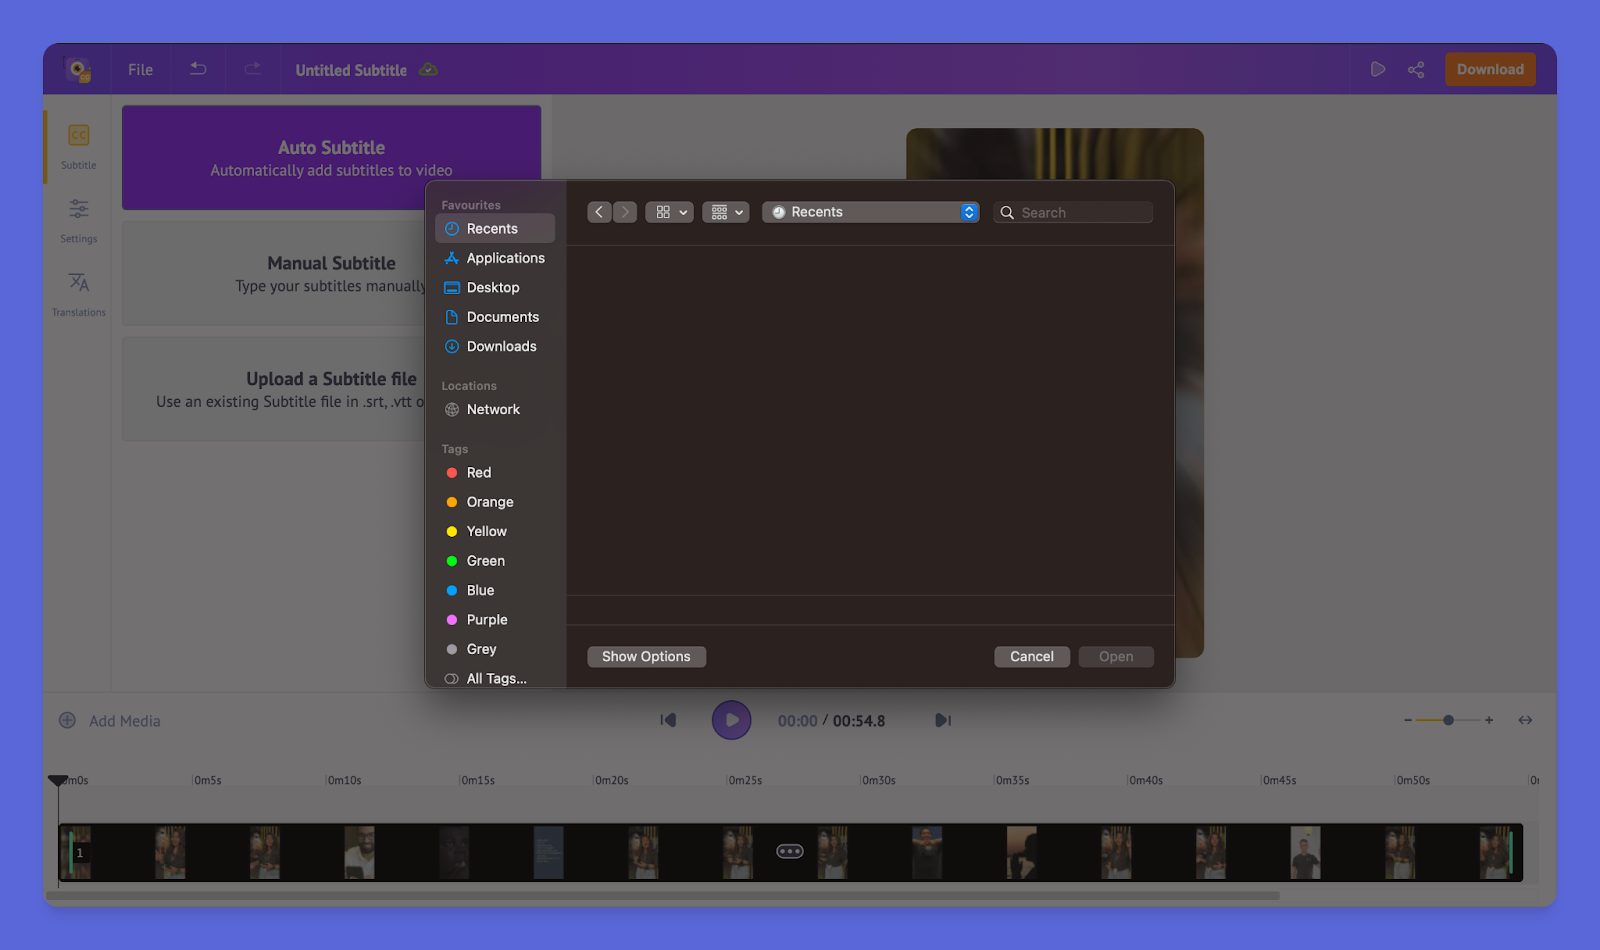
Step 1. Just follow the first three steps as mentioned above and choose the option - Upload a subtitle.

Step 2. It will open up your computer file manager, from which you can choose the subtitle file and add them to your video.
D. Bonus - How to translate Subtitles
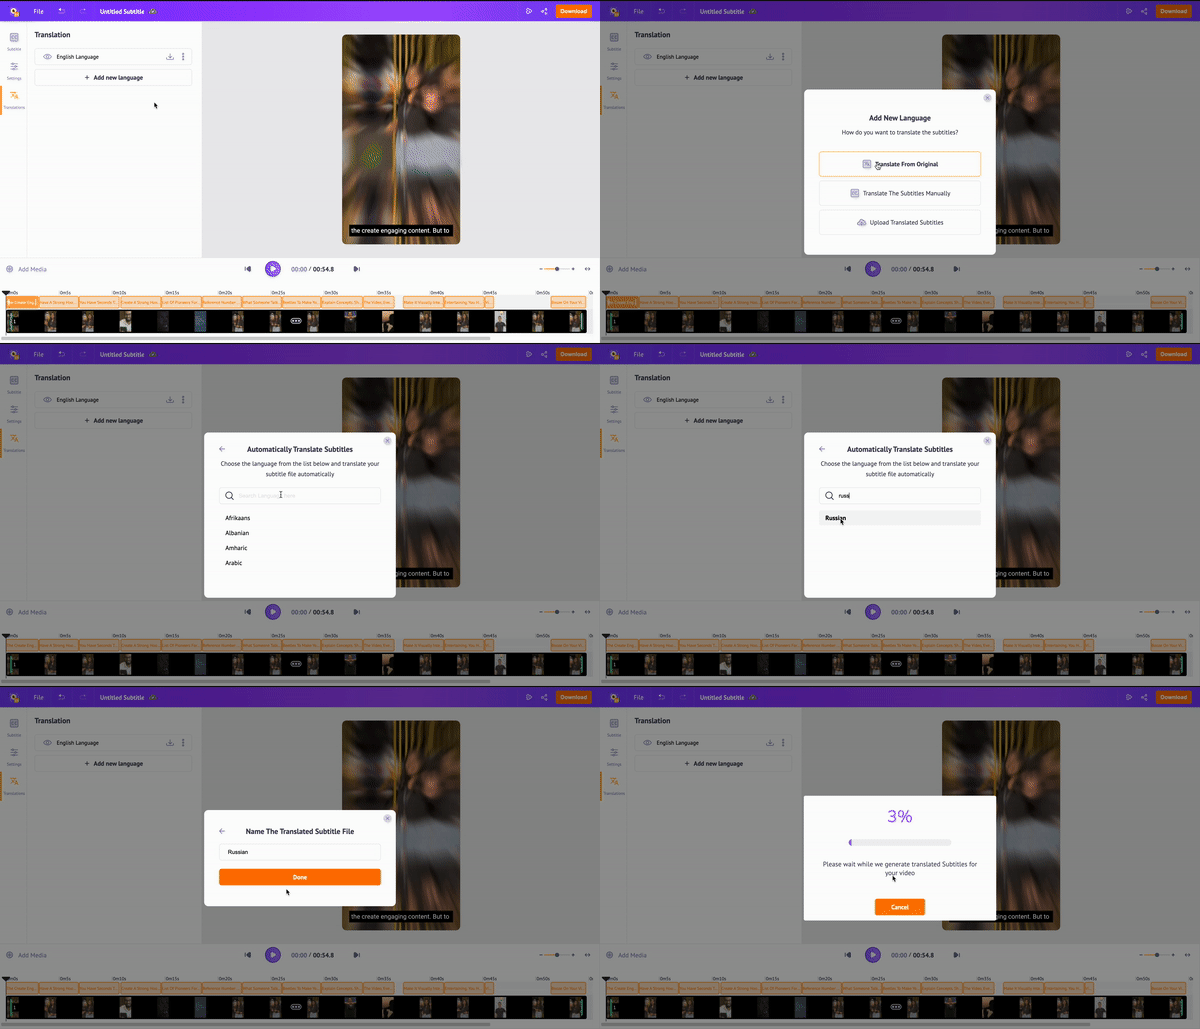
This bonus tip is quite an interesting one. Did you know you can automatically translate the subtitles you just added to your video to 100+ languages in a single click? Here’s how.
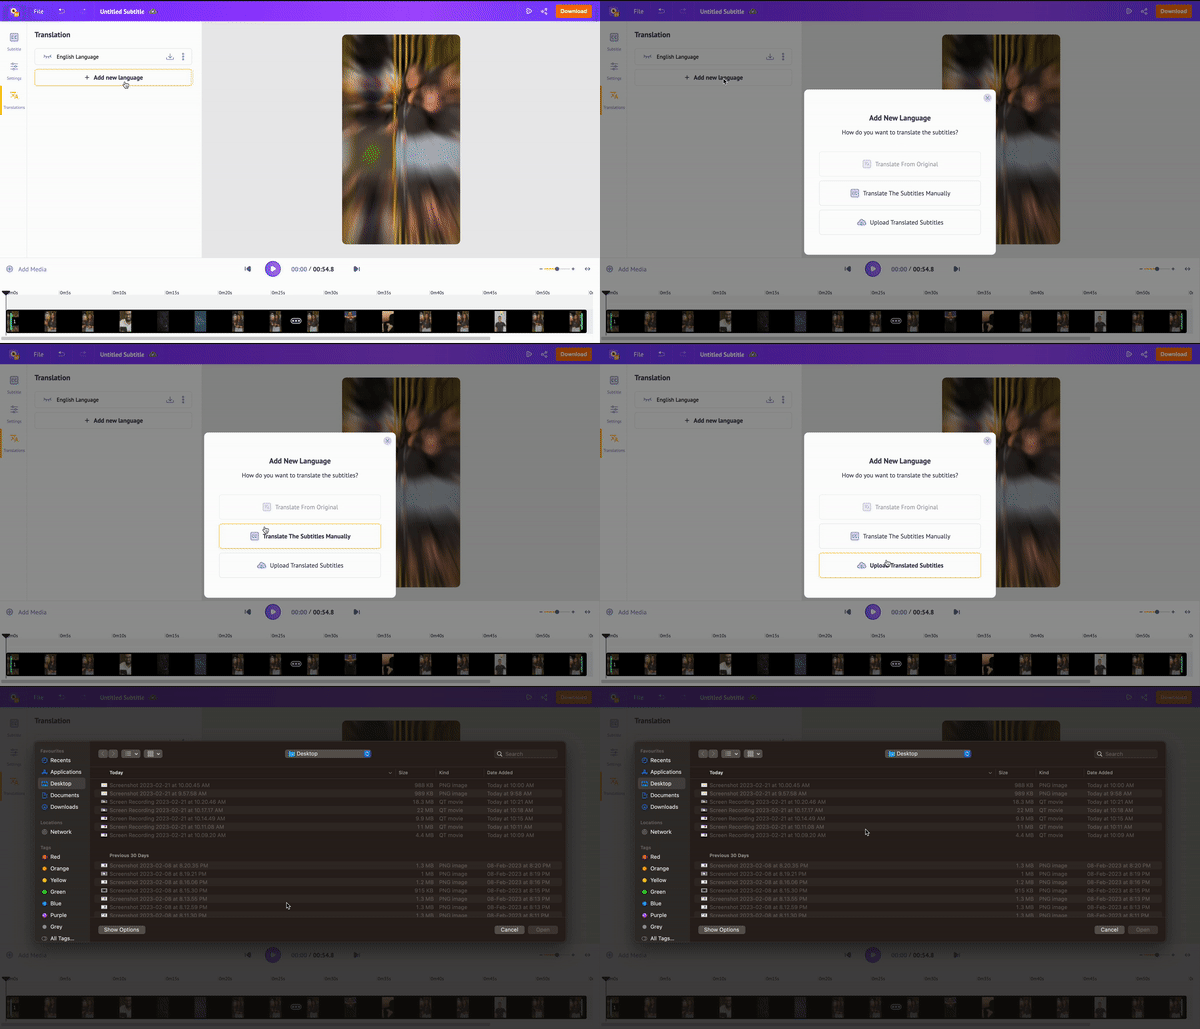
To translate your subtitles and localize your video content, click on Translation from the left menu and click on Add a new language.

Once you click, a prompt will ask, " How do you want to translate the subtitles?. And there will be three options from which you can choose -
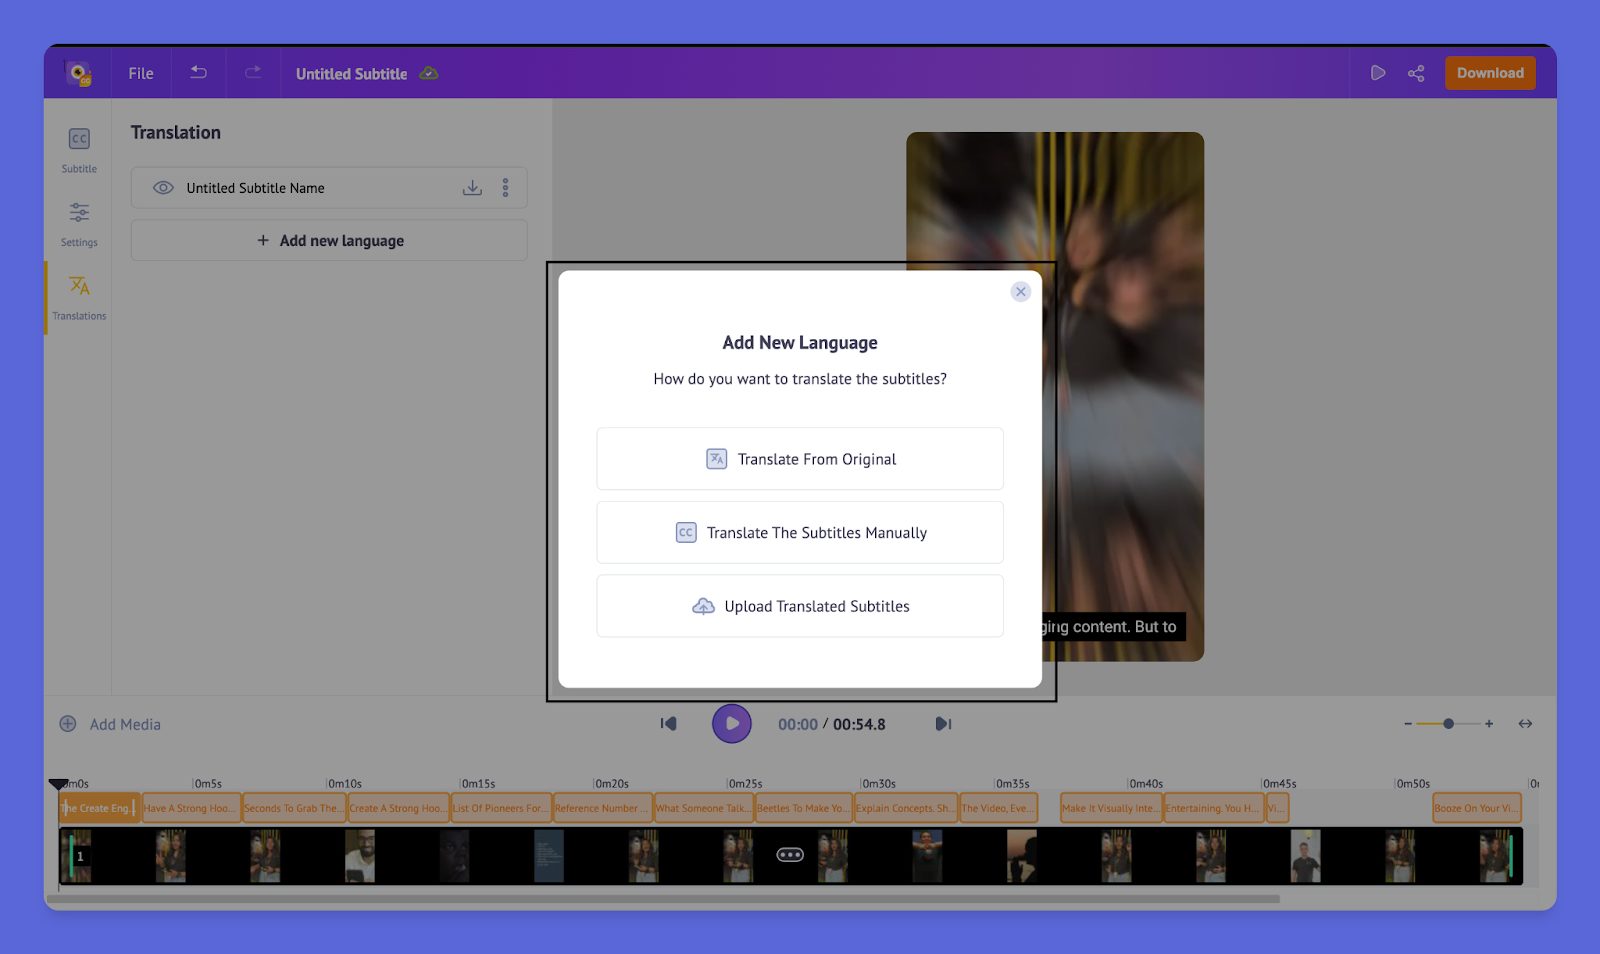
Translate from original - This will automatically translate your subtitle from the language in the audio to the language you choose.
Translate the subtitles manually - Just like manual transcription, you can manually translate the subtitles with this option.
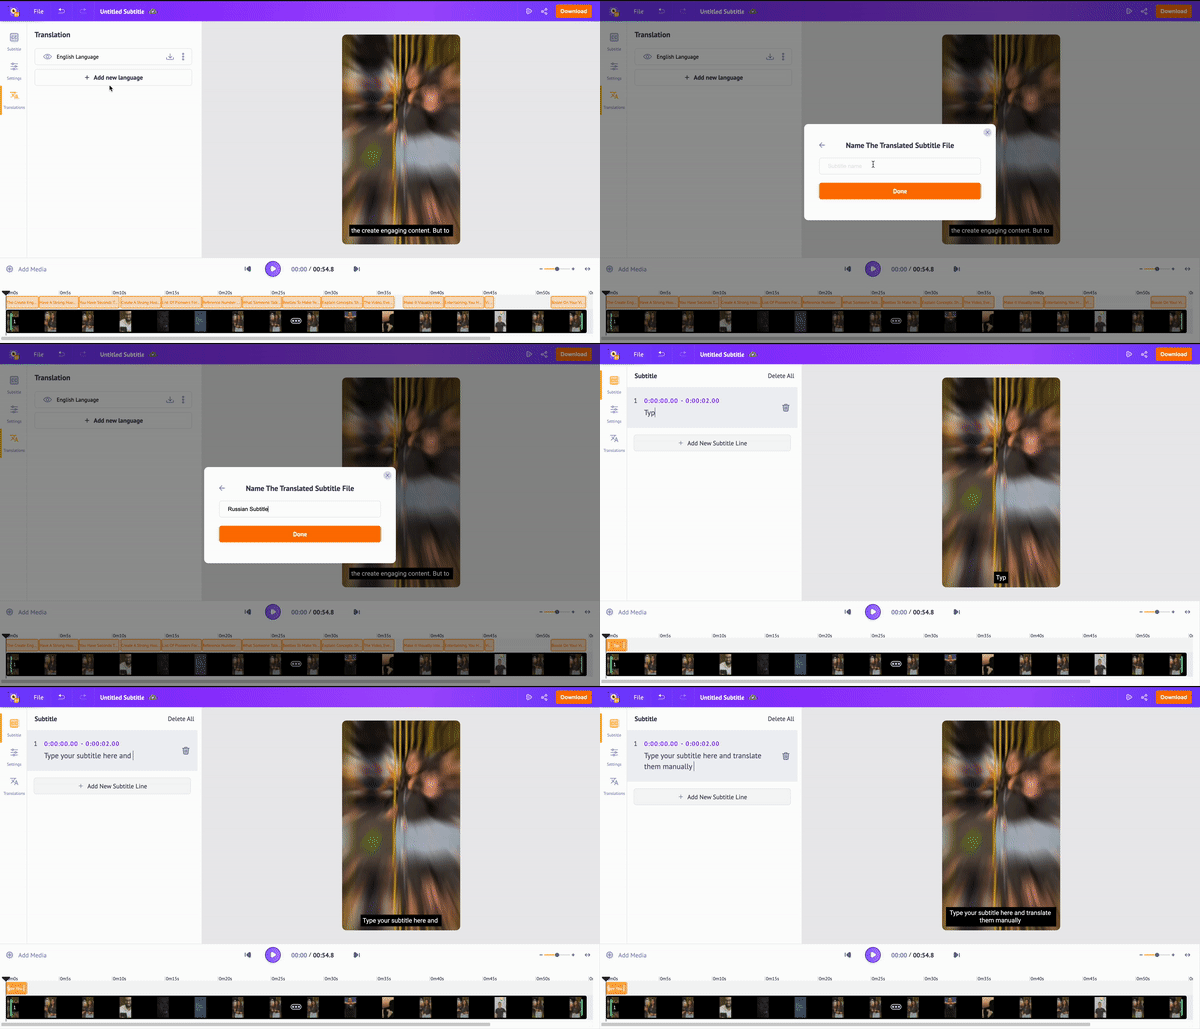
Upload translated subtitles - If you already have a translated version of your subtitles, you can easily add them to your video using this feature.
Wait, it’s not over yet. There’s more you can do with Animaker’s subtitle generator. Once the subtitles are in place, you can customize them from the subtitle menu on the left side.
The finalized subtitles will be on the left side, along with their timestamps, and here’s how you can customize them further.
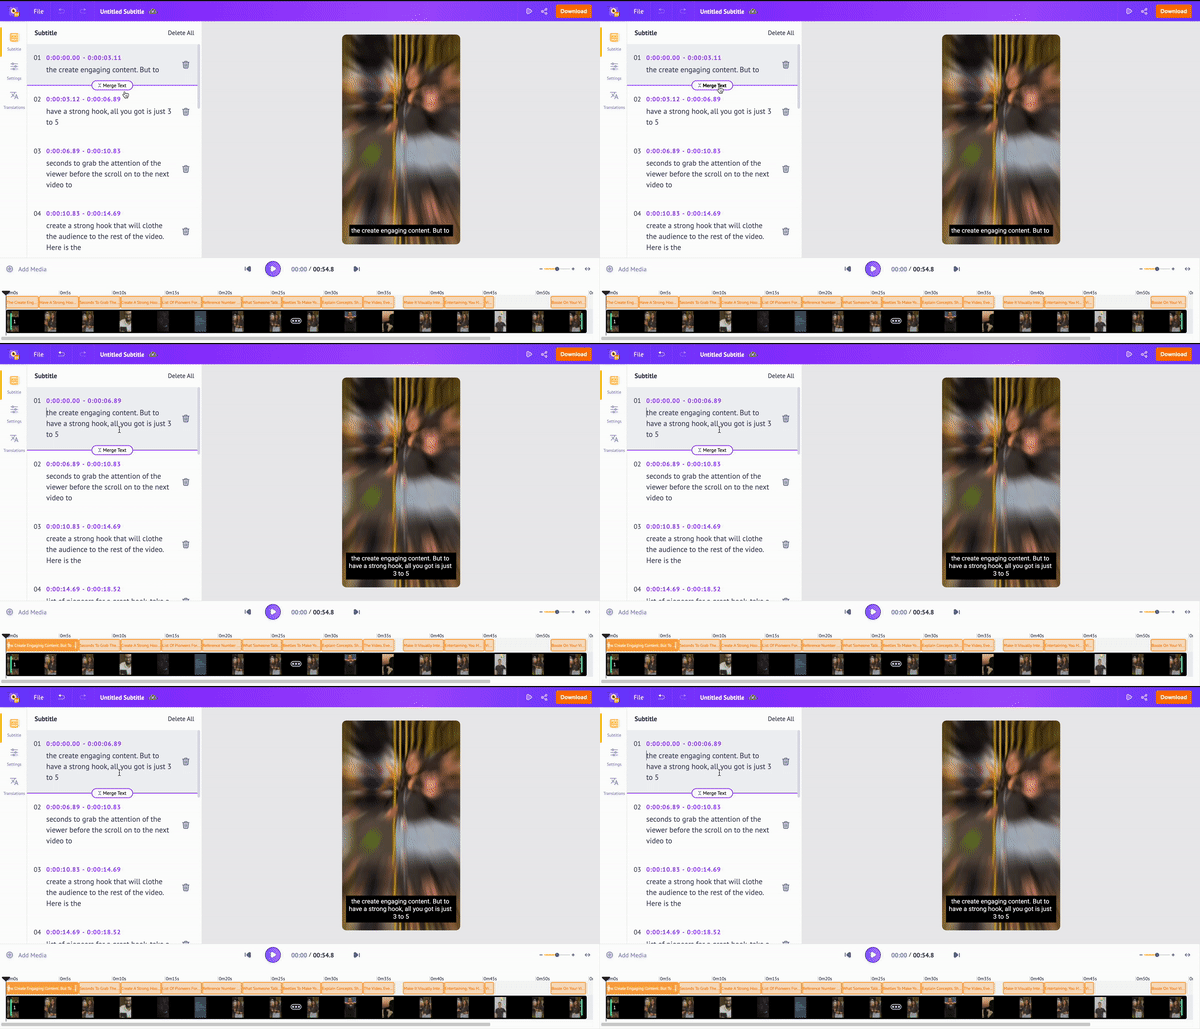
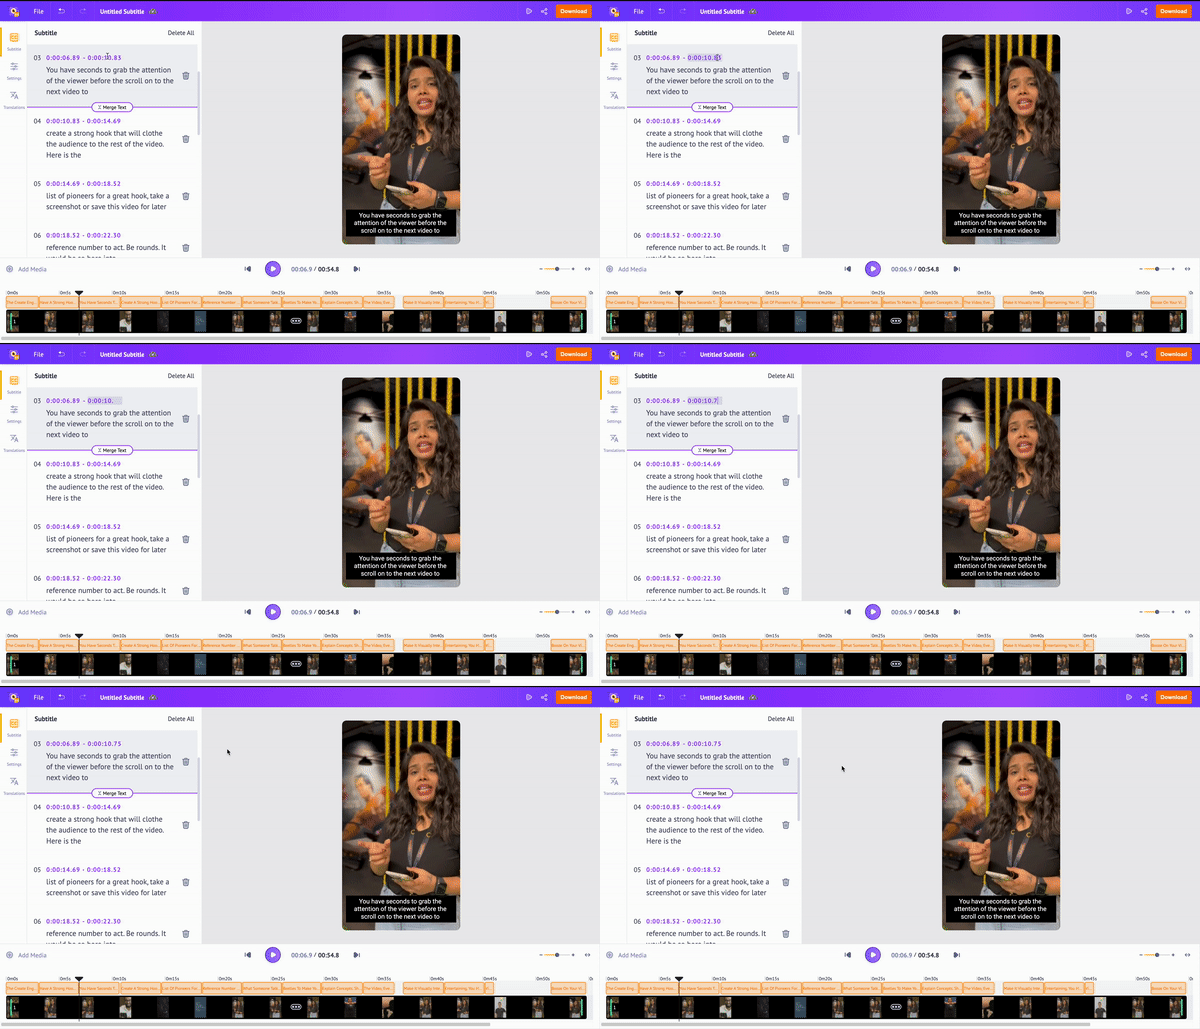
1. Merge - With this option, you can merge two subtitles into one in a single click. This will be useful when there’s a subtitle with very little duration. In that situation, merging it with the previous subtitle will make it more accessible to the audience.
Notice how the subtitles merge both on the subtitle tab and on the timeline below, and also how the duration gets updated automatically.
2. Editing text - The automatic text generated by the AI can be easily edited by clicking on it and making changes to it. Additionally, you can add more text to that subtitle if needed.
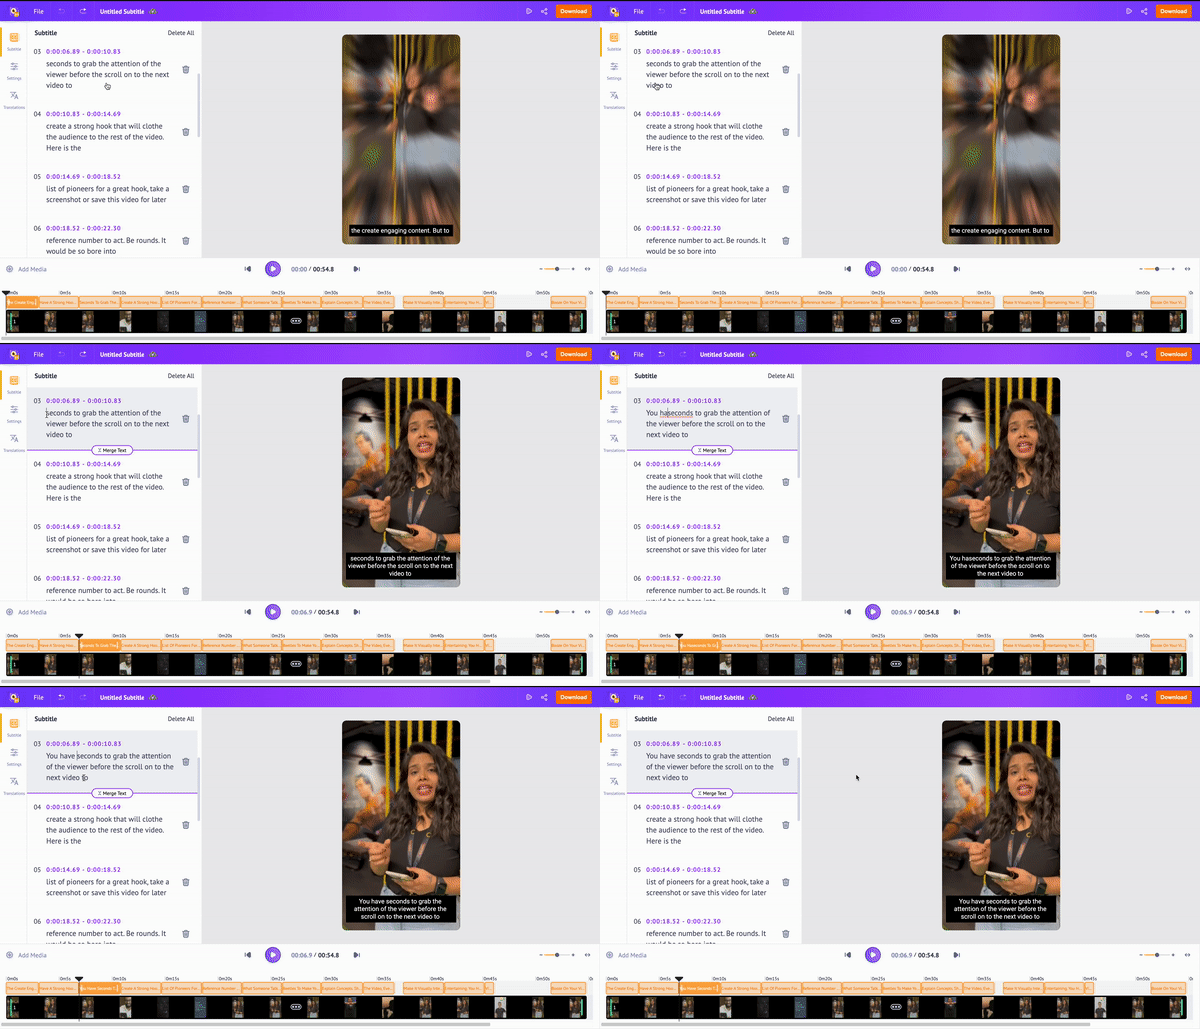
3. Adjust the duration - By default, the AI would’ve added default timestamps to your video. If you wish to extend or adjust the timestamps, you can click on it to edit and modify the subtitle duration.
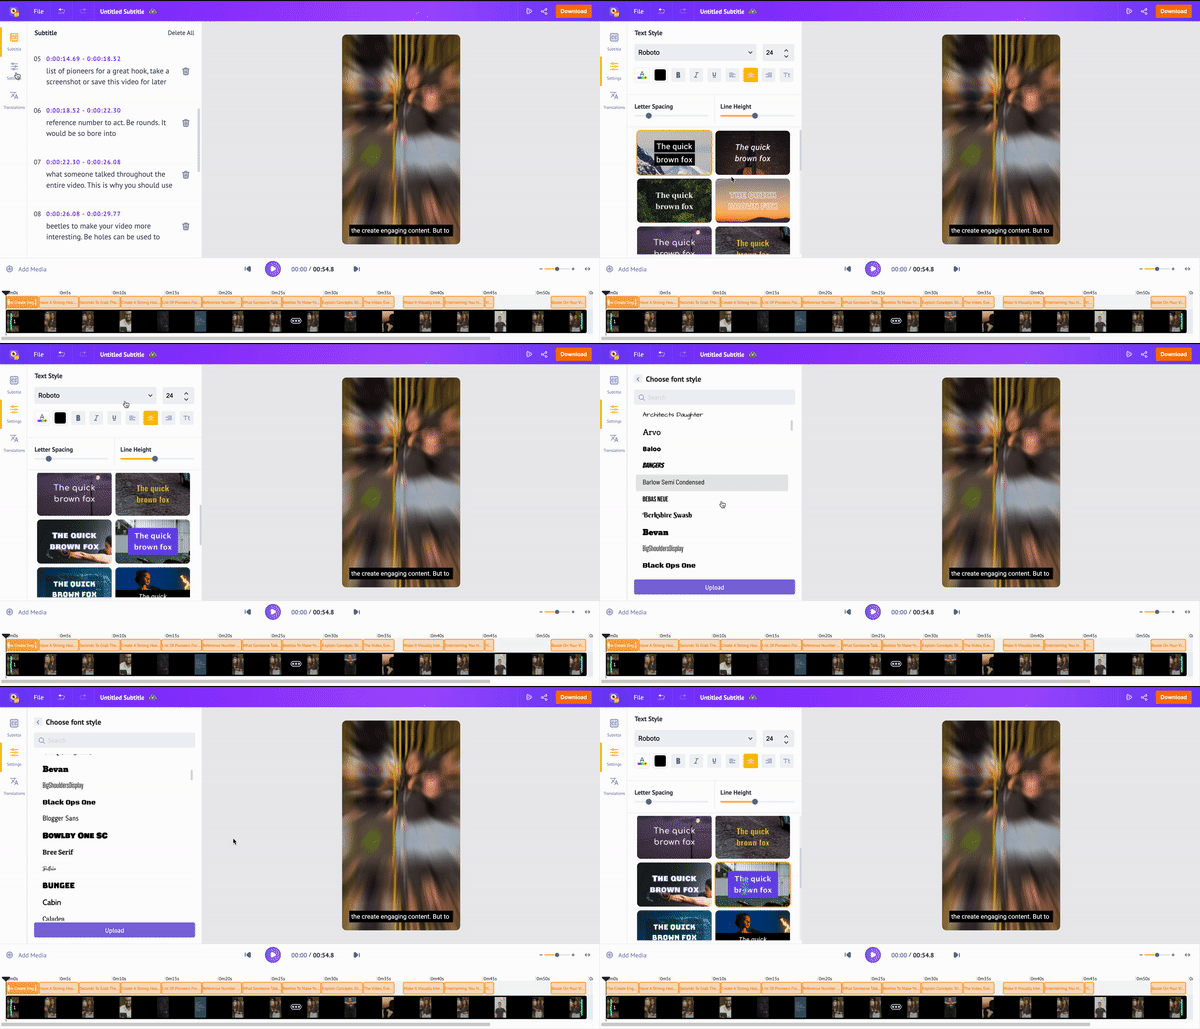
4. Customize the text - Additionally, you can step up your subtitles game by customizing and playing around with your subtitle designs. Animaker’s library has over 150+ fonts, text styling options, and 15 ready-made subtitle presets to make things easier.
Phew, that’s a lot of different ways to create subtitles, right? To top it off, here are a few more reasons why you should consider adding subtitles to your videos.
(2) How to make subtitles using YouTube's subtitle tool? (In Under 10 Minutes)
YouTube as a platform allows you to add subtitles to your video directly using the inbuilt caption generator in the Creator Studio. Follow the steps below to add subtitles-
Step 1. Login to your YouTube account and head over to the YouTube Studio. 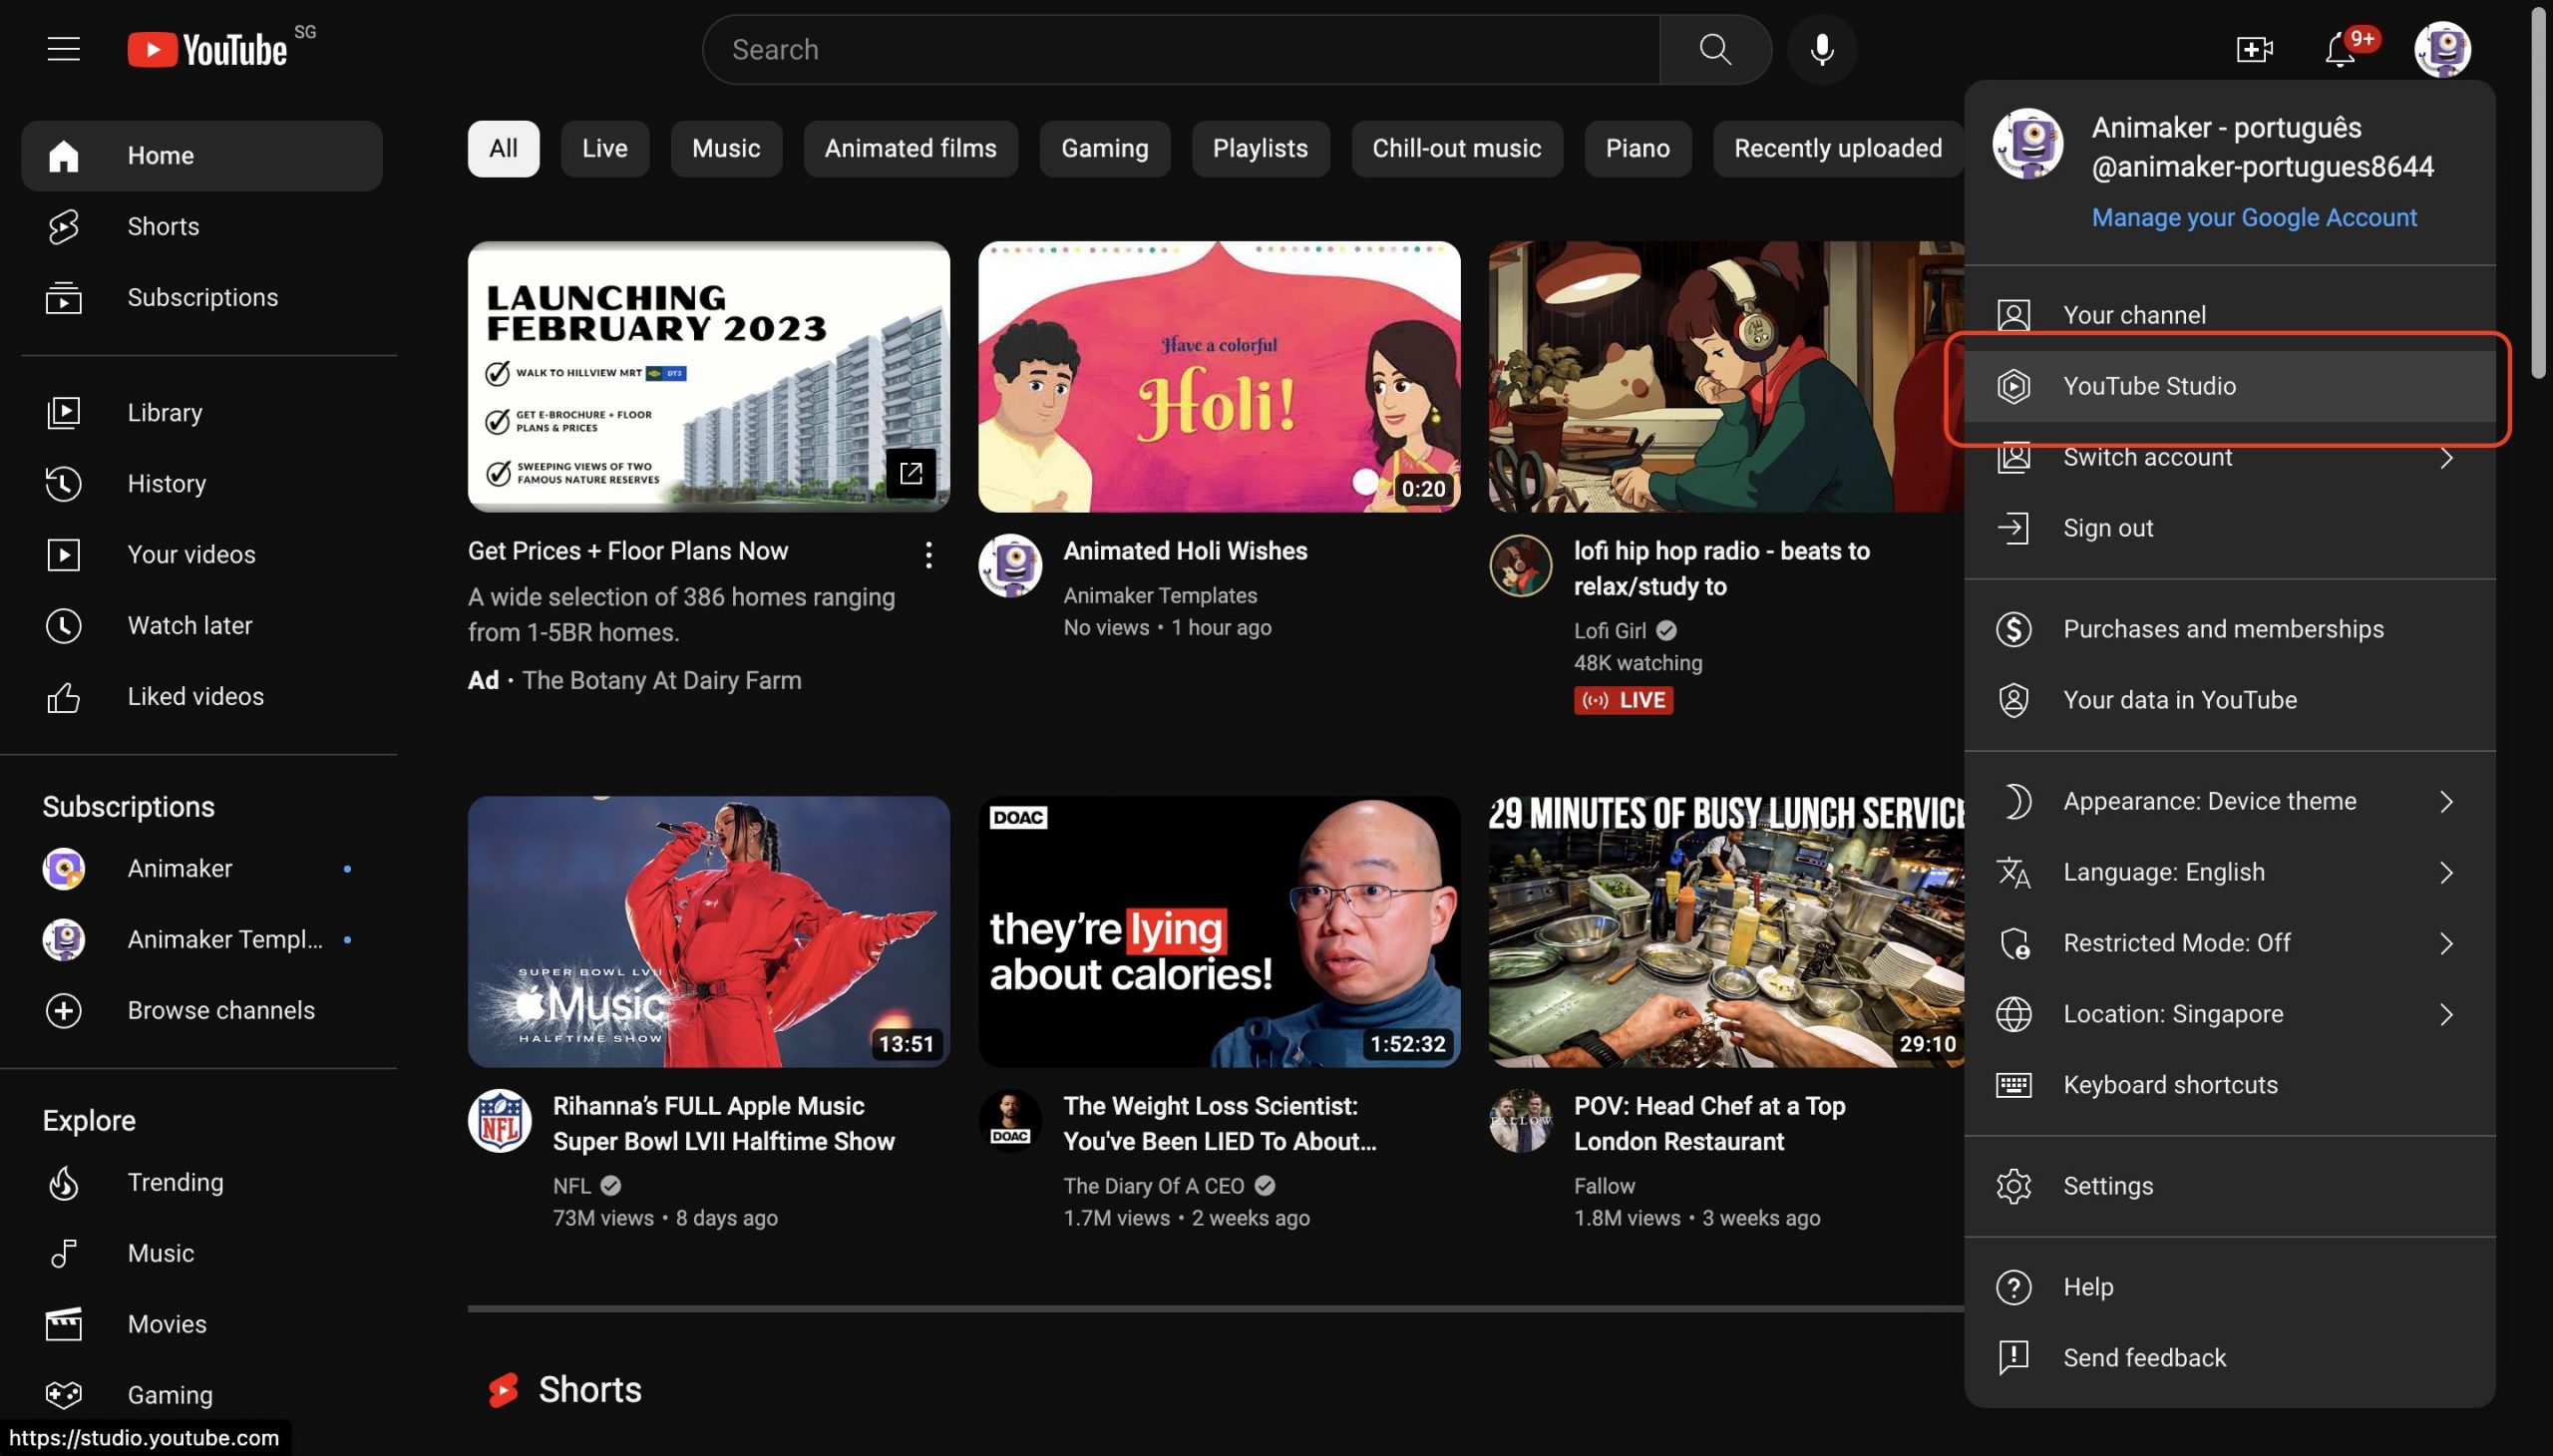
Step 2. In the YouTube Studio dashboard, click on content.
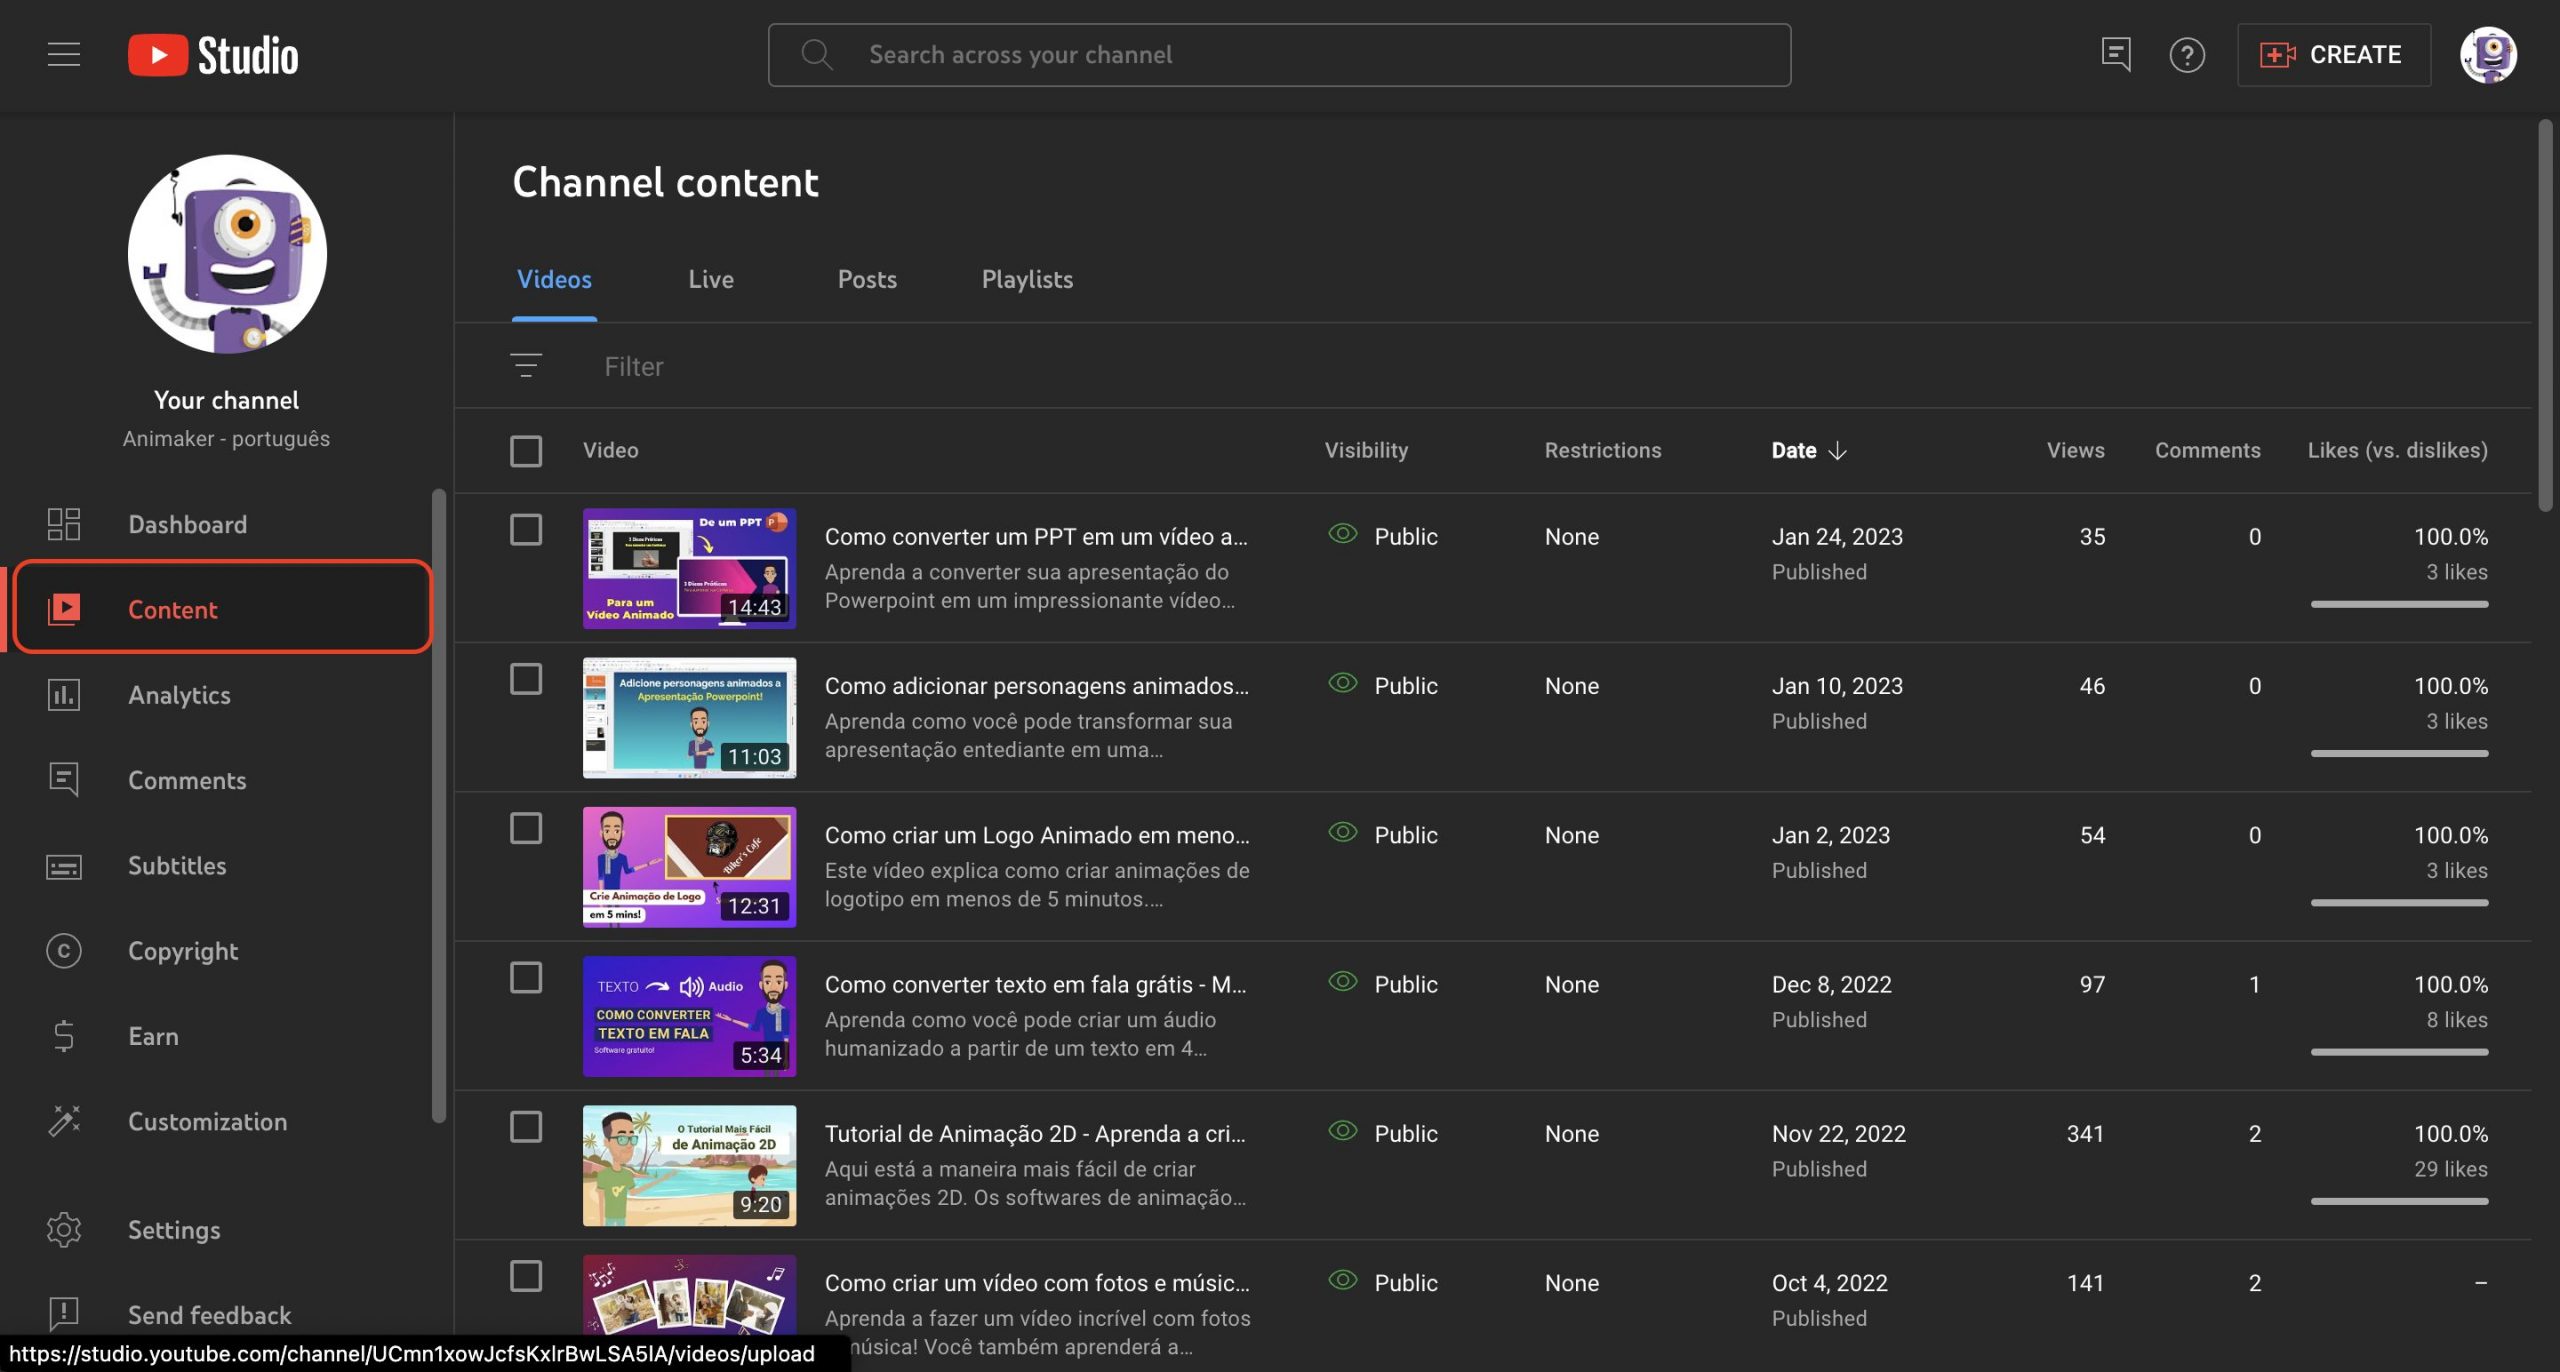
Step 3. In the Channel Content section, choose the video you wish to subtitle.
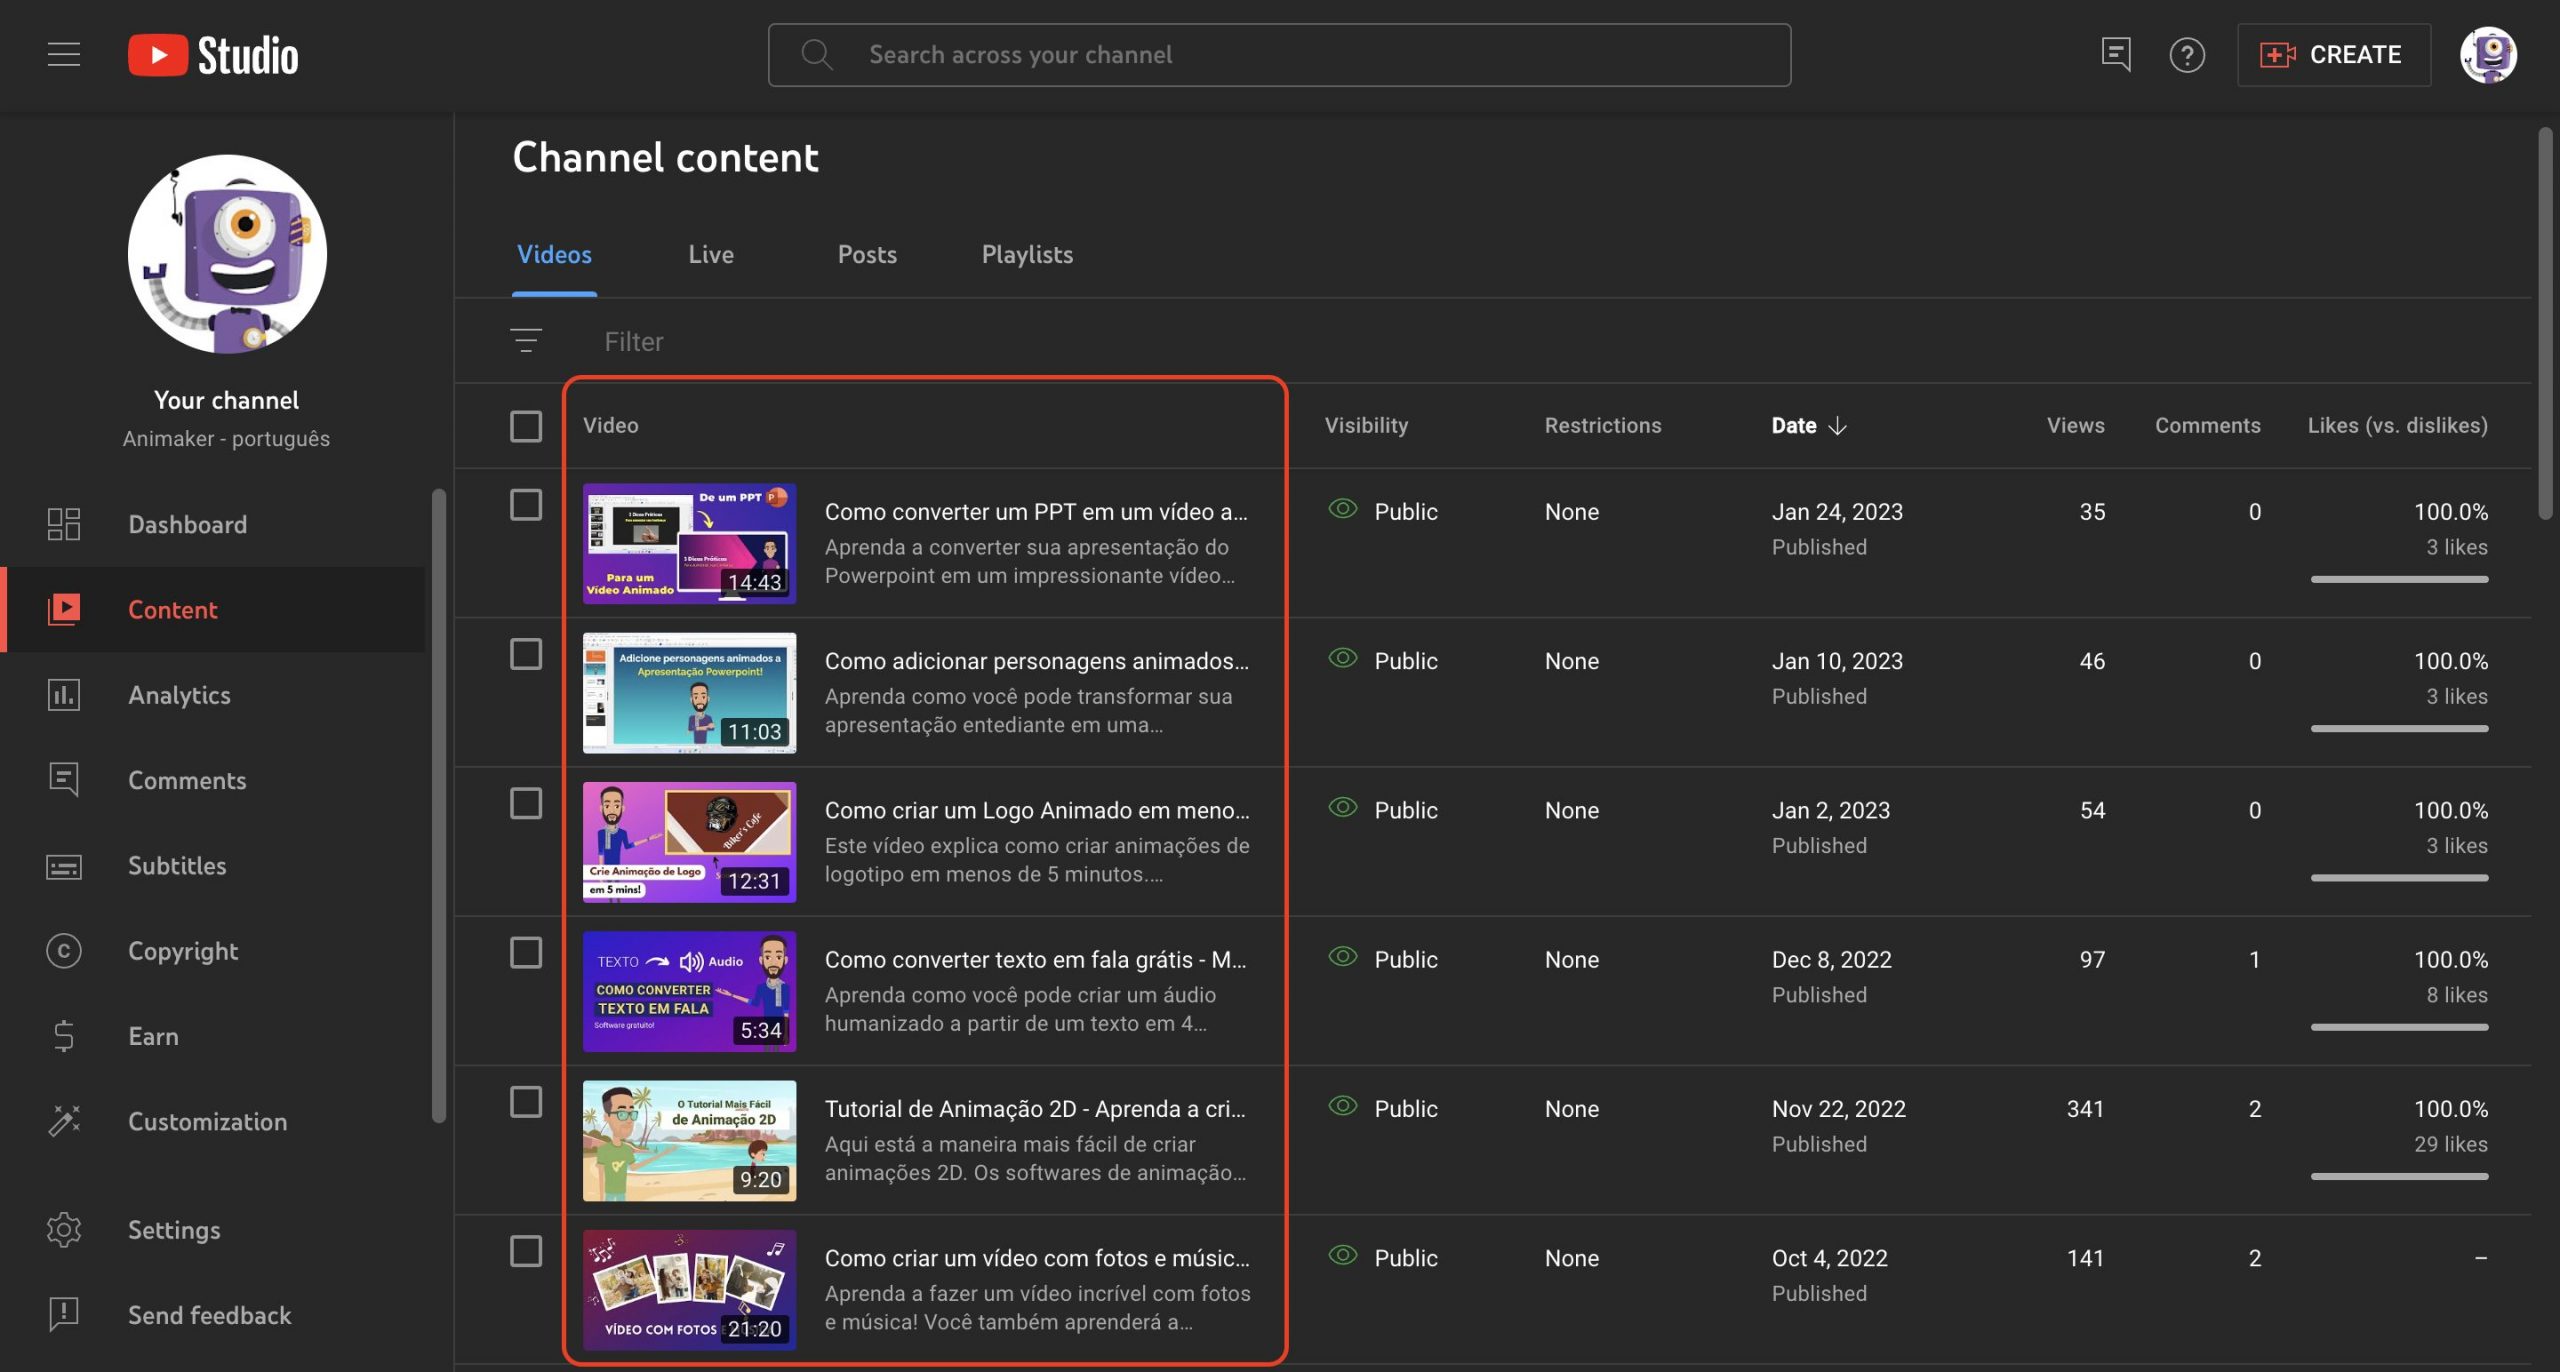
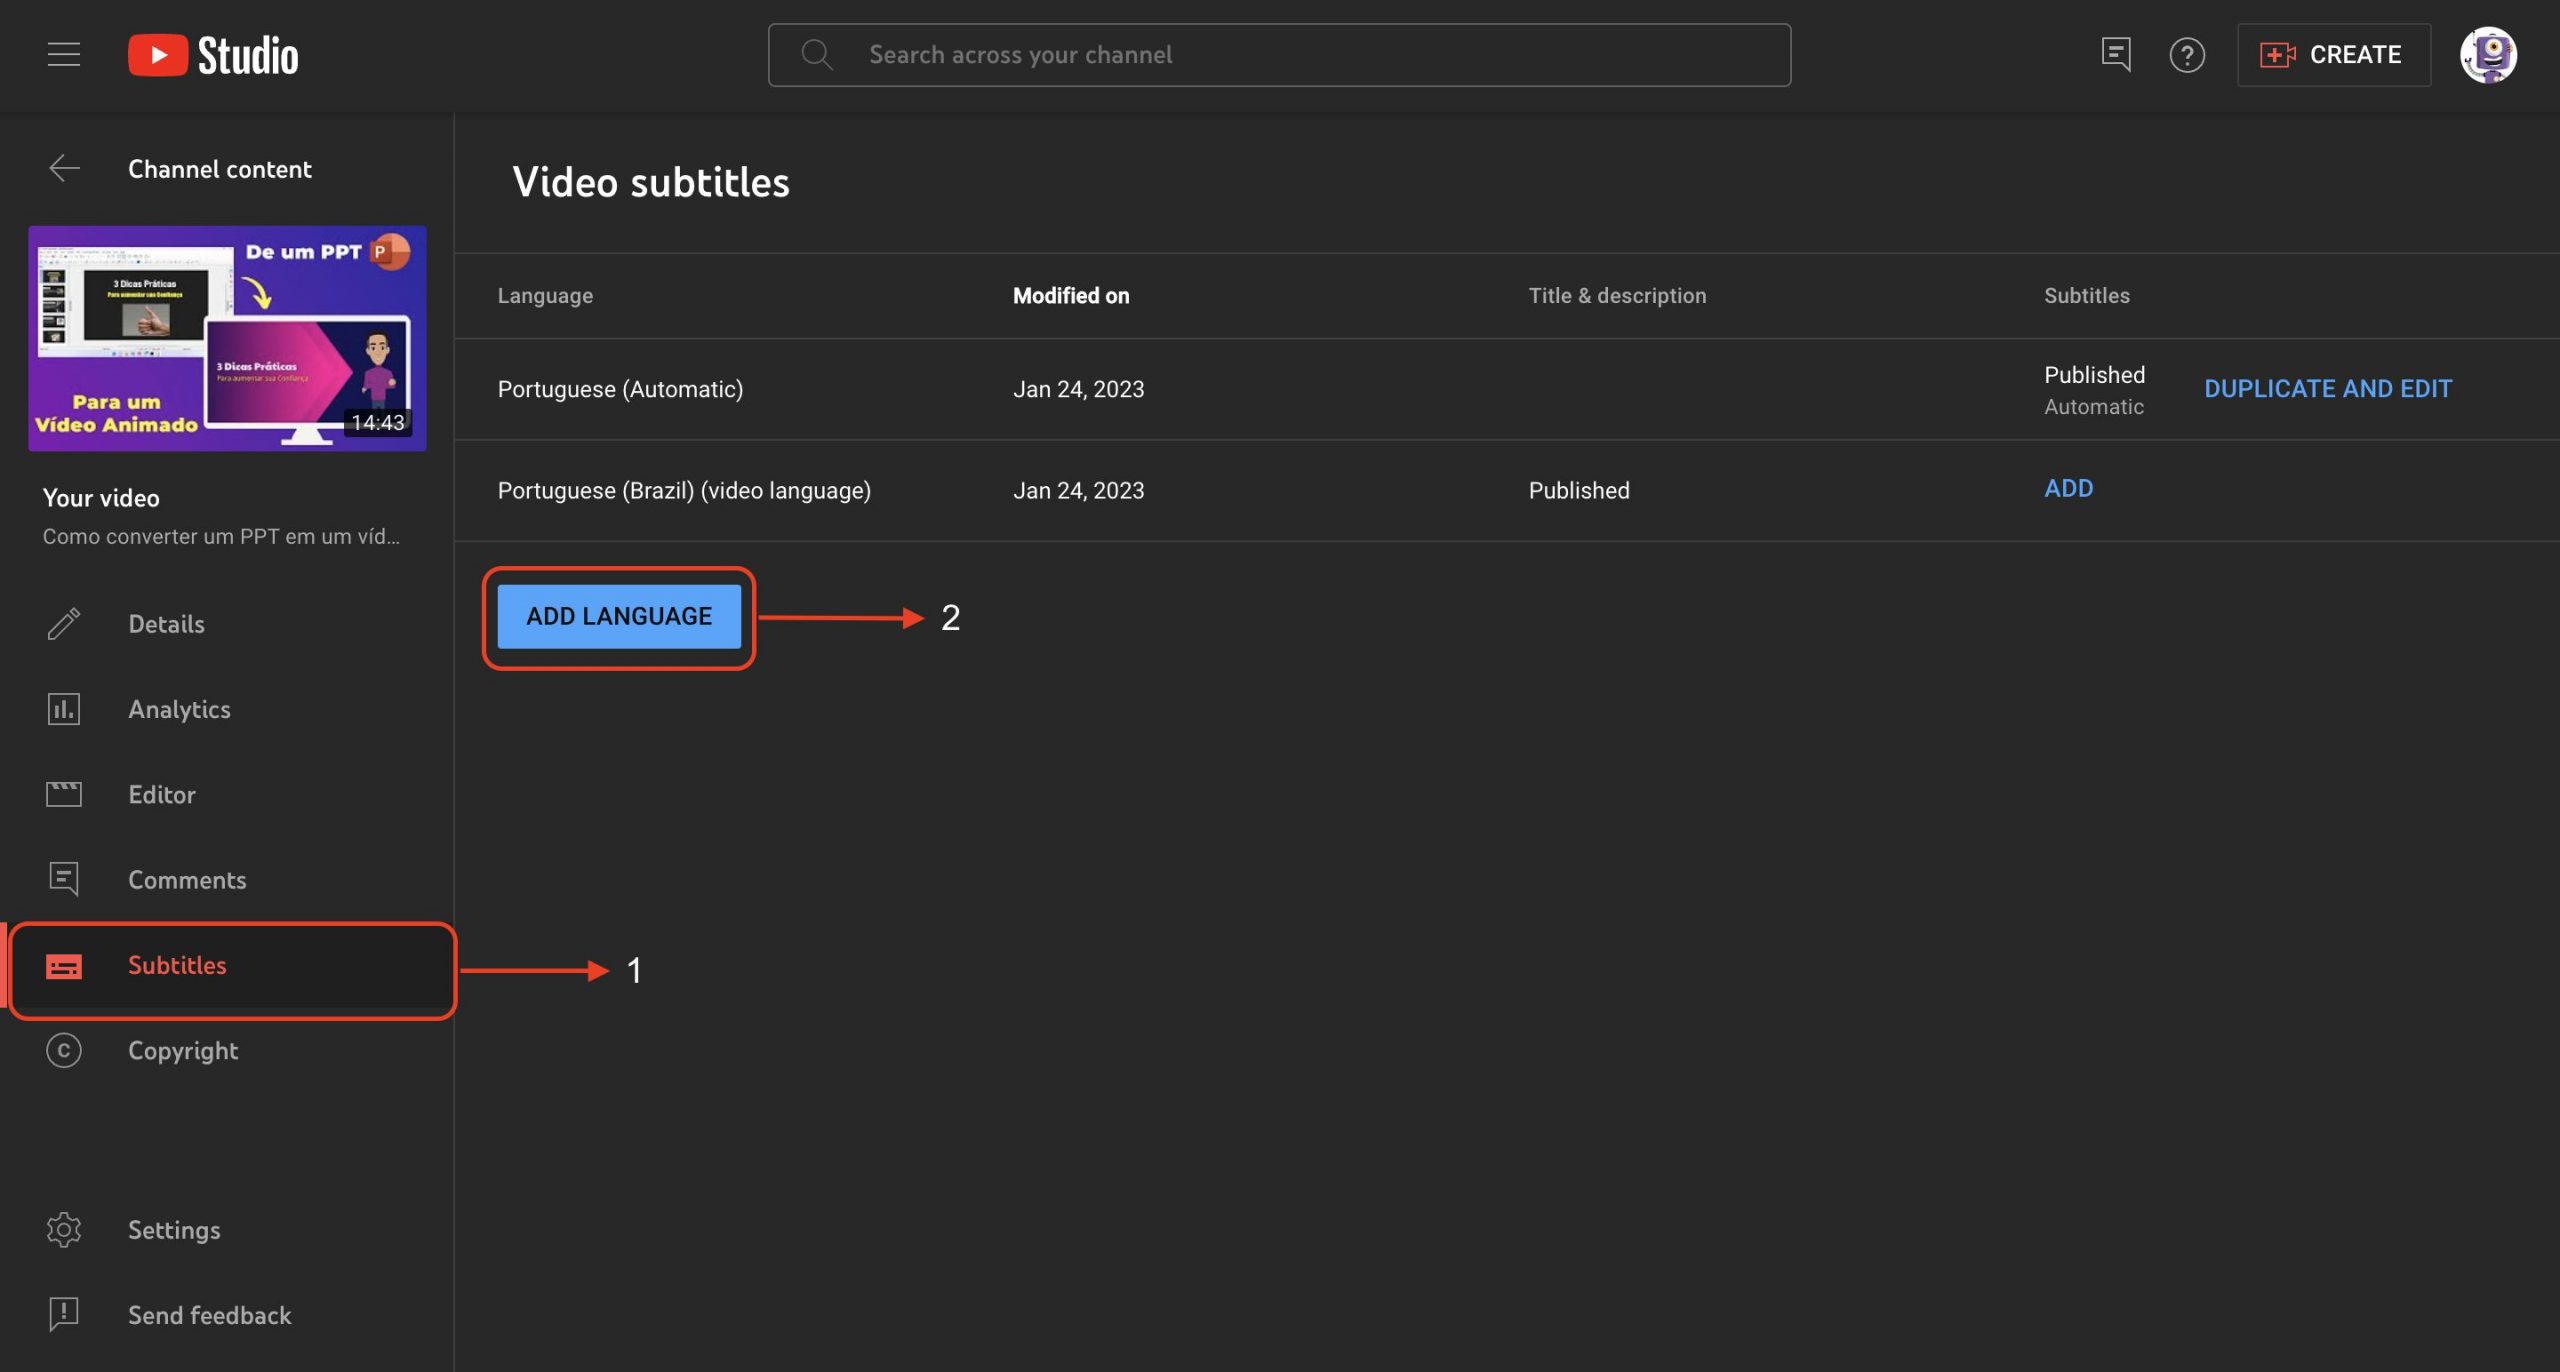
Step 4. In the video, click on Subtitles and click on Add language button.
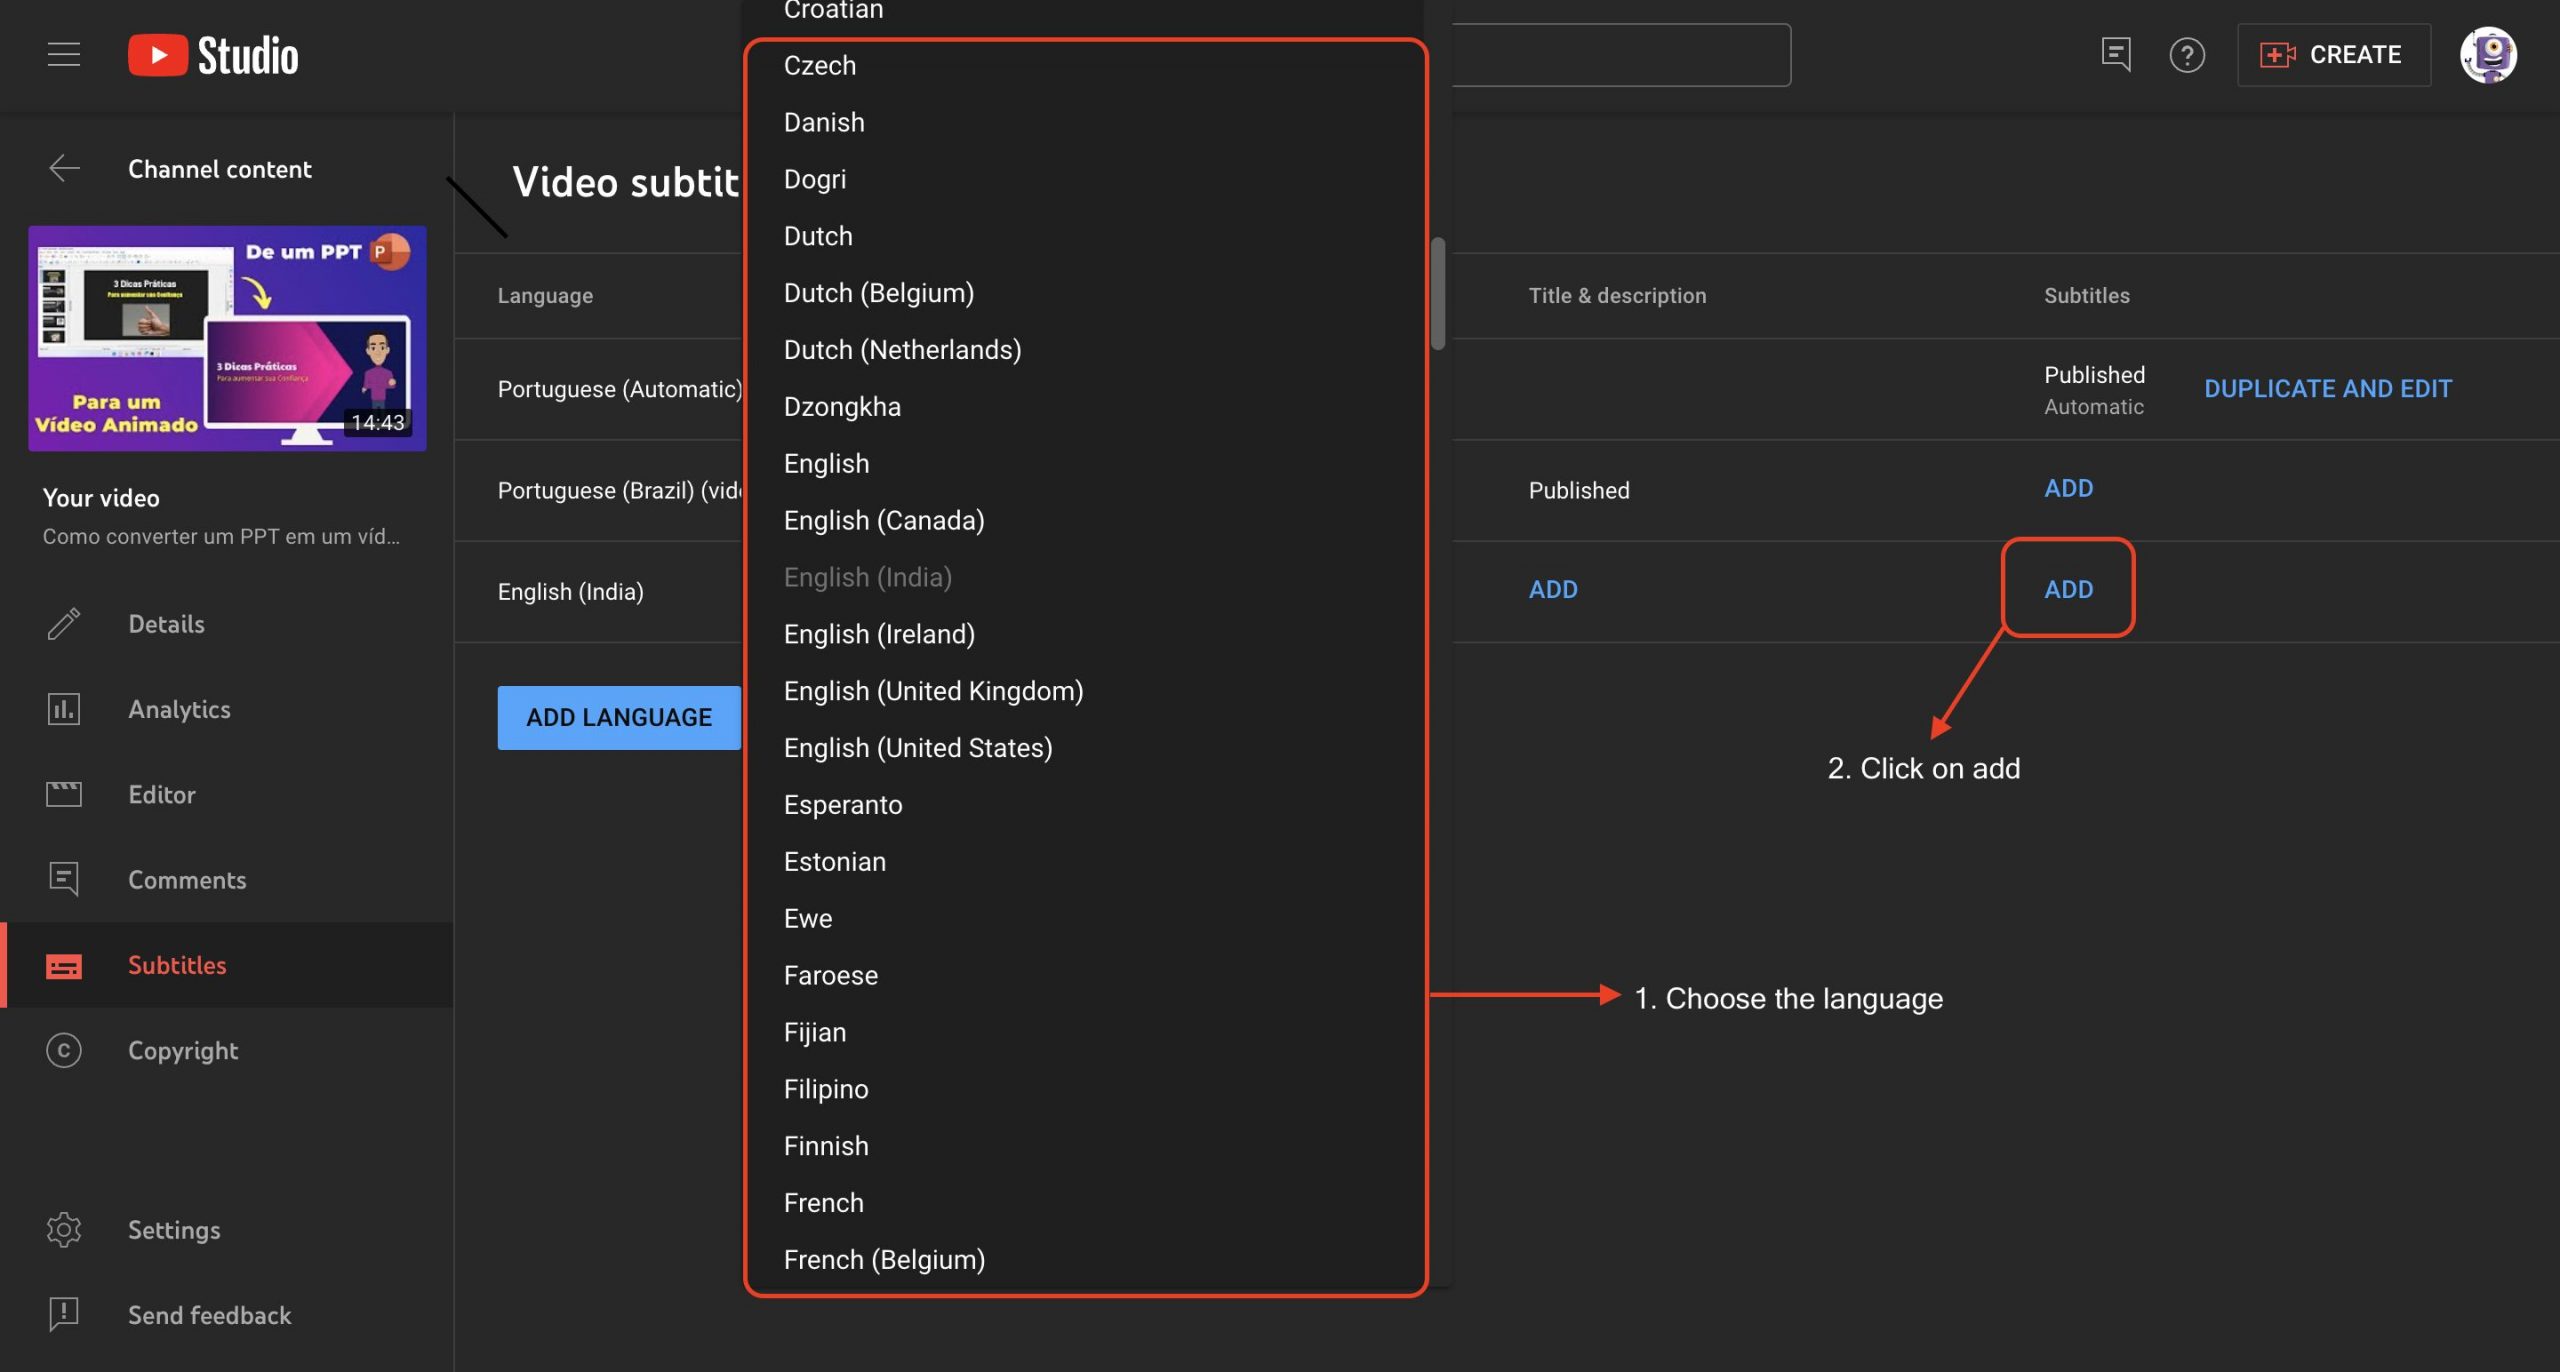
Step 5. Once you click on add language, It will prompt the user to choose the desired language you want to add subtitles for. Choose the language and click on add.
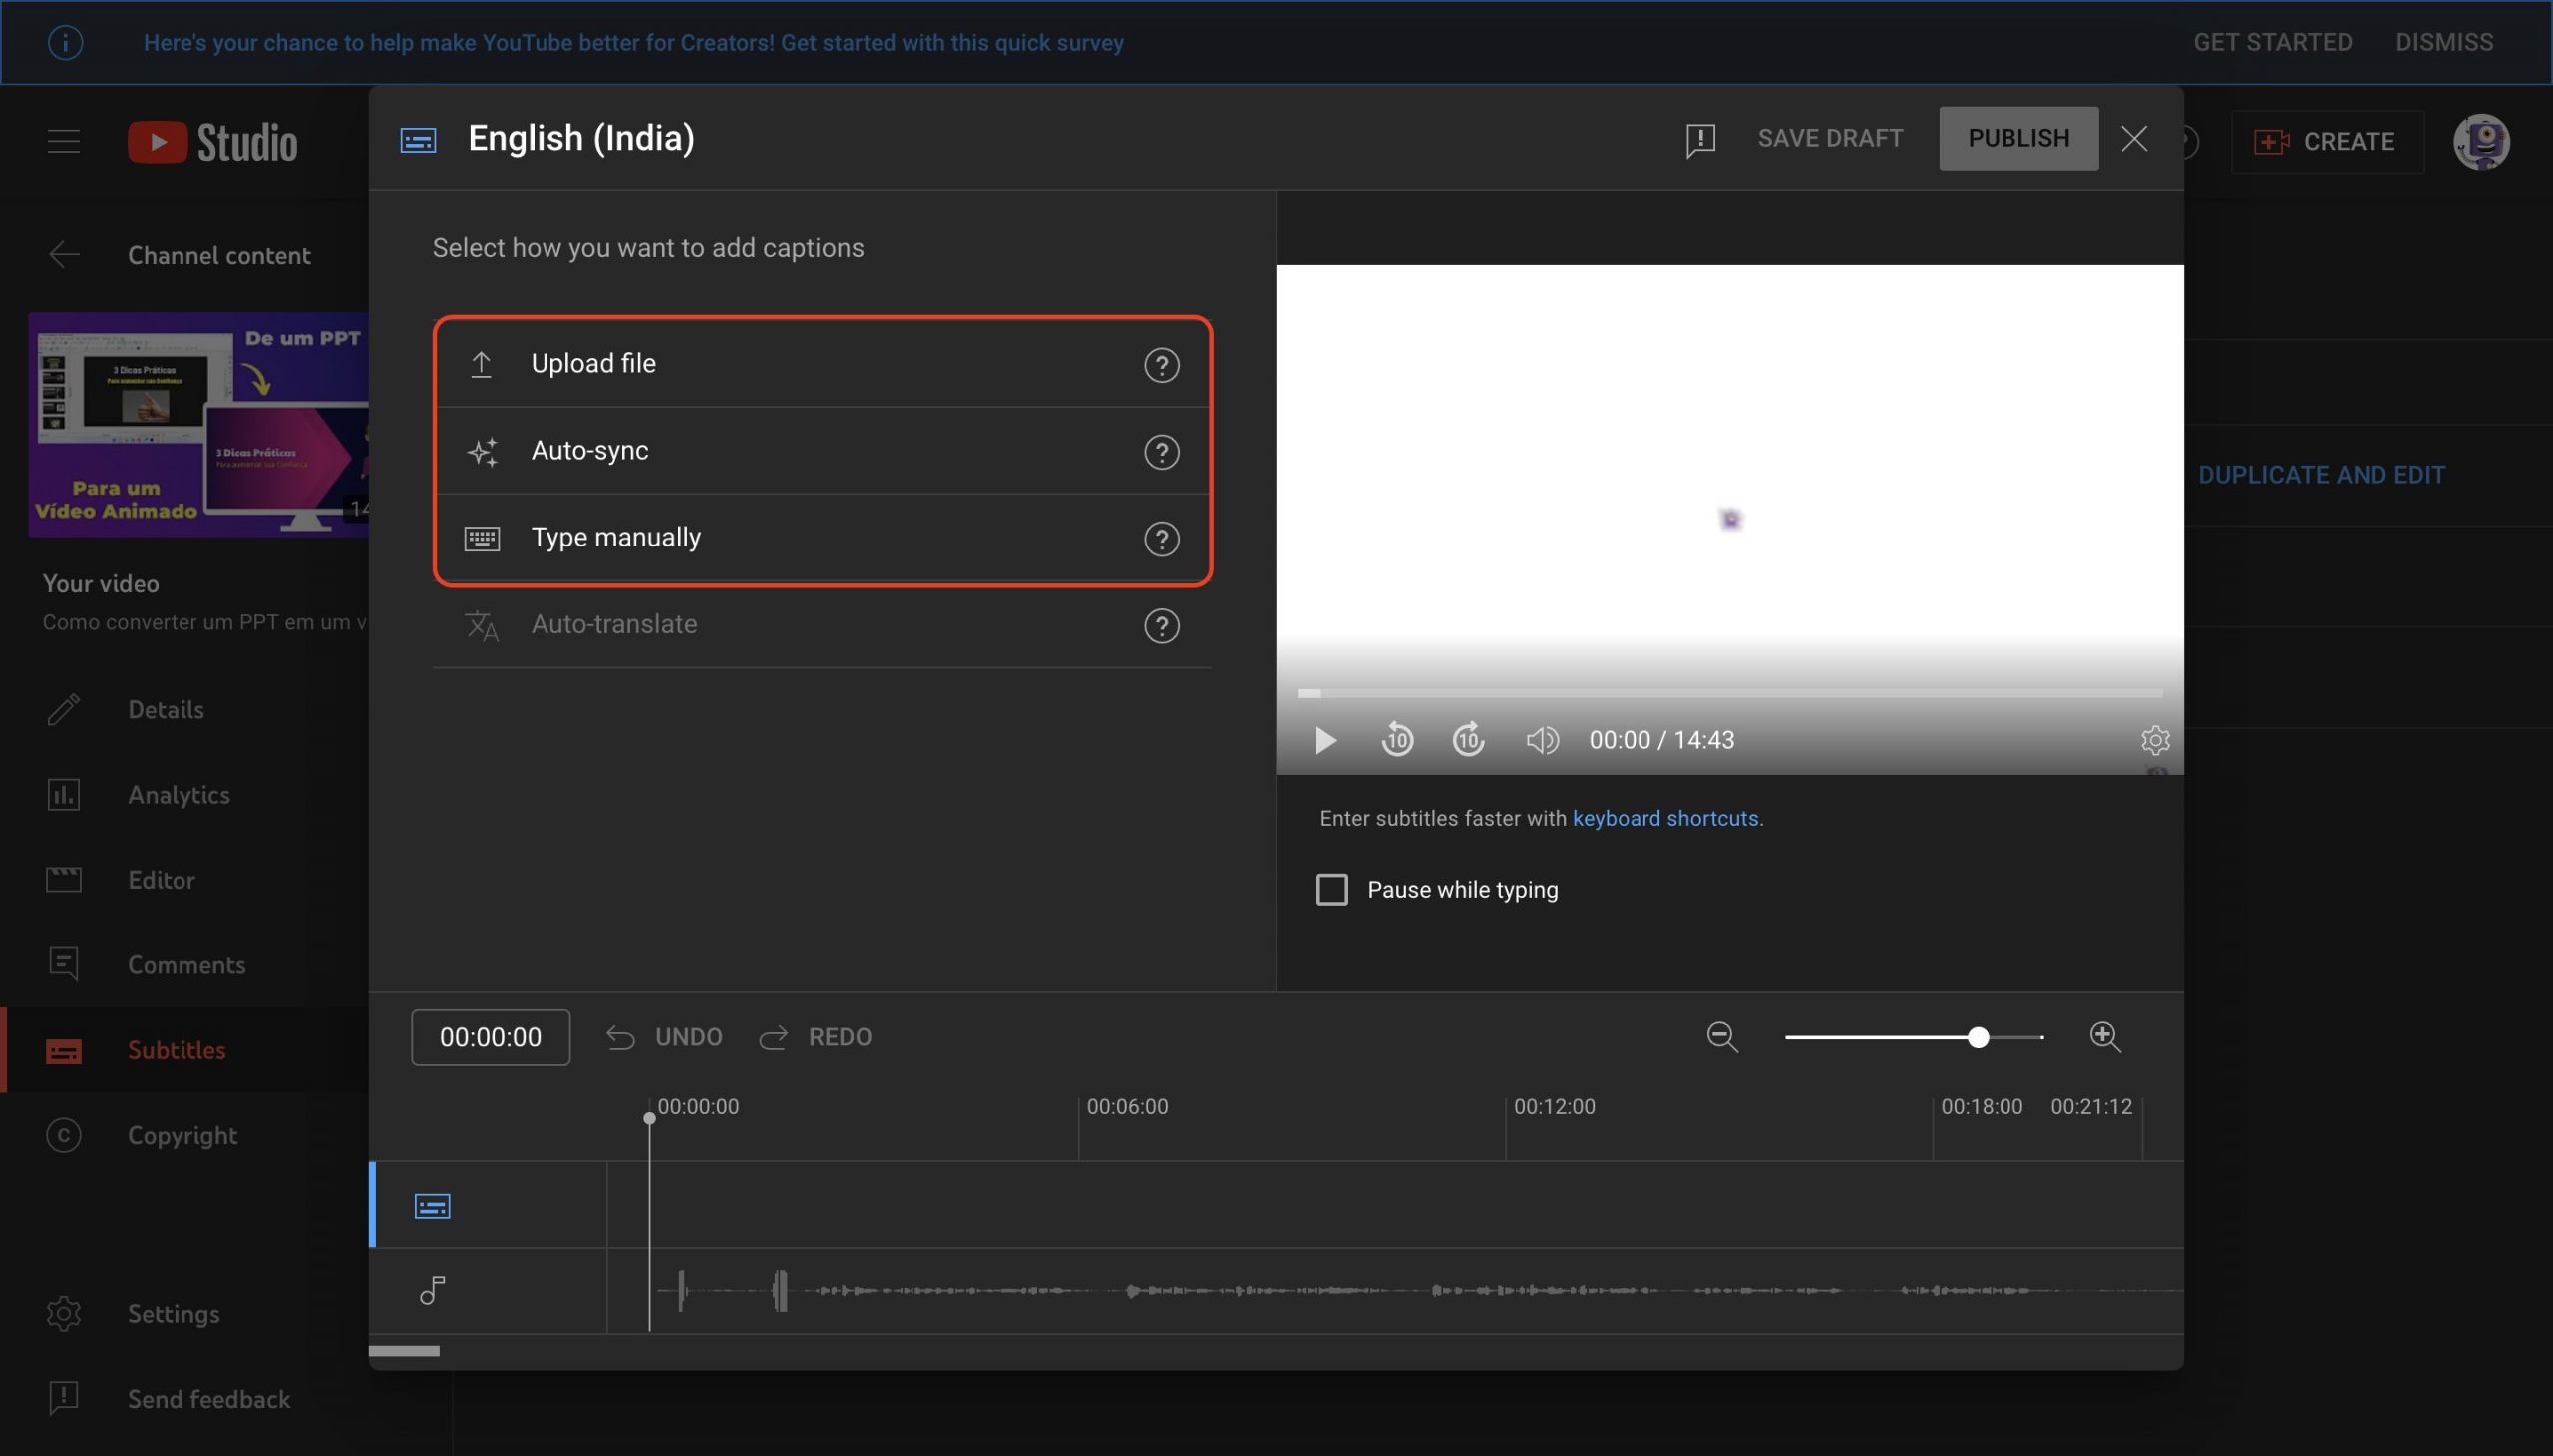
Once you click on add, you will be presented with three options - Upload File, Auto Sync, and Type manually. Select any of the three options and you will be able to add subtitles to your YouTube videos easily.
Wasn’t that simple? If you think that’s cool and handy, then you should check out the next section!
(3) How to make subtitles from scratch? (In Under 30 Minutes)
Traditionally, creating subtitles involves transcribing the audio of a video into text and synchronizing it with the video. This basically involves three steps -
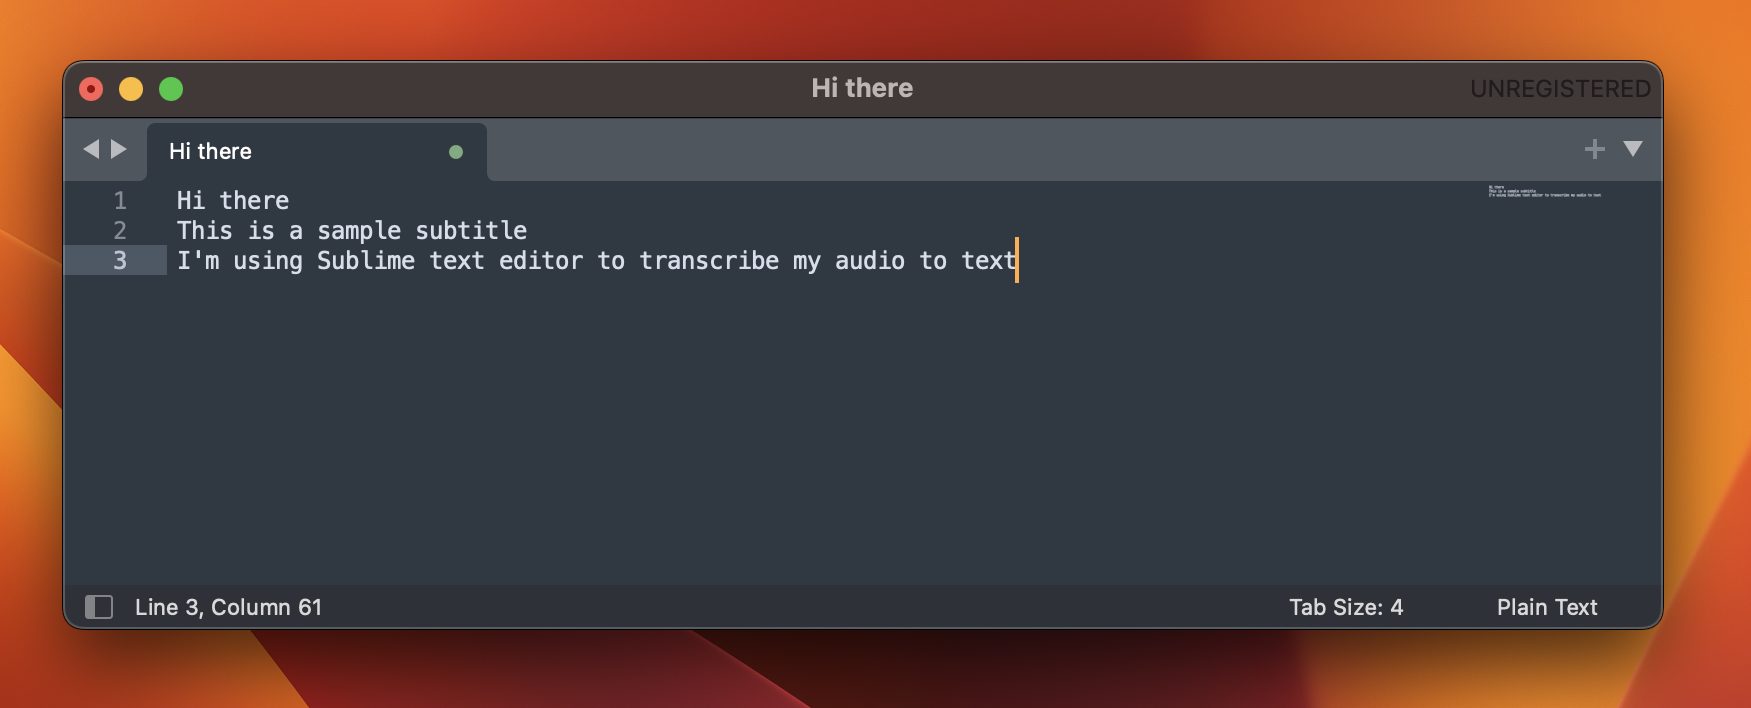
Step 1. Transcribing the audio - This is the first step of creating the subtitle. It involves hearing the audio, including pauses & effects, and converting it into text.
Subtitle lines can be added to text editors like Notepad ++, Text Edit, TextMate, and more to create your .SRT files.
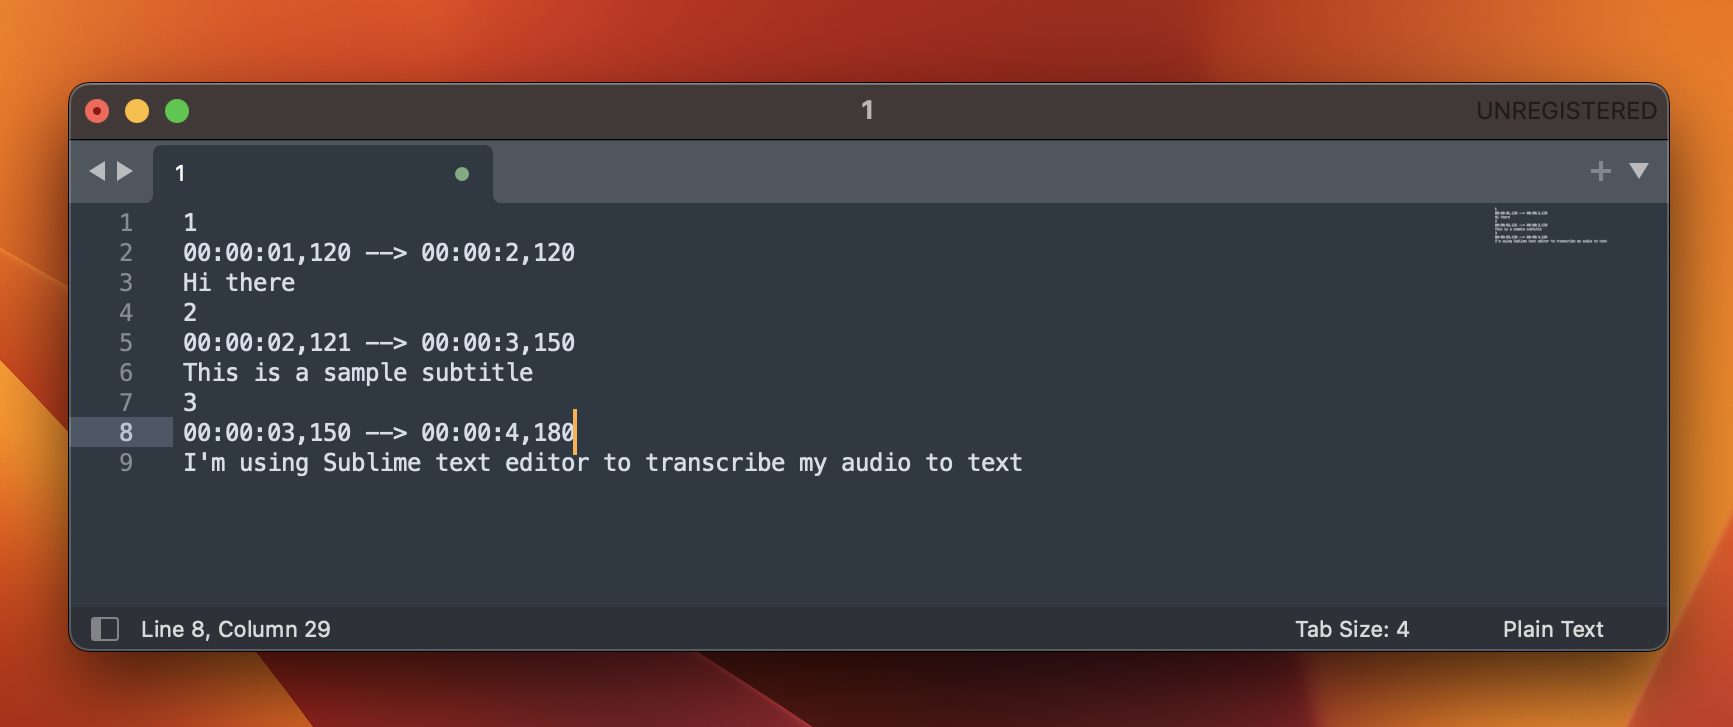
Step 2. Adding a timestamp to the audio - Once you have the transcribed text ready, it's time to add the timings to each subtitle. This will indicate when the subtitle should appear and disappear in a video.
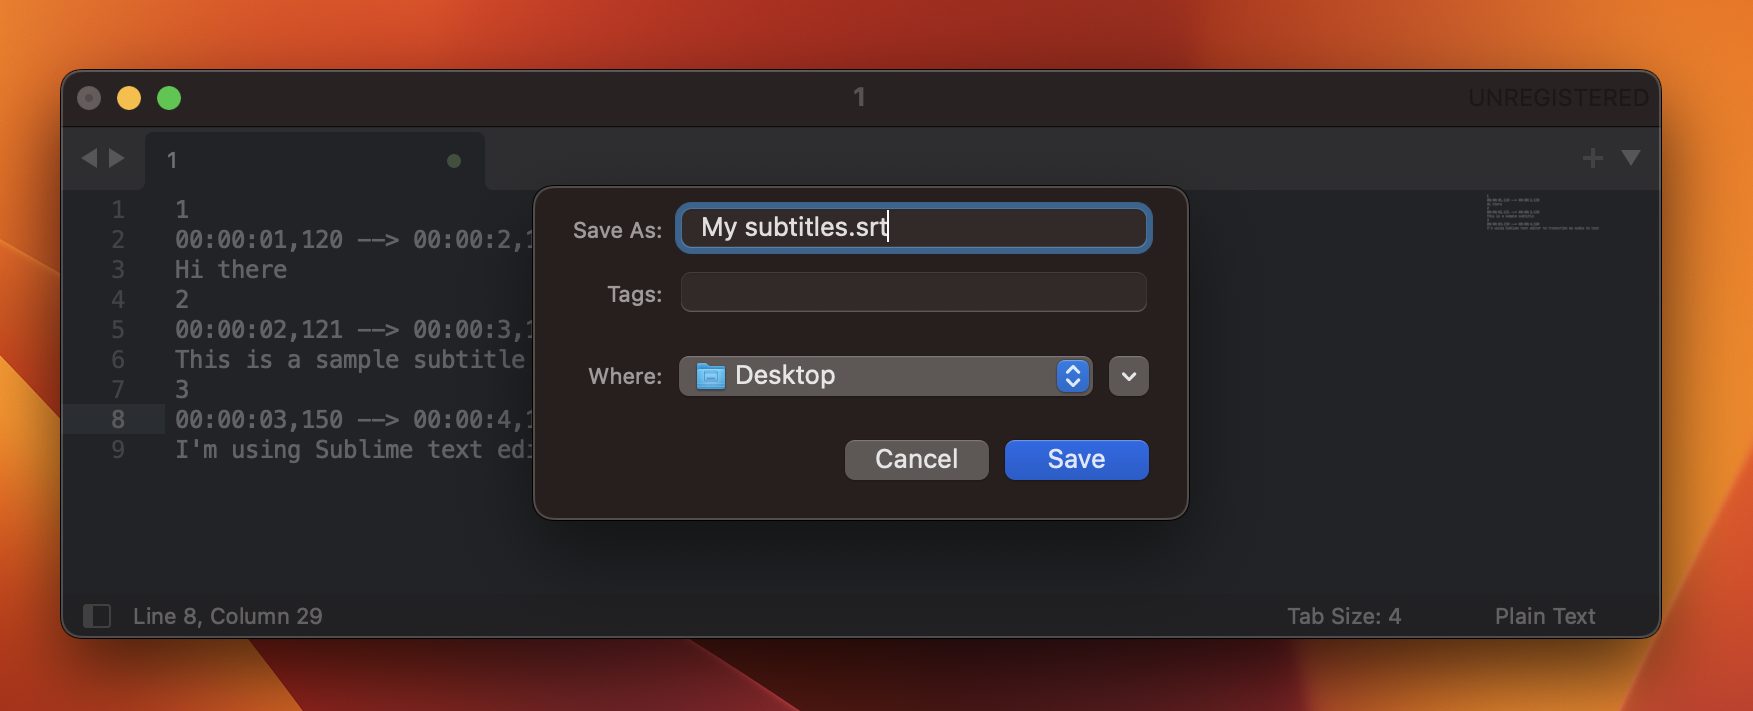
Step 3. Exporting the subtitle - Once everything is done, you can save the file in the .srt extension and use it to upload it to the desired platform.
That was easy, wasn’t it? Now, let’s move to the next section, adding subtitles to a video using Youtube’s inbuilt caption generator.
And, that’s it!
As simple as that, you have learned How to Make Subtitles. It’s time to add subtitles to your video and make your engagement rate skyrocket 🚀
Bonus : If you are looking for an easy way to add subtitles to your Instagram reels, then read - How to add Captions to Reels to Hook your audience!
Additionally, we have created a video to make it easy for you to create subtitles -
So, what are you waiting for? Get started and easily add subtitles to your video in minutes with our all in one AI Subtitle Generator. If you have any questions, feel free to drop them in the comments down below.

