How to make a Cute Anniversary Video? [Quick guide!]
Your anniversary is just around the corner, and you wonder what might be a good gift for your loved one...
As much as those expensive rings, shoes, and clothes will be a sight for the eyes, gifts with a personal touch can sweep your partner right off their feet!
And what better way to swoon your loved one if not for a video made with beautiful photos taken all through the years? Just the sound of it gives you a good feeling, right?
We have all felt a rush of happiness when we scroll through photos in our galleries, reminiscing the happiest moments.

After all, memories are eternal treasures of our hearts! And videos can be a great way to relive those memories. That’s precisely why we are going to make an anniversary video!
Now let me show you how to make that awesome anniversary video of yours in a matter of minutes!
There are two ways to do this:
Whichever method you choose, we will be delighted to guide you!
So, with no further delay, let’s dive in!
1. Create using Animaker’s Anniversary Video Maker:
The Anniversary Video Maker is extremely easy to use, efficient, and completes most of the work for you. Above all that, it is free!
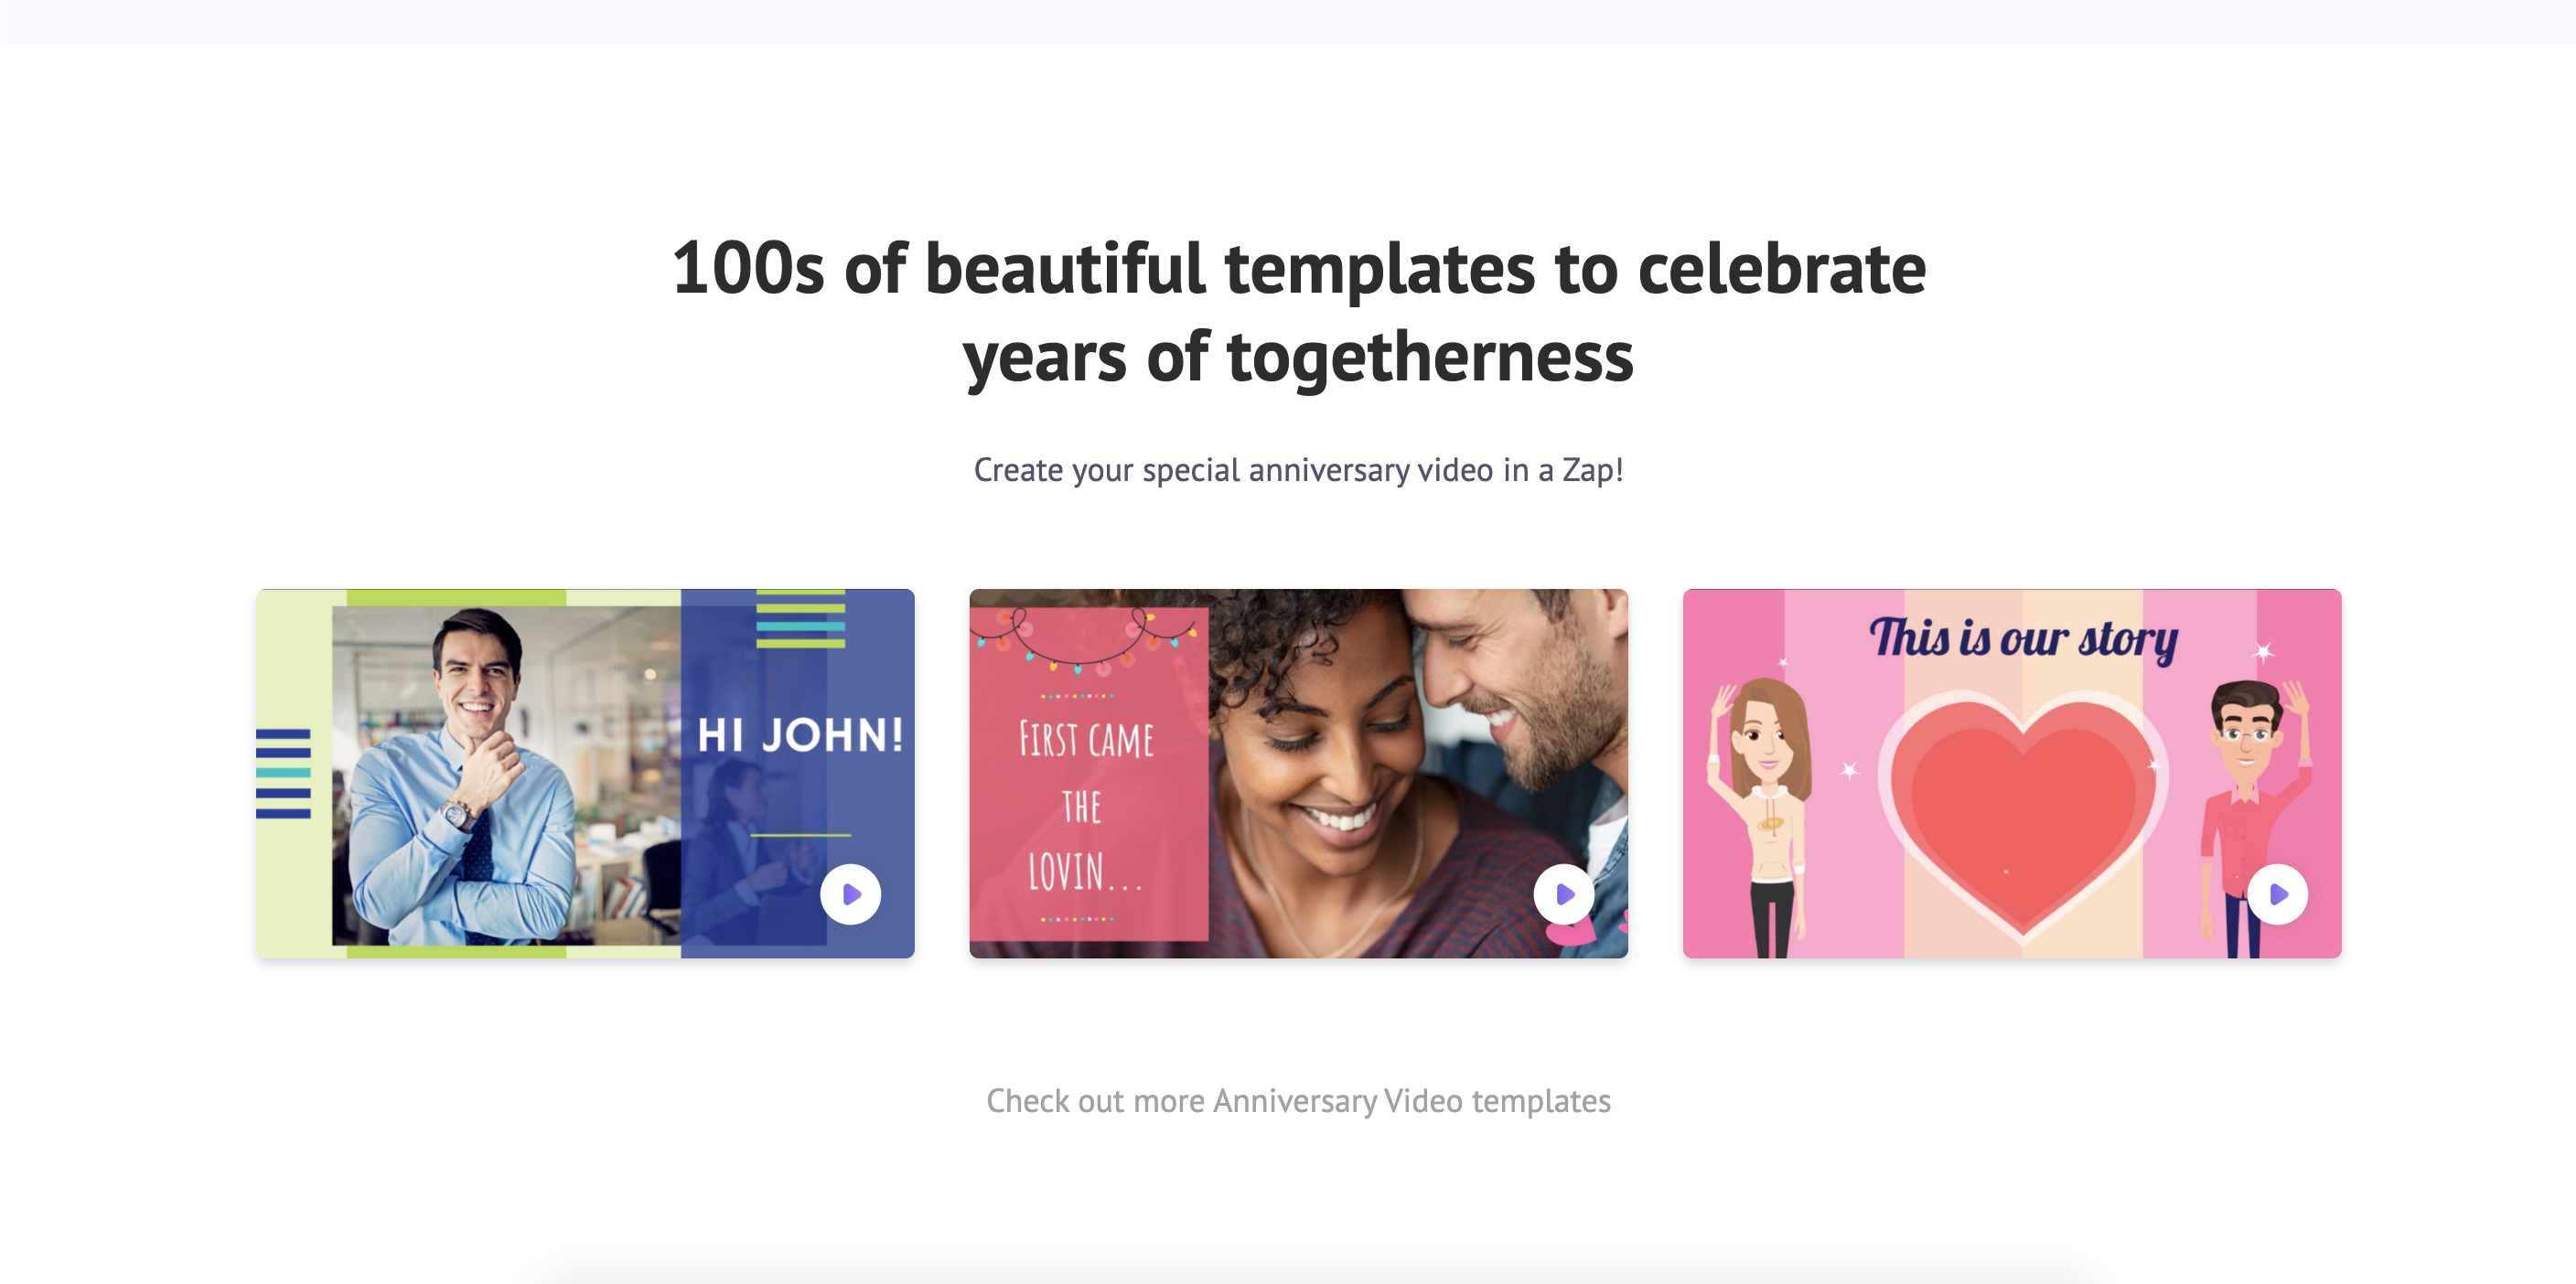
Let’s get started on the steps to collate the images into a beautiful video using this video maker:
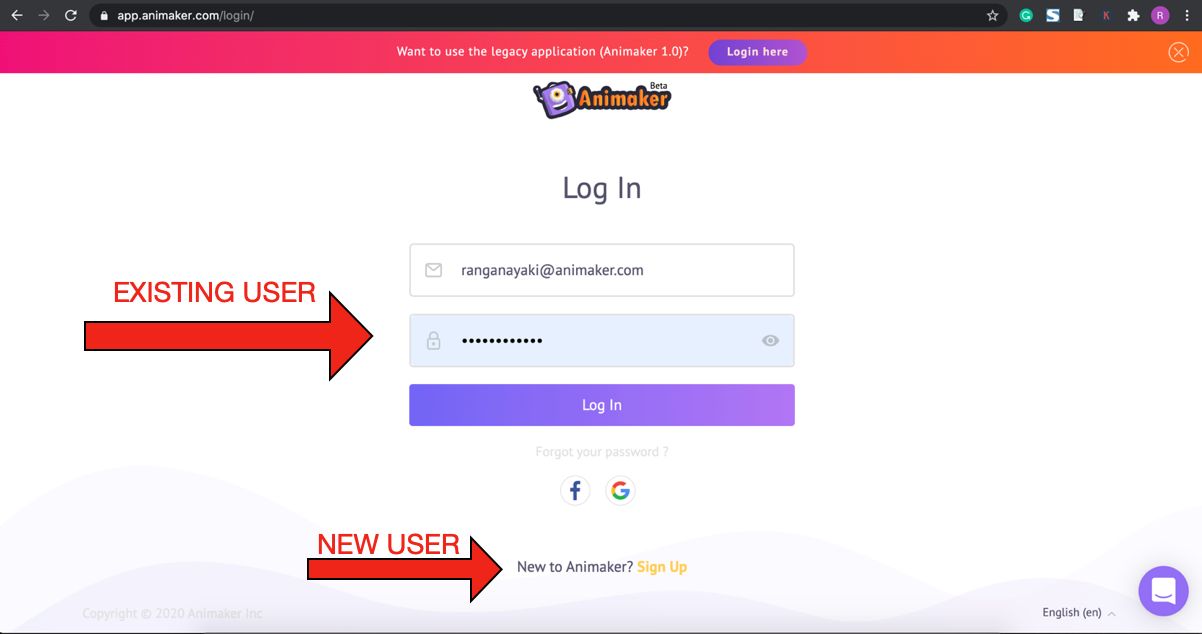
1. If you are already a user of Animaker, click here to log in. If you are new to Animaker, click here to sign up.
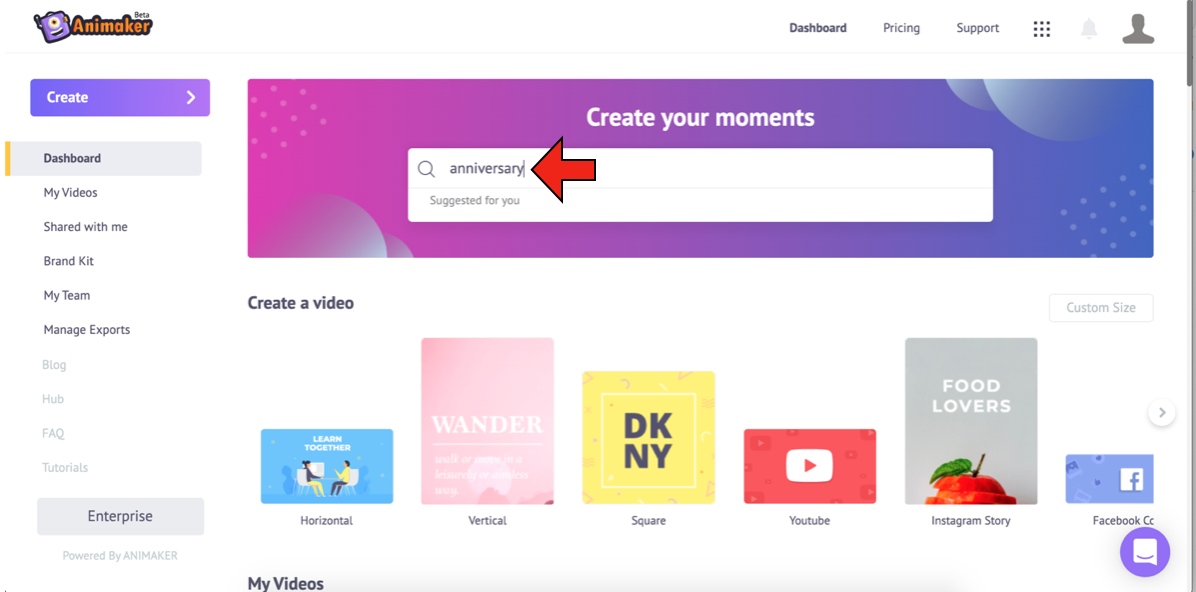
2. This will lead you to the dashboard, where you will see tons of existing templates for different use cases. Look for “anniversary” in the search bar at the top.
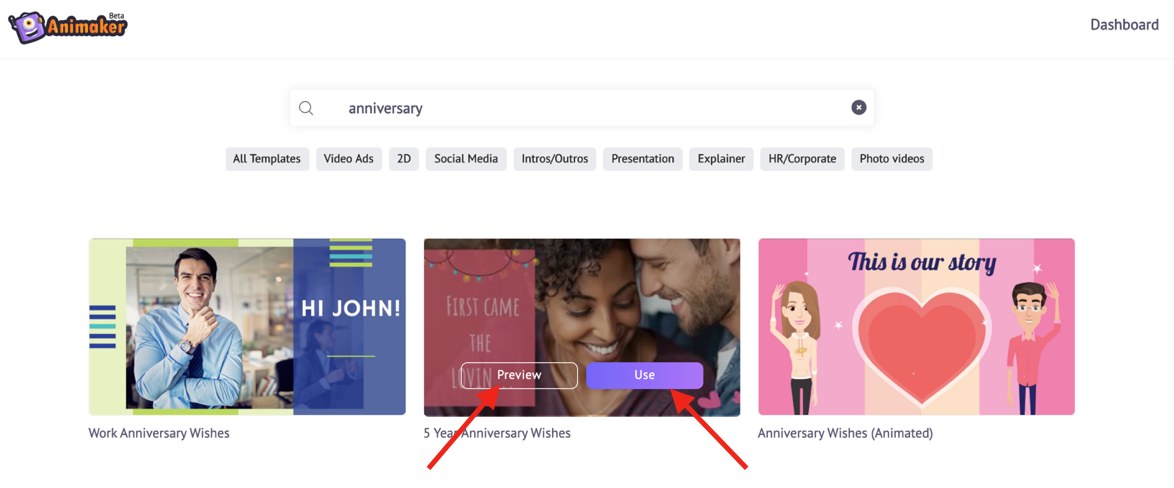
3. This will redirect you to the Moments page with a list of anniversary video templates displayed. You can hover over any template and click on ‘Preview’ to get an idea of the template. Once you decide which one to use, click on the ‘Use’ button.
4. The template that you have chosen will get launched as a new project.
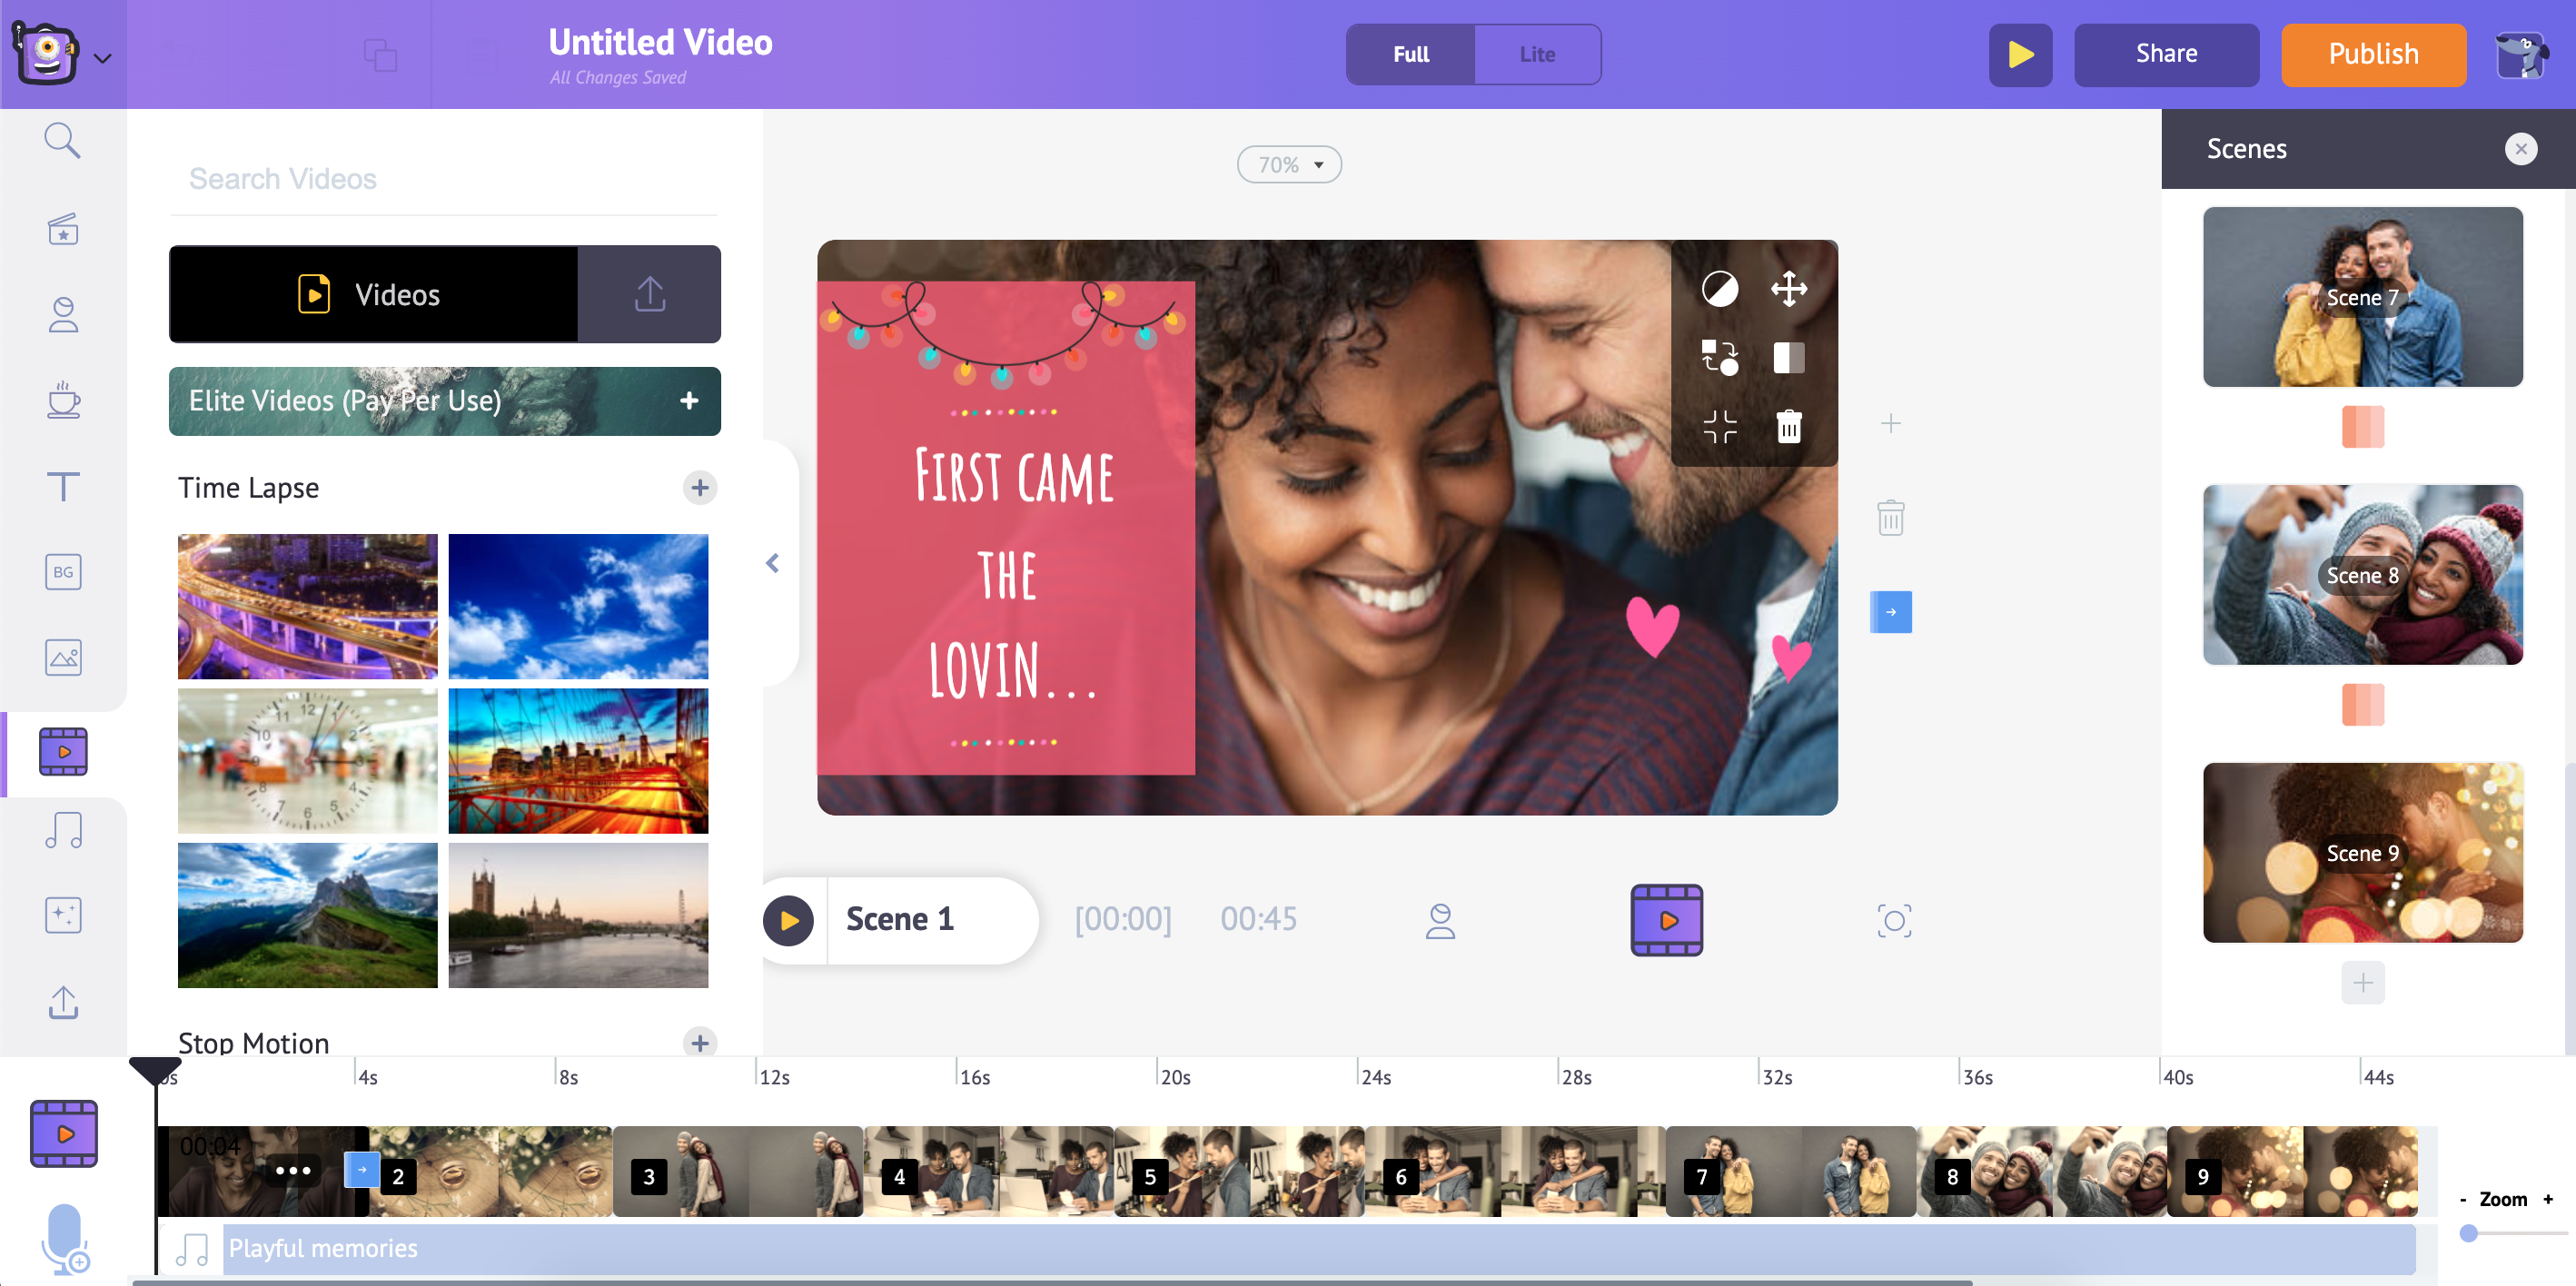
5. You will see that the template has everything, right from the emotion to the background music. All you need to do is, swap the pictures in it with yours. We shall start with this swapping by uploading your images one by one. Choose the file that you want to upload from your local storage. Click the Upload button, navigate to the file, select it, and click on Open. You can also drag and drop the file from your local storage.
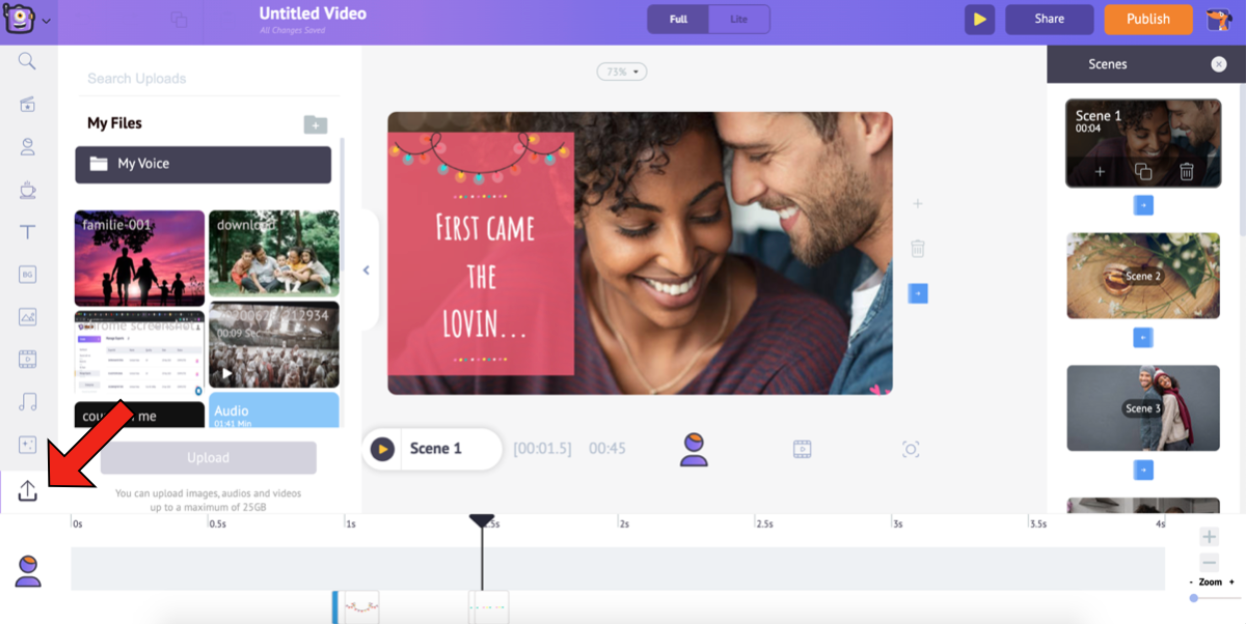
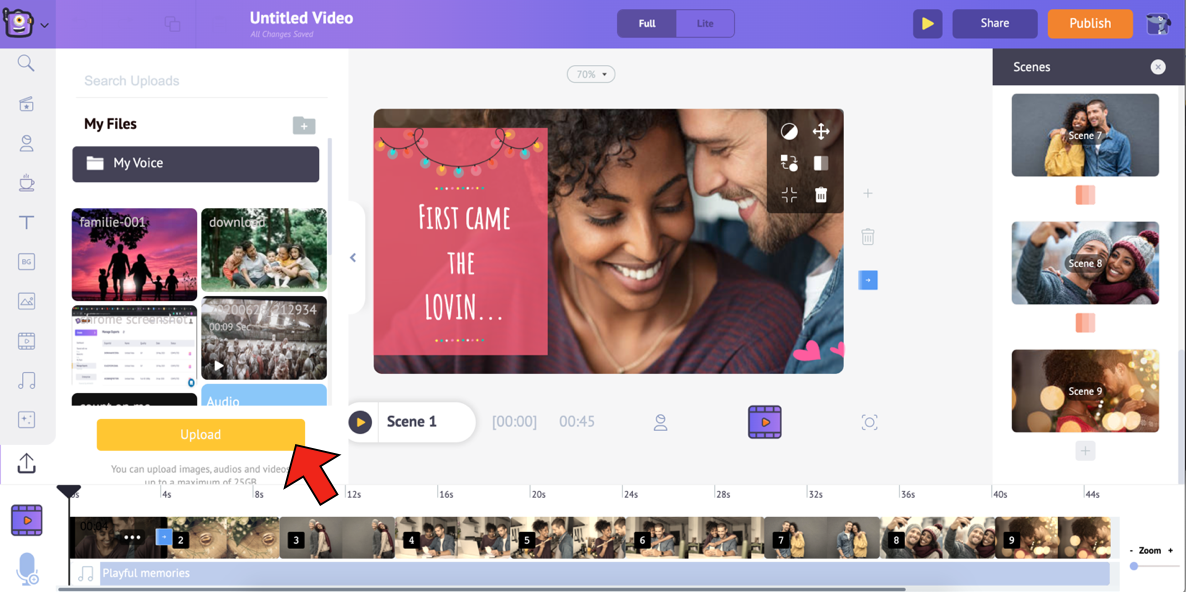
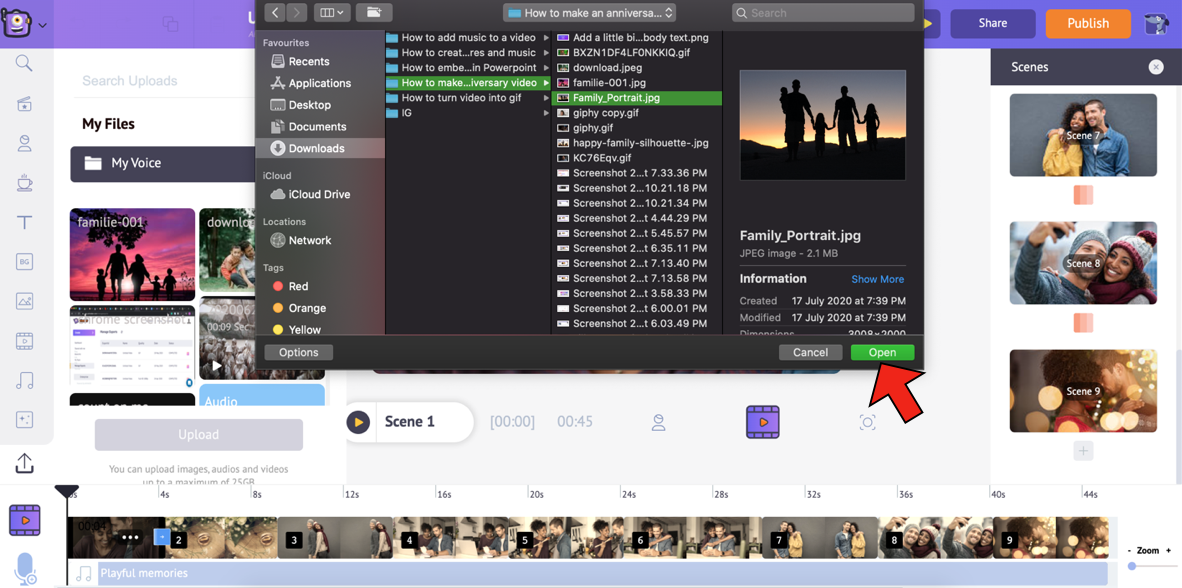
6. Similarly, upload all the pictures. Once you are done, select the photo in the template. This will open the Item Menu. Select the Swap option from the Item Menu.
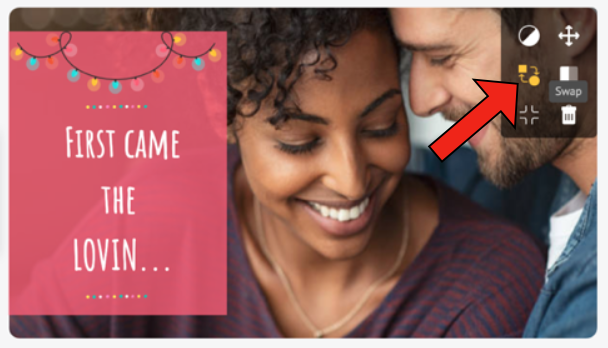
7. This will open the Images section from the library. Using the Swap option allows you to swap the existing image with an image or video, either from the Library or from the My Uploads section. Since we will use the photo that was uploaded, choose the My Uploads icon in the images section.
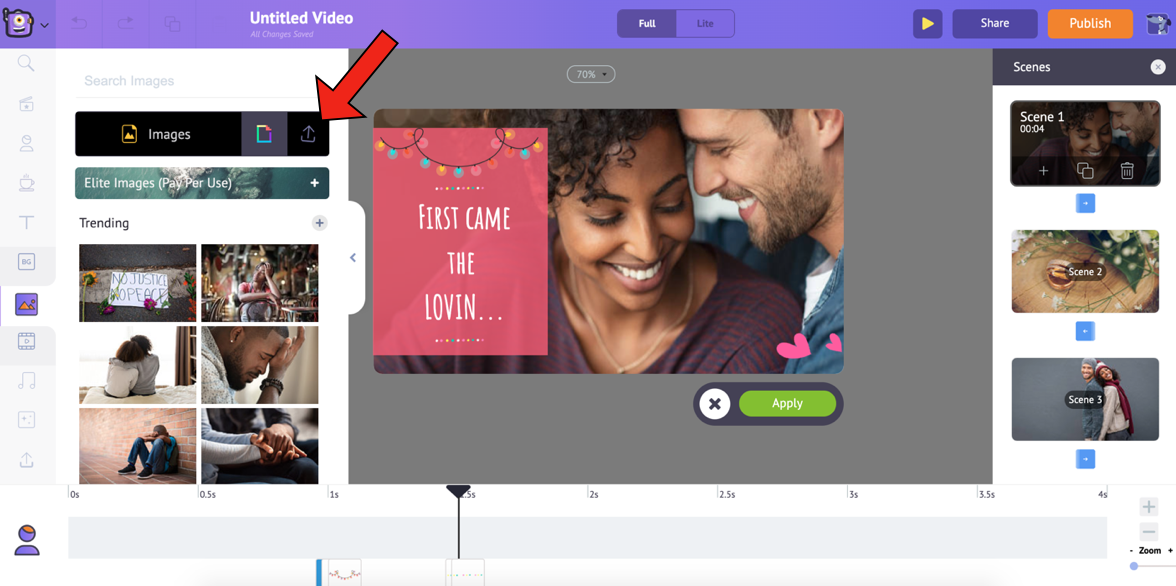
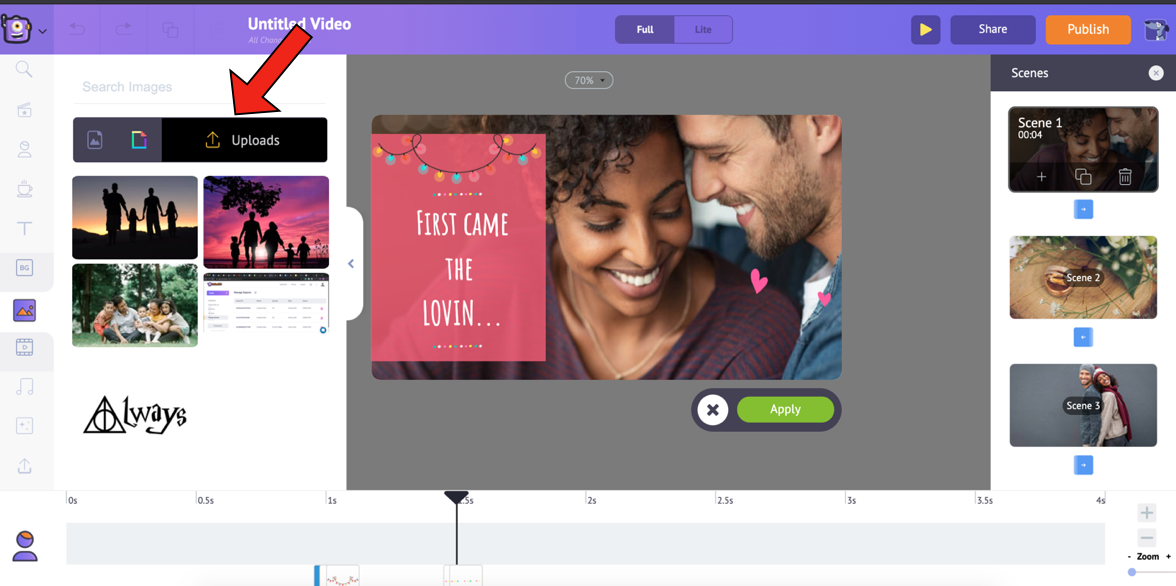
8. Select the image you want to swap the existing image with, and click on Apply.
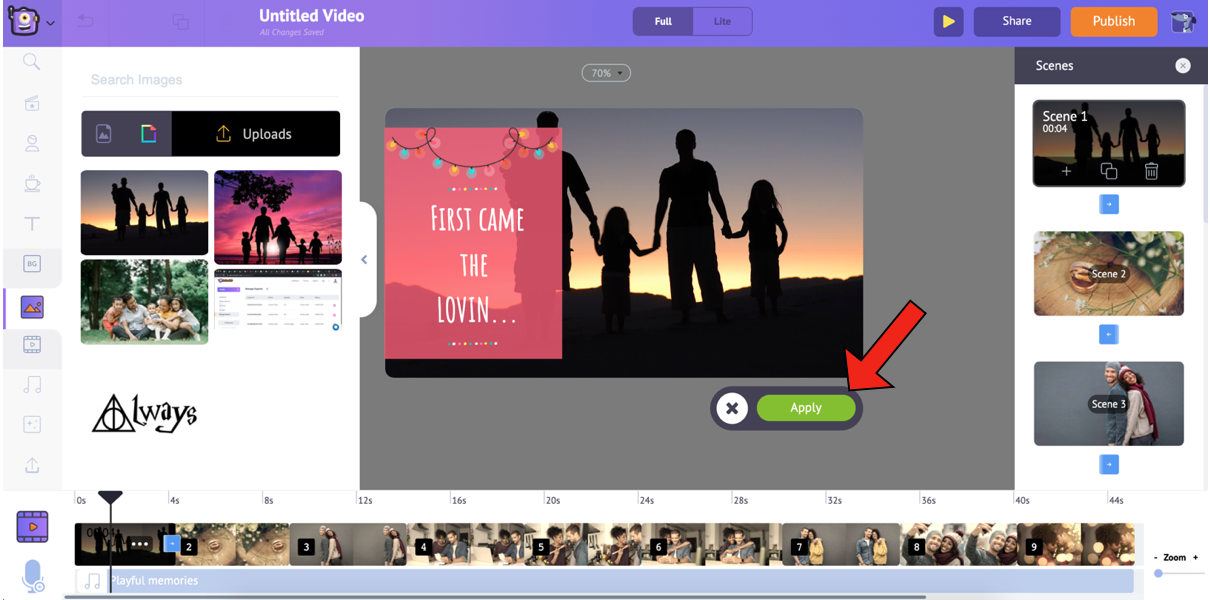
After swapping, you can resize the image by selecting it and then dragging its corners.
9. If you feel that the text in the template does not go with your image, you can readily change it by simply clicking on it. Clicking on it would open the Text Settings window, from which you can modify your text’s font style, size, alignment, letter spacing, transparency, entry/exit effect, and arrangement. Also, you can use Smart Move on your text to give it complex animations. Check out this video to know how to use Smart Move.
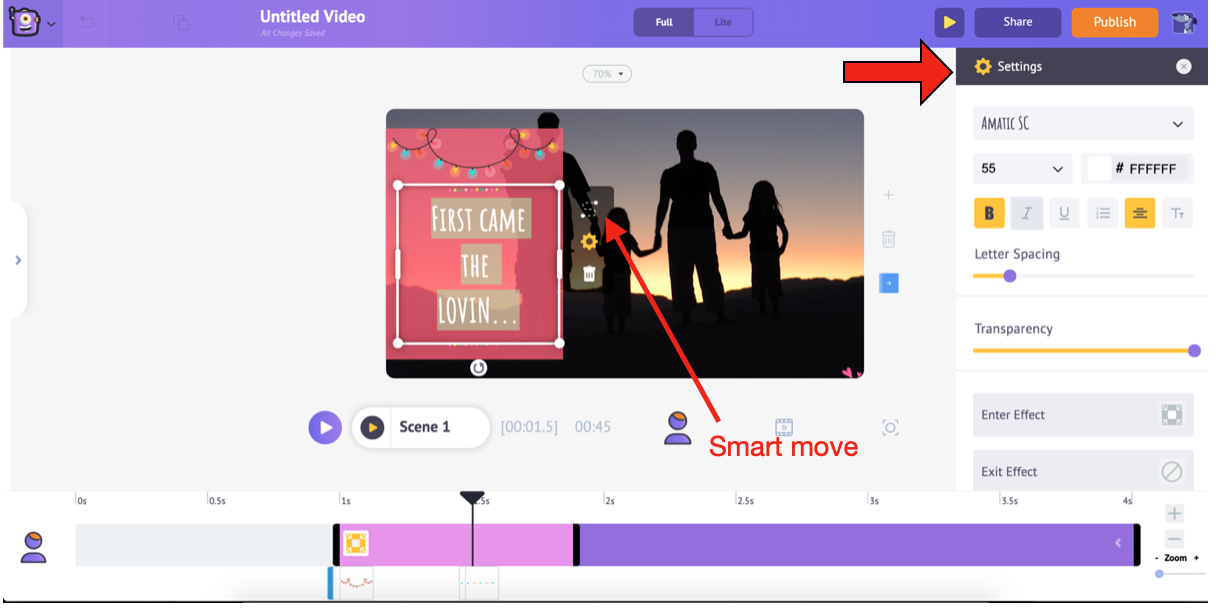
10. Alternatively, you can also delete the existing text box and replace it with one from the Text Pre-builts section. The Library also has a massive list of Text Pre-builts, which are formatted with unique entry and exit effects to make life easier for you. Apart from these pre-builts, you can also select a heading, subheading, or body text, format it, and provide it with your own entry/exit effects.
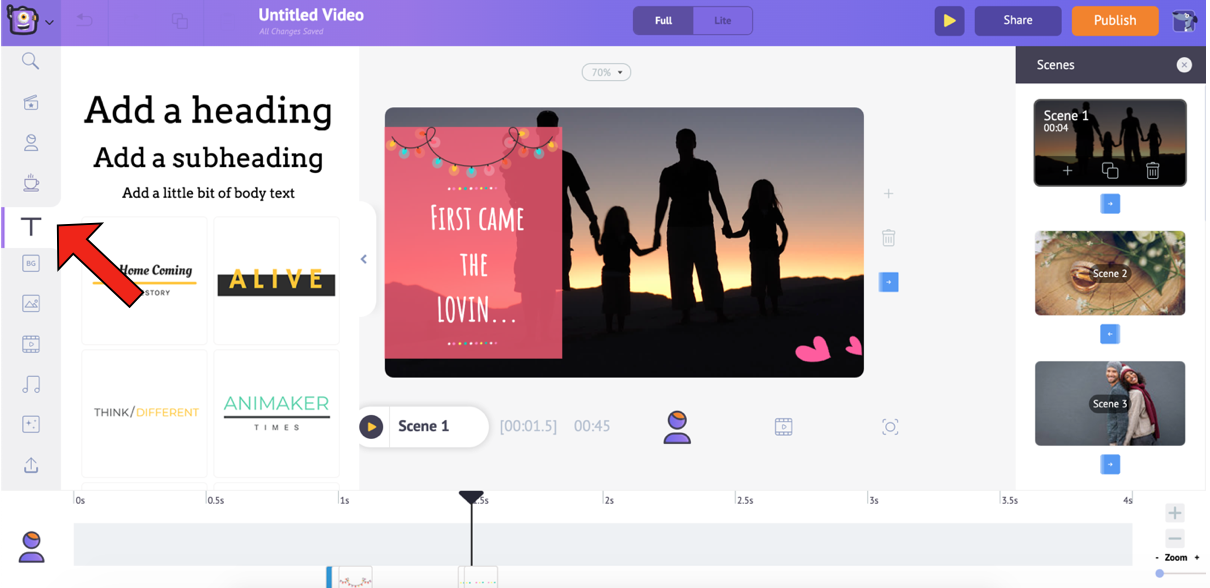
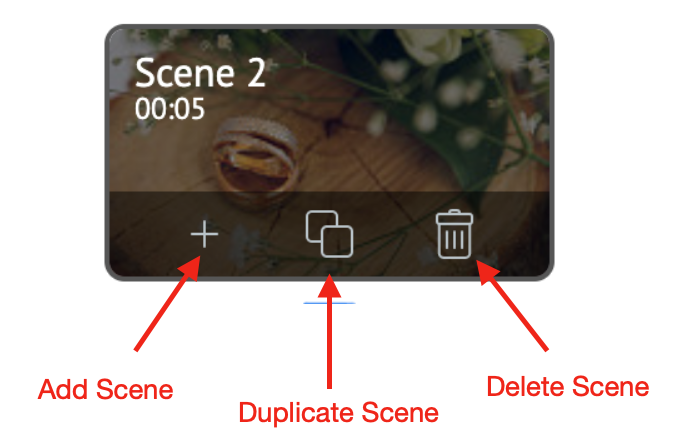
11. If you are confident enough, you can very well go ahead and create a scene from scratch. To do this, select the scene after which you want the new scene, and select the Add Scene option. If you want to add a new scene that doesn’t have many changes from a particular scene, the easiest and smartest thing to do is duplicate a scene. Select the Duplicate Scene option and make your changes in the newly added scene right away. To delete a particular scene, select it from the Scenes section and select the Delete Scene option.
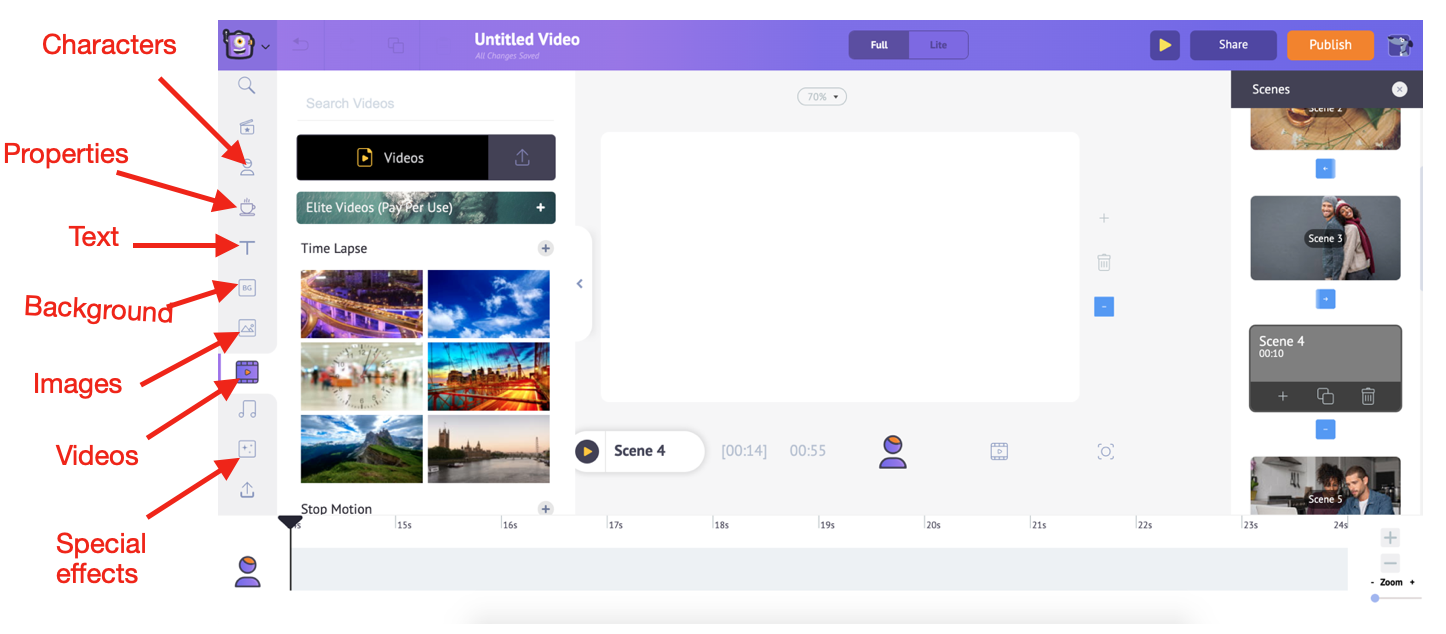
You can also add any asset from the Library to any scene and enhance your video. Refer to the screenshot below to know where each asset type can be found.
As and when you add an element to the scene, you will notice it getting added to the timeline below. For instance, when you add a photo that you’d uploaded, this is how it gets added to the Workspace and the timeline.
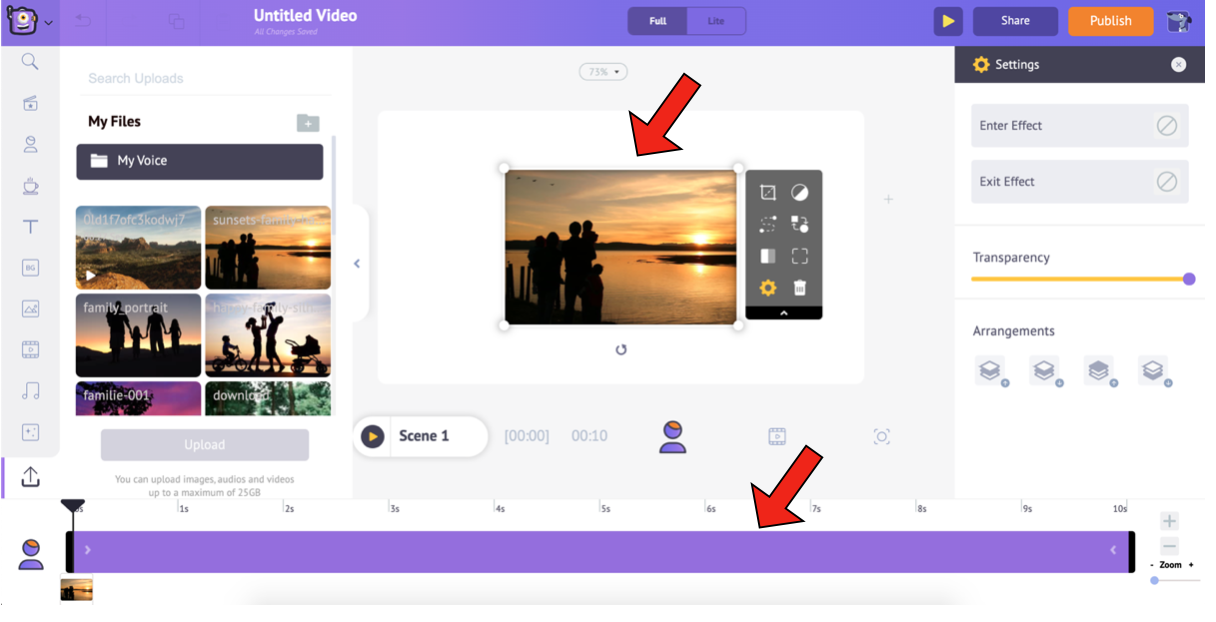
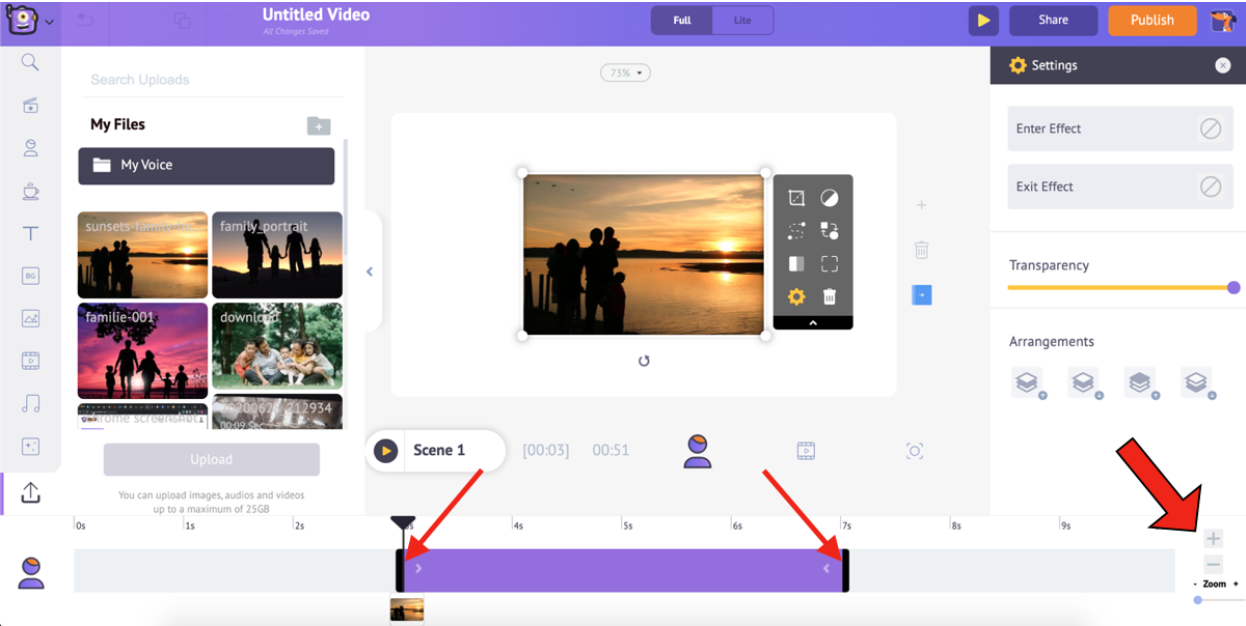
To adjust the duration of the asset’s visibility on a particular scene, drag the black bars at the ends of the scene in the timeline or by clicking the + and - options at the bottom right.
Once you are done editing the text and replacing the assets the way you want, we will move on to the next step; one of the most critical steps for creating a cool video…
Adding music to a video:
Music is one of the essential elements of a video. Its absence can make a video lack flavor and make it seem...

To add the right amount of oomph to your video, you need to choose an apt tune that would go with your video's overall essence. And that, my friends, is where Animaker comes to the rescue...
Apart from providing different elements like properties, special effects, images, etc., Animaker’s Library also offers a vast collection of ready-to-use, royalty-free music tracks and sound effects.
Also, just like you had added your photos, you can add tunes that you have composed or tunes from the internet, provided they are royalty-free like our tracks (You wouldn’t want to get sued or have your video removed for using others’ tunes without permission, right?)
You would have noticed that the pre-built template that we had selected comes with background music. If you want to change it, Animaker’s rich library gives you a whole host of options.
First, select the video timeline.
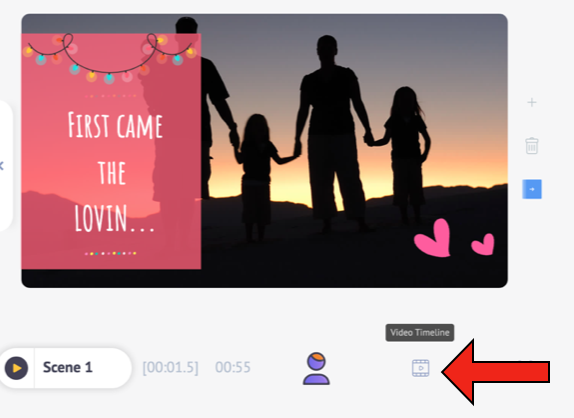
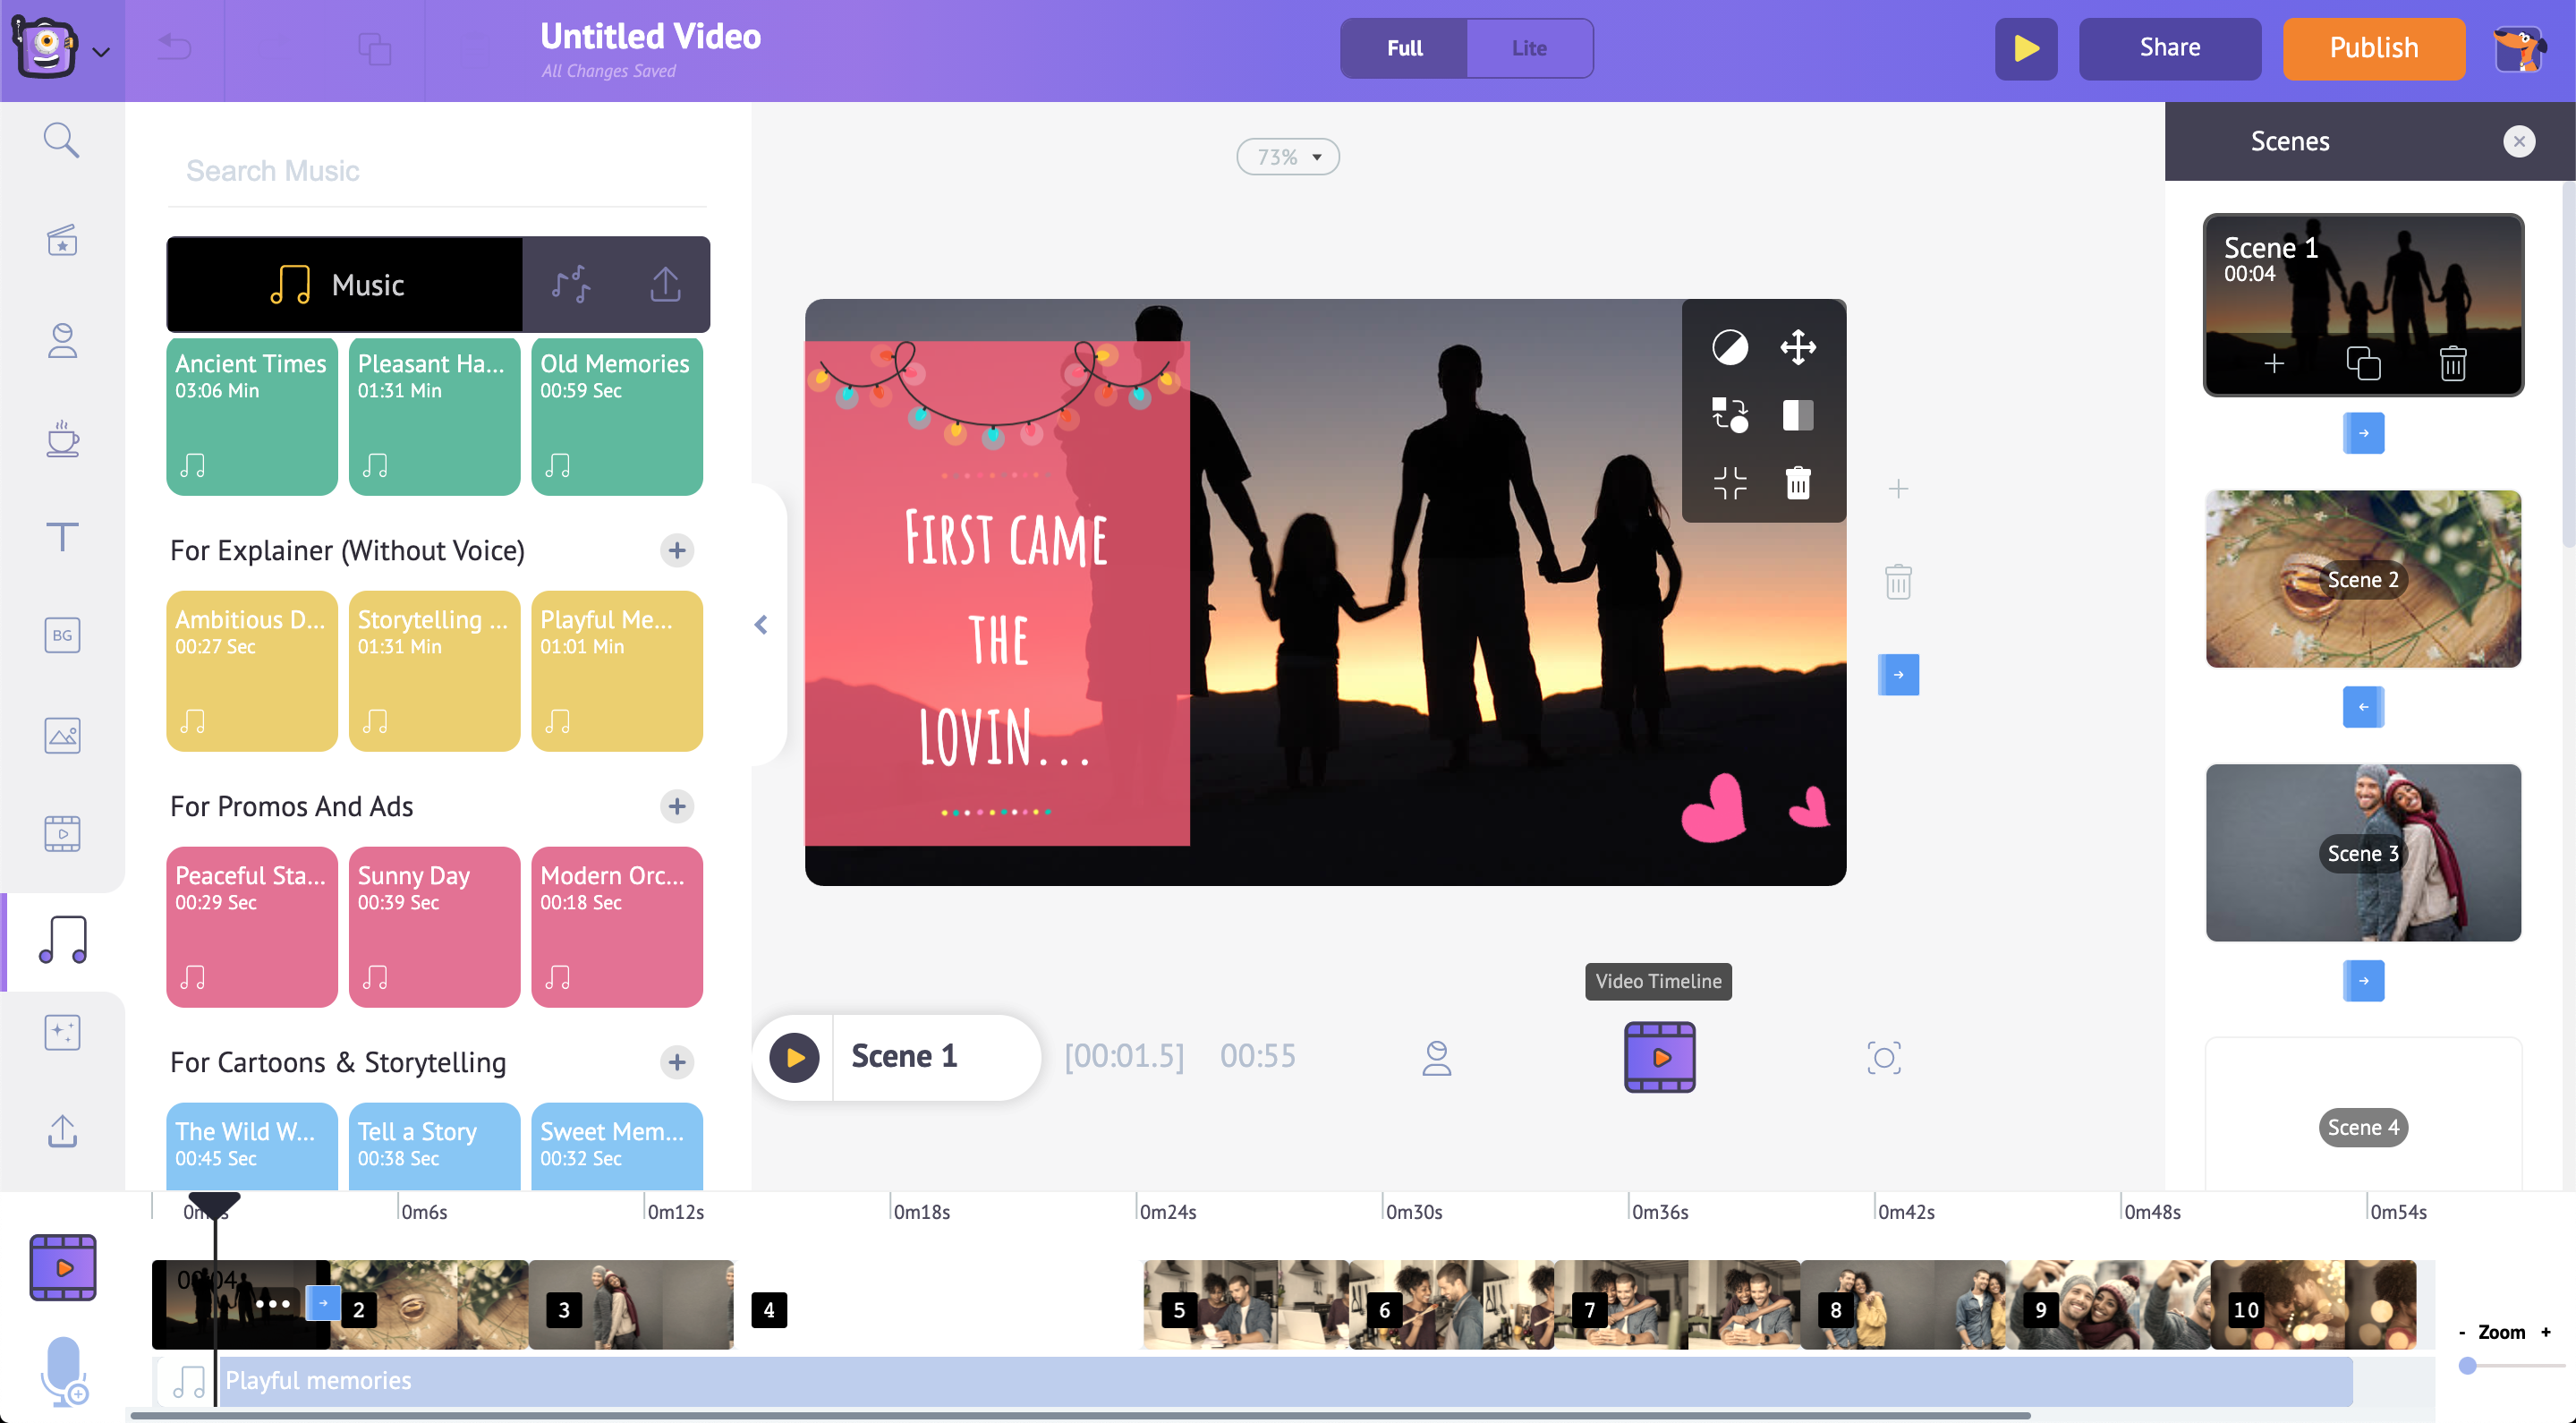
To change the existing BGM in this template, click on the music track in the timeline. You will notice a pop-up with some options appear. Remove the track by selecting the Delete option.

To choose a new music track/sound effect, select the Music option in the library. This will list several royalty-free music tracks. Similarly, to add sound effects, select the option next to Music.
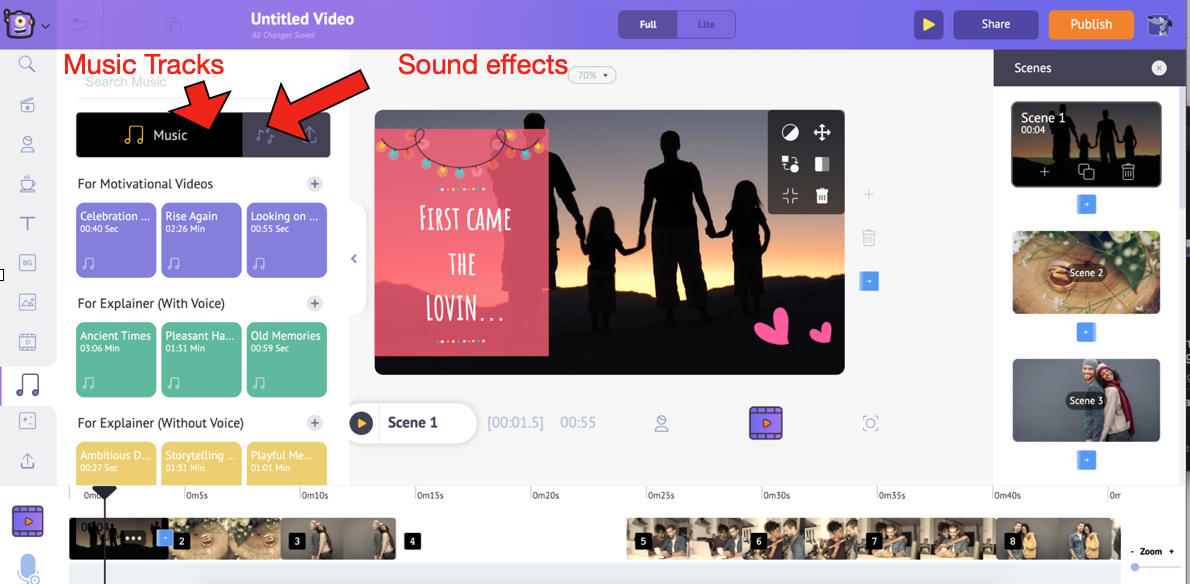
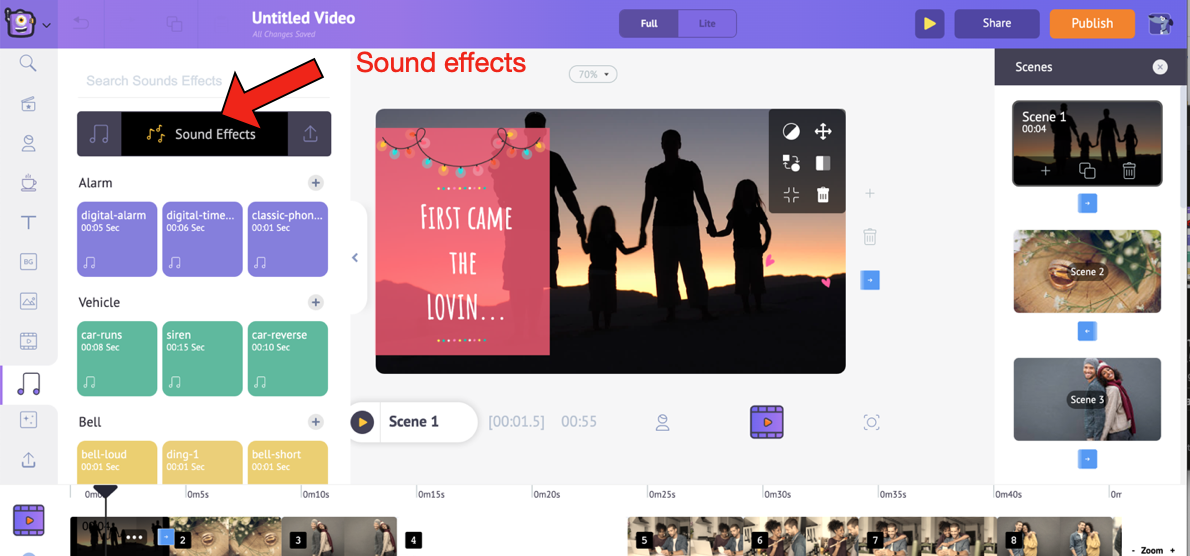
Hover over any track to preview it. Add a track to the video by simply clicking on it. From the timeline, you can preview the track, adjust its volume, duplicate it, and delete it. You can also move the black edges of the track to extend or contract it and match the track length with your video’s duration.
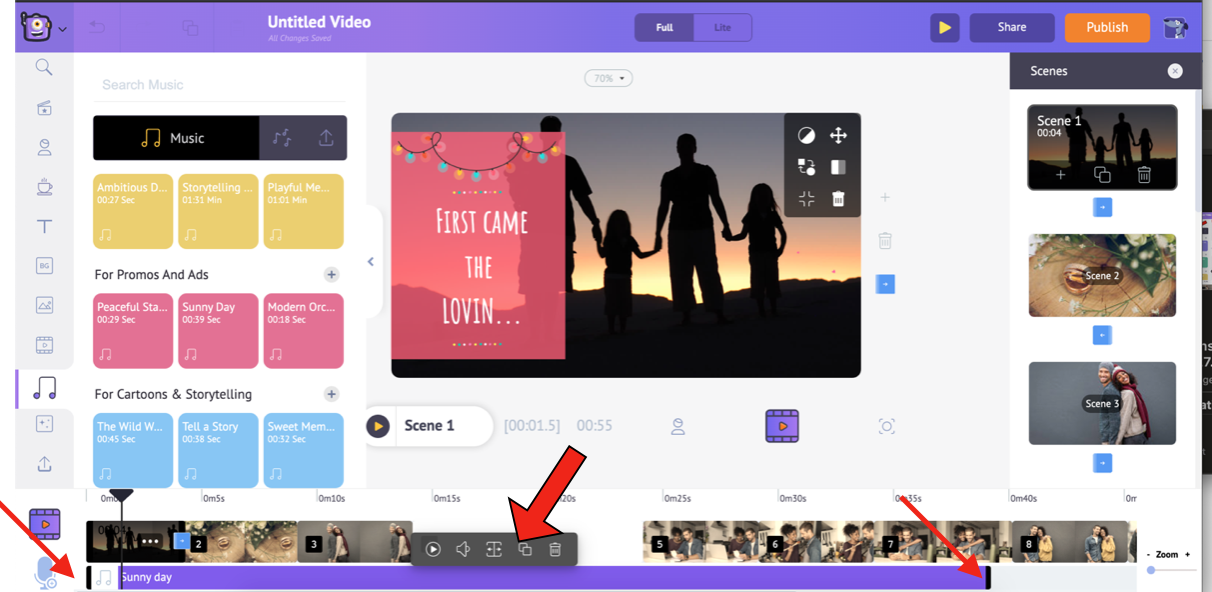
And if that’s still not enough, you can upload your own music the same way you uploaded your pictures and add it to the video.
After adding all the elements, preview the video to ensure that they have been added the way you wanted them to be. After all, you need the video to be perfect, right?
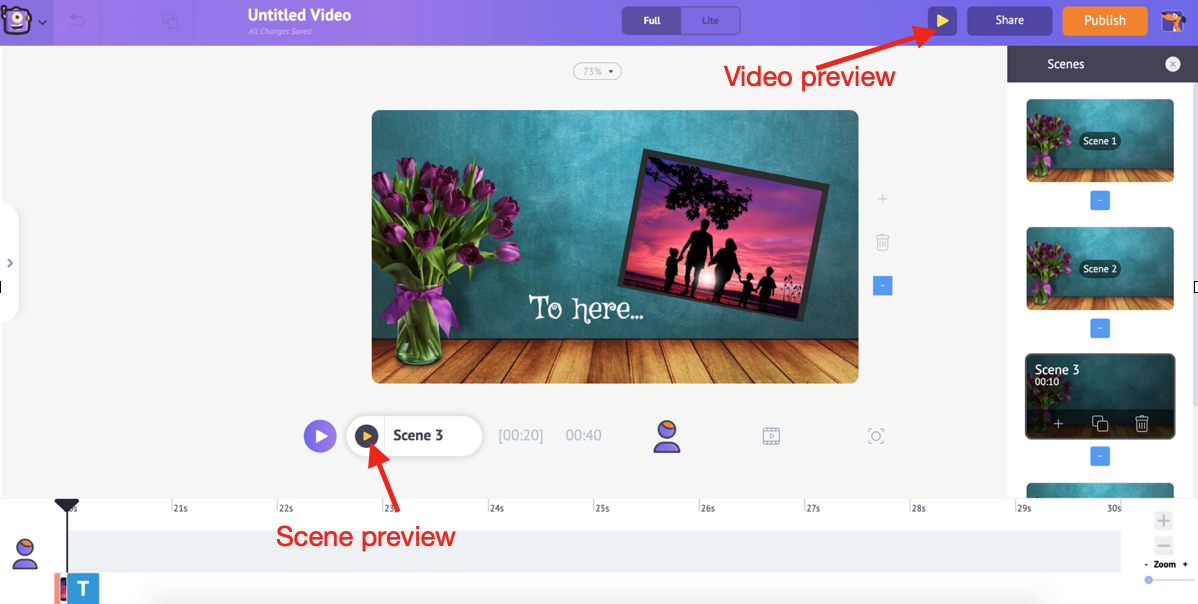
Select the Scene Preview option to preview a particular scene and use the Video Preview option to preview the entire video.
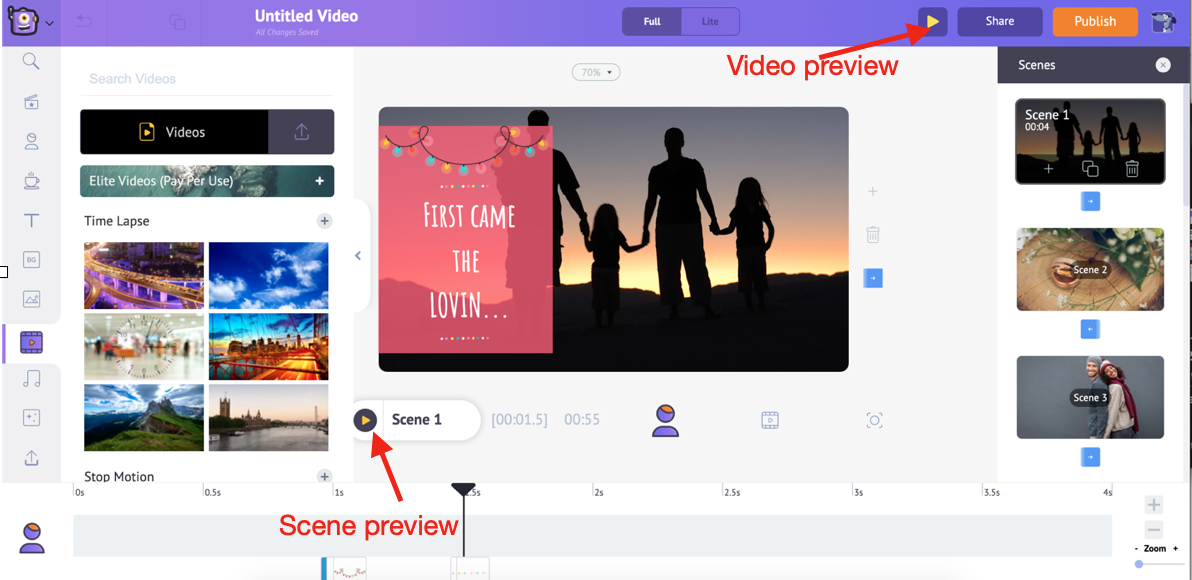
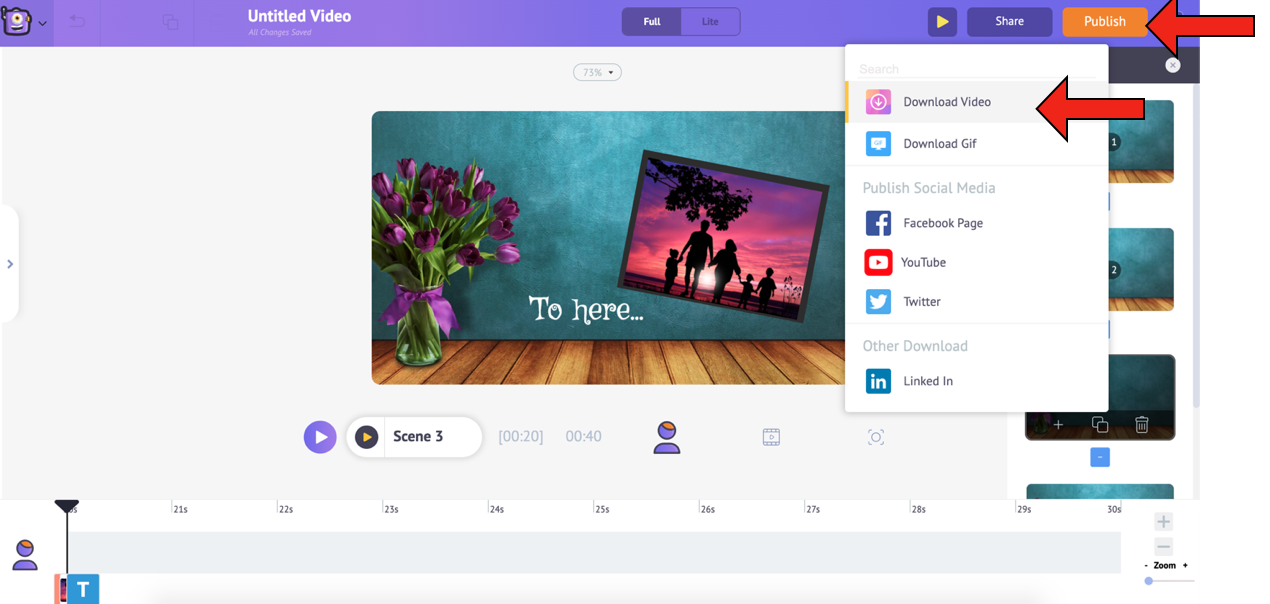
Once you are done, click on Publish -> Download video. You can rename it, select the preferred video quality, and then click on Download.
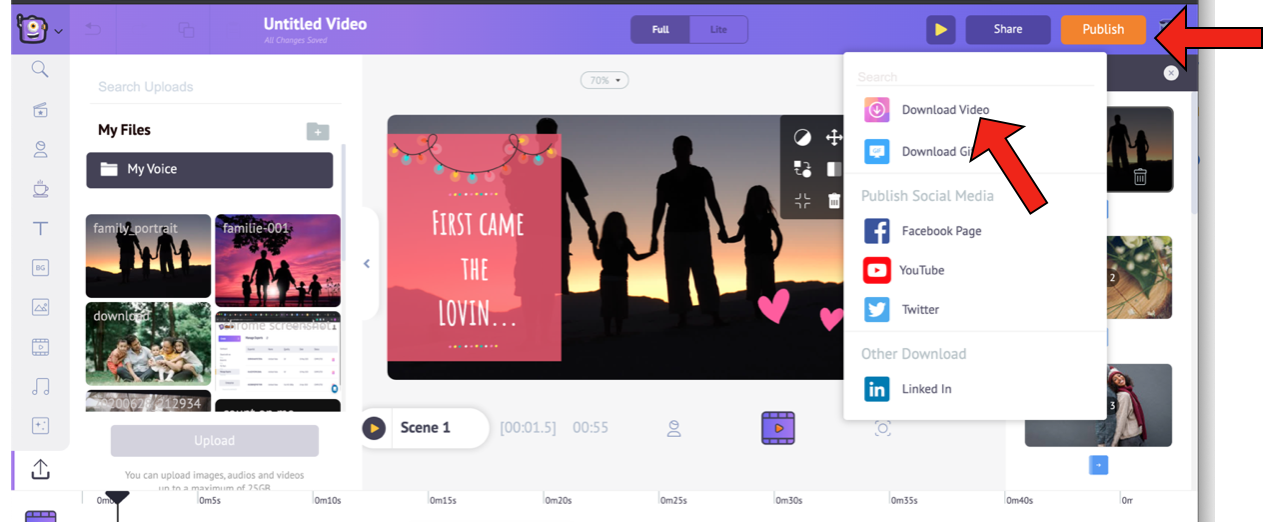
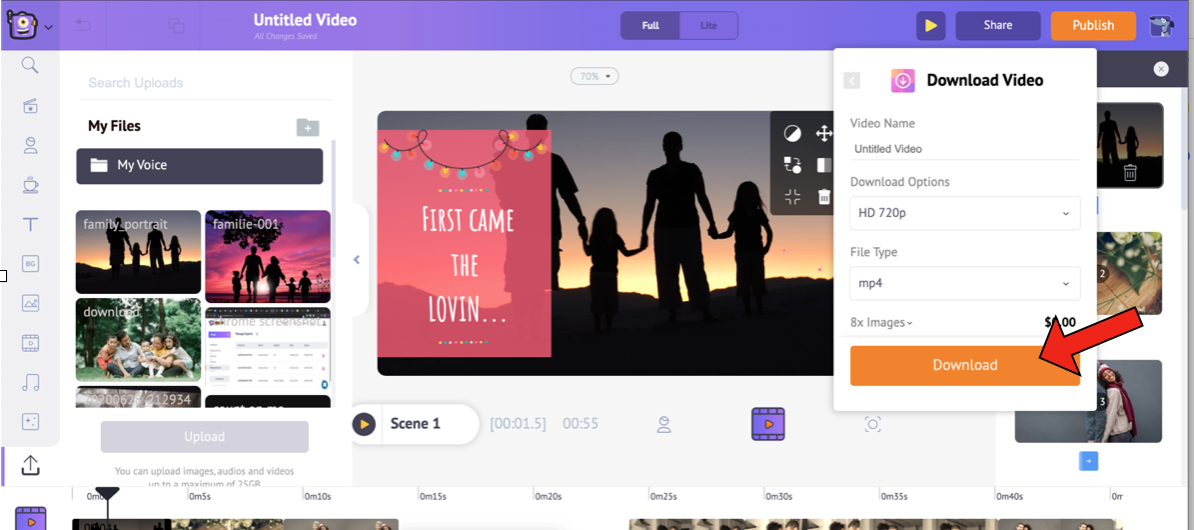
Your video is ready! Once the rendering is done, you can download it. Additionally, you will also receive the video link via mail. Brace yourselves, cuz it’s...
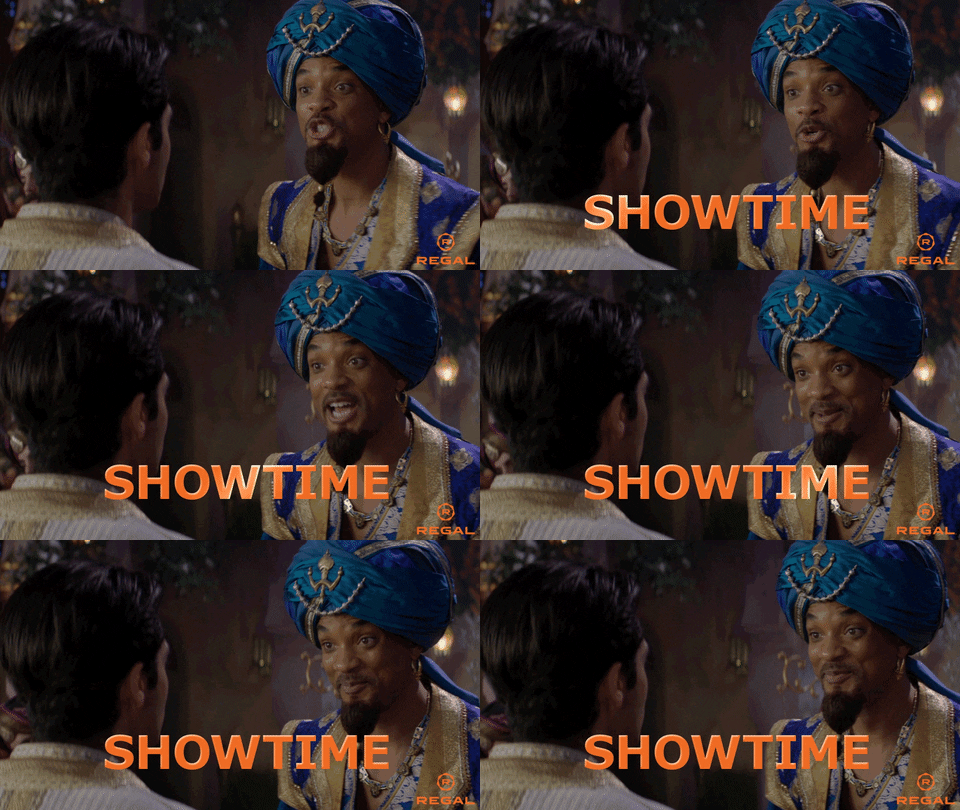
Show your loved ones the awesome video that you’d created and see them go…
2. Create an Anniversary Video from scratch:
If you do not want to make use of a template and start from scratch, well, we have options for that too! Here are the steps:
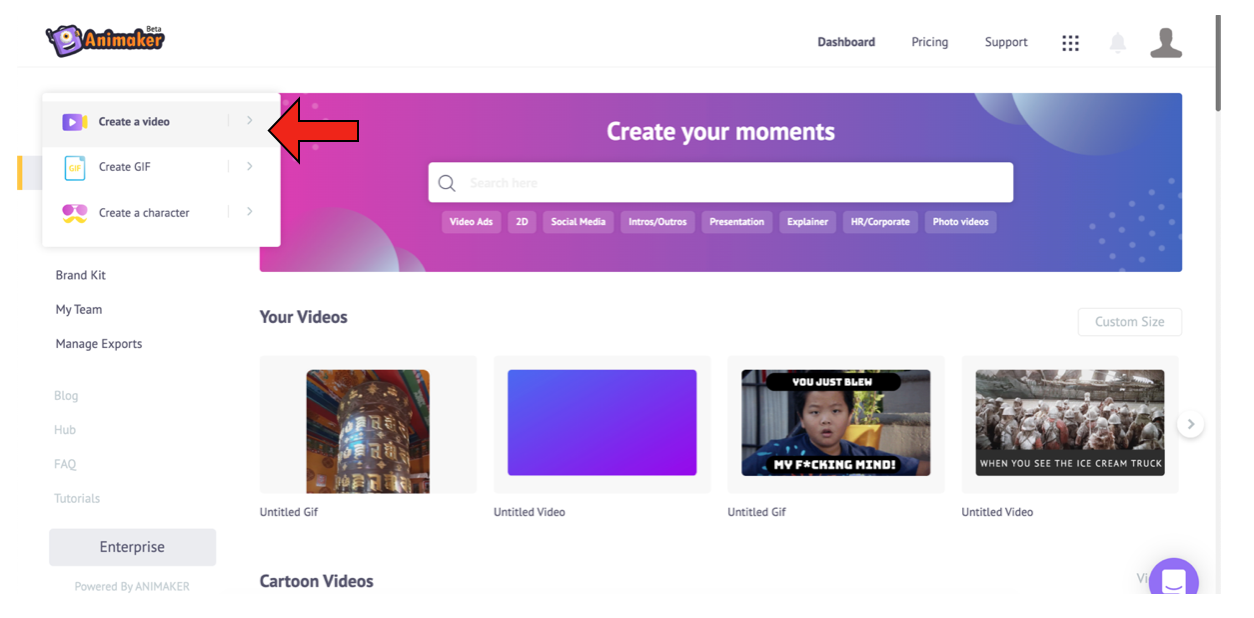
1. After logging into your account, Click on Create -> Create a video on the dashboard.
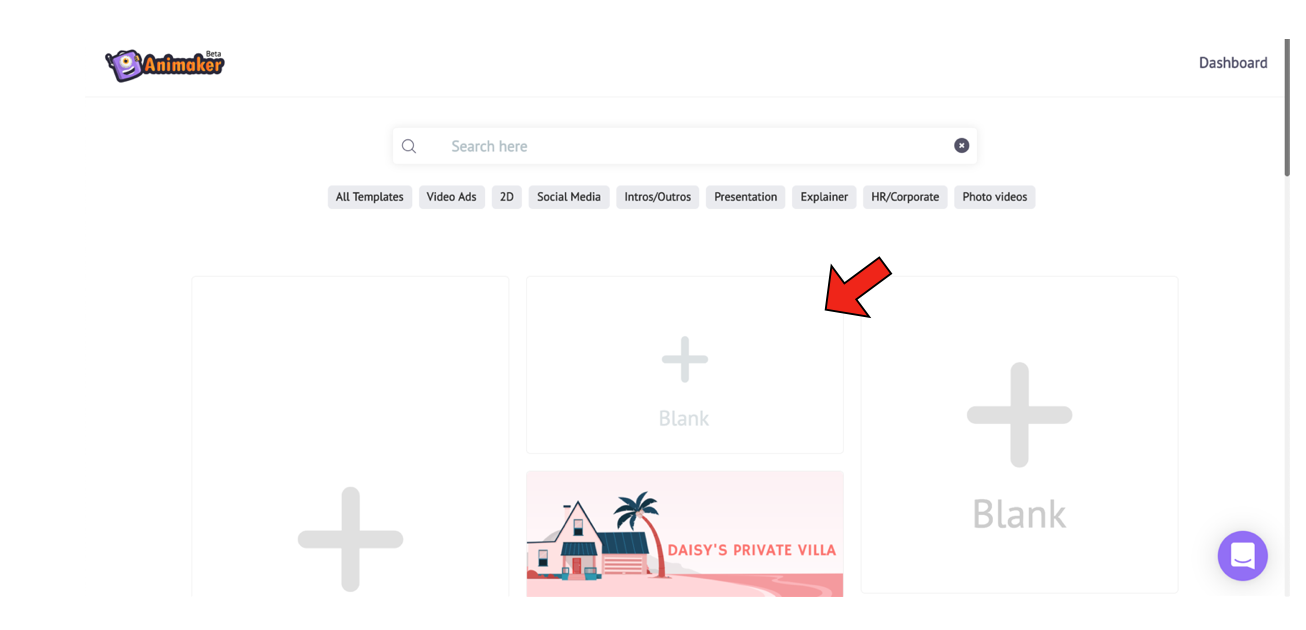
2. This will take you to the Moments page. This page lists three blank options at the top along with the other predefined templates. Select one among the three blank templates (vertical, square, and horizontal), depending on the dimension you want.
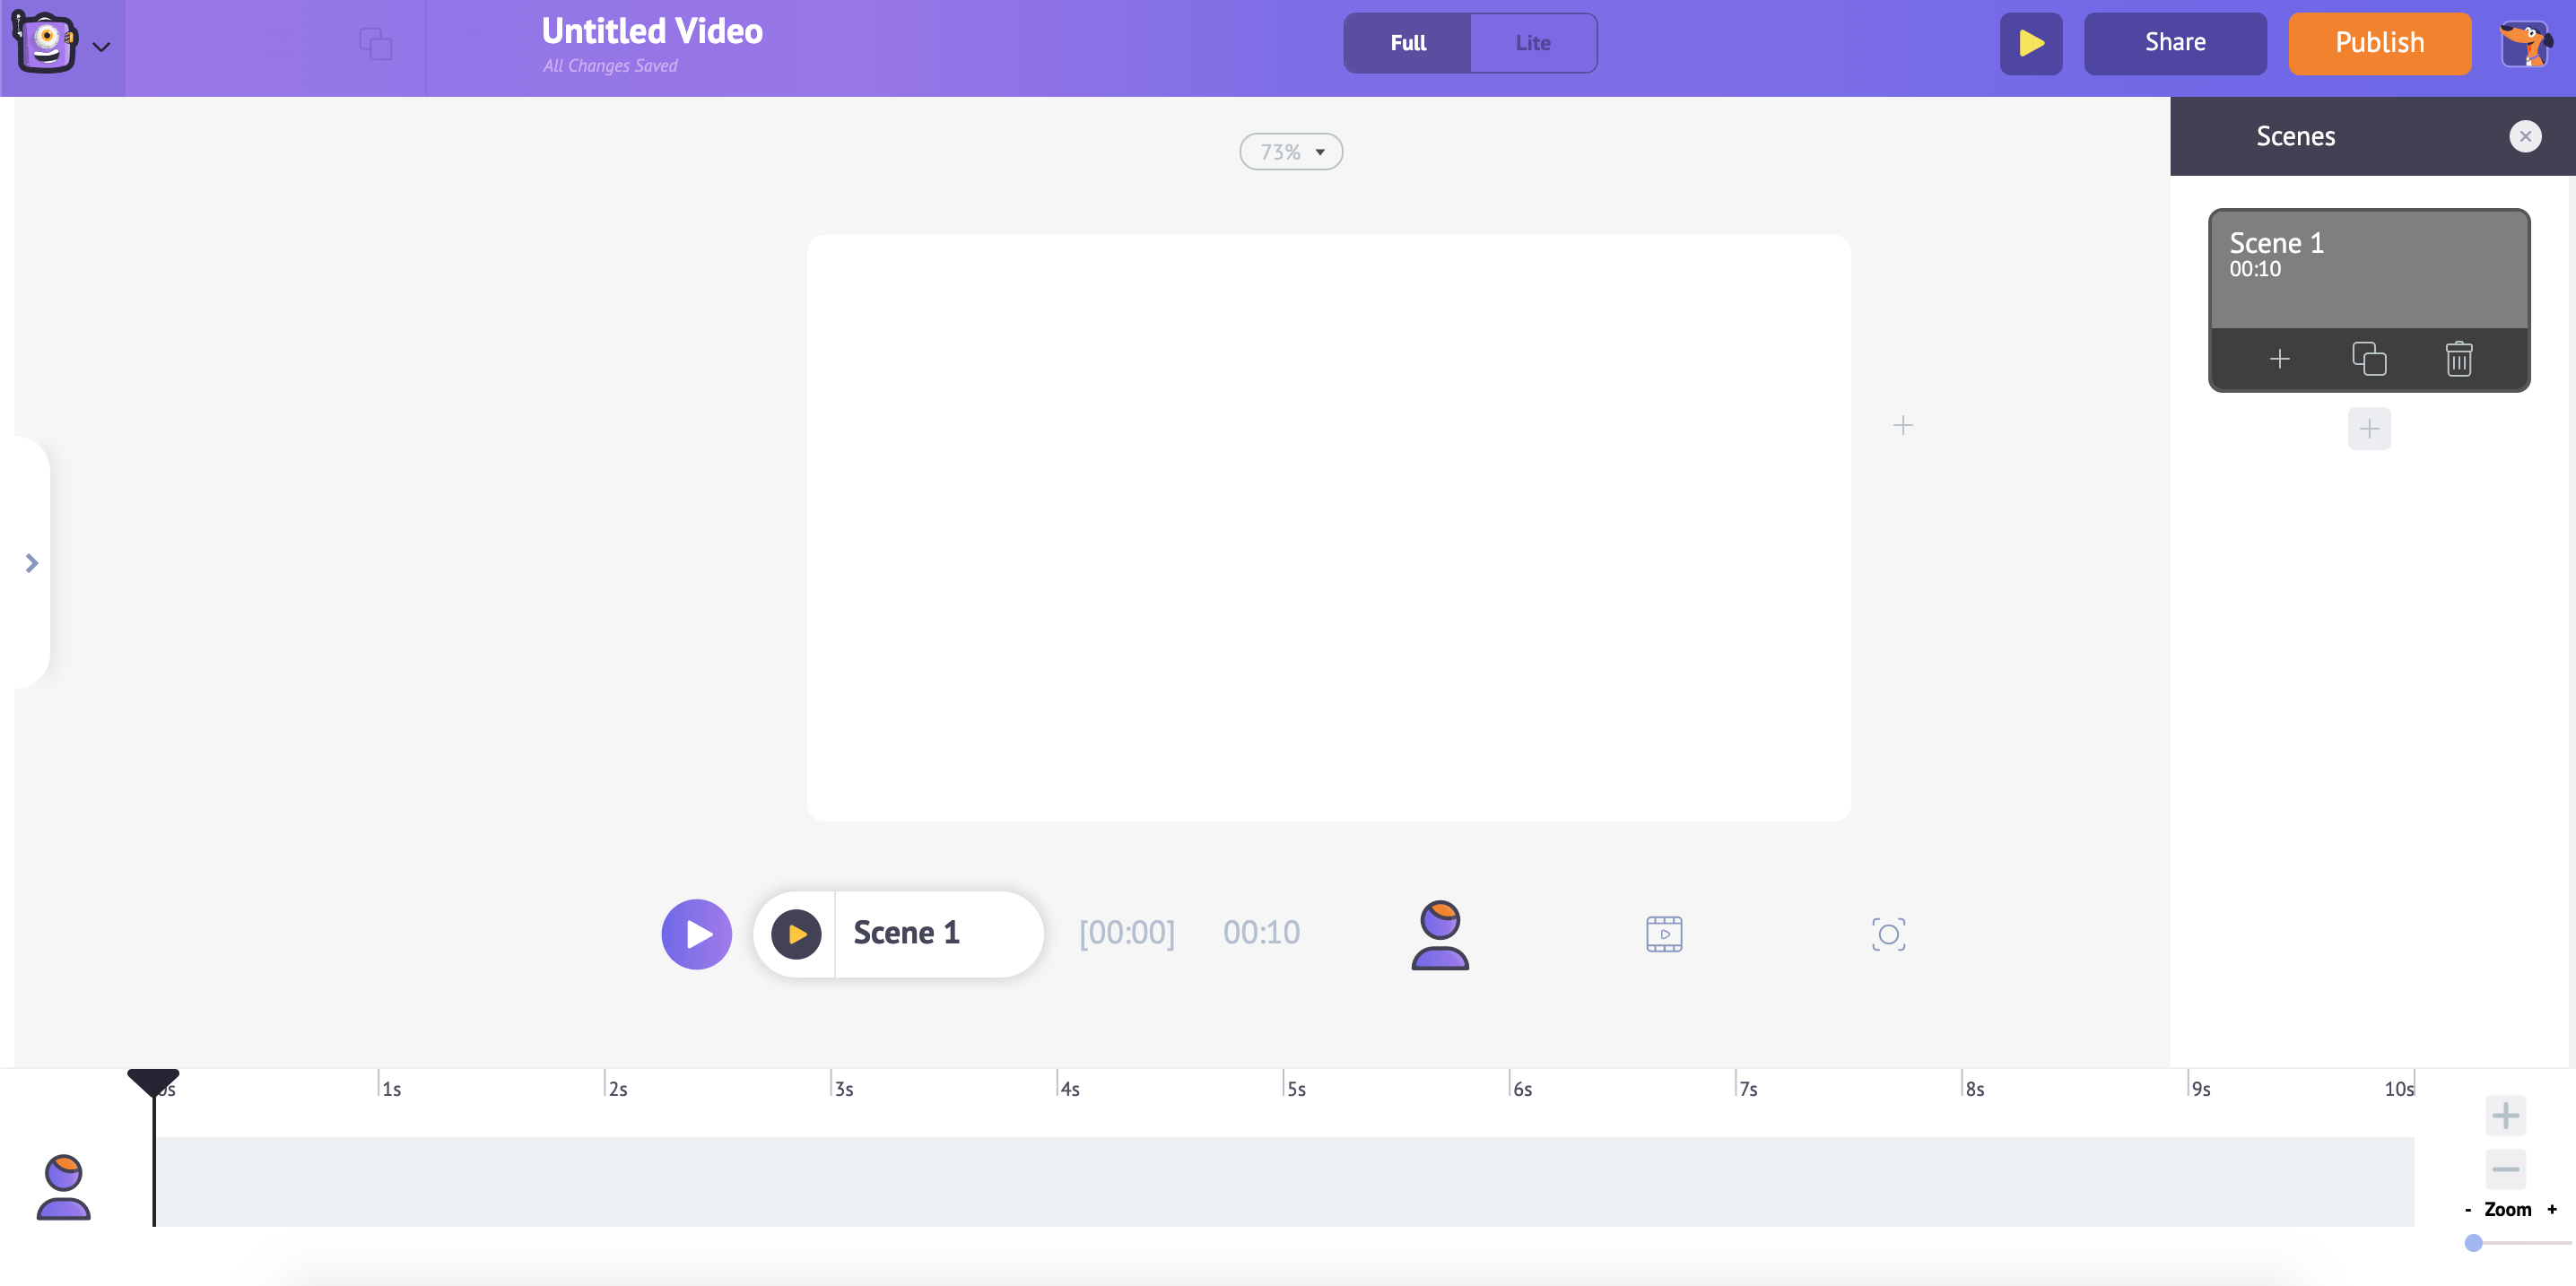
3. Selecting a blank template will start a new project as shown below.
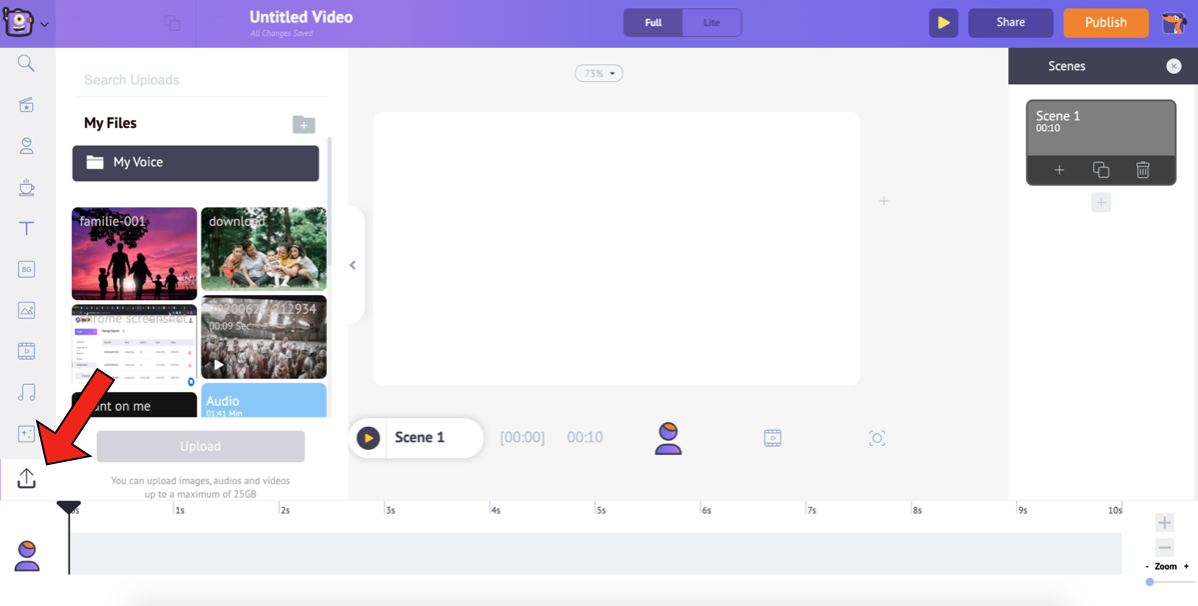
4. After the project is launched, start by uploading the pictures following the steps mentioned earlier.
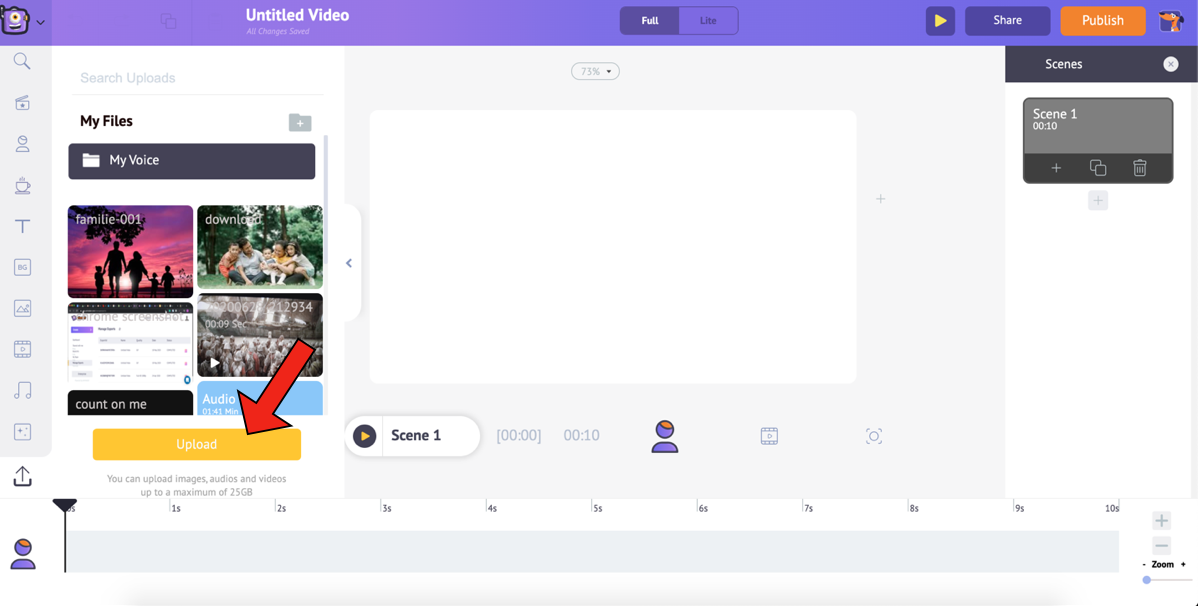
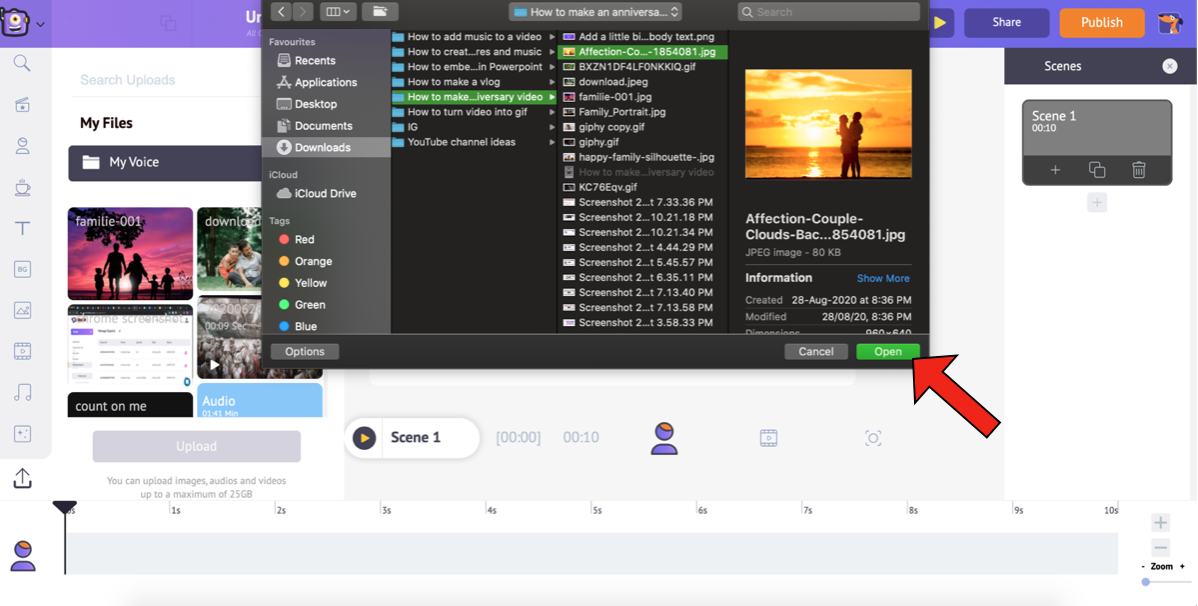
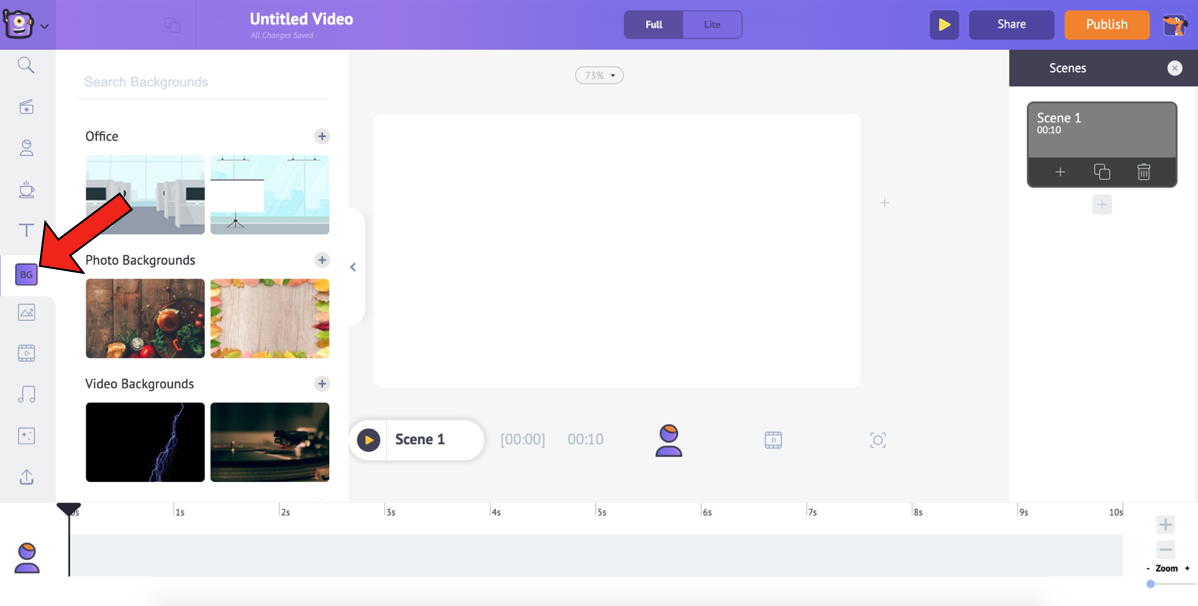
5. Once the pictures are uploaded, our next step will be to add a good background to the video. Using Animaker, you can add four different types of backgrounds to your video. Check out this video to know more.
6. For this video, I would prefer to go with an image background. As it is an anniversary video, I will search for the keyword “love” in the search bar and choose one from the filtered list. To add a background you like to the workspace, simply click on it.
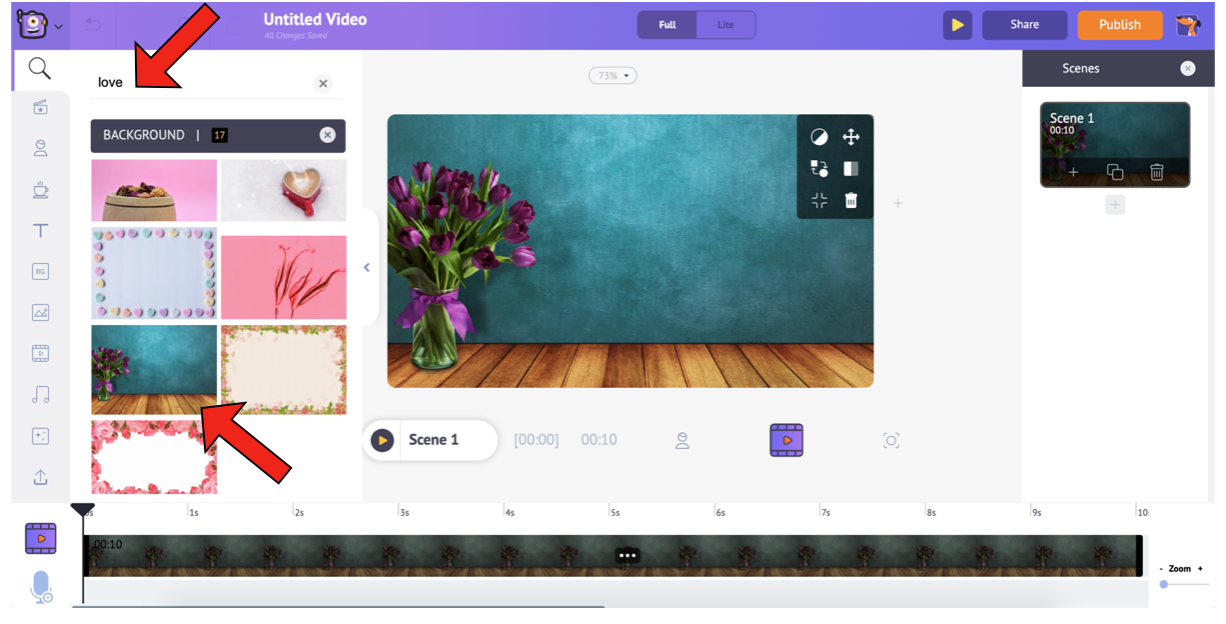
7. Now that our background is selected, the next step will be to add the uploaded photos to the workspace. Go to the Uploads section in the library and select the photo that you want to add to the workspace.
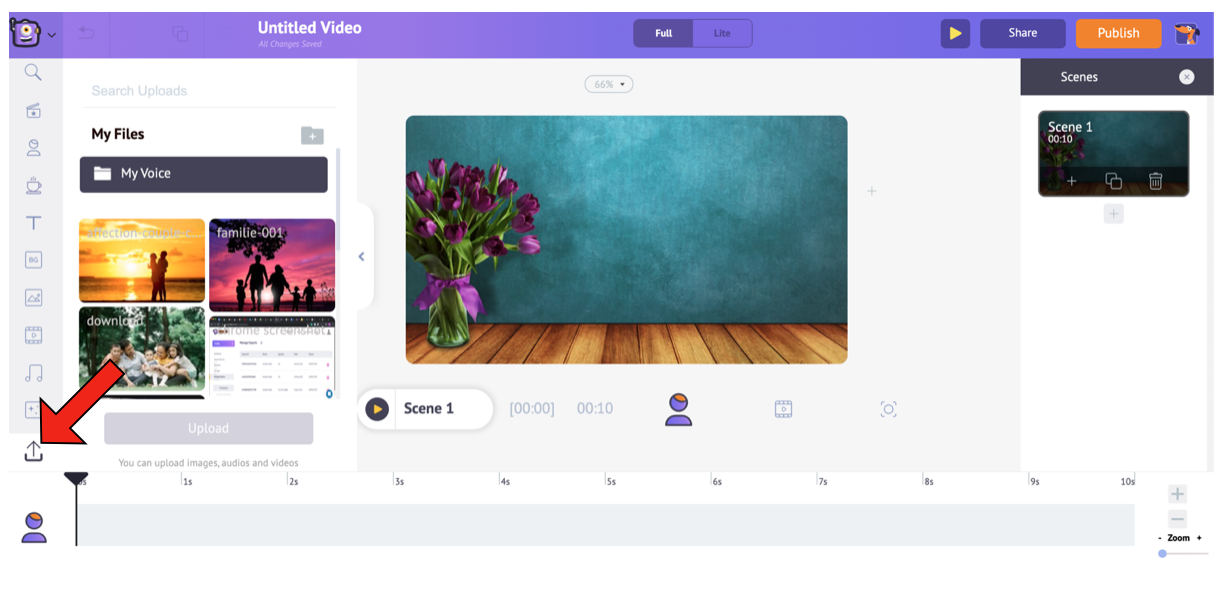
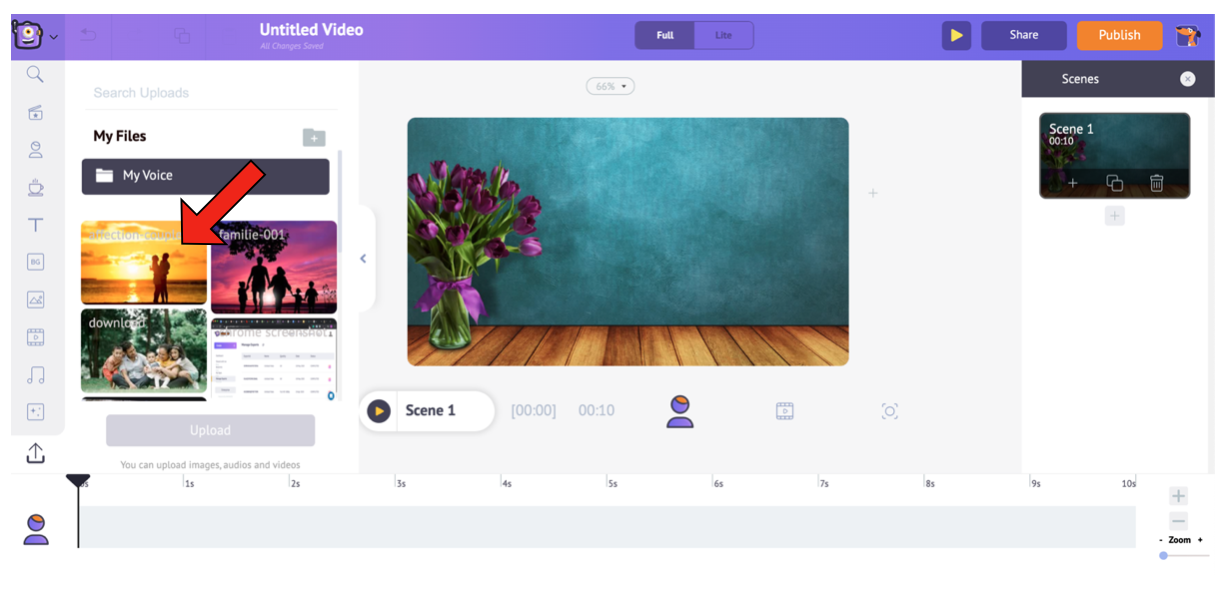
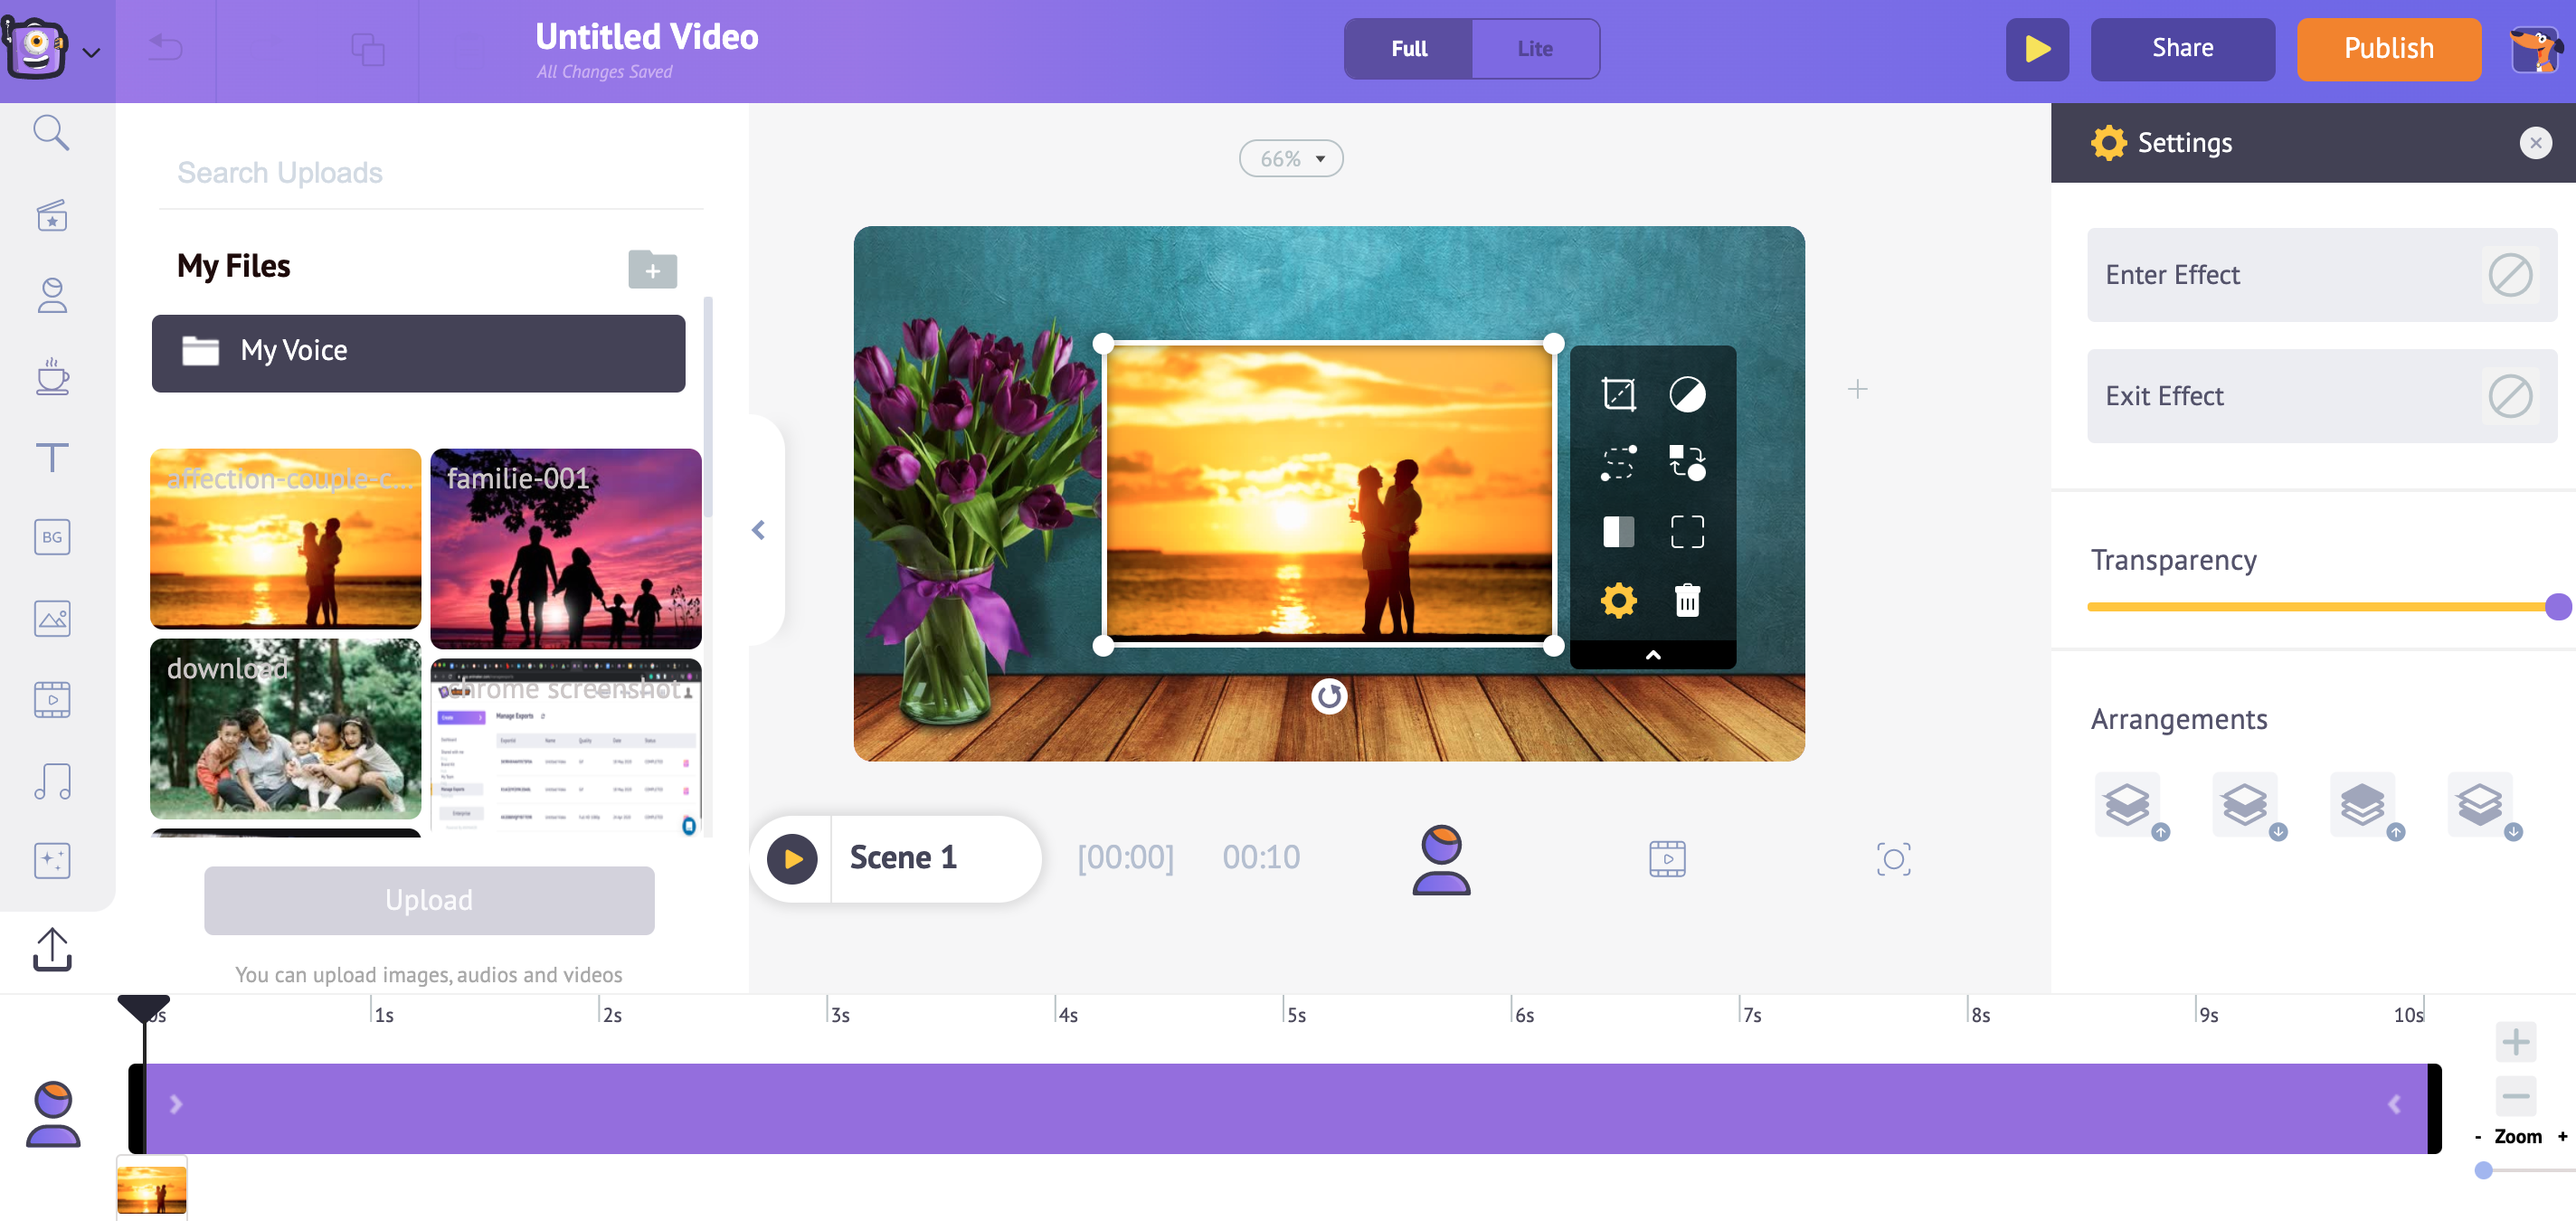
Resize the image by dragging its corners and place it properly.
8. Here’s a subtle trick for you. Though adding the image would do, adding a frame to the picture can emphasize it. Wondering how? Look down.
- Click on Properties in the Library.
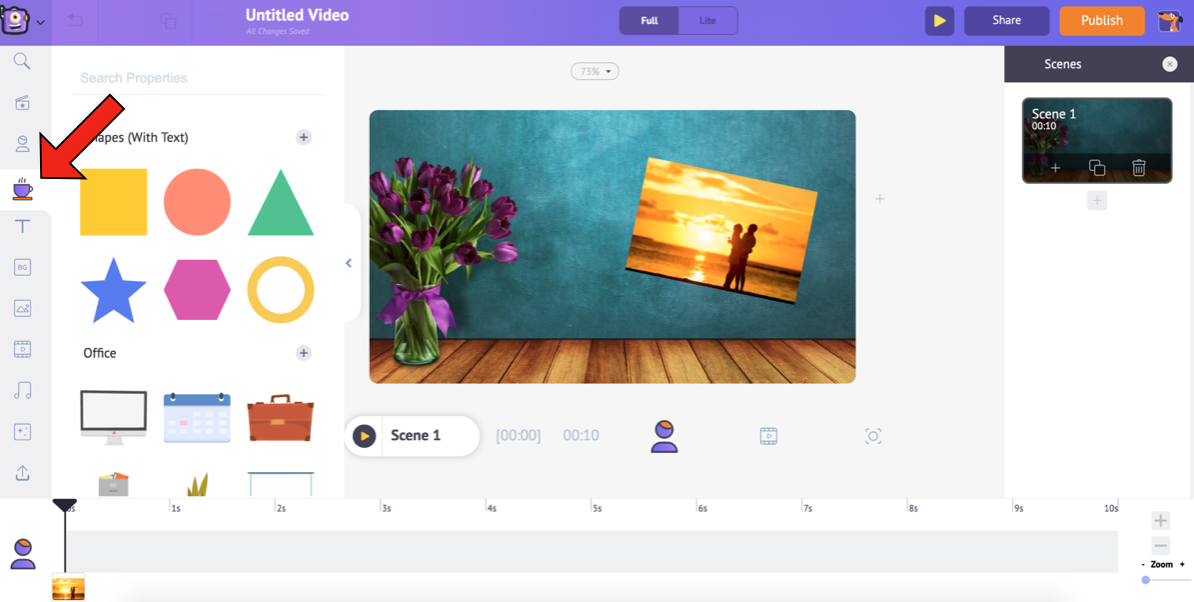
- Since the image is in landscape format, we can choose the rectangle shape. To choose the rectangle shape, click on the plus symbol next to Shapes (With Text) under Properties.
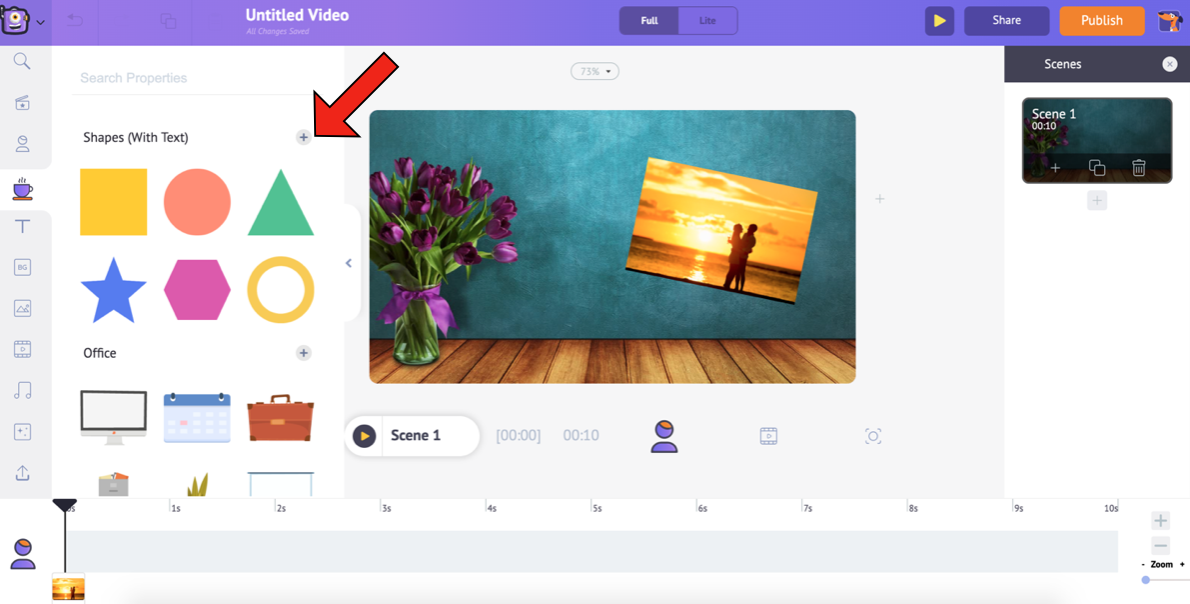
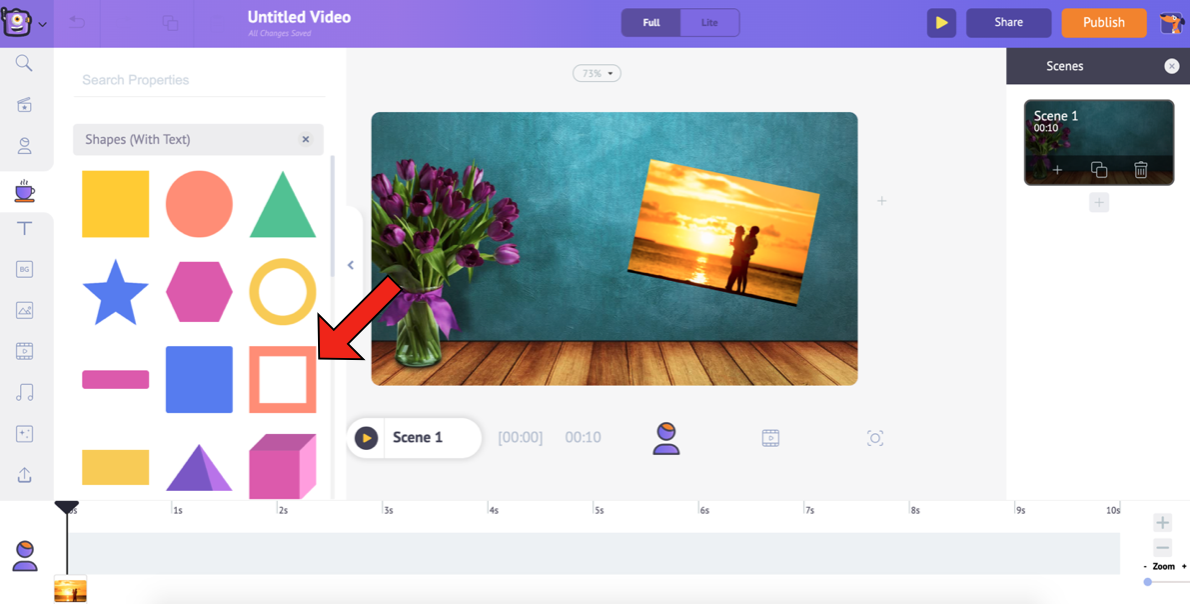
- This will expand the Shapes section. Select the rectangle to add it to the workspace.
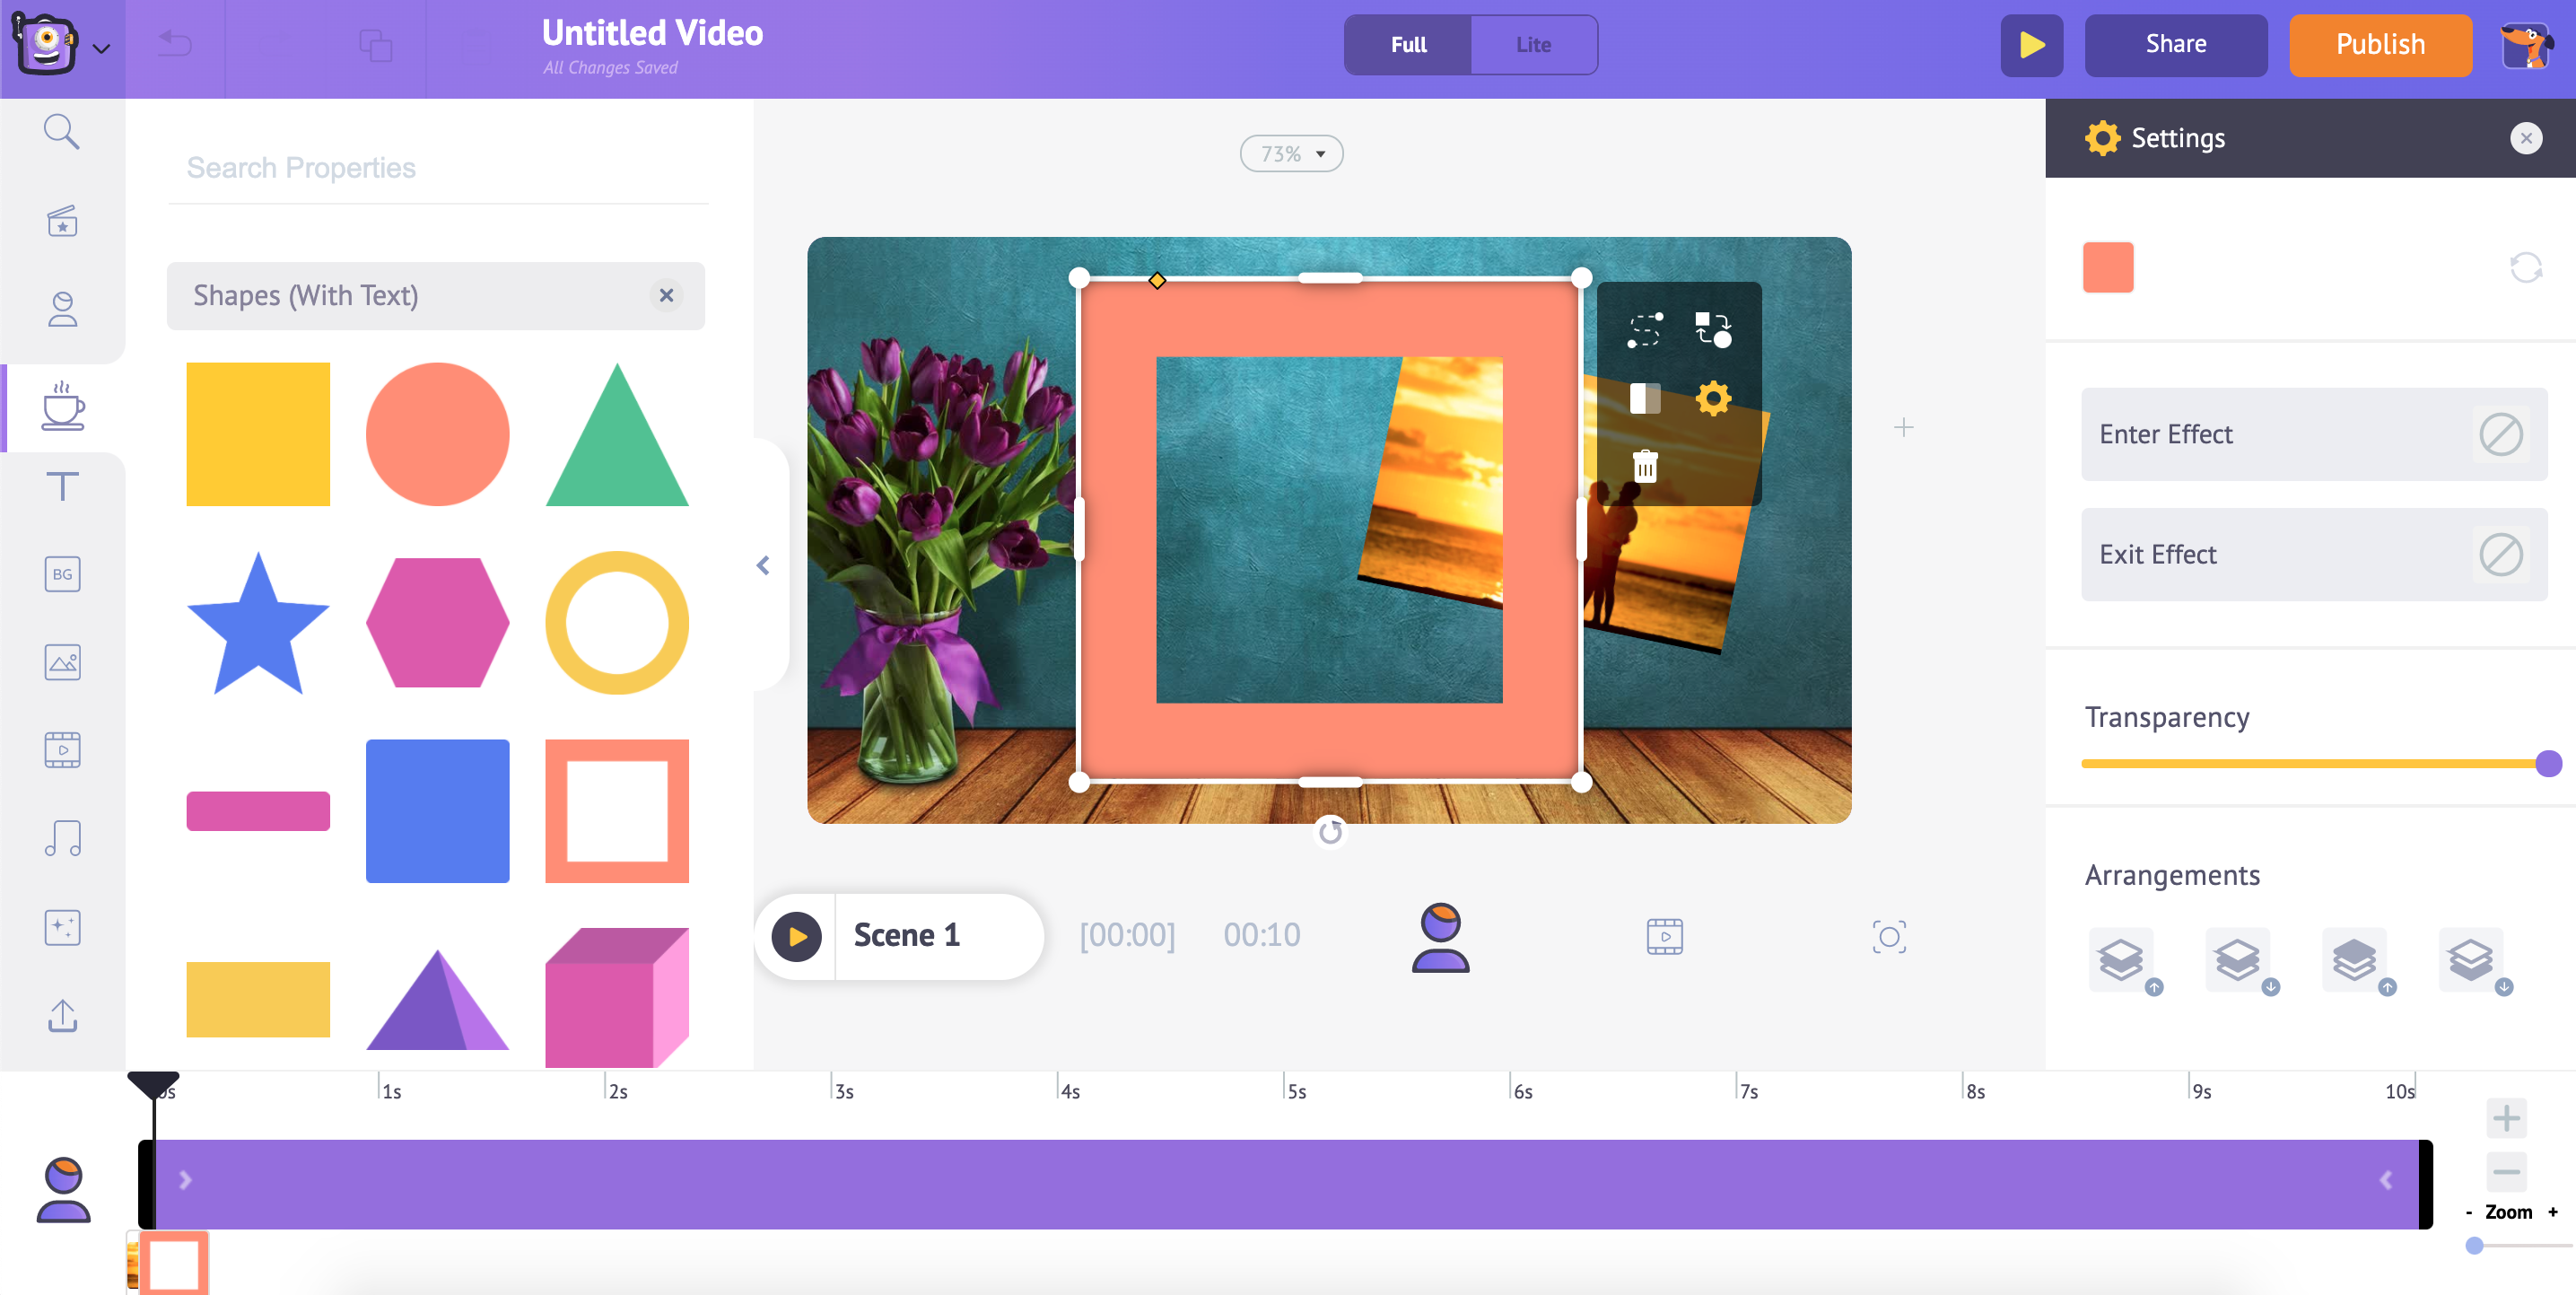
- Besides using the corners of the shape to resize it, you can also change its width by using the rhombus icon in the shape. This will help you to scale the frame like this…
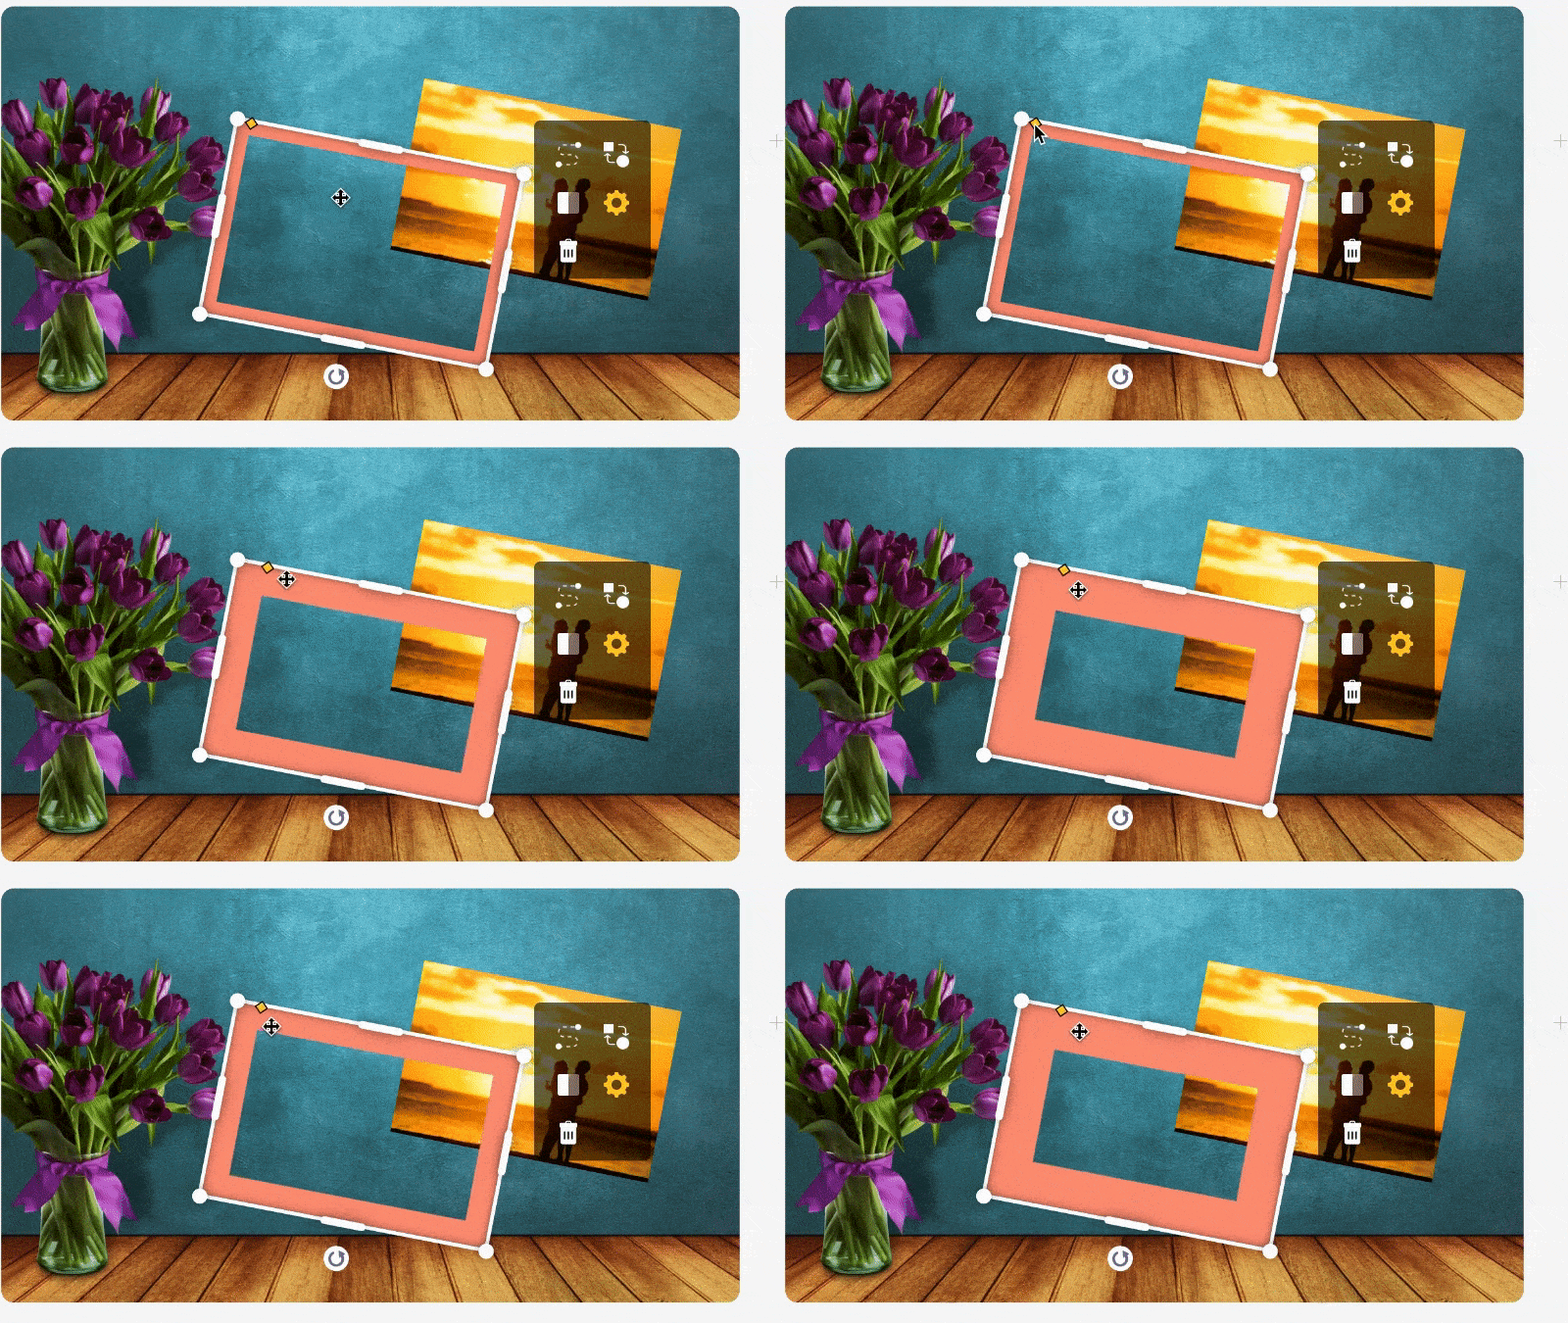
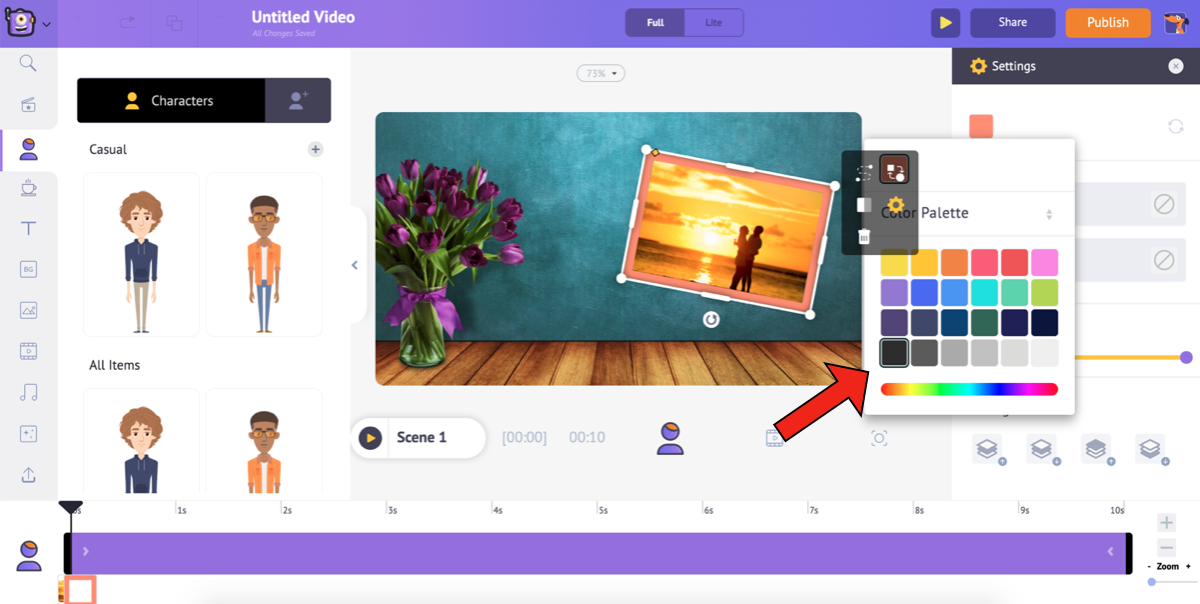
- Once you have made the frame fit the picture perfectly, you can change the color of the shape and give it entry/exit effects from the settings.
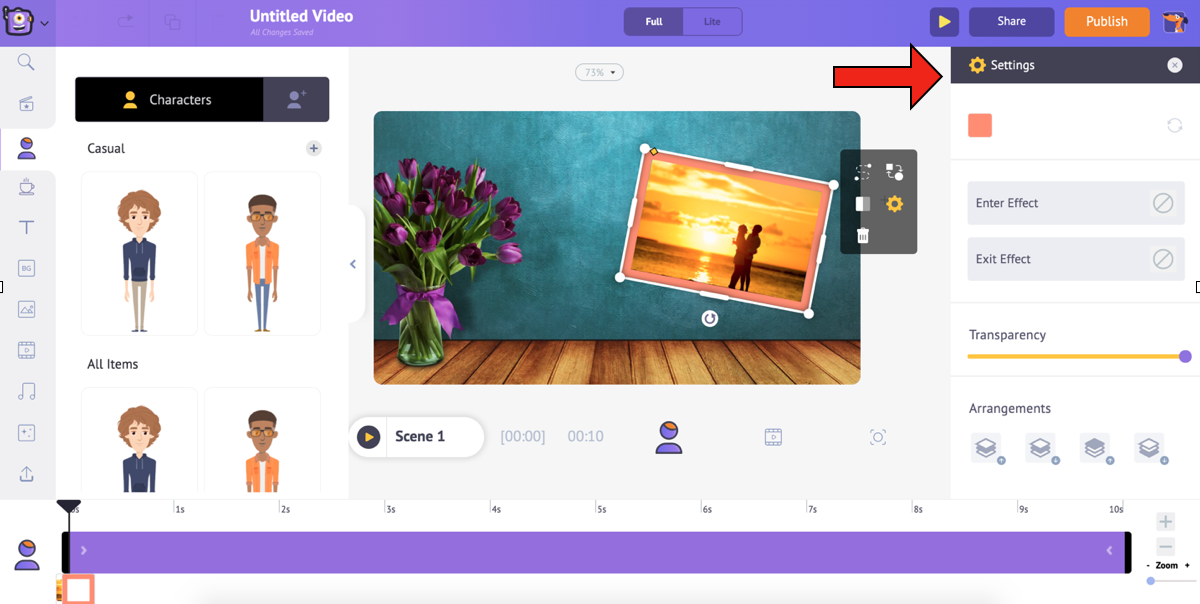
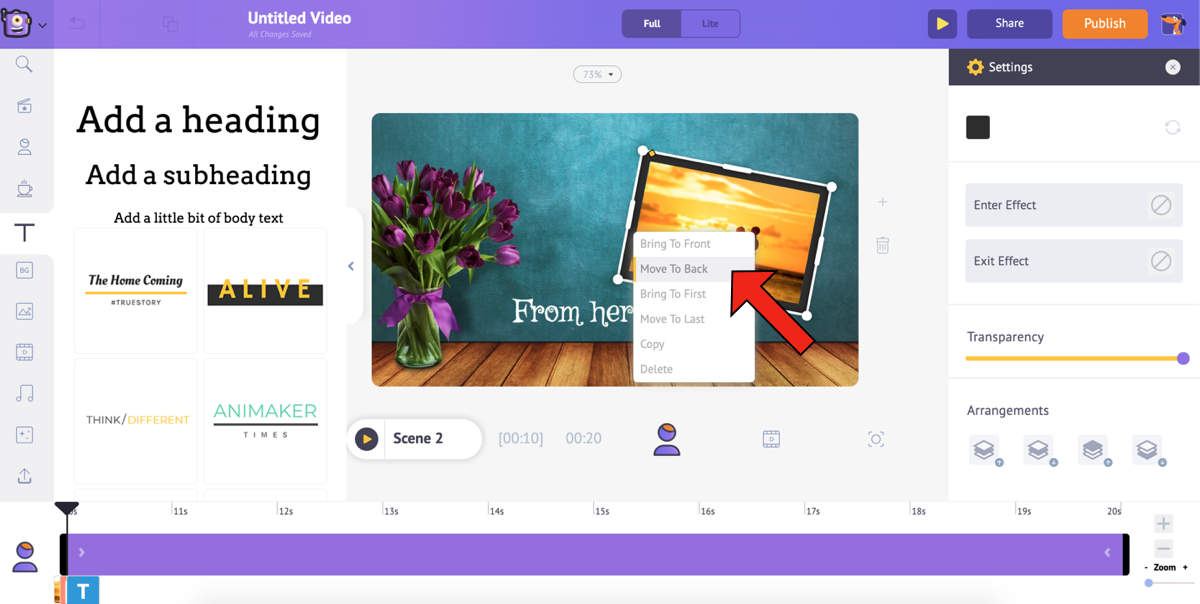
- Now that your frame is set, right-click on it and select Move to Back. This will help you in performing the next step without any hassles.
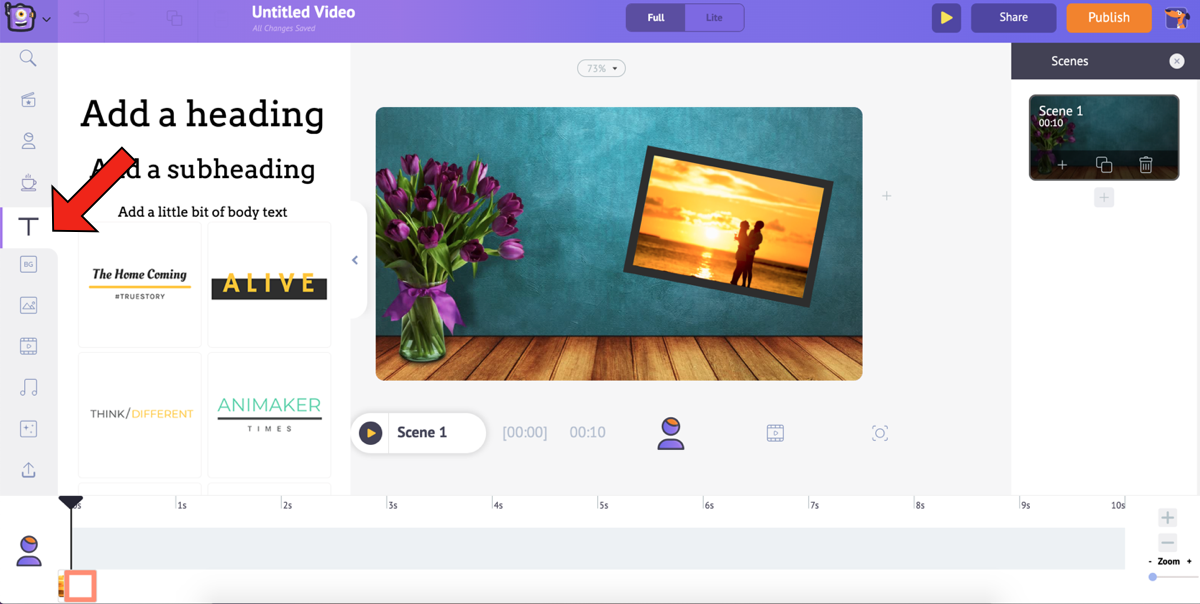
9. You can now add text to the video canvas by selecting the Text option from the library. Select a heading/subheading/body text or choose a style from the vast list of Text-Prebuilts.
For this video, I select the body text and enter the text to add to the video.
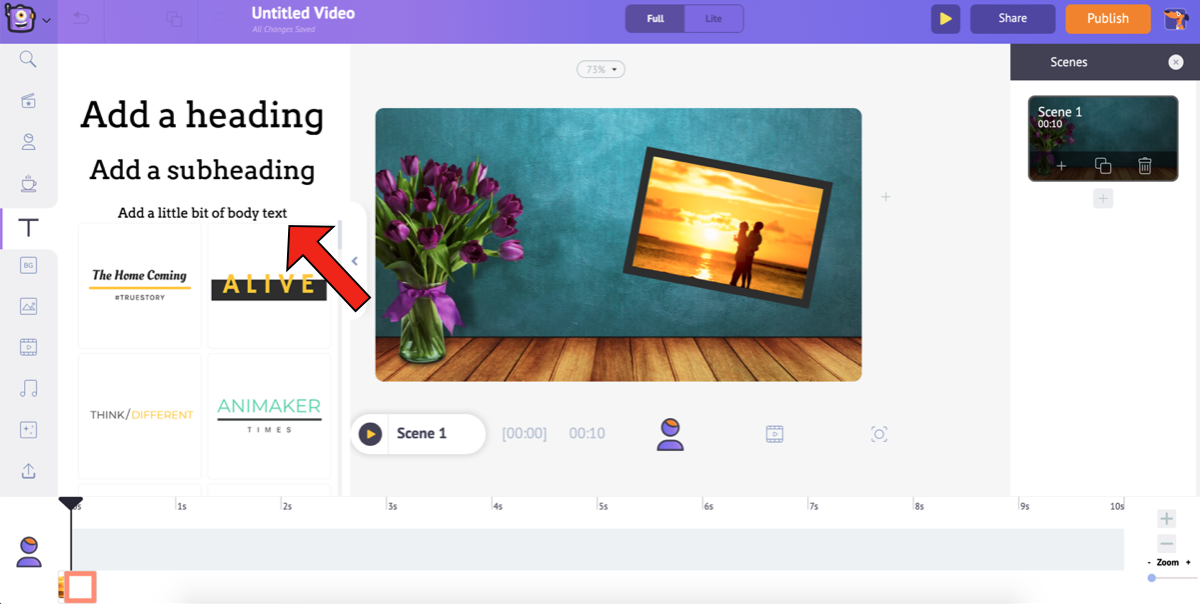
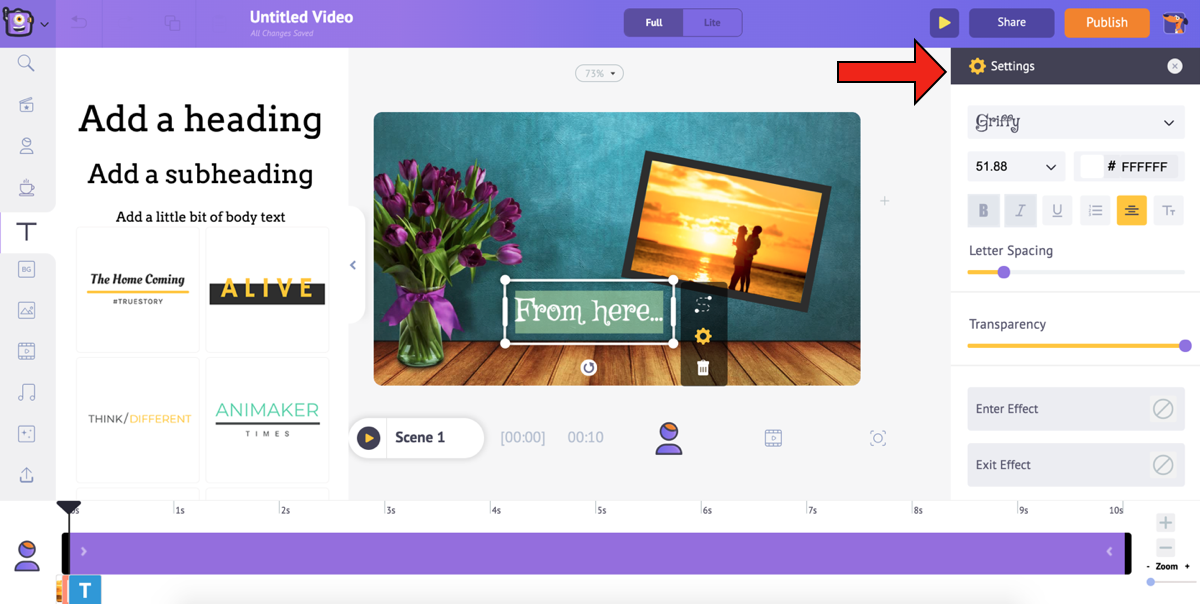
Similar to the other assets, you can format the text the way you want it to be and also give it entry/exit effects from the Text Settings window.
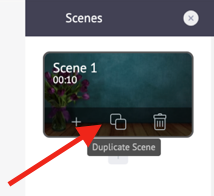
10. Let’s move on to the next scene. Now that our first scene is perfectly set, the easiest and smartest thing to do would be duplicating it and simply changing the picture and text for the other scenes. This would help you complete your video faster. To duplicate the scene, click on the Duplicate Scene option on the first scene under the Scenes tab.
11. Now, our task is to replace the image and the text, and we are done with the second scene. To replace the image, select it, and choose the Swap option from the Item Menu.
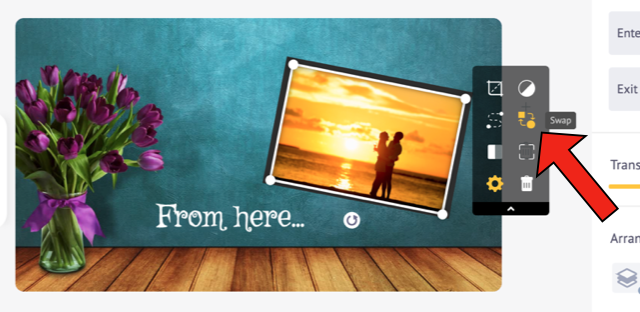
This will open the Images section from the library. Using the Swap option allows you to swap the existing image with an image or video, either from the Library or from the My Uploads section. Since will use the photo that was uploaded, choose the My Uploads icon in the images section.
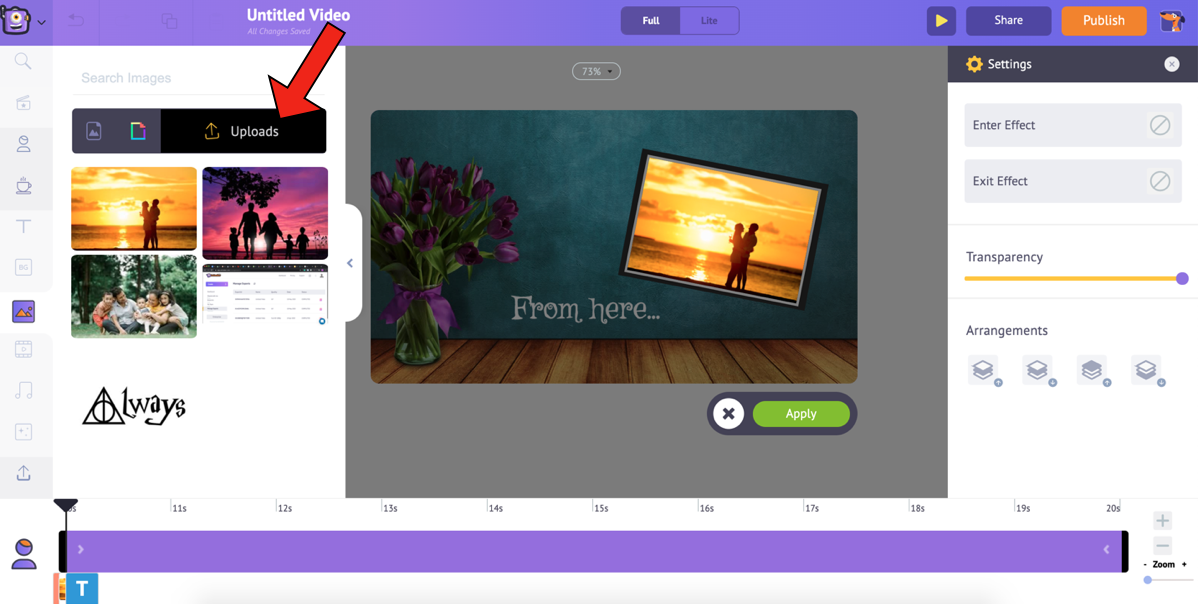
Select the image you want to replace the current image with and click on Apply.
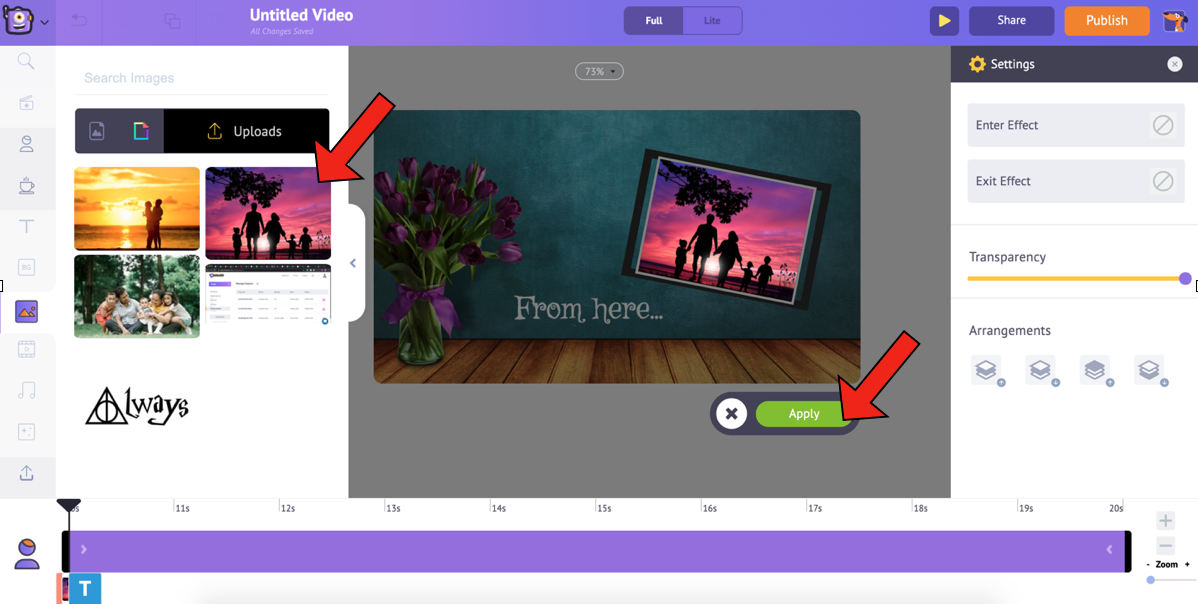
You can resize the image by dragging its corners and fitting it into the frame.
12. Next, change the text accordingly.
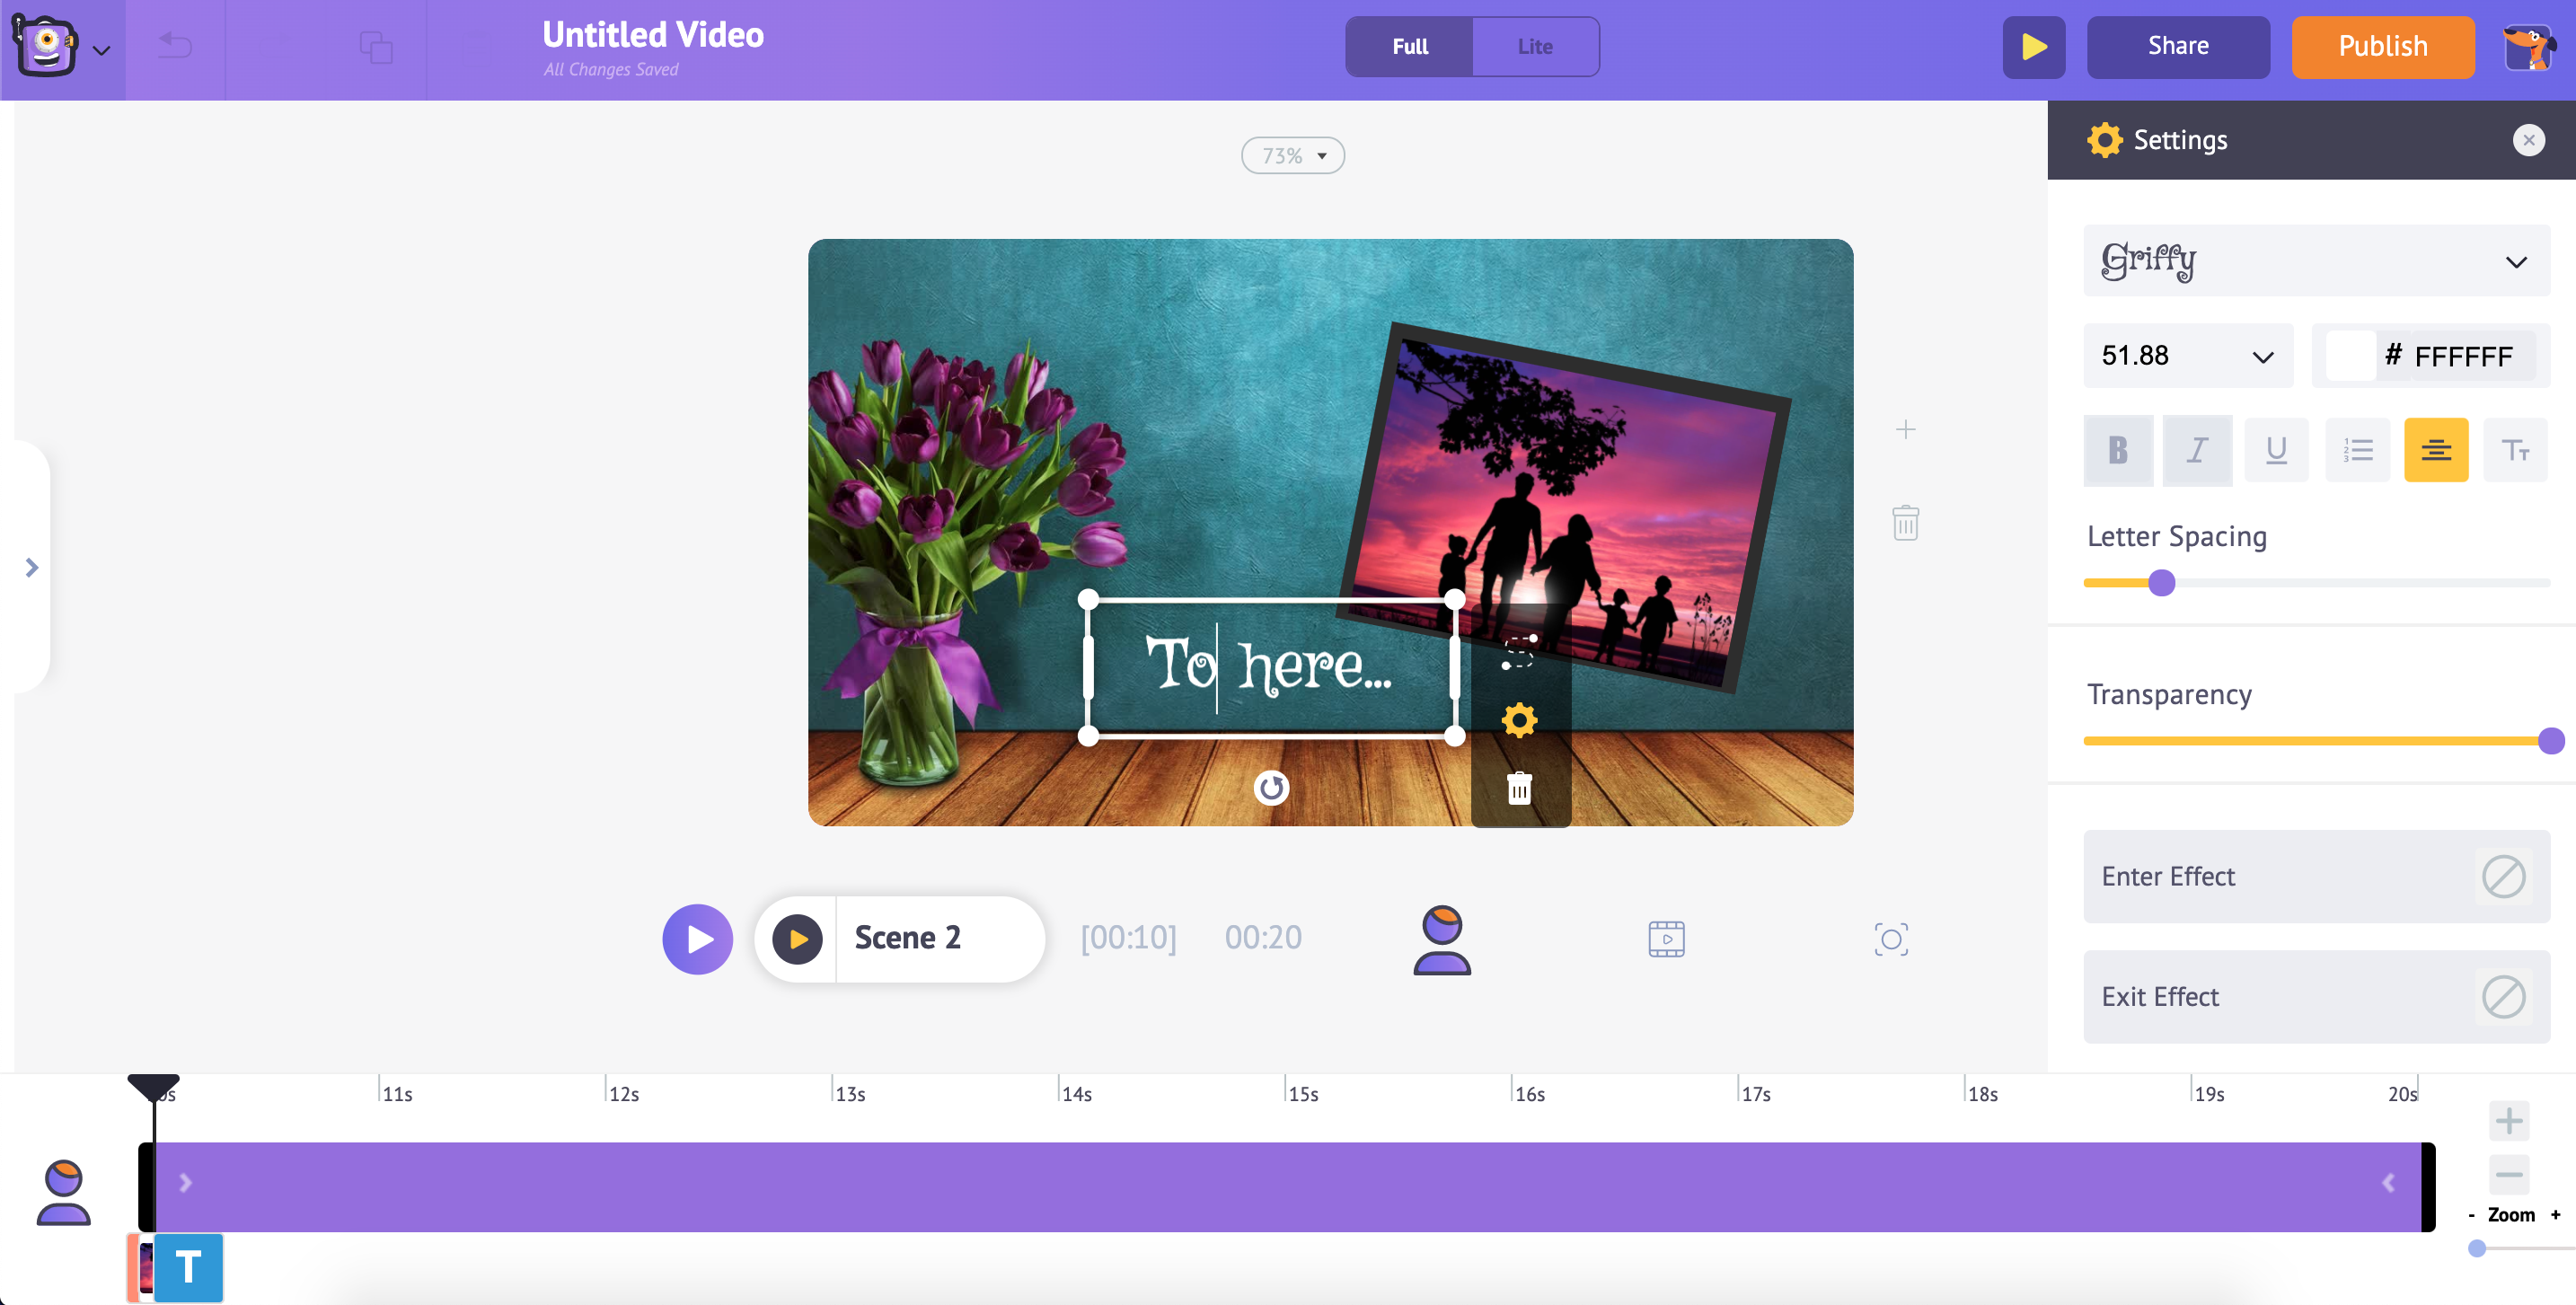
Similarly, you can duplicate the first scene and change the picture and text in forthcoming scenes.
13. The final step is to add music to your video. To choose a new music track/sound effect, select the Music option in the library. This will list several royalty-free music tracks. Similarly, to add sound effects, select the option next to Music.
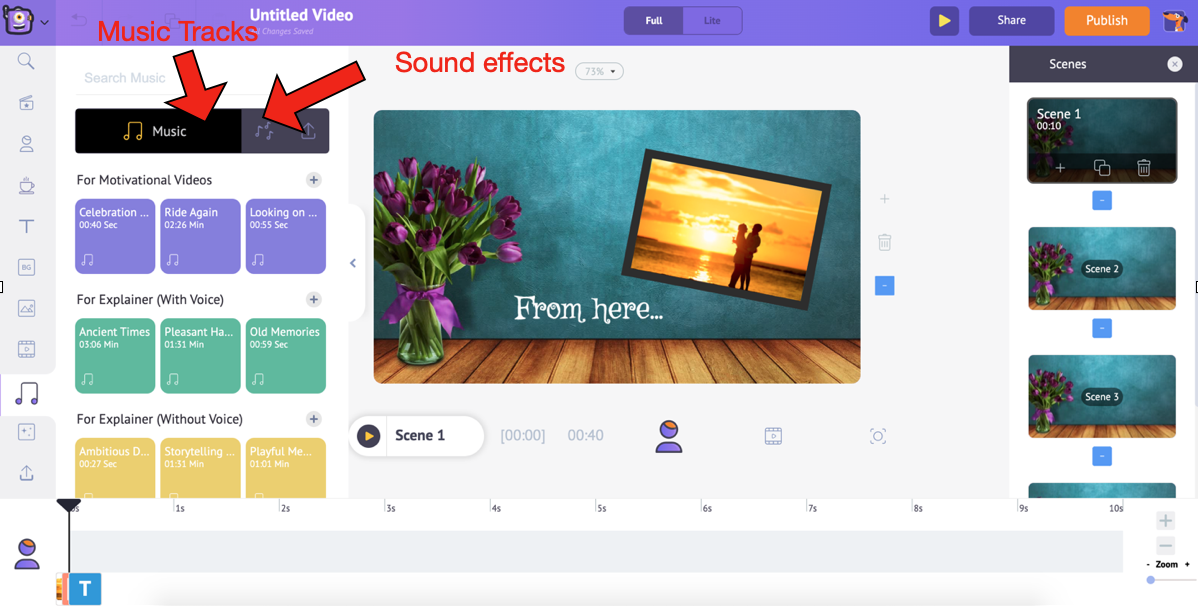

14. Hover over any track/effect to preview it. Add a track to the video by simply clicking on it. From the timeline, you can preview the track, adjust its volume, duplicate it, and delete it. You can also extend the black marks at the ends of the track to extend or contract it.
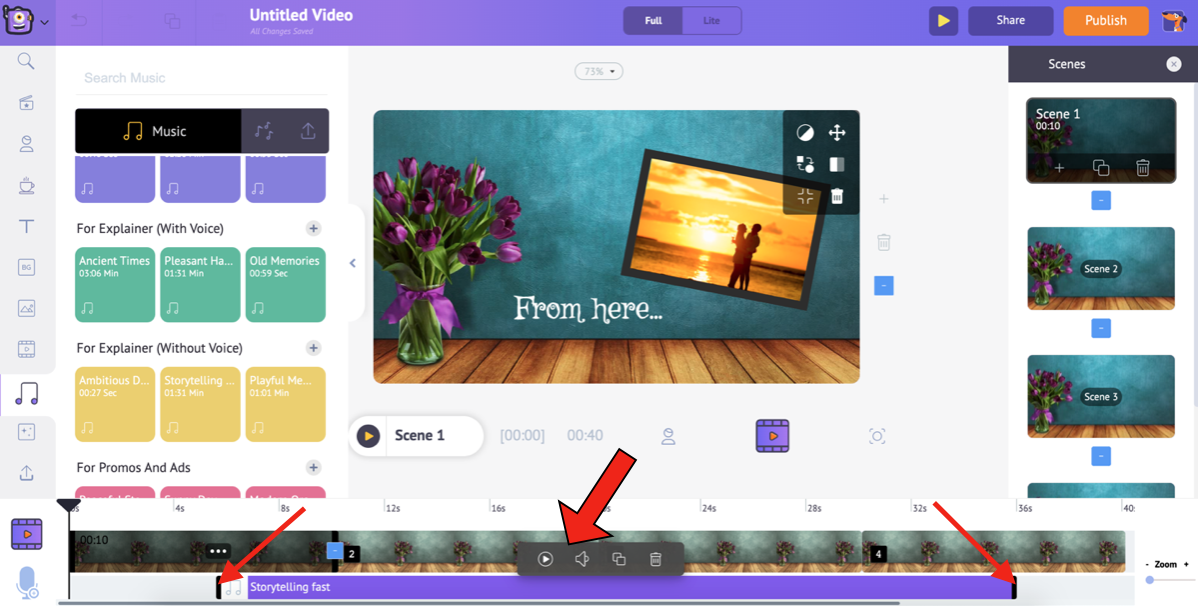
And if that’s still not enough, you can upload your music the same way you uploaded your pictures and add it to the video.
After adding all the elements, preview the video to ensure that they have been added correctly.
Select the Scene Preview option to preview a particular scene and use the Video Preview option to preview the entire video.
Once you are done, click on Publish -> Download video. You can rename it, select the preferred video quality, and then click on Download.
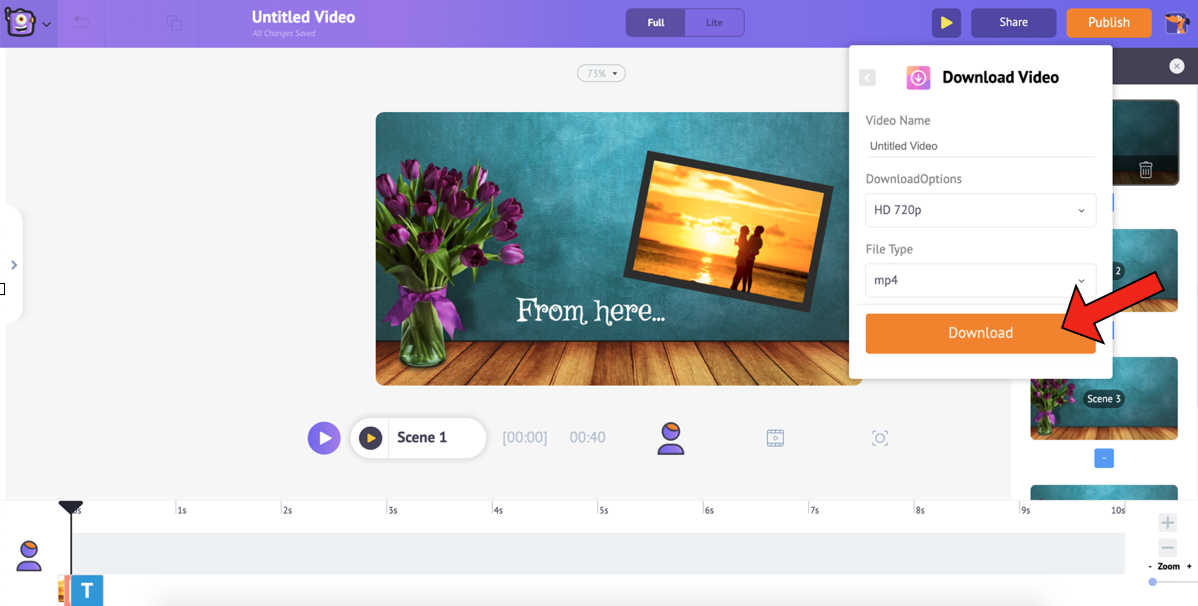
Your video is ready! Once the rendering is done, you can download it, Additionally, you will also receive the video link via mail.
You would have noticed that the process is extremely simple. So, what are you waiting for? Unleash thy creative self, shower all those elements, and create the best anniversary video ever!!
Should you have any questions/doubts, shoot ‘em in the comments section. We will be happy to help you out!
