How to create effective job aids using videos? (Free template)
The average employee is only productive for 2 hours and 33 minutes per day
Productivity is the pillar of an effective workforce. In the age of information overload, a key factor in increasing productivity is to have the right information at the right time.

Job aids provide a simple and effective way to boost the productivity of employees by providing essential information in an easily accessible format.
What is a Job Aid?
Job aids are concise instructions or hints that help employees perform a particular task by providing the right information at the right time. They help employees increase productivity by preventing mistakes. Job aids come in many forms like One-pagers, Videos, Infographics, Manuals, To-do lists, Checklists, etc.
Job aids are so useful that your employees may already be using them in one form or another. Have you ever seen a computer like this in your office?

Congratulations, your employees have already realized the power of Job aids!👍
Employees utilize the resources that they have at their disposal to create job aids that can help them complete their tasks efficiently. But what if you could provide a job aid that is 1000x better than the sticky notes?
Video Job Aid
Job Aids come in many shapes and forms. Some of the most commonly used job aids are in the form of a printed document that is not more than a page in length. They can be used as a quick memory refresher that gives you the essential information just when you are about to perform a task. Have you seen this image on fire extinguishers?

In case of a fire, this piece of paper gives you the exact information you need to use the extinguisher and save yourself. This is a great example of a job aid outside the work environment. It is effective because it gives you all the information you need to get the job done at the correct time.
In the digital era, not all job aids have to be on a printed sheet. For example, if you take on the task of cooking pasta at your next company outing, would you prefer to have a long 10-page printed document on how to do it, or would you prefer to play this video and cook along?
According to Forrester Research, employees are 75% more likely to watch a video than reading text. Videos are the ultimate job aides as they utilize both the audio and visual senses to communicate information effectively. This creates a bigger memory imprint in the mind of the viewer thereby making the process of information retention much more efficient.
For example, here is a video job aid created by BambooHR company as a simple demo to their employees.
This video gives a complete walkthrough of their tool in under 10 minutes. Whereas, a text document with the same process would be so long and tedious for the employees to read and understand.
Now, Let's dive in and find out how to create engaging job aides using videos.
How to create an effective job aid (step-by-step)
Video job aids are very useful and effective, yet we don't see a lot of companies creating these yet. There are two main reasons:
- Cost
- Time
Traditionally, creating video job aids was both expensive and time-consuming. With the advent of powerful video creation tools like Animaker, video job aids have become easy and affordable to make.
Let's see the step-by-step process of how to create video job aids easily.
Step 1: Collect outline data on the task
Step 2: Choose the format
Step 3: Create the script and the storyboard
Step 4: Create a video job aid using Animaker
Now, let's get into each of the steps.
Step 1: Collect outline data on the task
The role of a job aid in the workplace is to help employees perform a specific task, so the best place to start a job aid is from the employees themself. Collect data regarding the particular task from the employees who perform the task regularly.
Note down all the important points. Understand the concept before moving on to the next step.
Step 2: Choose the format
Now, it's time for you to choose the right video type to represent your job-aid.
As we discussed earlier, video job aids come in different types. Each different video type has its own benefits. Depending on the type of content that you are putting into your job aid, you can choose the type that works best for you. Here are some of some examples:
- How to videos - Great for explaining DIY tasks
- Listicle videos - Great for explaining step by step processes and lists
- Explainer videos - Works best for explaining complicated concepts
- Screen capture walkthrough videos - Great for showing product walkthroughs/demos
- Talking head videos - Great for explaining concepts that require face-to-face interaction eg, soft skill training.
Step 3: Create the script and storyboard
The most important aspect of any effective video job aid is the script. Scripts are like a roadmap that can guide you to create the perfect video job aid. To make your video creation process even easier, you can convert the script into a simple storyboard.
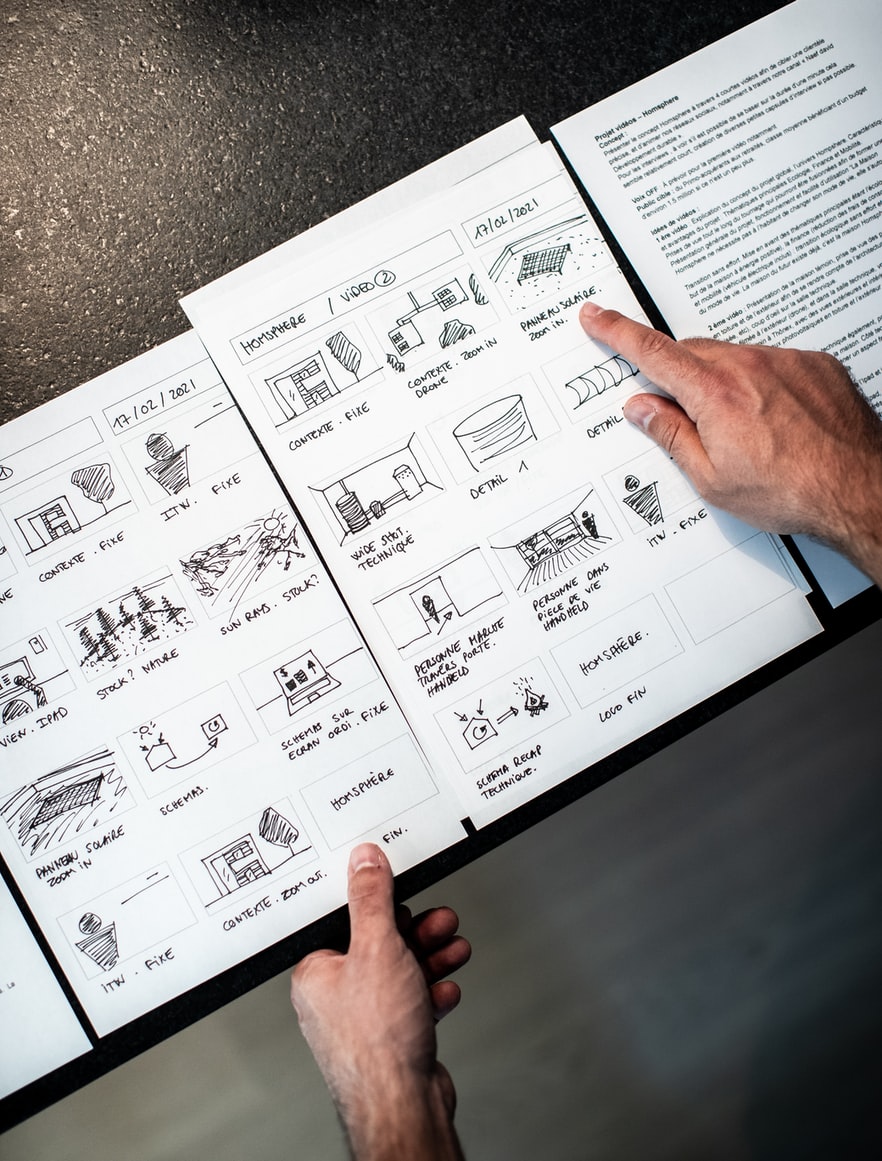
You don’t have to be an artist to create a storyboard, just a rough sketch with some stickman figures will also do the trick.
Step 4: Create a video job aid
Let’s look into how to create an effective video job aid. Creating a video job aid can be done very easily using a powerful video creation tool like Animaker.
For the purpose of this article, let's create a video job aid that showcases 6 steps of the customer onboarding process. This job aid will have two goals:
- Educate the team on the steps to be followed for smooth customer onboarding
- Serve as a memory refresher that they can refer every time they want to onboard a new customer
Want to start creating video job aids for your company? Click here to claim your free personalized demo of Animaker.
Once you have your own Animaker account,
Step 1: Log in

Step 2: It’ll lead you to the Dashboard
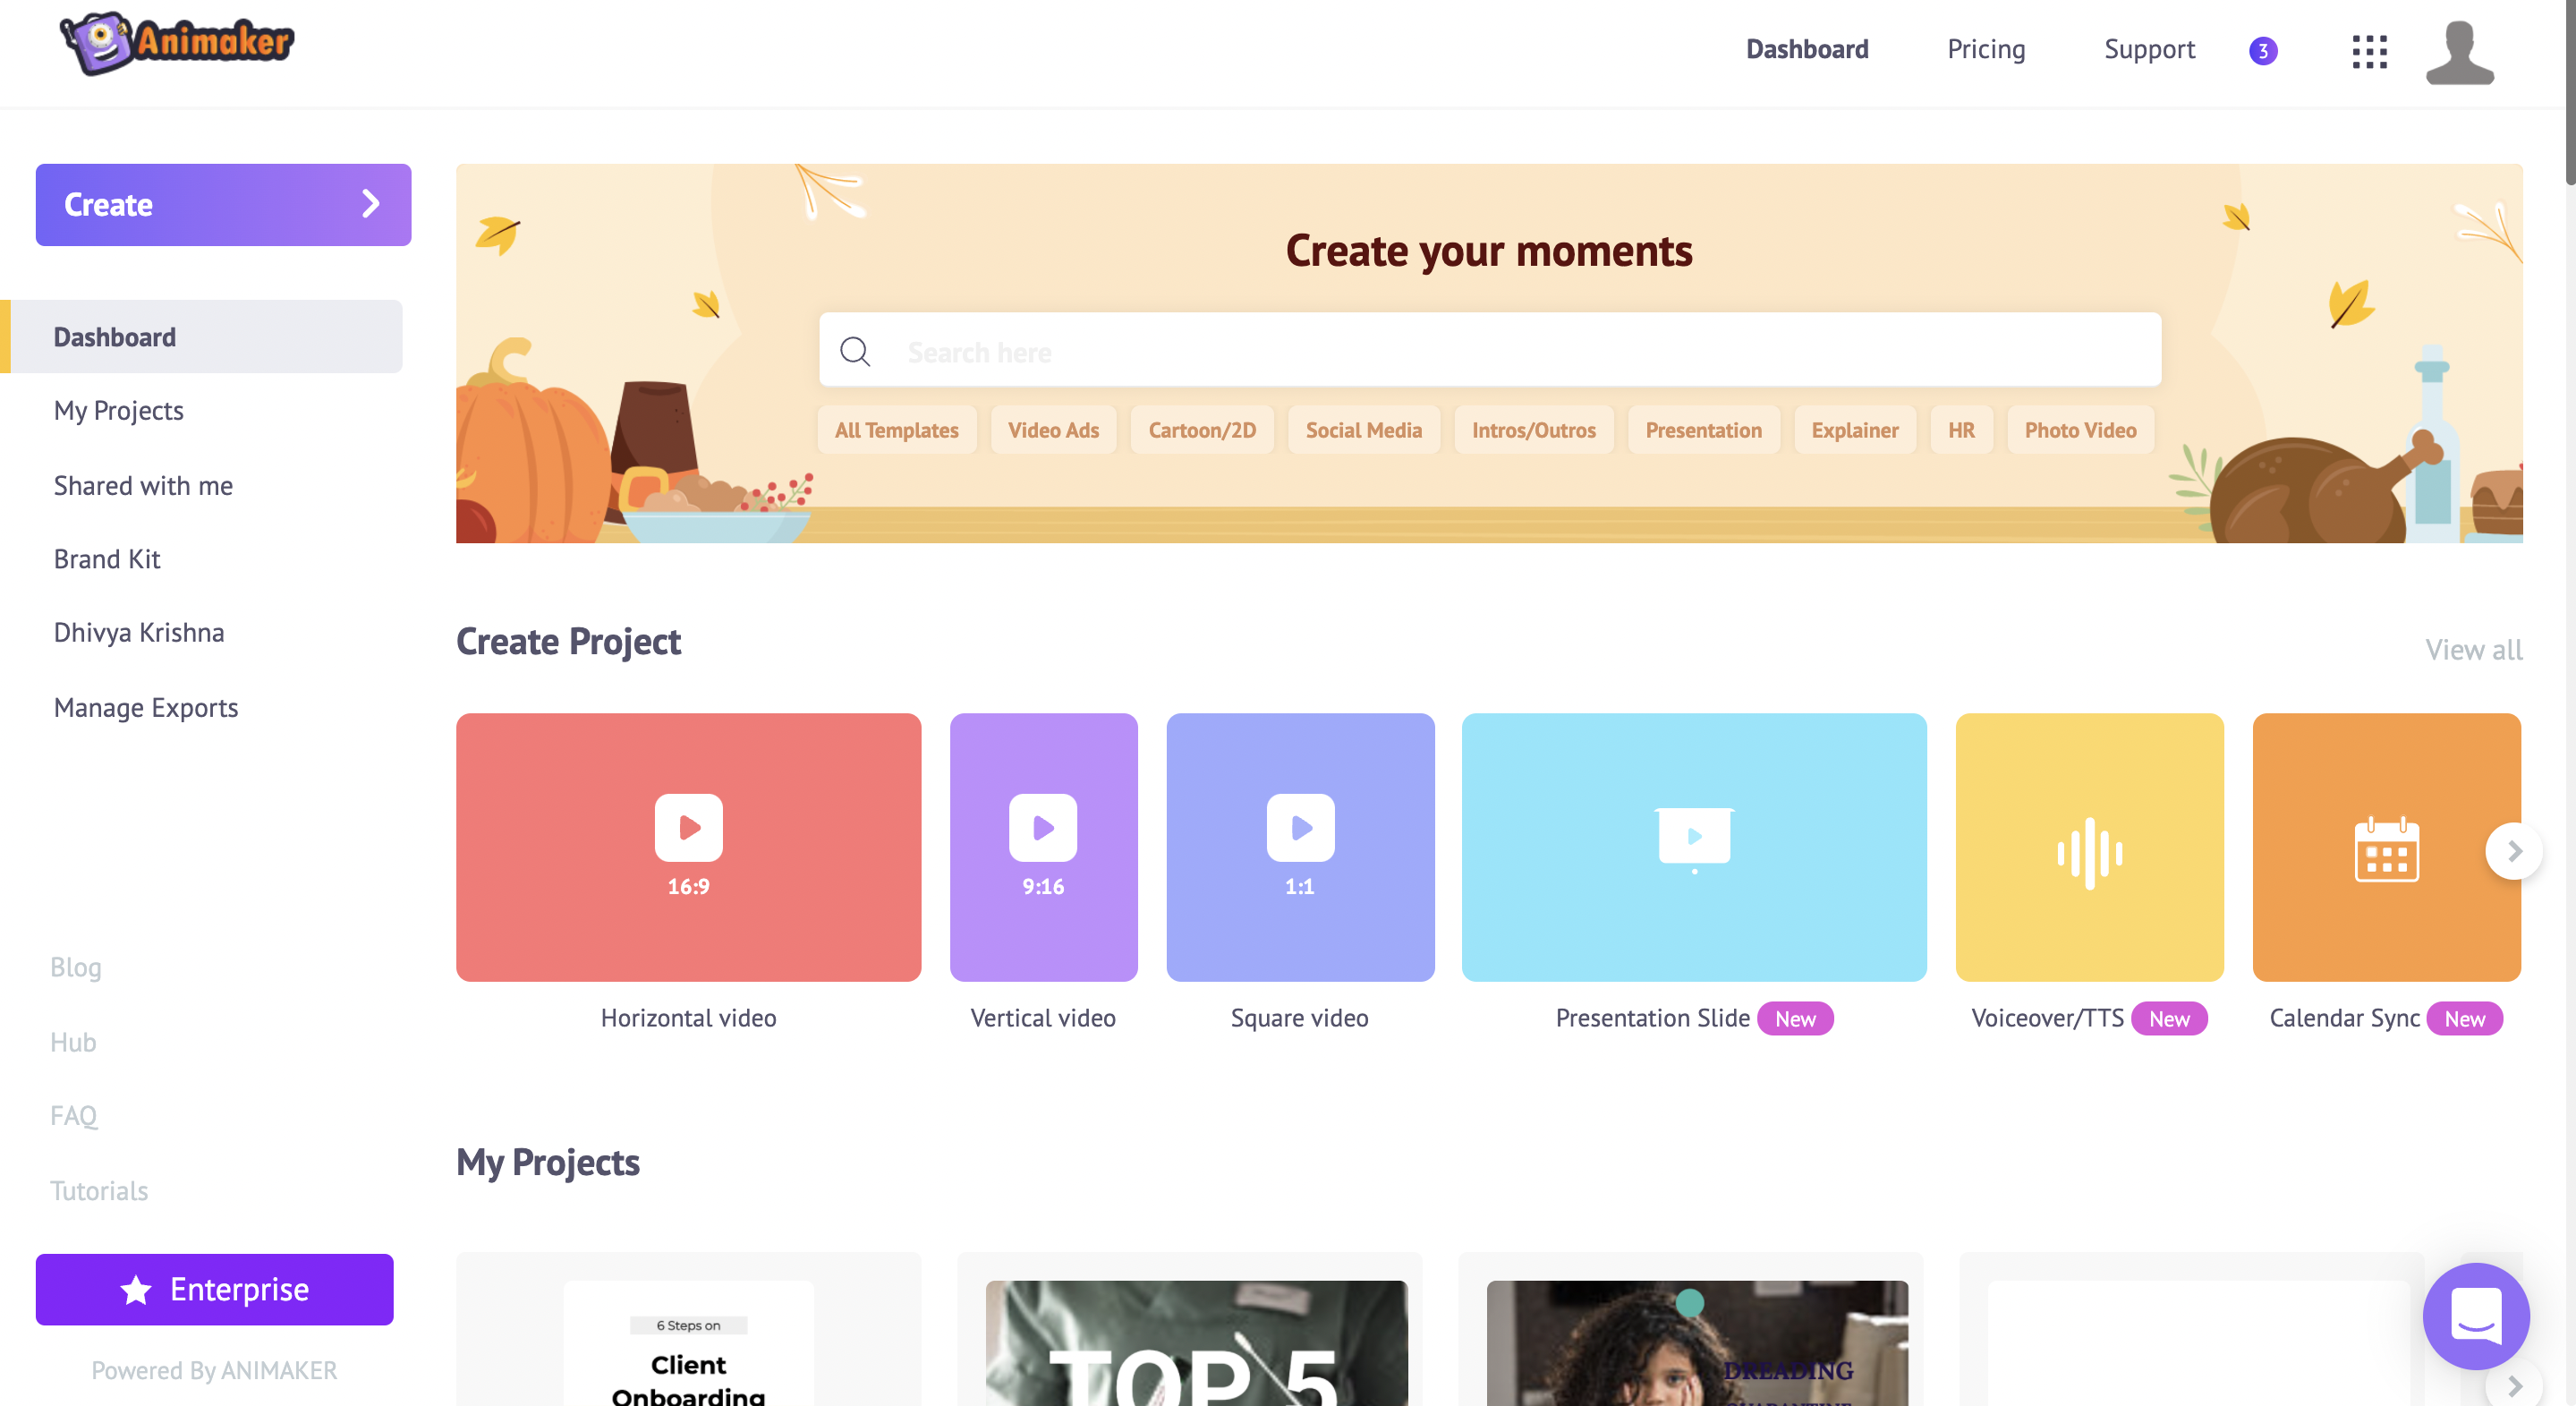
If you're unsure about starting a project from scratch, don't worry, we've got your back. Let our Animaker pre-built templates do the job for you.
Step 3: As mentioned above, we are creating a job aid for the customer onboarding process. To emphasize the step-by-step process of onboarding, a listicle video will be the ideal choice.
Scroll down to the listicle video templates section in the Animaker dashboard and pick a template. You can pick any of the listicle templates and customize them to your needs.

Now, let’s see how to edit the template according to our context.
Before jumping into creating a job-aid, let us get you accustomed to the different sections of the Animaker application so that it’ll be easy for you to understand the interface and create one of your own.
There are 5 sections in Animaker:
- Library
- Workspace
- Scenes
- Menu bar
- Timeline

Library – The Library of the Animaker app is where you will find all the assets needed for your video, including characters, props, icons, stock assets, music files, and more.
Workspace – The whitespace at the center is called the workspace. This is where your job aid will come to life.
Scenes – The scenes section houses all the different scenes that are part of a video. They are similar to the slides section in presentation tools.
Menu bar - You can change the title of the video, play the video from the beginning, share and publish the video.
Timeline – At the bottom of the screen is the timeline. There are three different timelines:
- Animation timeline: Lets you adjust the entry and exit timings of any kind of elements like characters, props, text, logos, images, etc., that are present in the video.
- Video timeline: Lets you trim and adjust the music and video files used to edit the video and the music track.
- Camera timeline: Lets you add and adjust the timings of the camera effects.
Let’s get started!🤩
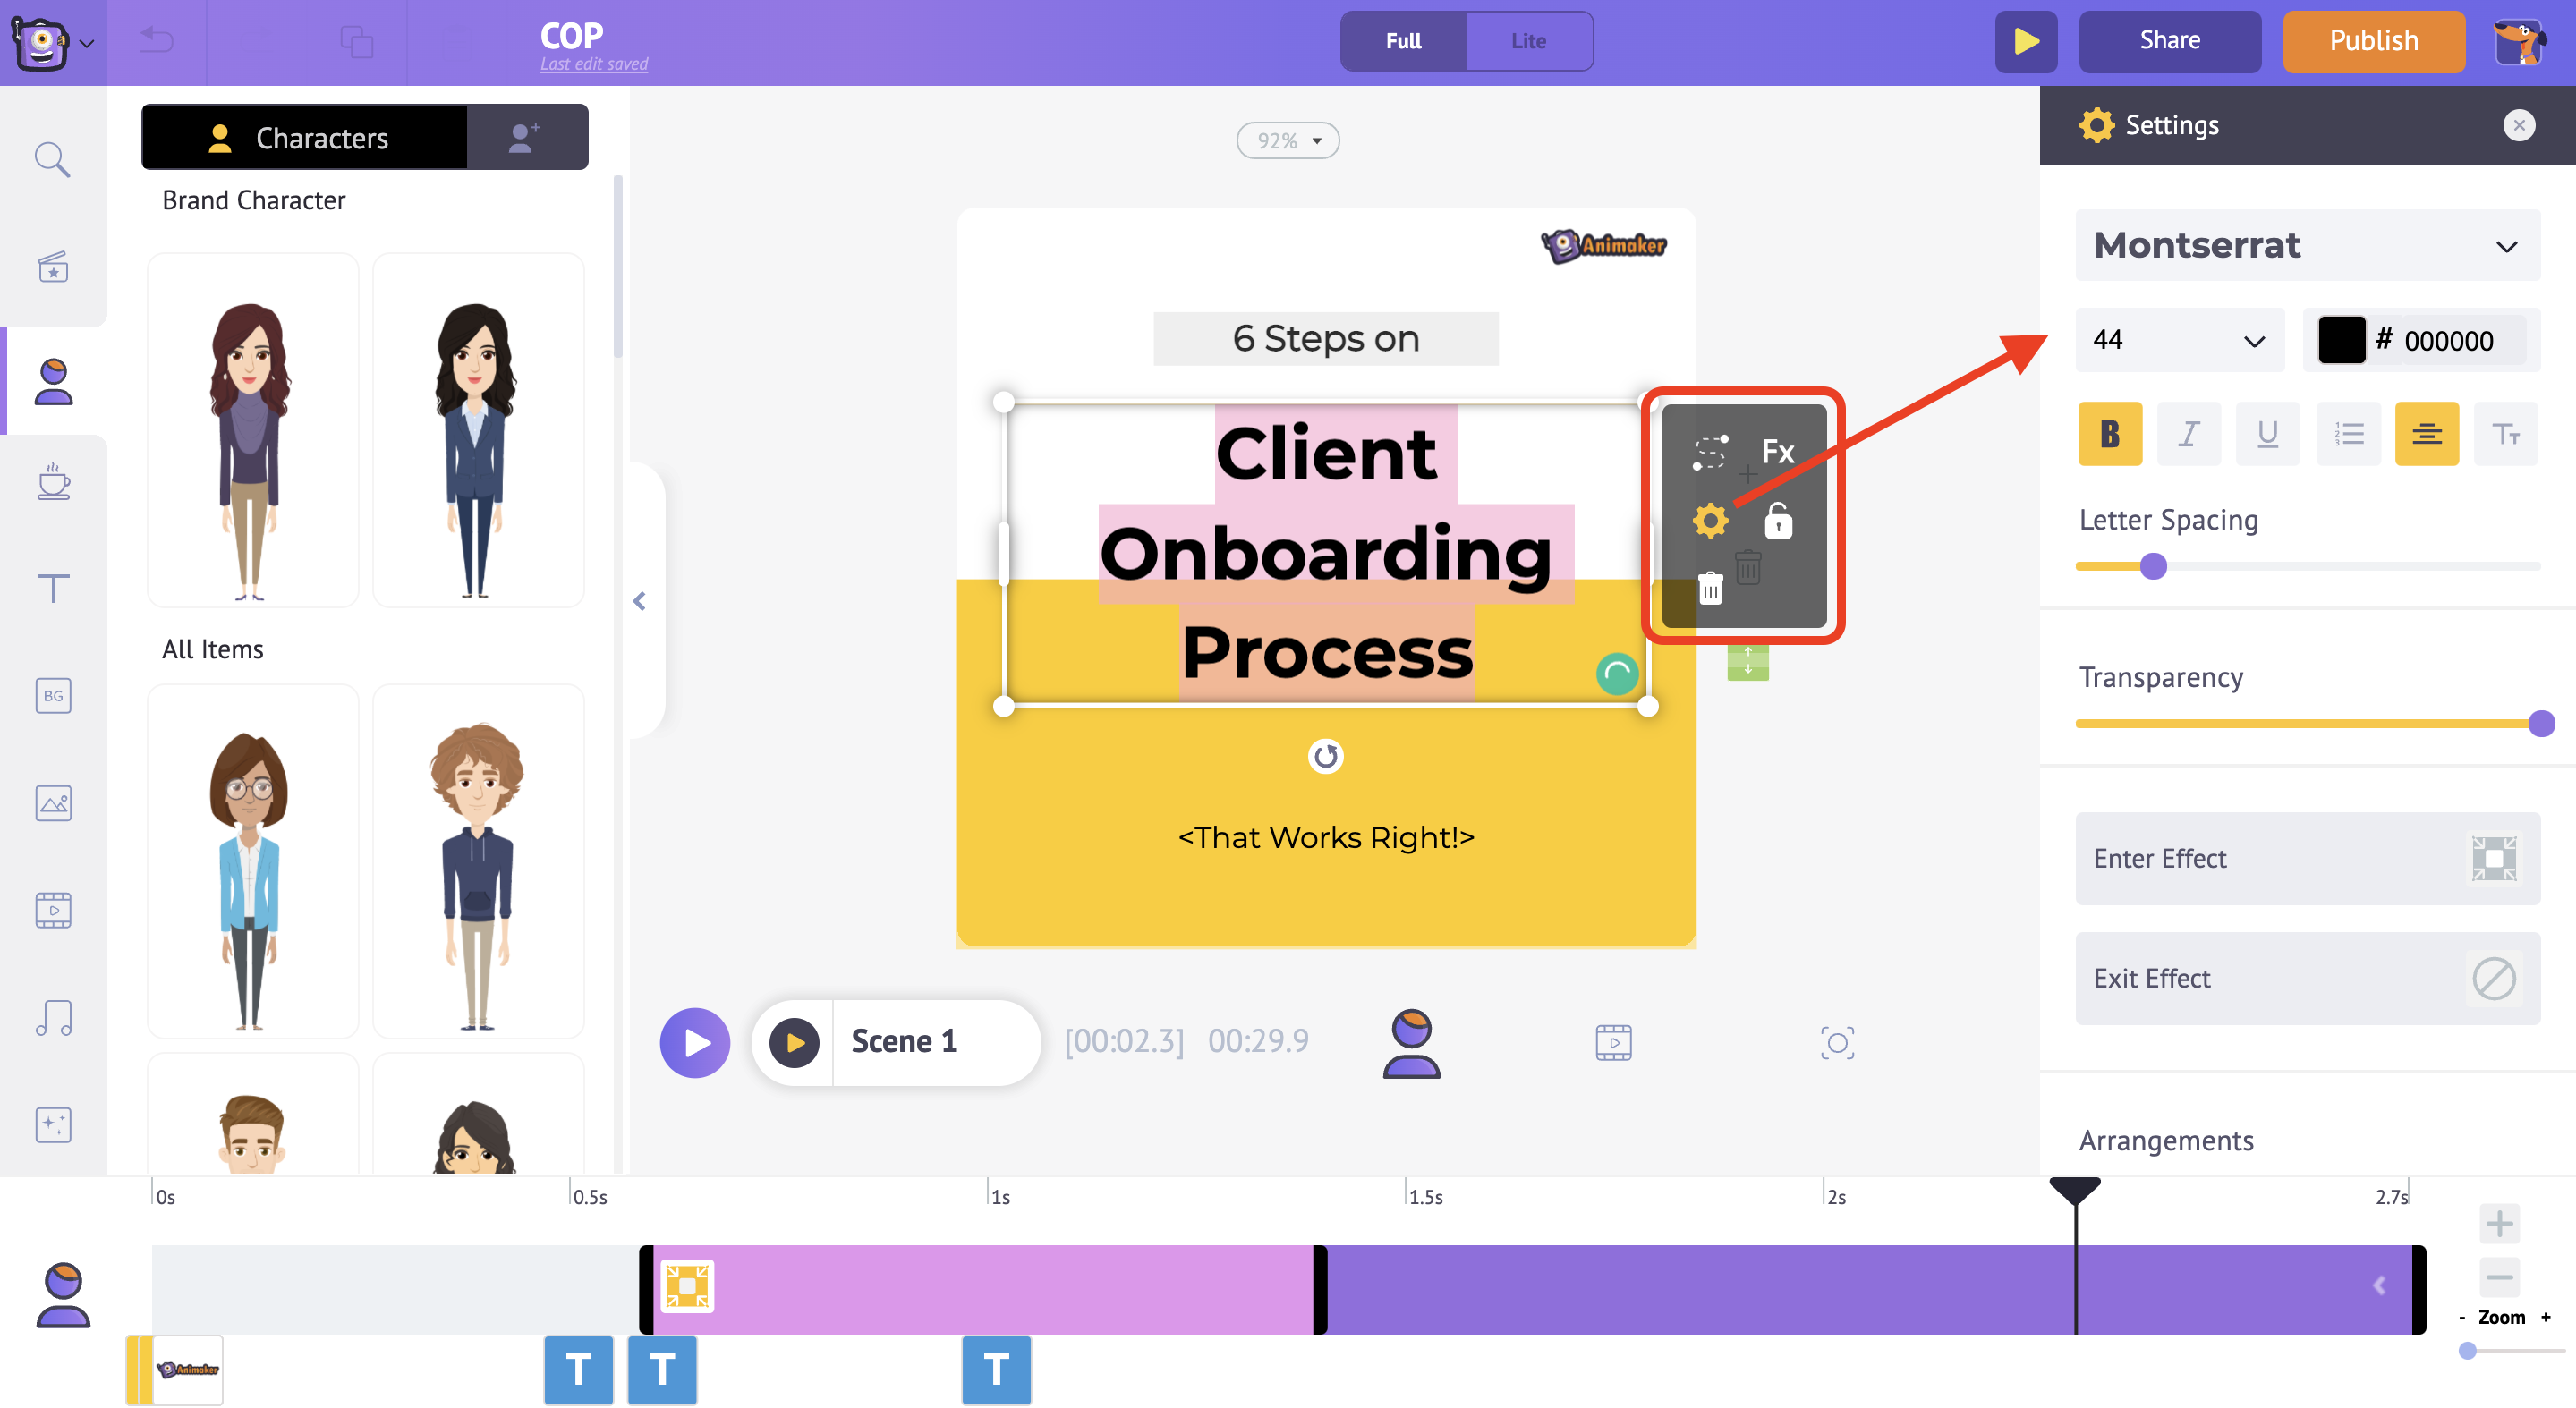
Step 4: Firstly, let’s see how to edit the texts in the template.
To change the text just double click and enter the new text. When you click on any text, you’ll notice a bunch of options appearing along with the text.
This is called the item menu. The item menu allows you to modify the text. You can change the font style, font size, font color, etc.
(Usually, in pre-built templates, the effects will be already designed - all you have to do is either use them or edit them to your convenience)
Step 5: Let’s look at how to change the background and adjust it according to your use.
First, select the scene where you want to change the background. Then simply click on the video icon from the library section and search for your relevant video.
Click on the video and it will be uploaded to the workspace.

Step 6: Next, let’s see how to upload a logo into your video.
Click on the Upload section that is available on the bottom left of the library. Now upload the video/image which you want to insert.

Once the file is uploaded, click on the uploaded file in the library to load it into the workspace.

Step 7: Add music tracks to your text animation.
Go to the music section of the library, here you can find 30000+ music tracks. To have a preview of a music track, just hover over it. Then, click on the music track of your choice to apply it to the video.
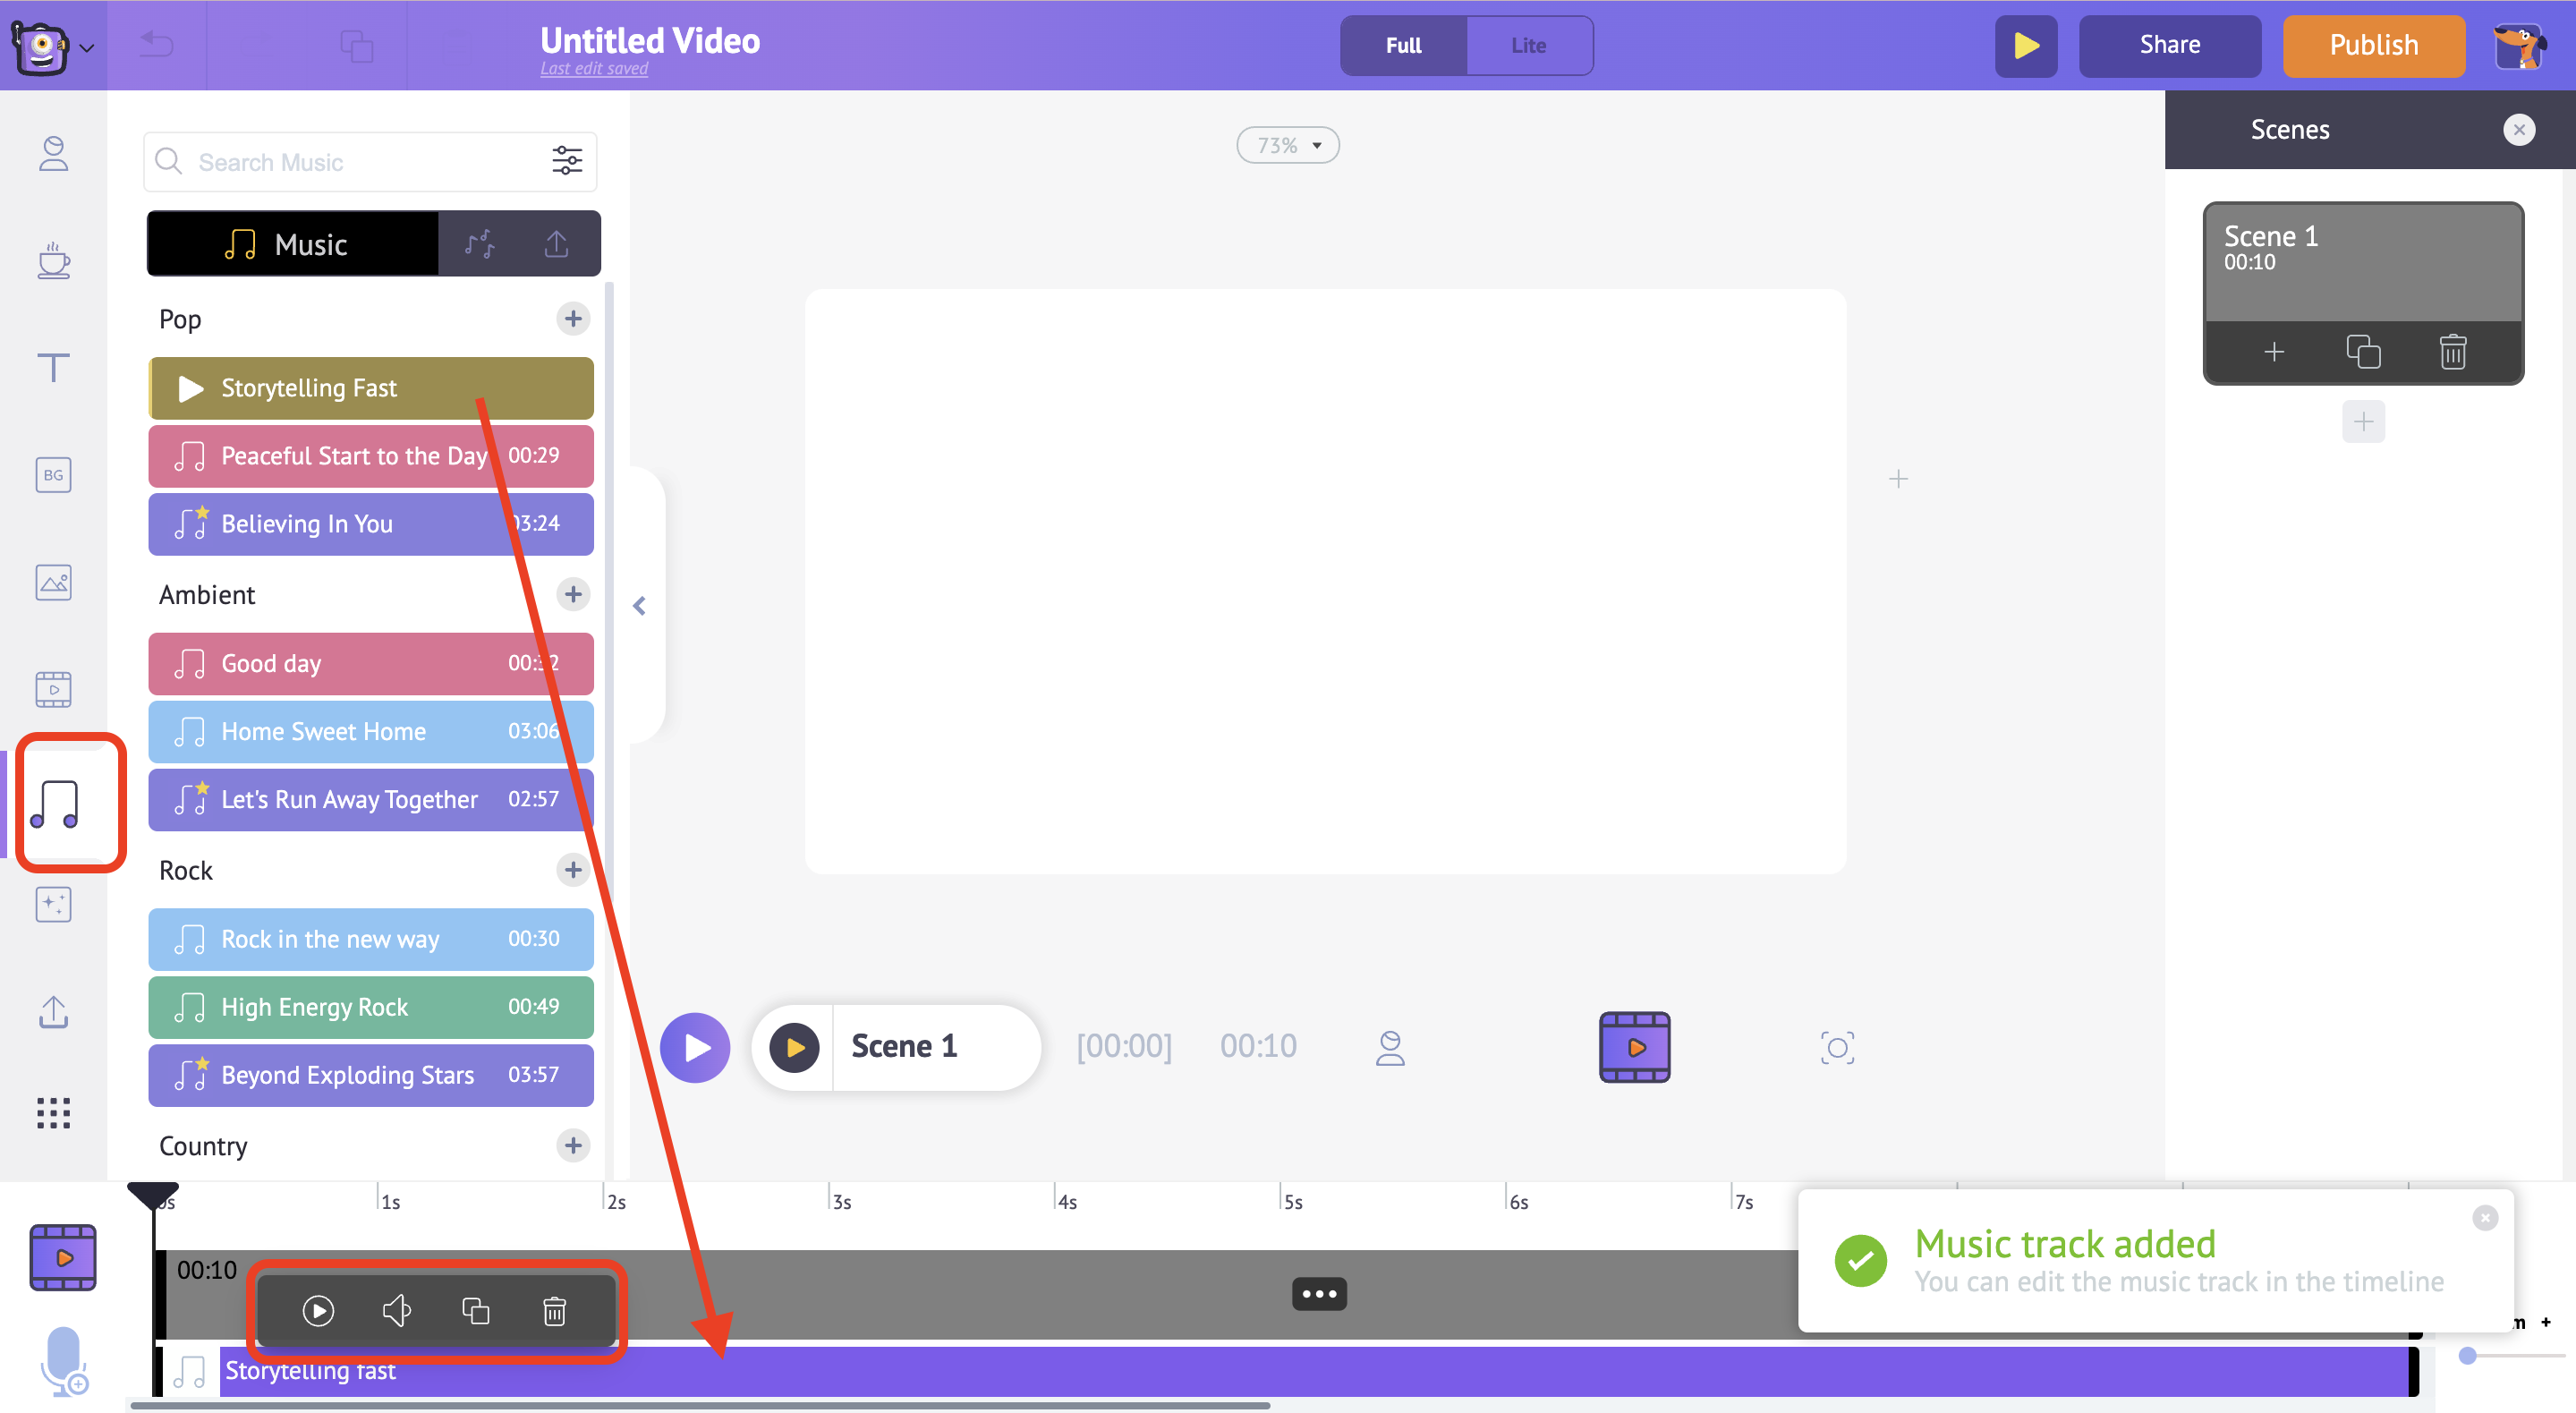
You can see the music track in the video and audio timeline, and if you further click on the music track, you will get a bunch of different options.
Here, you can preview the music track, control the volume of the music track, duplicate it, and delete it.
That’s it, your first video job aid is ready in seven easy steps.
Yes, you are most welcome to put your imagination into a real video and customize it further!
And here’s our final video:😎

Want to utilize this template for your company? Click here to talk to an Animaker Expert.
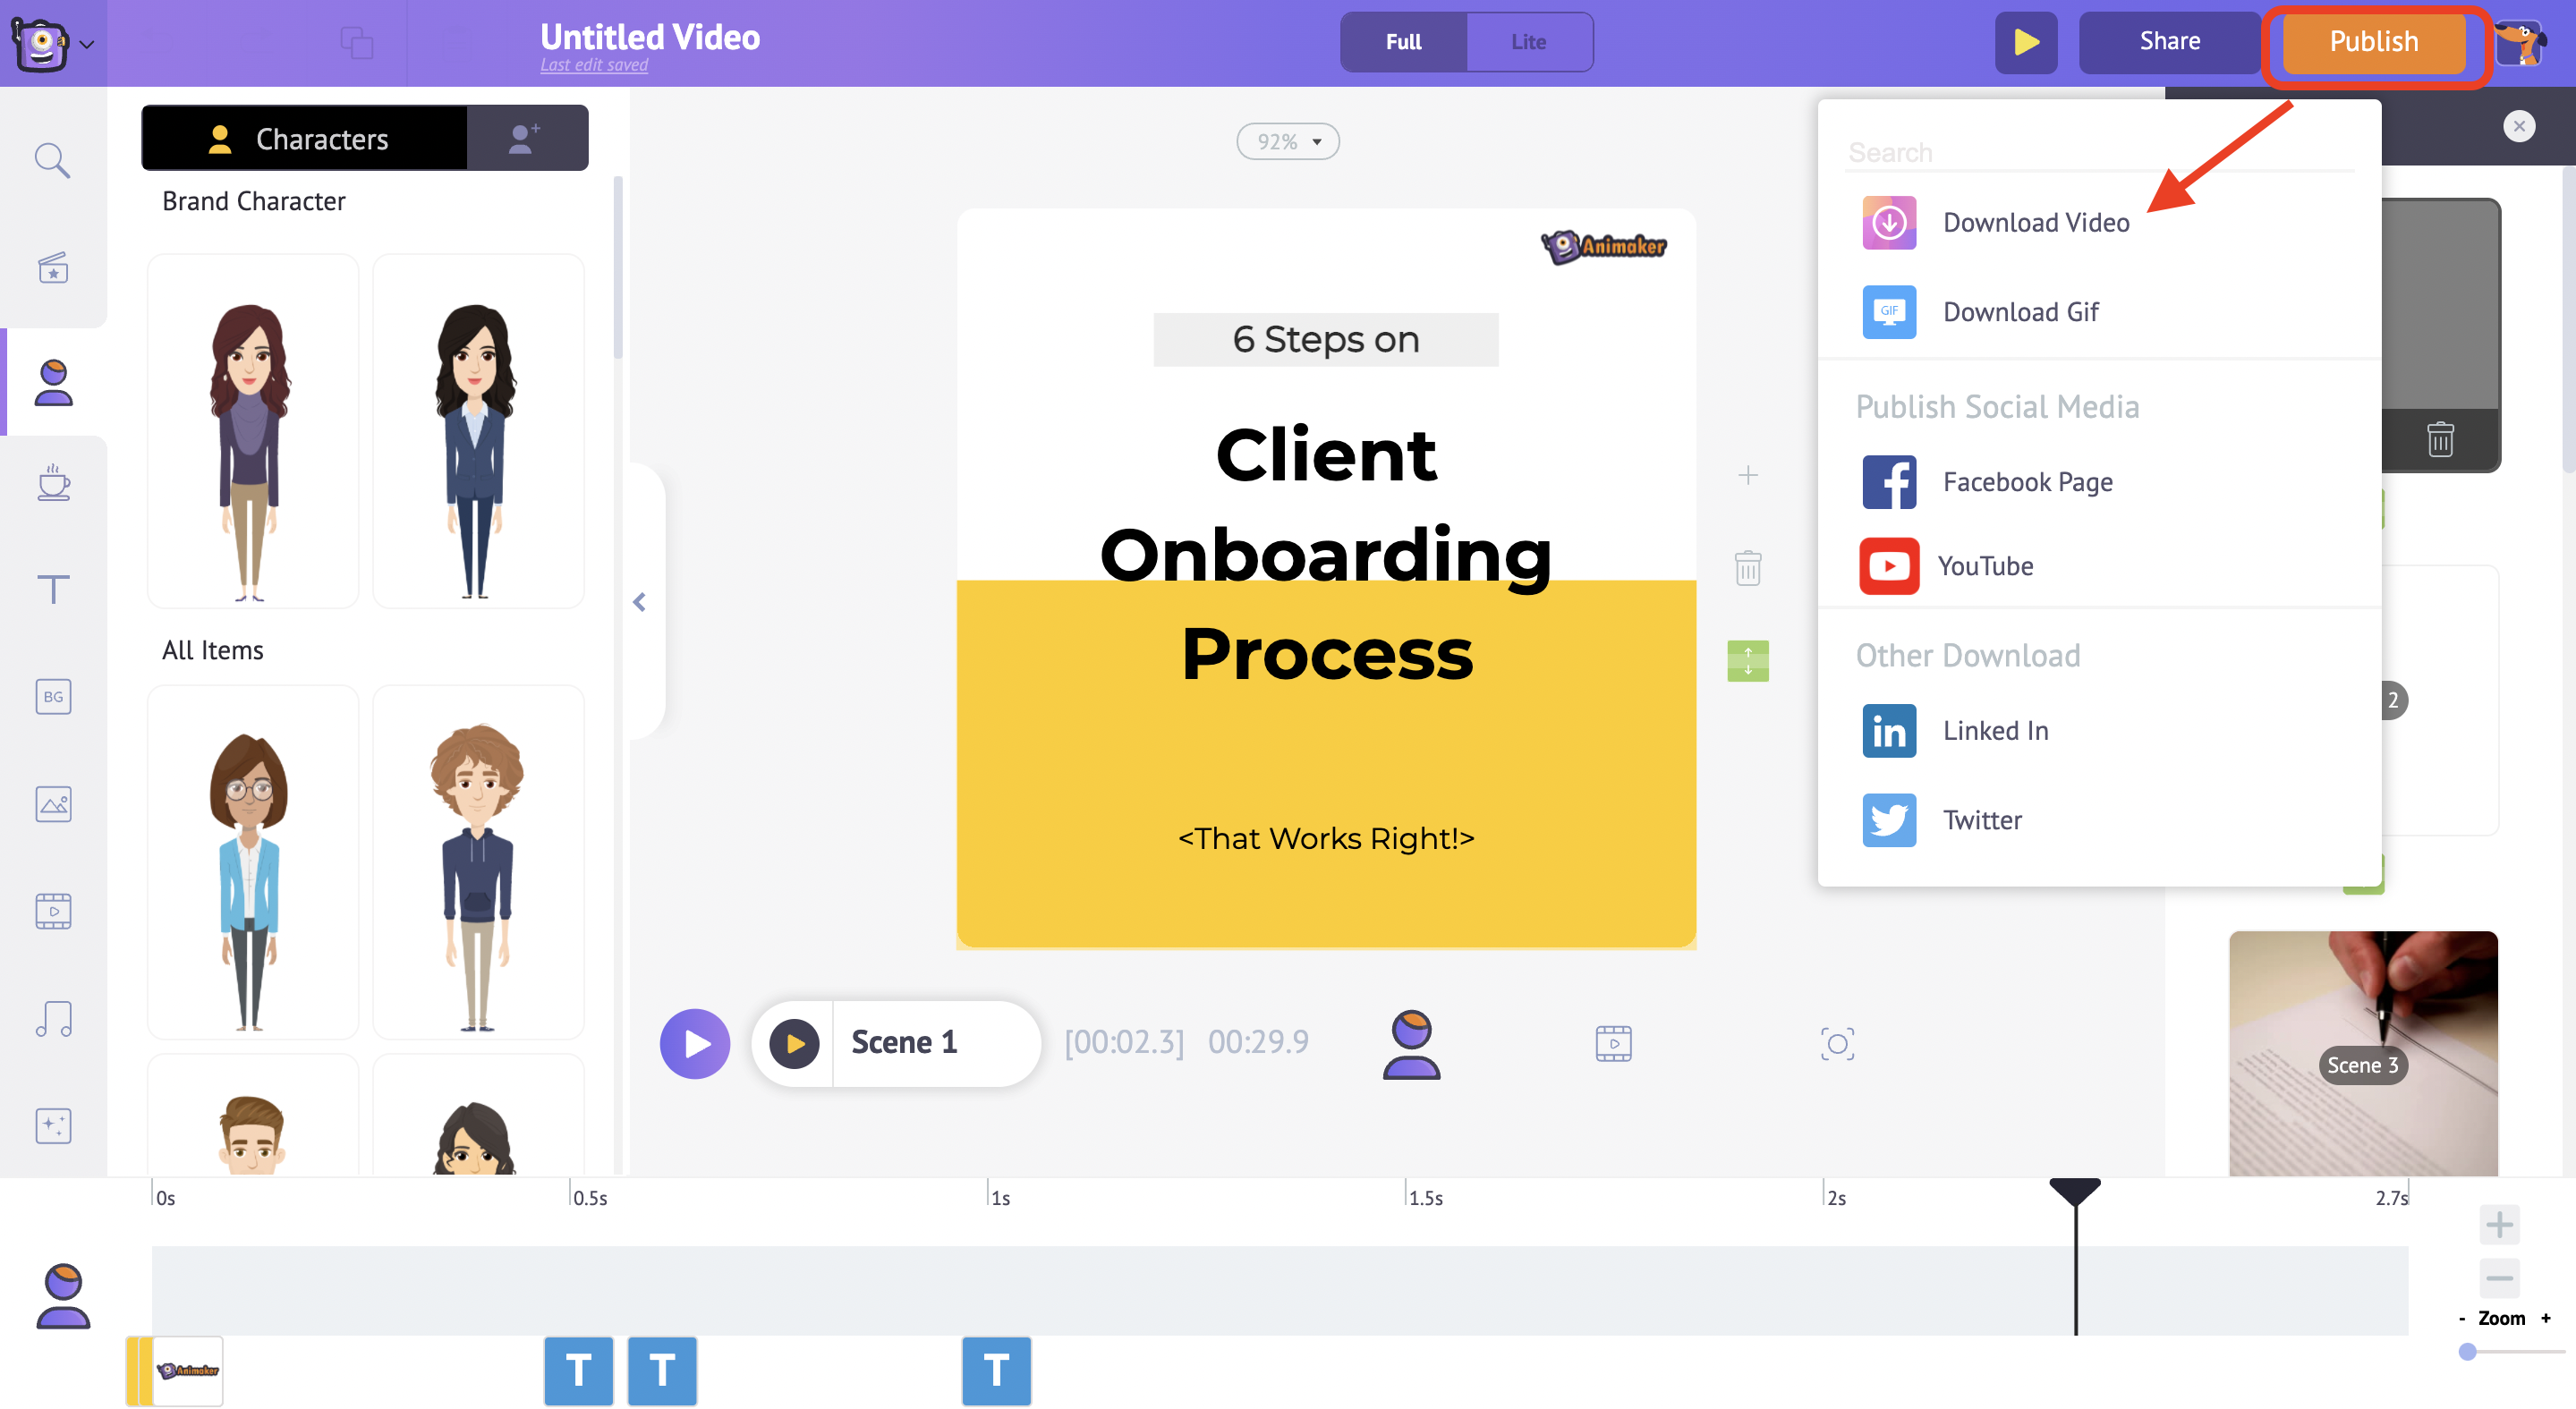
To download your video, go to the Publish option at the right top of your window. Click the ‘Download Video’ option and then download.
Conclusion
Video job aids are an essential tool to boost the productivity of your employees. The steps used in this article are just the beginning. The world of video job aids has hundreds of other applications that will help you skyrocket your employee performance.


