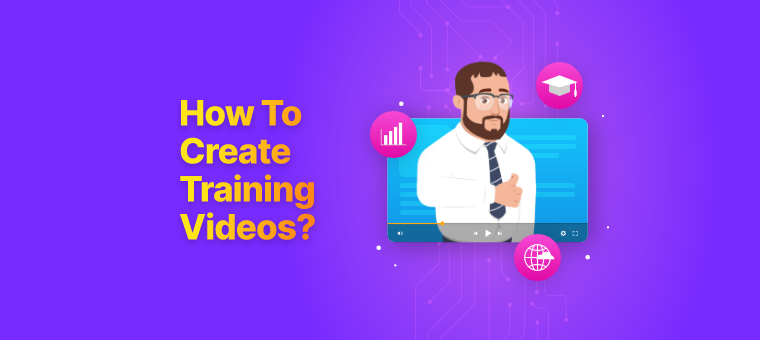
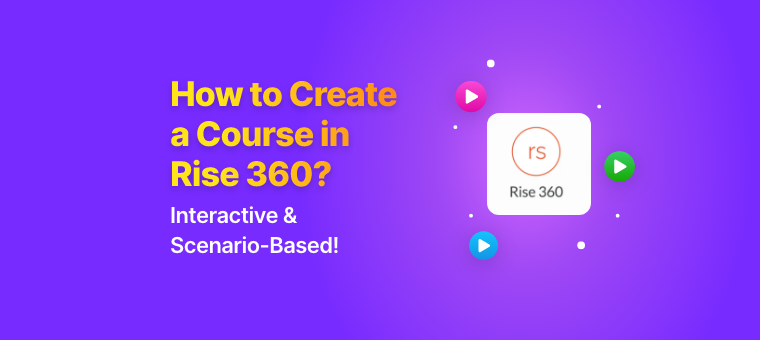
How to Create a Course in Rise 360? [with Animated Scenarios!]

Shreshtra - September 27, 2024 - Leave your thoughts. 13 min read
Today’s organizations thrive on effective training solutions, making eLearning authoring tools vital for crafting engaging, high-quality courses that learners can access on their own terms.
Among the many options available, Rise 360 stands out as one of the most popular tools for creating responsive, professional eLearning experiences. Its intuitive design and block-style interface make it easy for instructional designers to rapidly build clean, structured courses.
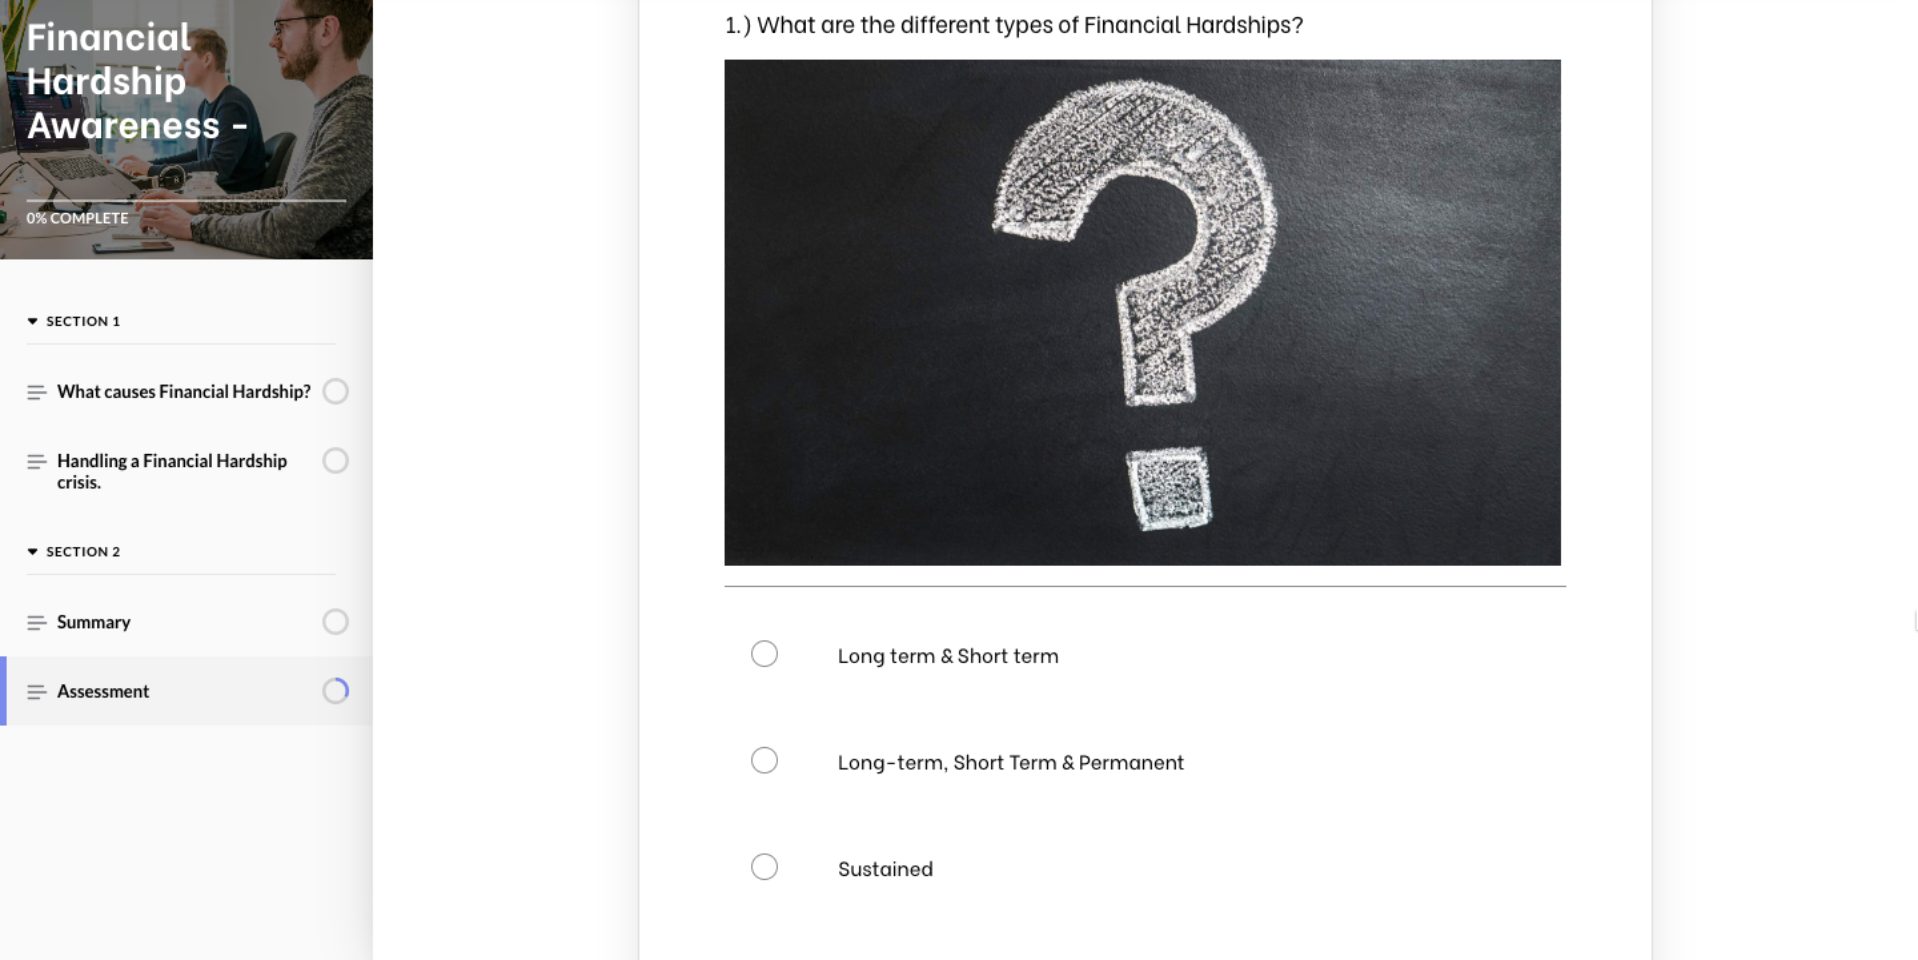
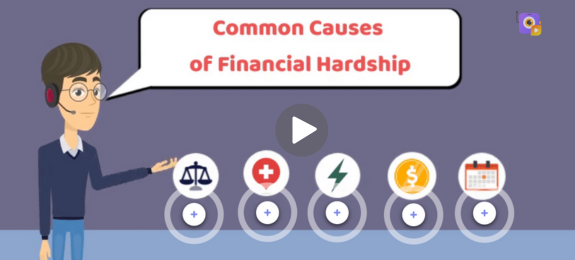
For example, click on the thumbnail below to look at a course I recently created titled "Financial Hardship Awareness" using Rise 360.

However, the course felt quite dull, especially in the assessment section, which was just a basic questionnaire - useful but not exactly engaging or effective for learners.
Wanting to improve the experience, I tried including Rise 360’s scenario block in my course to make the learning more interactive.
While it does offer interactivity, the static cutout characters, and their limited, stiff poses made the scenarios feel flat and uninspired, far from the engaging experience I had in mind.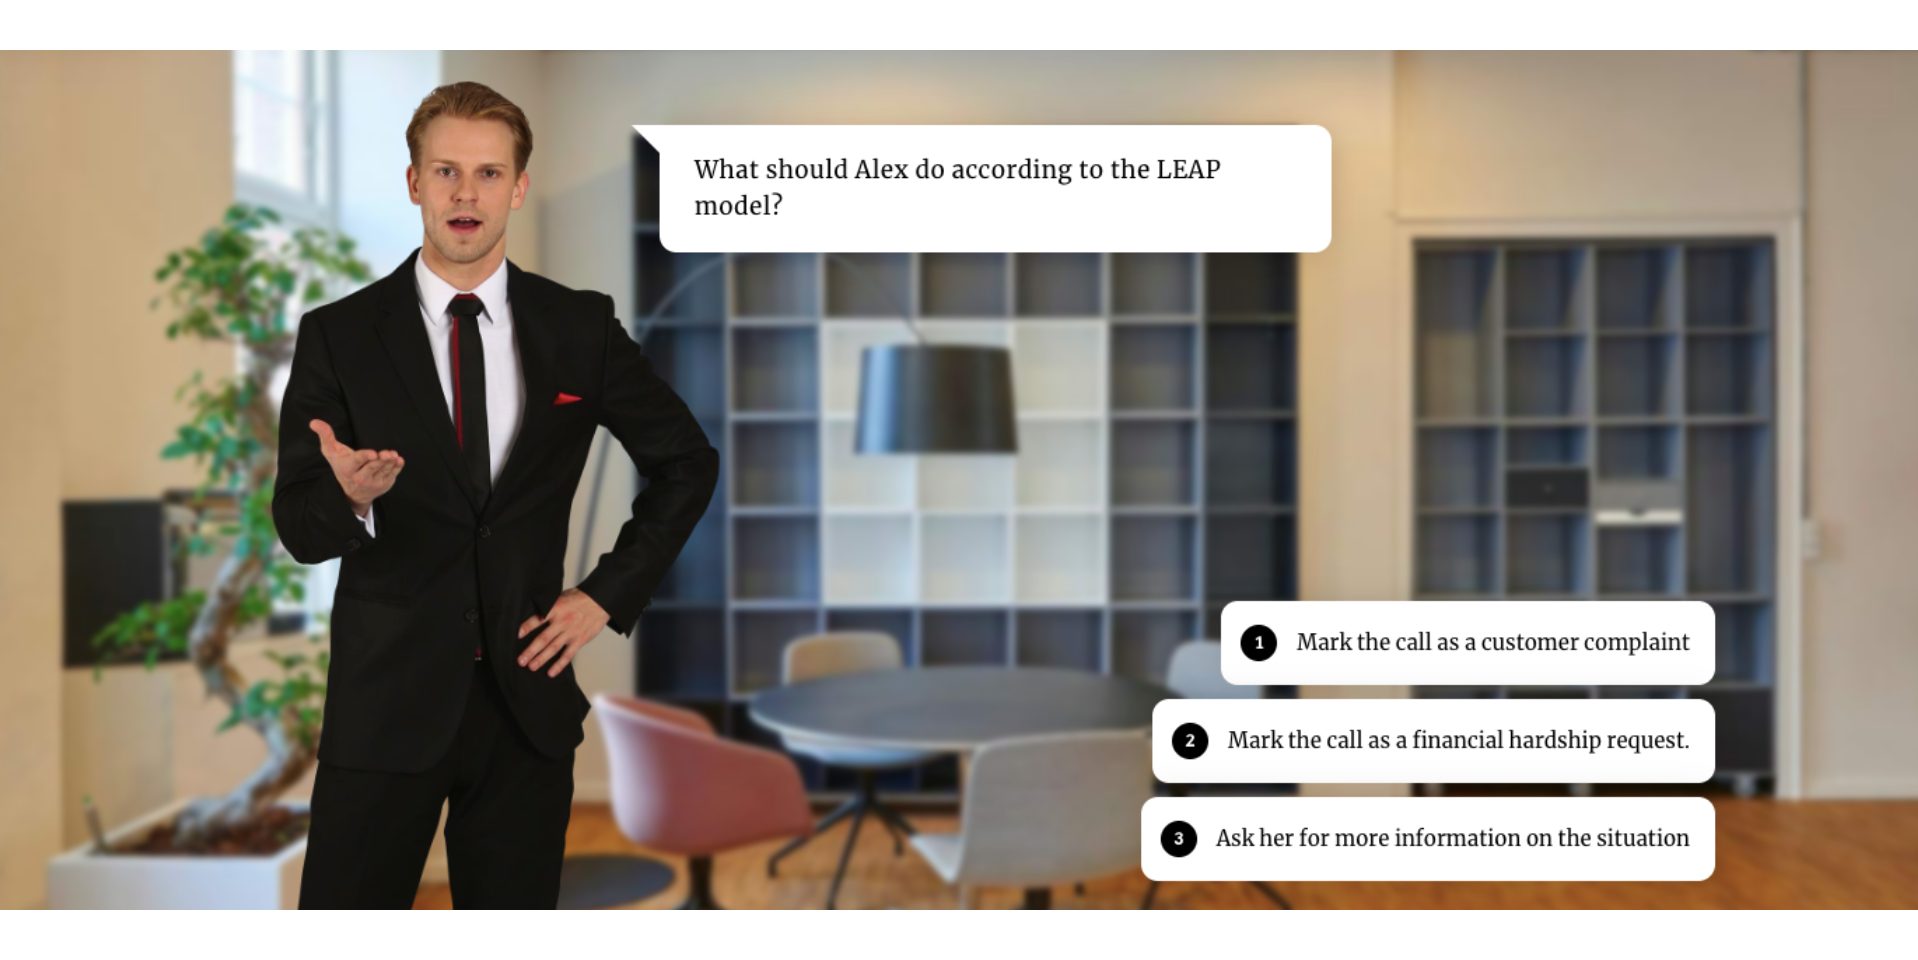
 But I knew there was a better way.
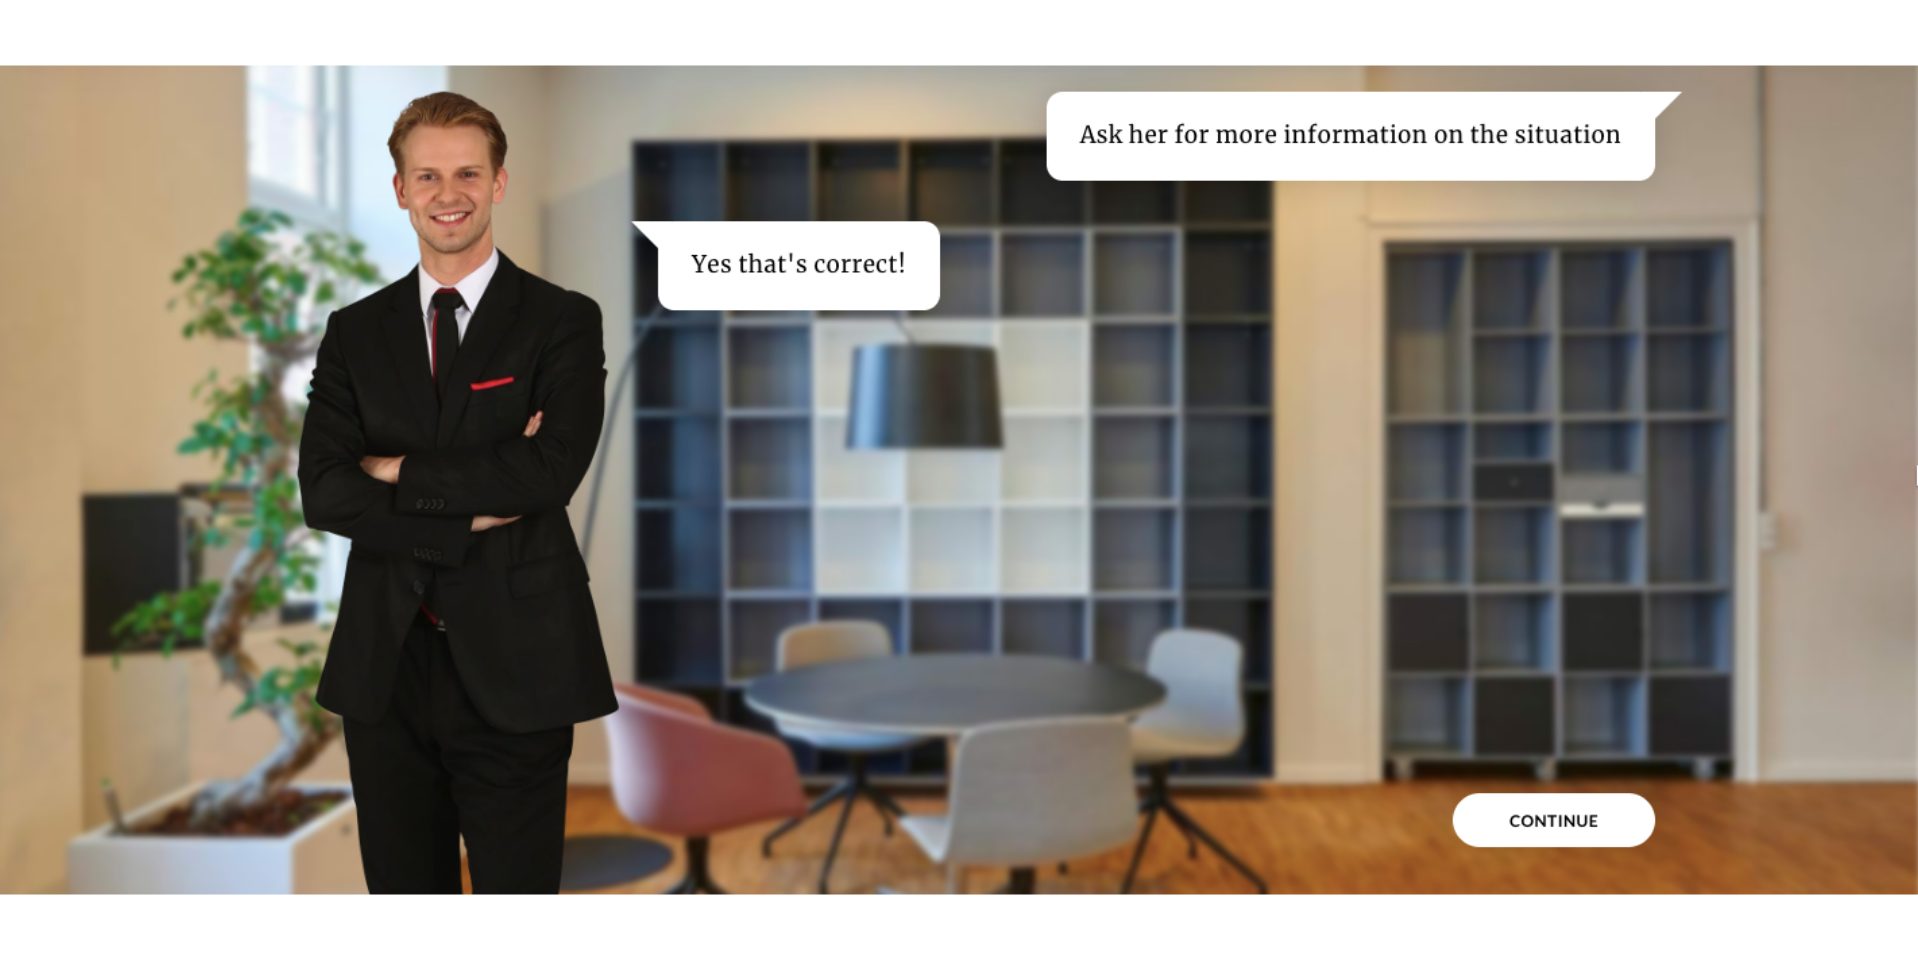
So, I took it a step further and revamped the course with animated gifs and scenario-based experiences, adding dynamic characters and interactive storylines that bring the learning to life.
The result? An immersive, engaging course with an assessment that feels more like a real-world scenario than a static quiz with cutout characters.
See the difference? The animated gifs and characters breathe life into the learning experience, making it far more captivating than the standard cutouts provided by Rise 360.
This animated, scenario-based assessment was built using Animaker to create the animations and Articulate Storyline for interactivity, and it was finally integrated into a Rise 360 course.
For those unfamiliar, Animaker is an AI-powered, web-based tool that allows anyone to create professional-quality animated content, even with no prior experience.
Here’s a glimpse of Animaker’s impressive features -
- Animated character library - 1000+ characters of different ages, sizes, and professions with 1000+ actions and 20 expressions and an in-built character builder to create a Billion+ character possibilities.
- Asset library - Access to 150M+ assets, including 2D backgrounds, properties, icons, stock images, videos, and royalty-free music.
- In-built AI features -
- AI animation generator - Instantly generate animated videos, which can be further customized.
- AI asset generator - Generate backgrounds, properties, and images with ease.
- AI subtitle generator - Generate subtitles and translate them into 130+ languages.
- AI voice-over generator - Choose from 2,000+ voices in 200+ languages to narrate your videos.
With all these features at your disposal, creating engaging, animated content for your Rise 360 courses has never been easier.
Now, without any further ado, let’s see how to create a course in Rise 360 by integrating these powerful tools and features!
How to create a course in Rise 360? (Animated, Interactive, Scenario-based!)
This step-by-step guide will demonstrate how to seamlessly combine Animaker and Articulate Storyline, integrating them into a Rise course to create immersive, animated experiences that will captivate your learners.
- Create a Script
- Create animated videos using Animaker
- Upload videos to Articulate Storyline
- Integrate interactivity into the course
- Publish to Review 360
- Import the course to Rise 360
With these six steps, we can create a similar, engaging, interactive course. Now, let’s dive into the process!
Step 1: Create a Script
The first step is to get the script ready.
Outline the main points you want to cover in your course and structure them into clear, concise lessons. You can even seek the help of AI tools like ChatGPT and Gemini for structuring.
Once you get the script ready, or if you already have one, let’s move on to the next step.
Step 2: Create animated videos using Animaker
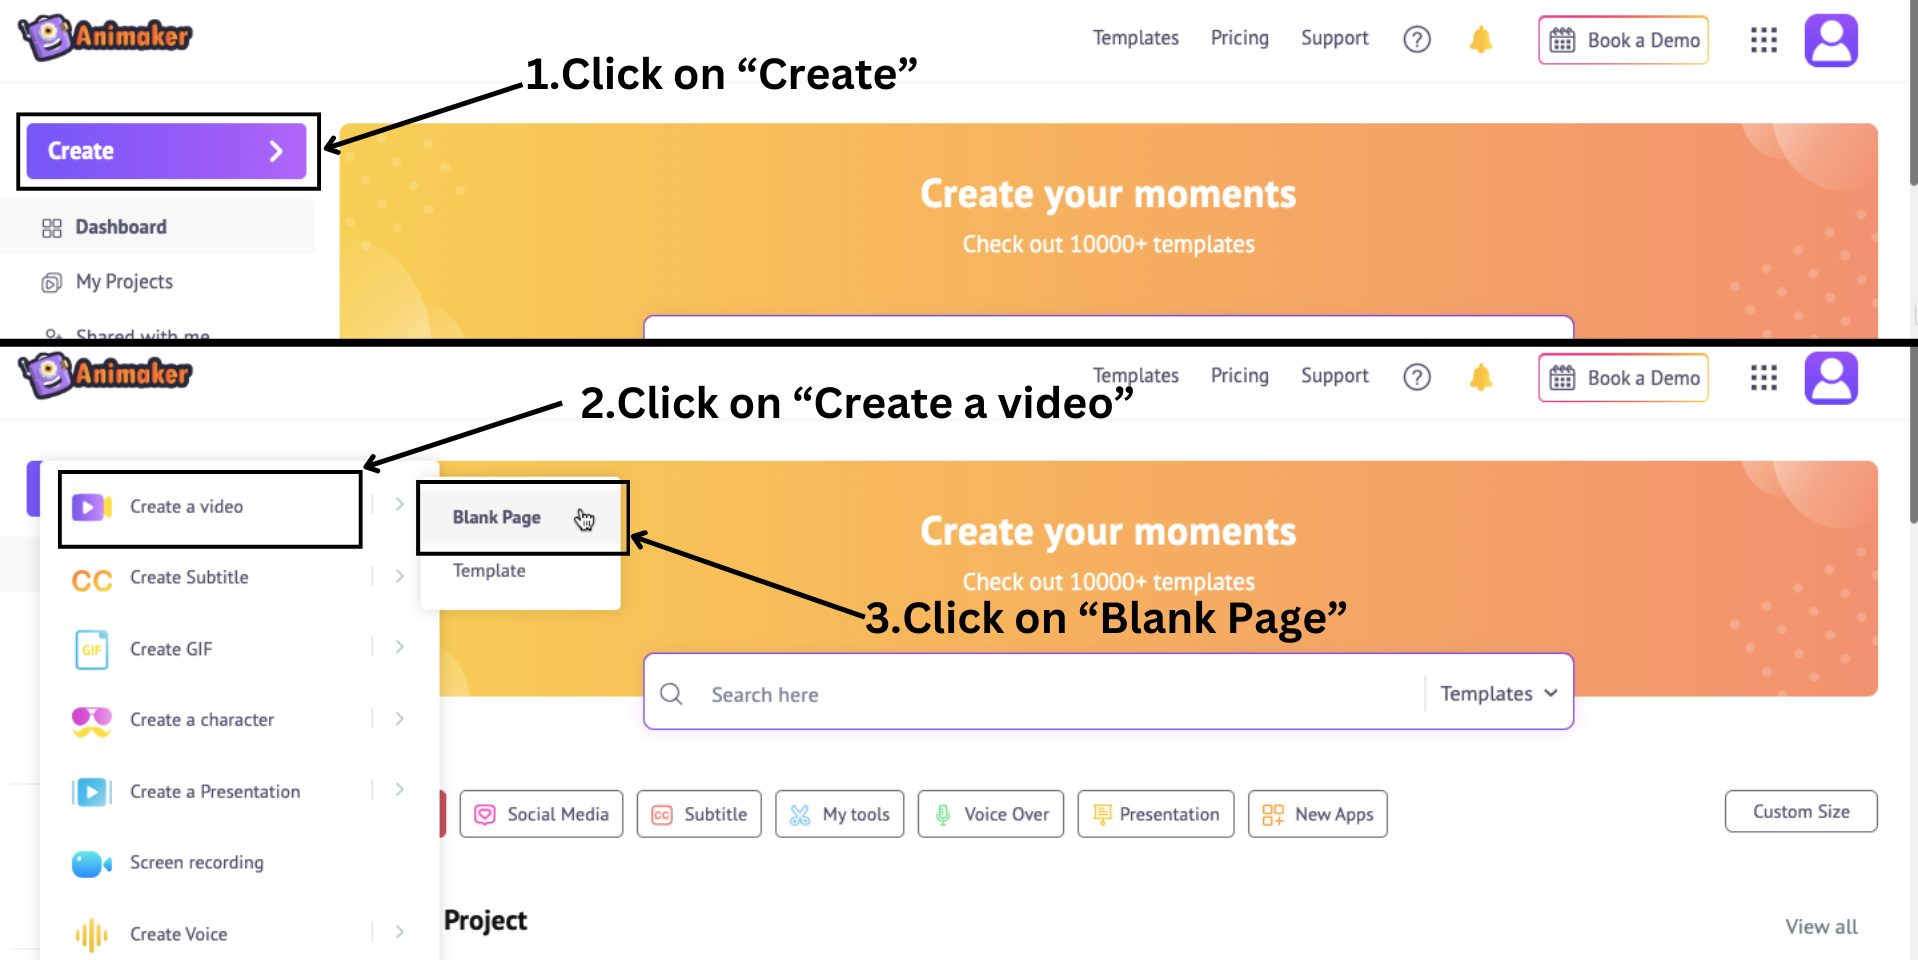
This is where we are going to create the engaging animated videos. Go to Animaker and log in or sign up if you’re new.
Once you’re in the dashboard, select Create > Create a video > Blank Page.
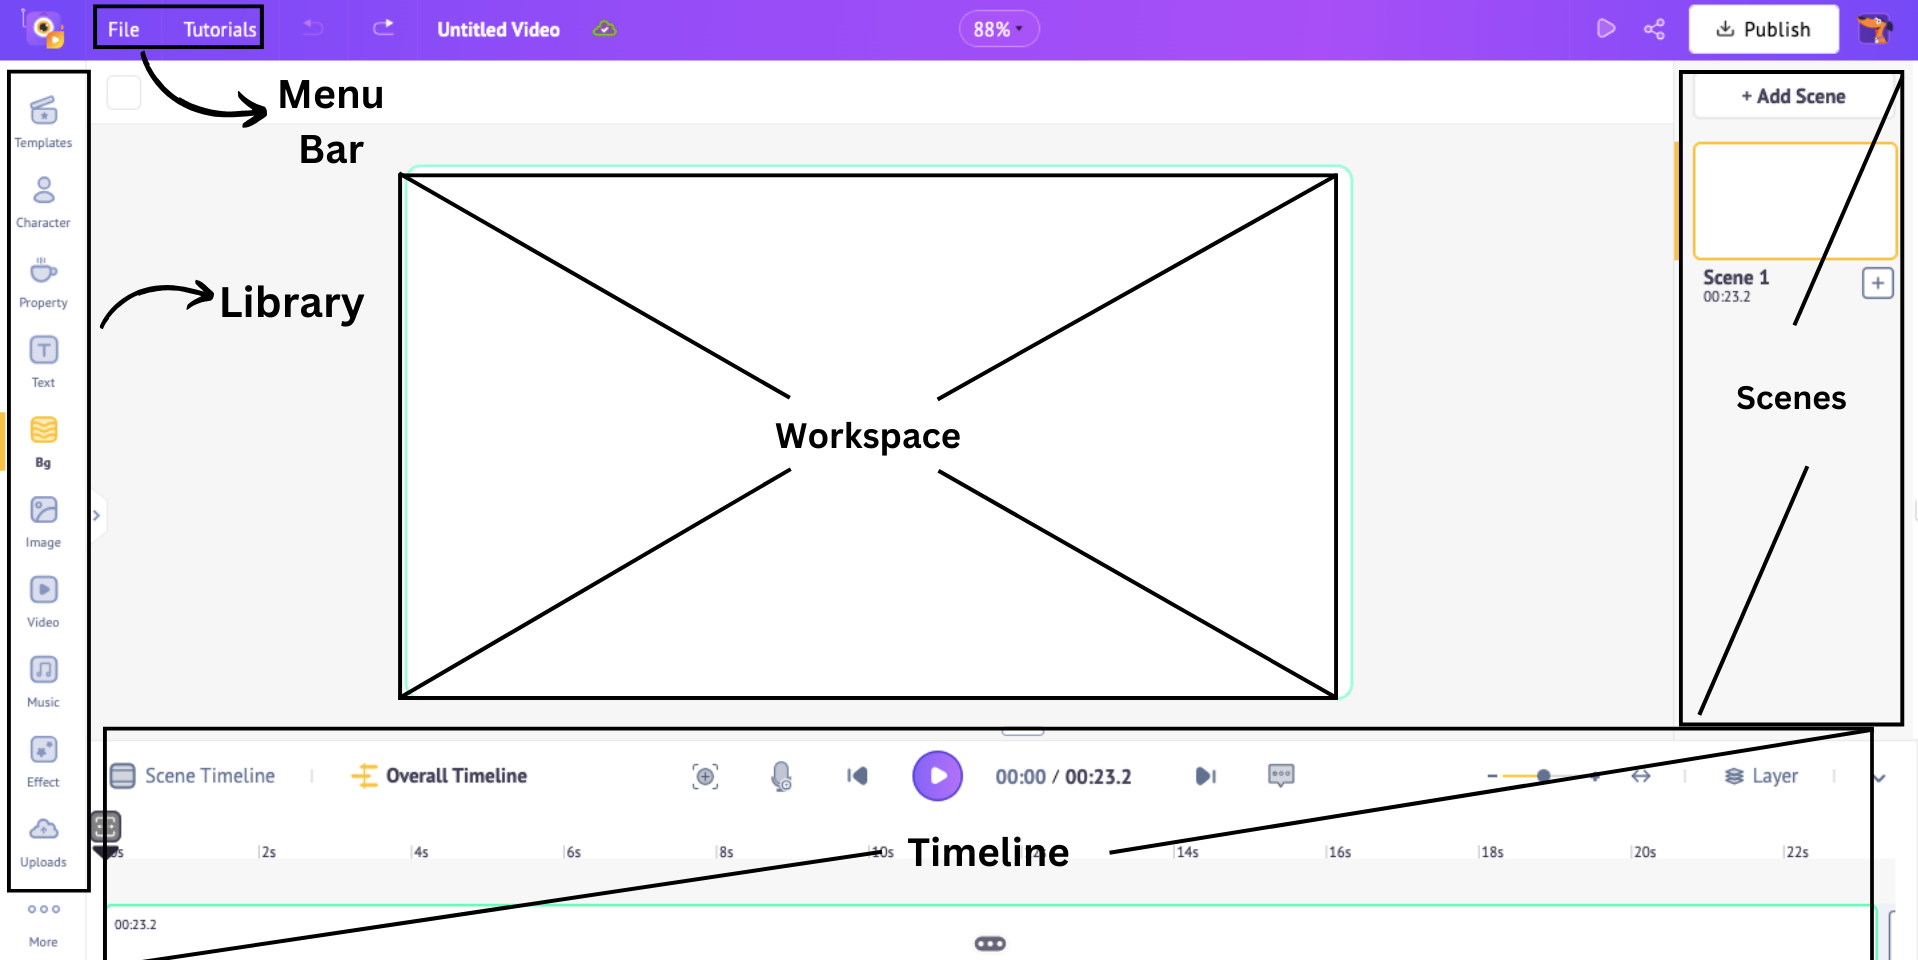
This opens a new blank project. Let me give you a quick tour of the interface.
The workspace is located in the center of the screen, where you can create and edit your video. On the left is the library with millions of assets and on the right is the scenes section where you can manage and organize your scenes.
Above the workspace is a menu bar with additional options and tools, and the timeline is located at the bottom, where you can precisely adjust your video and its assets.
Let’s start adding these elements one by one -
A. Add Backgrounds
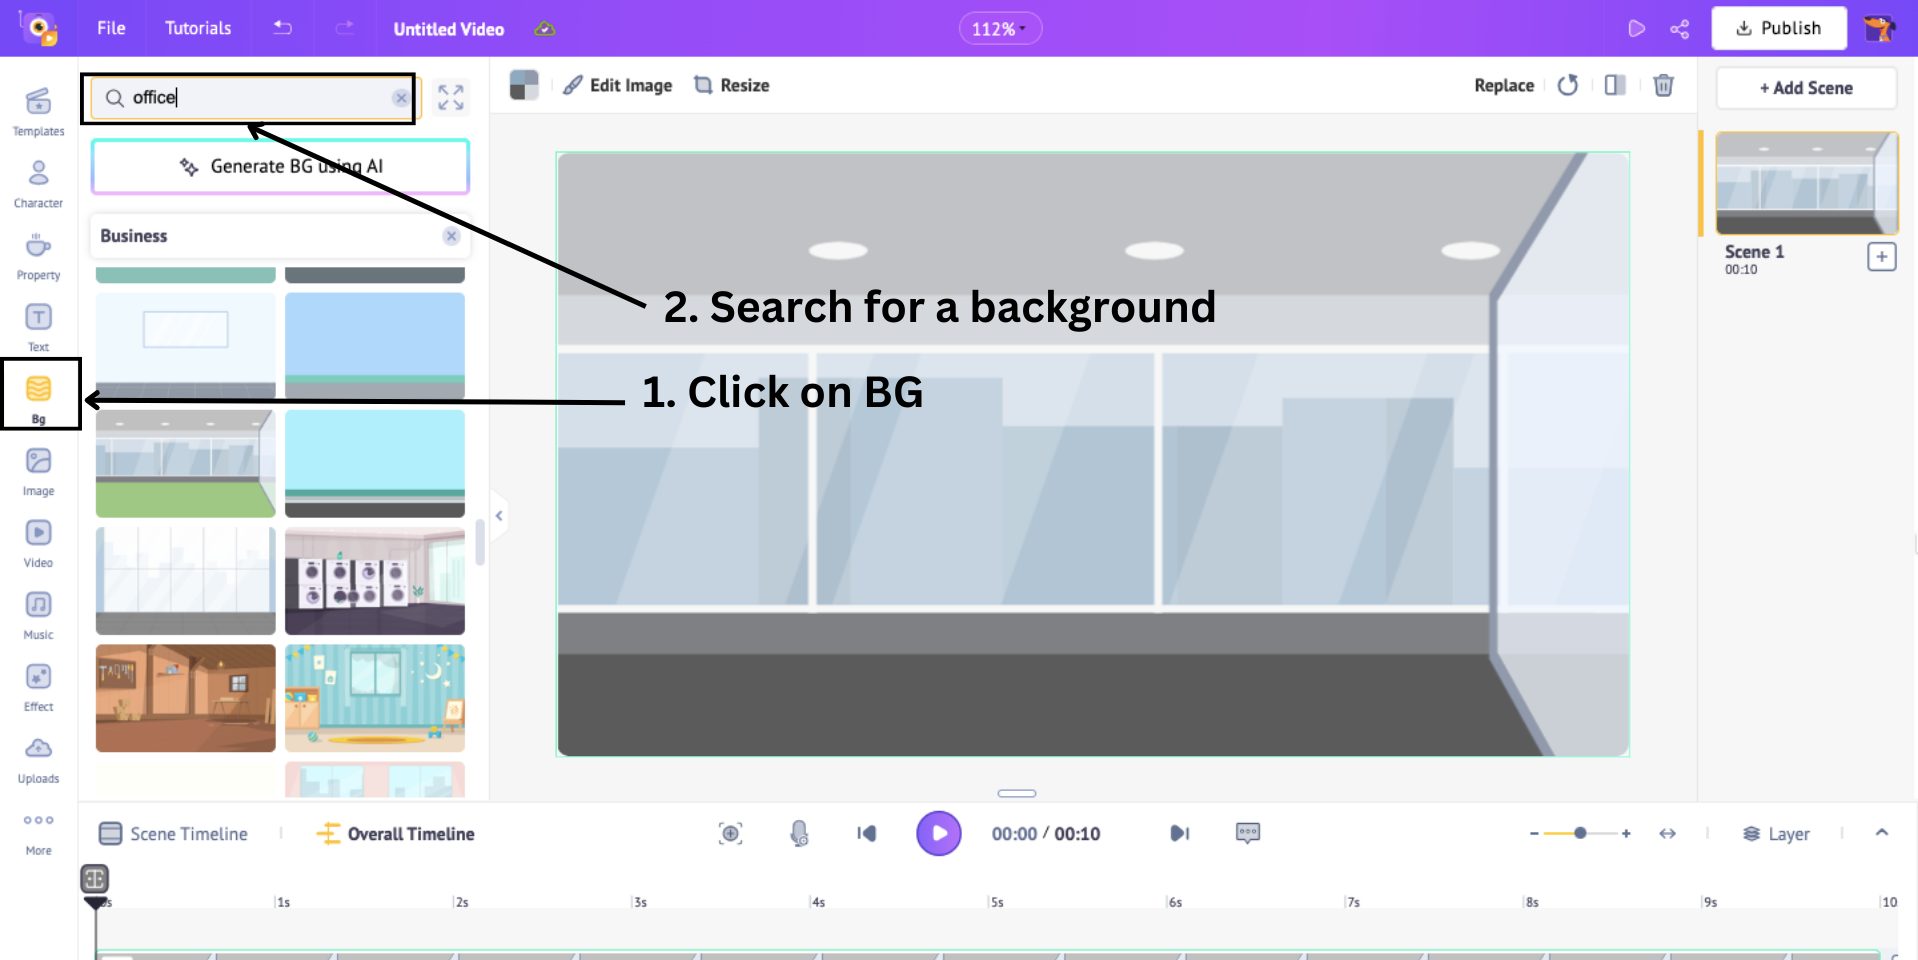
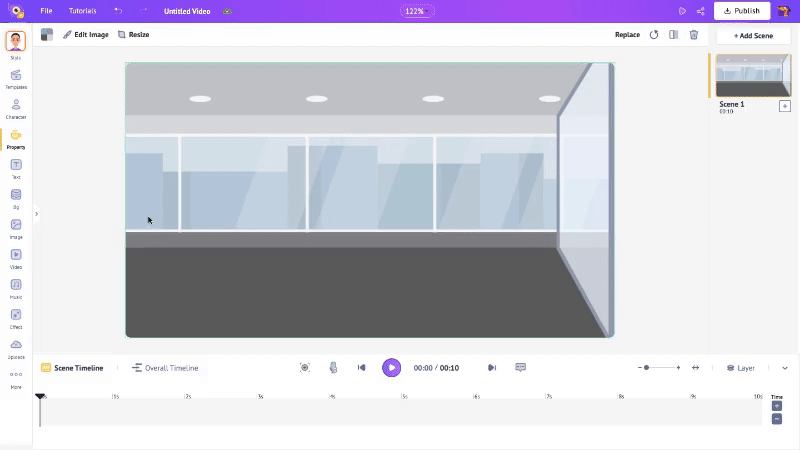
In Animaker, there are five different background options - solid, gradient, 2D, Image, and Video.
For my example, however, I require a 2D office background. So, I click on the Bg option from the library and search for the keyword “office”.
Choose a background from the results and click on it to add it as the background.
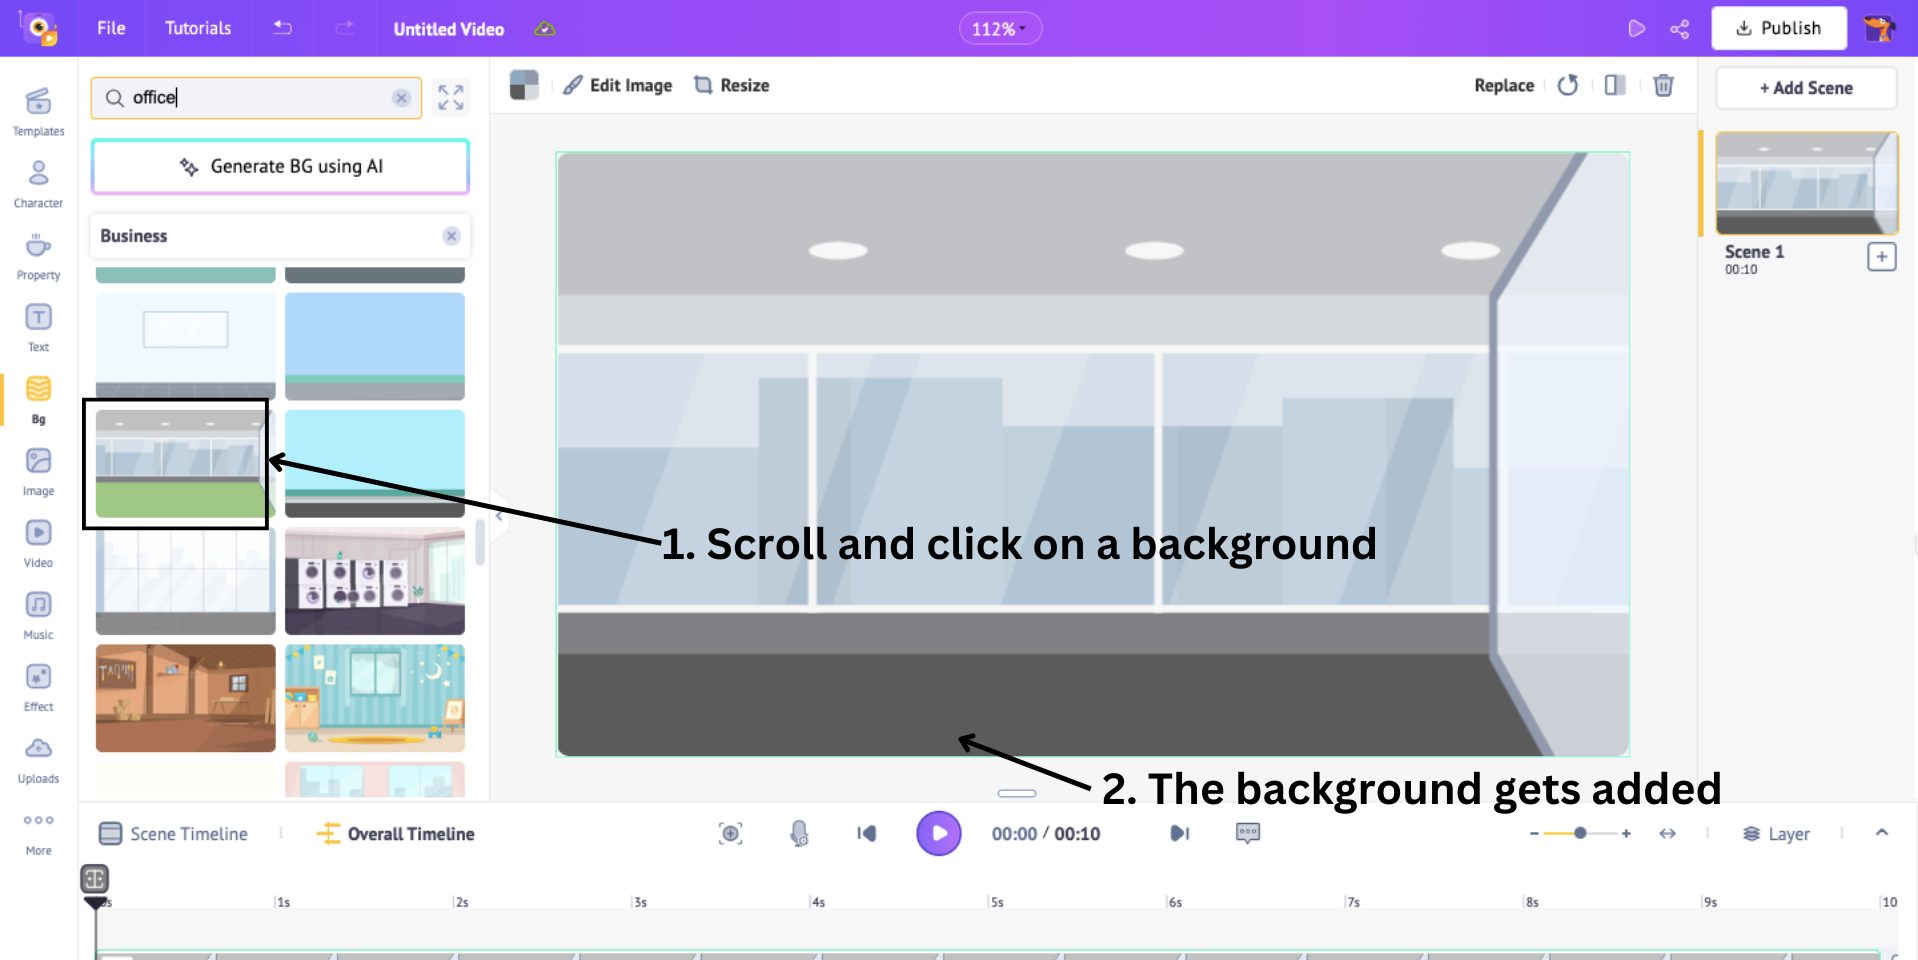
And just like that, we added the background! Next, let’s add some furniture to the background.
B. Add Property
Our Animaker Property Library has over 90K icons and properties, including various shapes, buildings, furniture, and more.
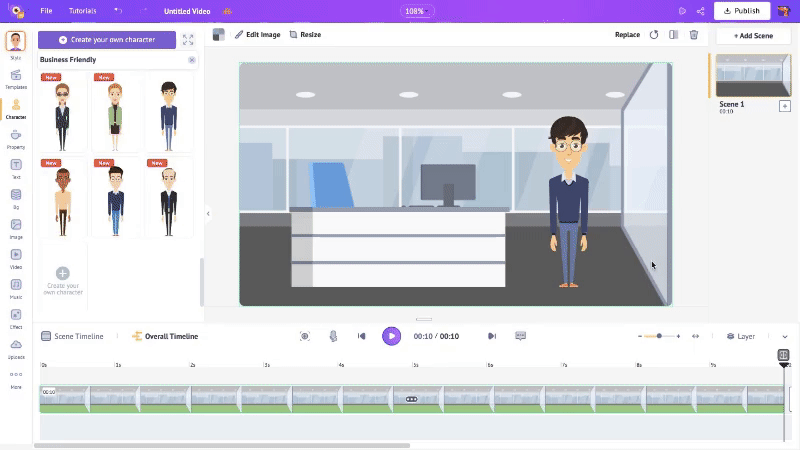
Here, let’s enhance our office background by adding some furniture. To begin, let's add a chair.
Click on the Property option and use the search box to find the furniture. Select a chair from the results, and it will be added to your background.
Feel free to resize and reposition it to fit perfectly in your scene.
Similarly, you can add a desk to the workspace.

You can also add more properties if you’d like. Once you are done, it's time to add the stars of our course - our animated characters.
C. Add Characters
Animaker’s Character Library features over 1,000 characters of various sizes, ages, and professions.
In addition to this extensive in-built collection, you can create a character from scratch using the Character Builder tool.
This allows you to customize facial features, hairstyles, outfits, and accessories, giving you the flexibility to create billions of unique character combinations!
Think about it: you can design a character that resembles someone in your organization, such as your CEO, Chief Learning Officer, or even a brand ambassador featured in all your courses. This personalization makes your training videos more relatable and memorable for your employees.
To learn how to make a character from scratch, check out the video below -

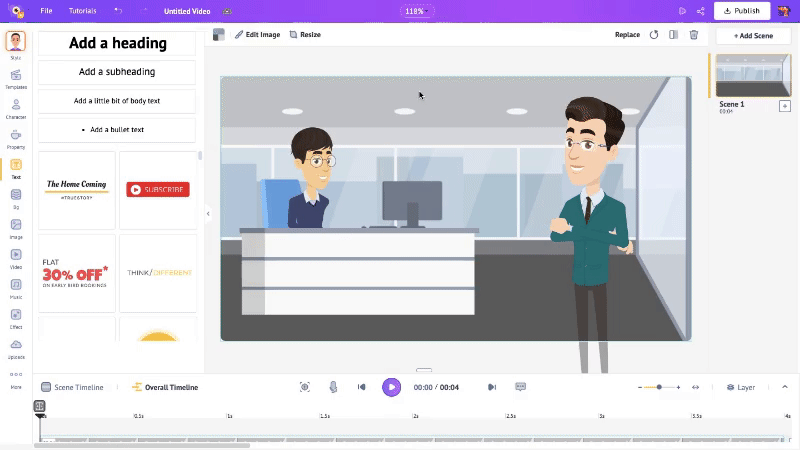
For this course, I am going to opt for a built-in character. To do that, click on the Character option and select a character from the business-friendly section. The character gets immediately added to the workspace when you click on it.

Next, let’s make the character sit and work. This is going to be very easy to do so.
Select the character, then head to the Action tab and type "sit" into the search box. Choose an action from the results, and watch as your character adopts that pose.
Then, place the character on the chair.
This is a simple one-action pose. Like this you can add multiple actions to a character like this in mere clicks -

Check out the video to learn how.
Apart from that employee sitting at the desk, I added one more character to the scene.
Now, let’s see how to add the next element.
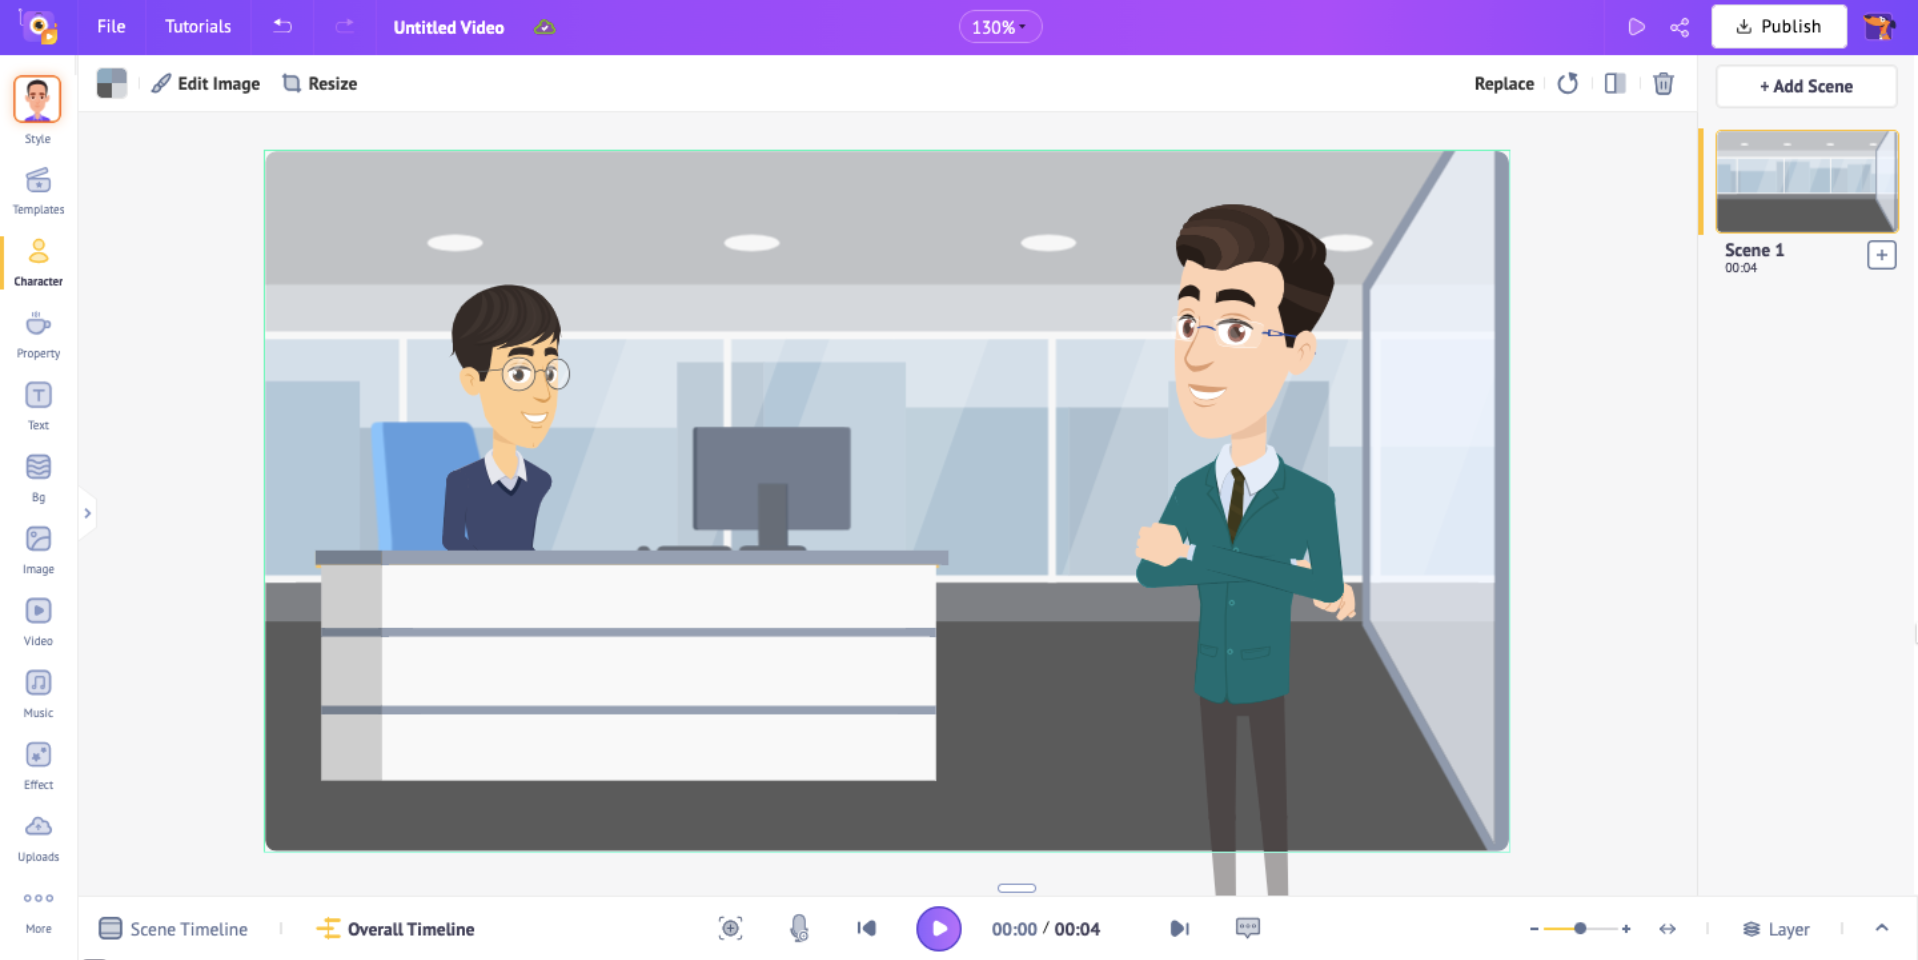
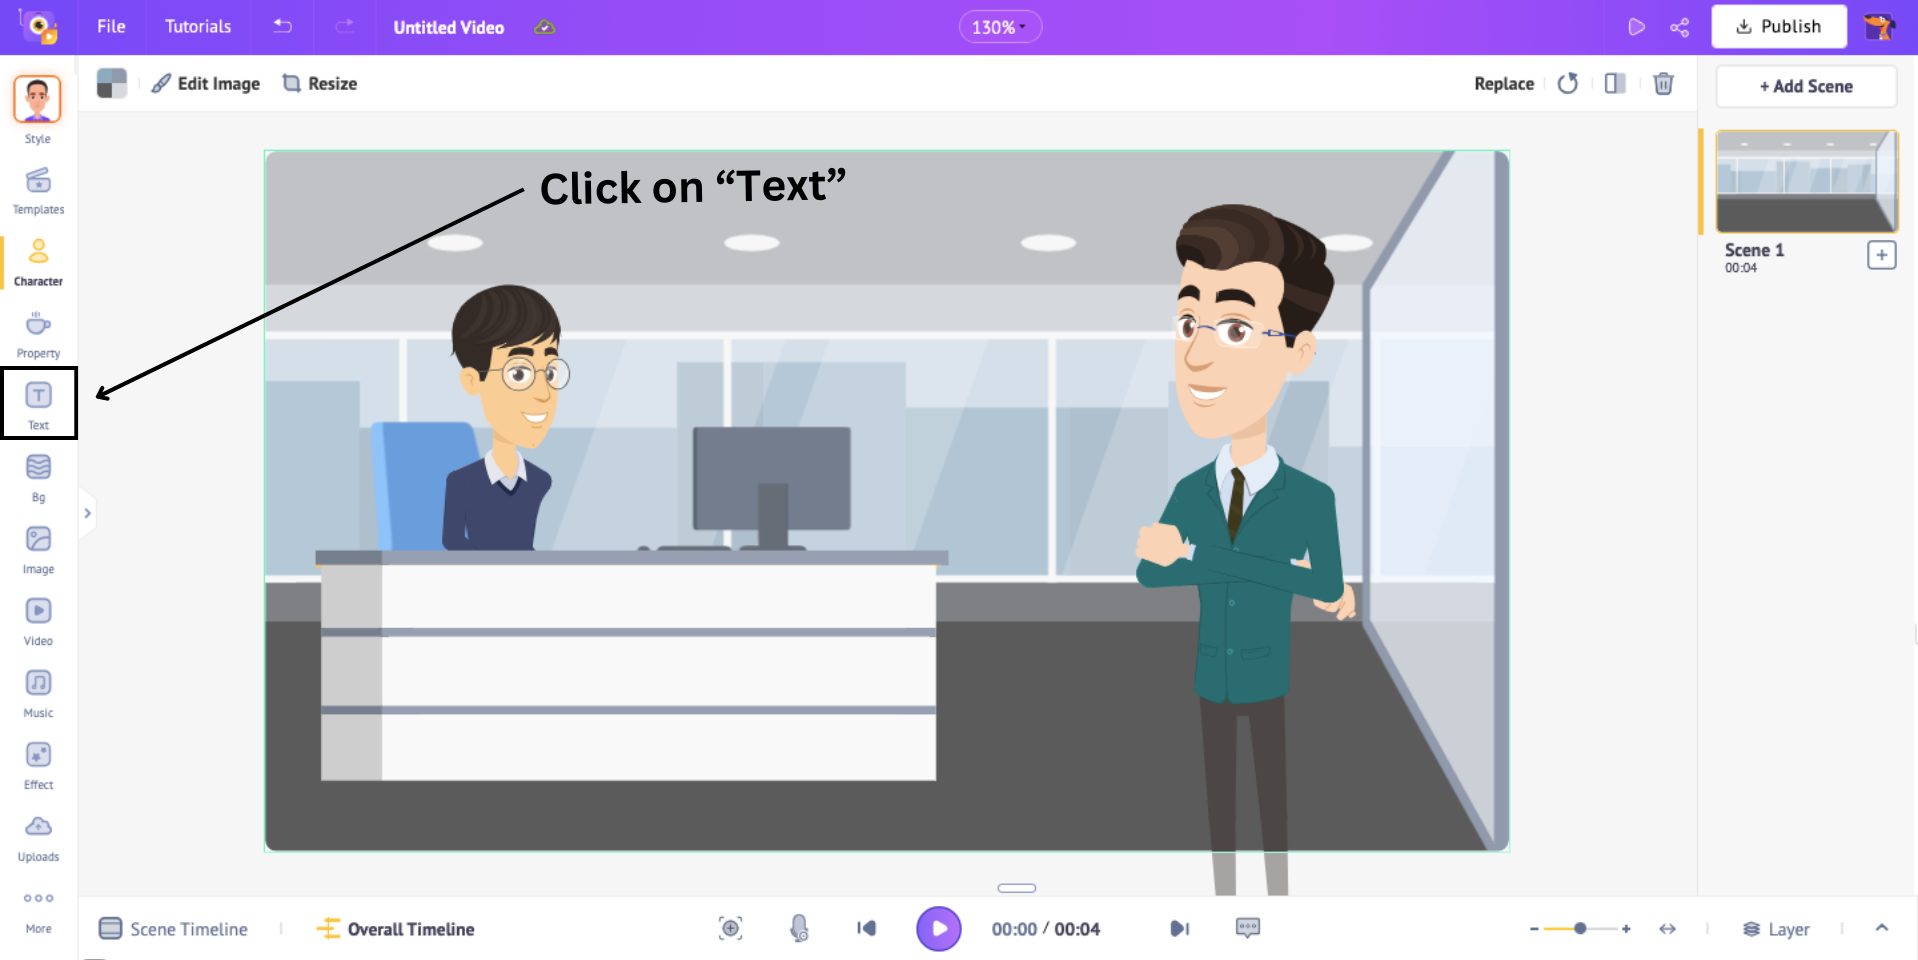
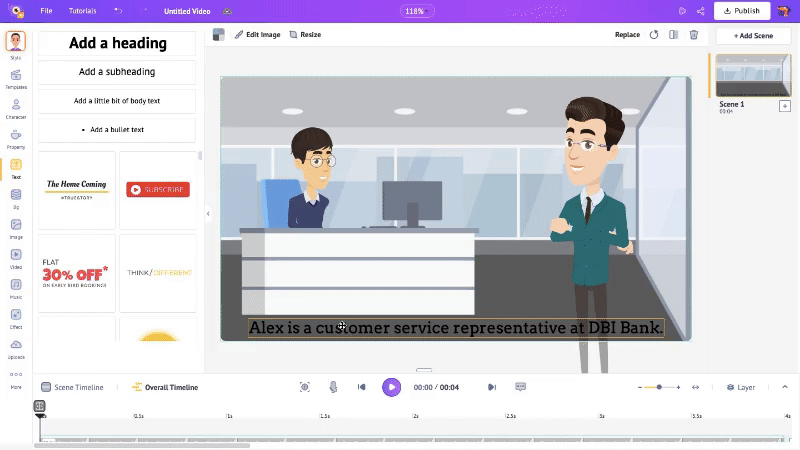
D. Add Text
Now that we have added the background, properties, and characters, let’s add text to the video.
To add text, click on the Text option.
This will open a side panel with two types of text - Prebuilds and Plain.
Text Prebuilds have everything already added, from design, text font, color, and animation effects added. Plain texts, on the other hand, can be customized from scratch by the user.

Here, I’m choosing the plain text. Click on one of the types of plain text box and position it to where you want it placed. Then, type in the text.
You can change the text color by clicking on the text box and selecting the color box. Then, you can click on the Edit text option to change the font and its size.
Apart from all this customization, you can even add animation effects to the text!
To do that, click on the text box and select the Animation option. This will open a list with 35+ enter and exit animation effects to choose from and add to your text.
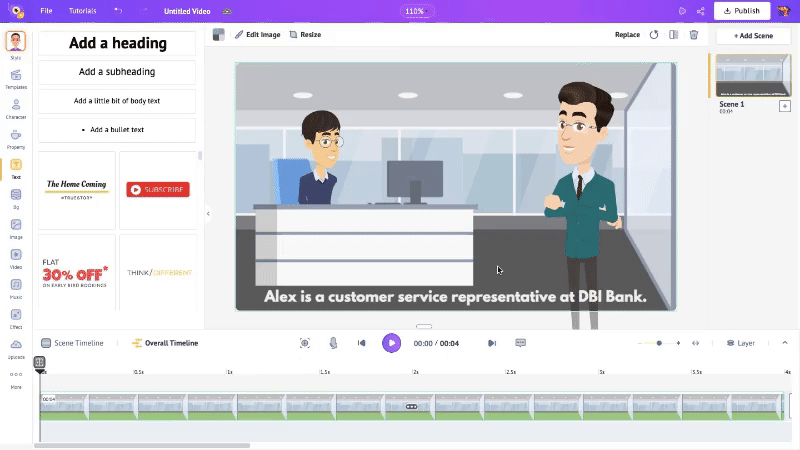
After selecting the desired effects, you will notice two highlighted sections appear on either end of the orange section on the timeline. These sections indicate the duration of the effects.
You can adjust the duration by dragging the inner corners of the highlighted section.

After adding the animation effects, the scene looks like this -

Looks great, right? This is how you add text and animation effects in Animaker. You can add more text boxes if you want.
However, I’m going to remove them for now and add them in the later steps.
Next, let’s give voice to the narrator!
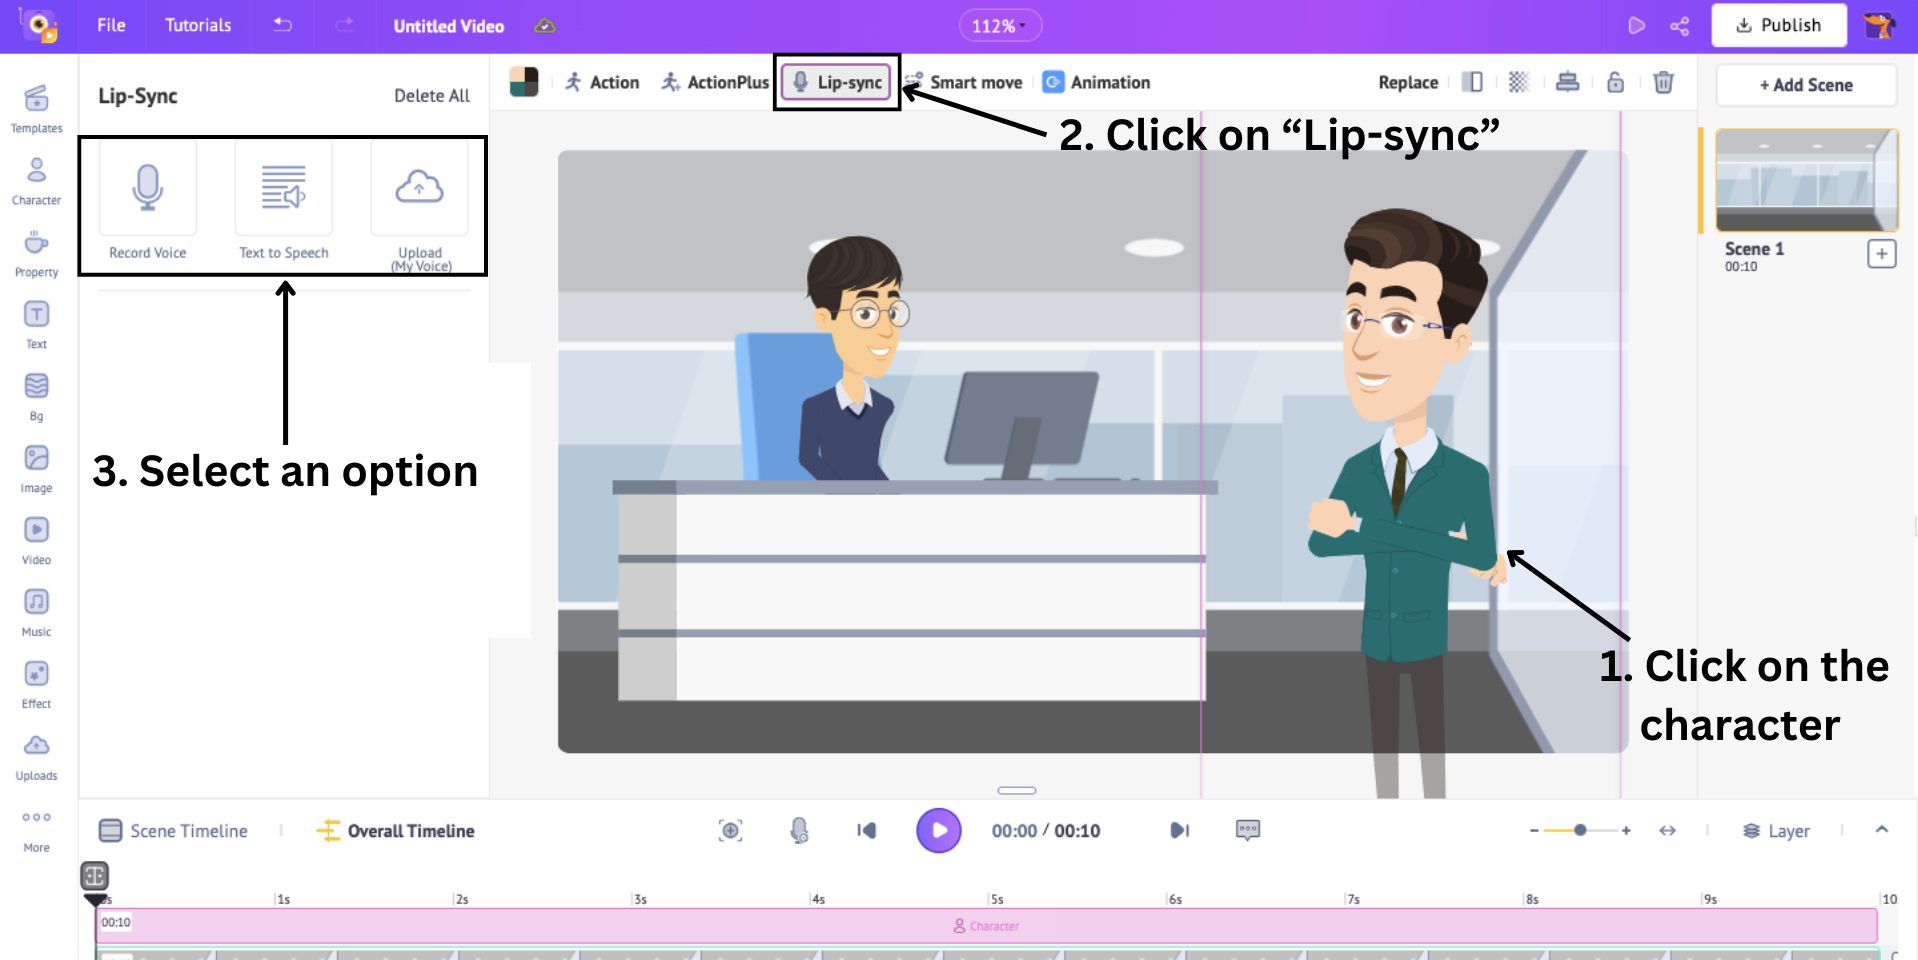
E. Add Voiceover
With Animaker, you can add voiceovers to the characters in multiple ways.
First, select the character and then click on the lip-sync option. Here, you will find three different options to add the voice-over.
- Upload - to upload an audio file
- Record Voice - to record directly and add the voice
- Text to Speech - to convert text to AI voices
Here, you guessed it, I’m going to use the TTS option.
When you click on that option, a pop-up window appears where you can type in the text for narration or dialogue. Then, on the right, choose the language and gender and select the AI voice from 200+ options and accents.
Click on Preview to listen to the AI voice, and click the other button to add it to the video.
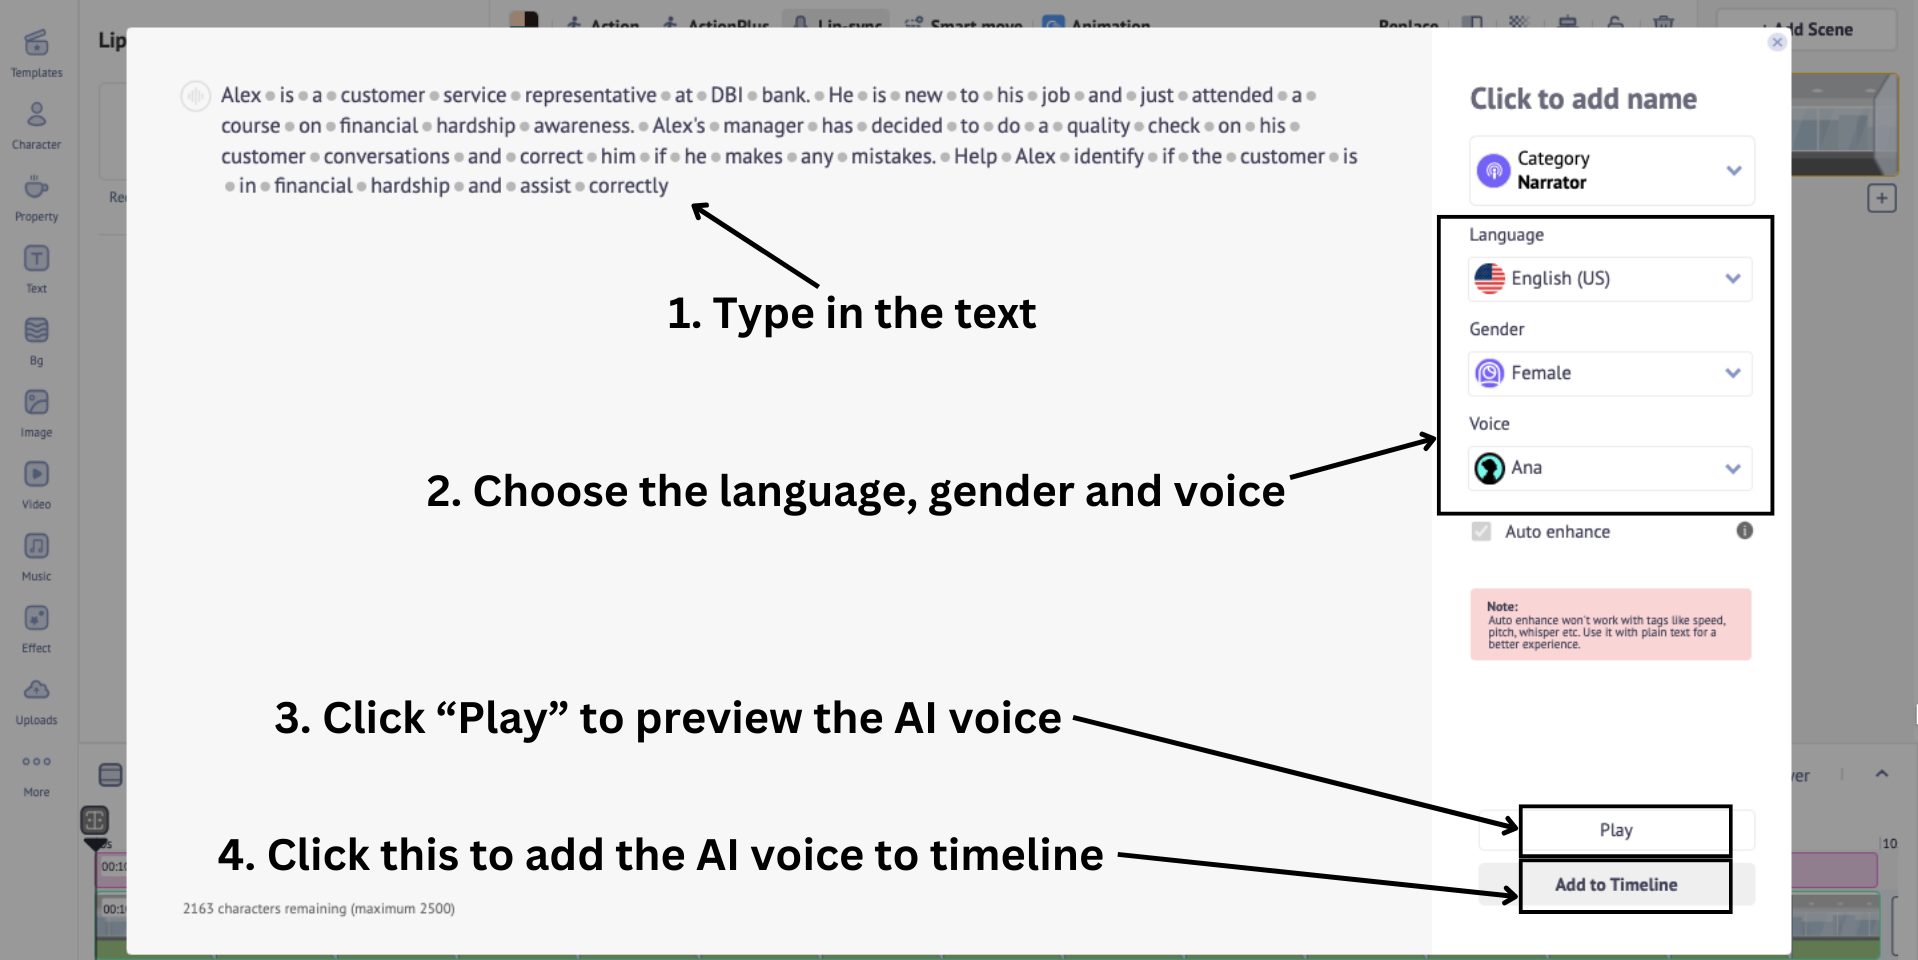
That’s all! The character now has an AI voiceover added to it.

This is just the first scene of the video. You can multiple scene to a video. To do that, click on the “+” button in the scenes section under Scene 1 box.
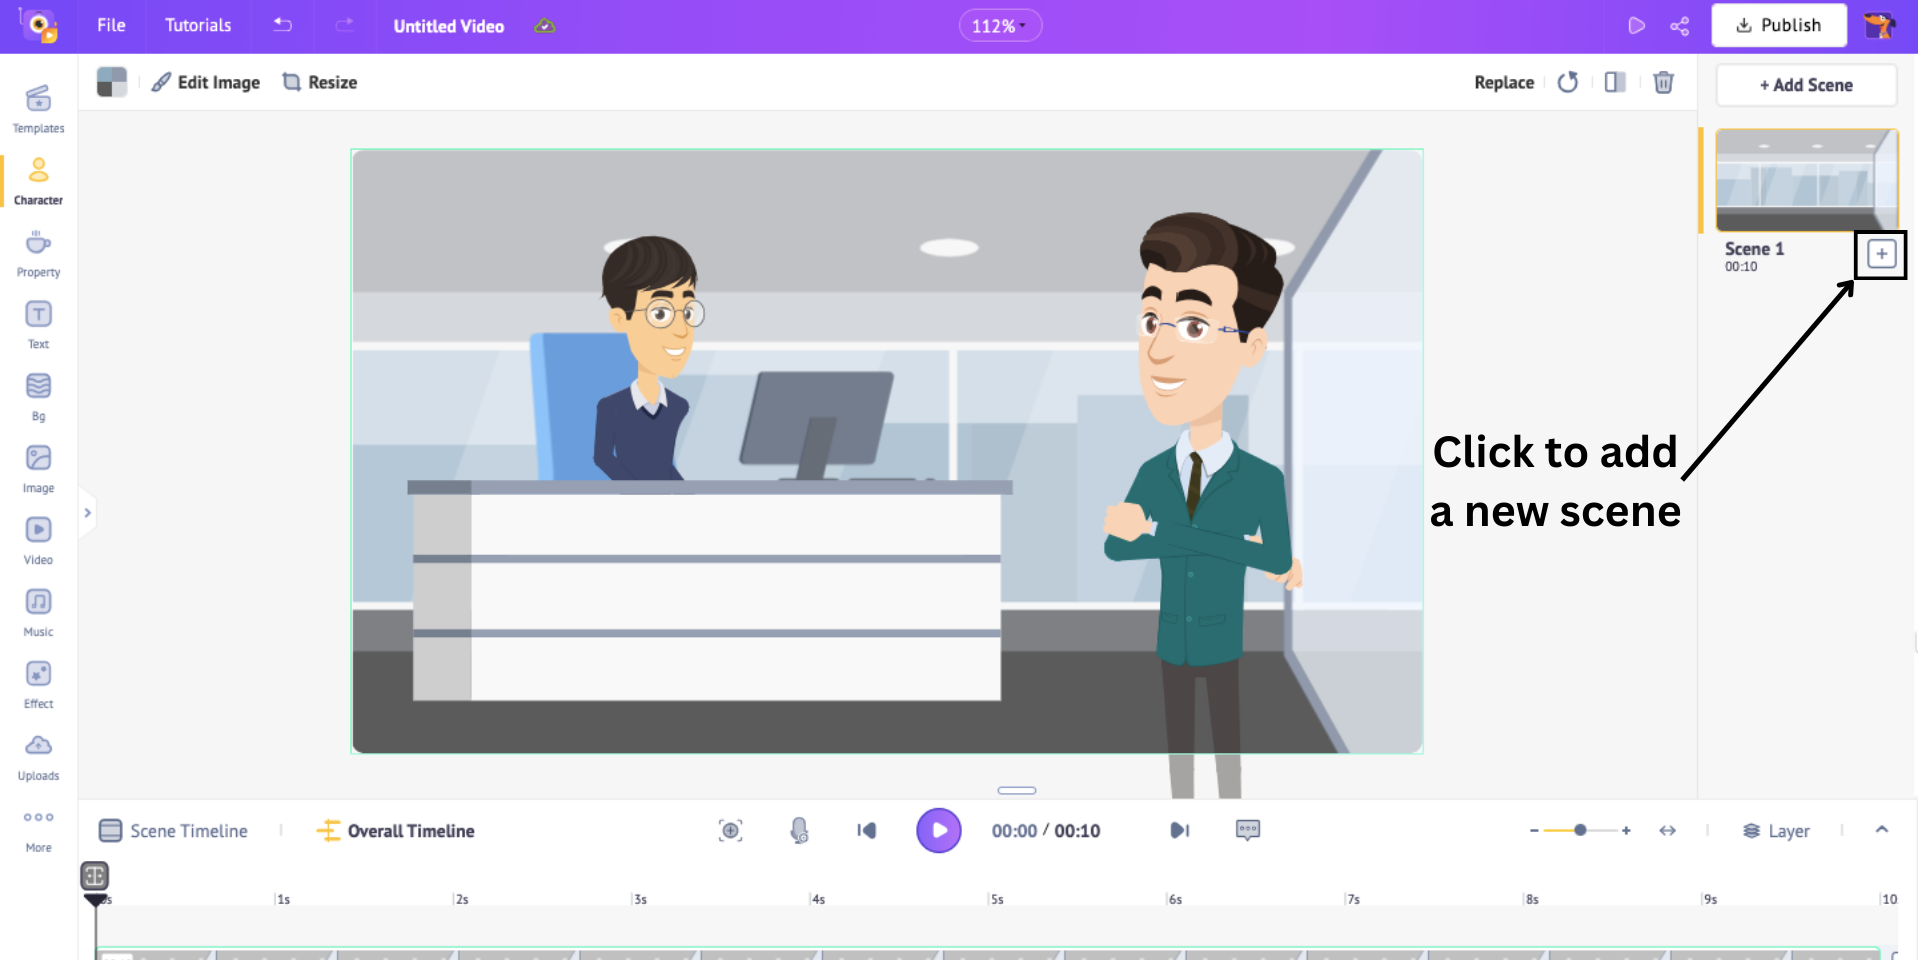
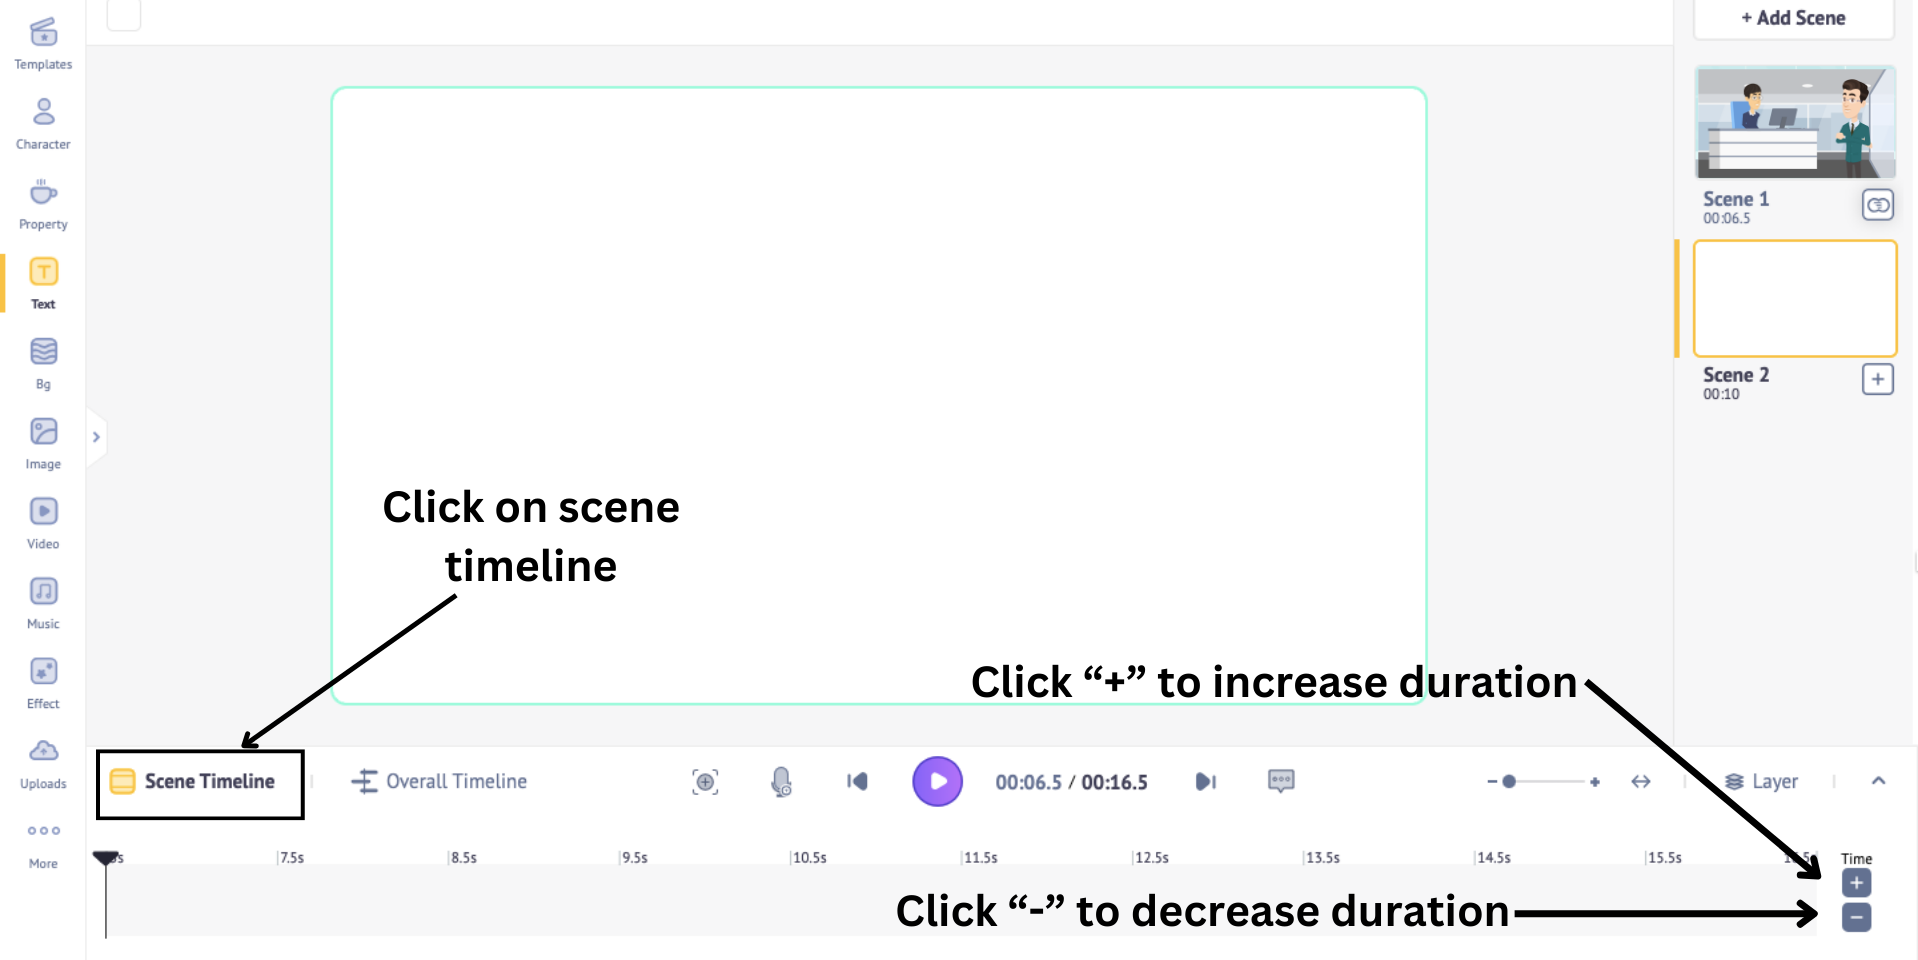
By default, the duration of each scene is 10 seconds. You can, however, adjust it by clicking on the “+” and “-” buttons in the scene timeline.
Using the steps above, you can add more scenes and elements to your video, such as properties and text.

So, once you finish creating the video, let’s move on to the next step.
F. Download the video
Once you are done, you can preview the video to check if it is the way you want it to be.

Next, to download, click on Publish > Download as a video > Download.
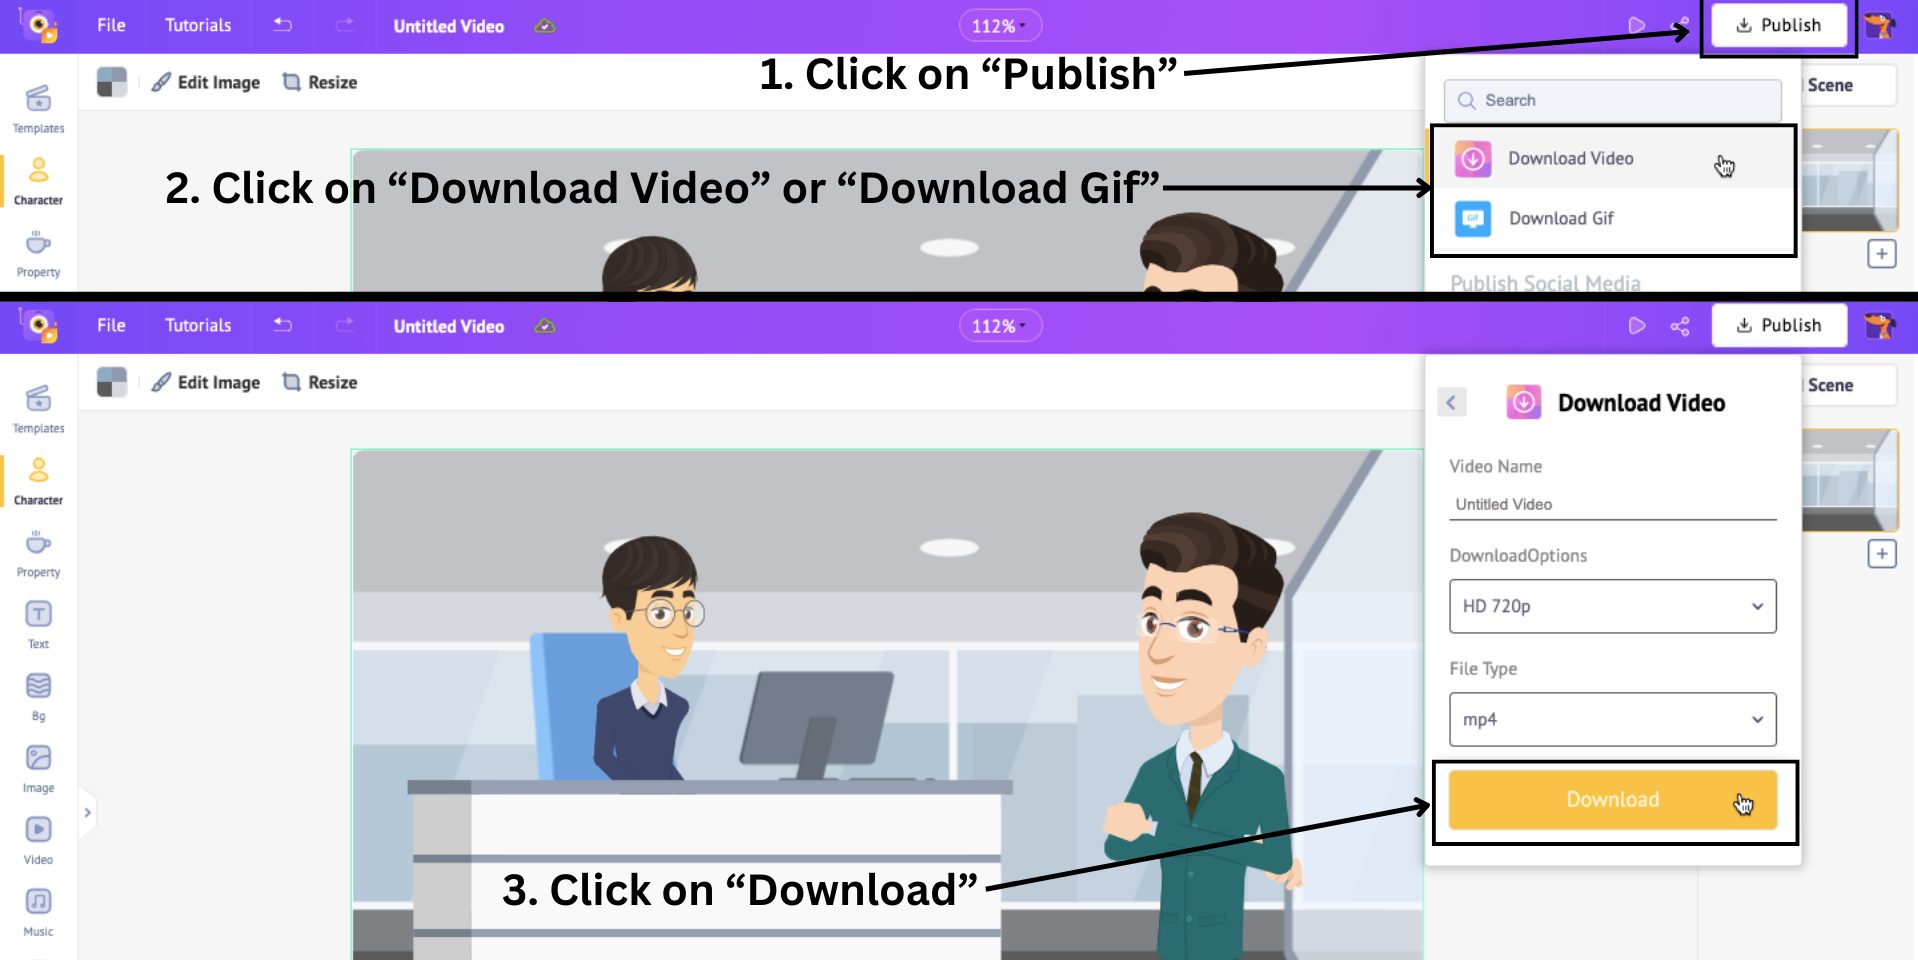
You will find the video ready to download from the exports page.
Now, before we move on to the next step, where we upload videos to Storyline, we need to create more videos to make a scenario-based course.
Let me explain.
You'll need to create multiple videos to illustrate various scenarios. This includes a video that presents a problem, along with separate videos for each option, each demonstrating different outcomes.
Create the rest of the videos and move on to the next step.
Step 3: Upload videos to Articulate Storyline
Once you have downloaded the videos from Animaker, the next step is to upload them on Articulate Storyline.
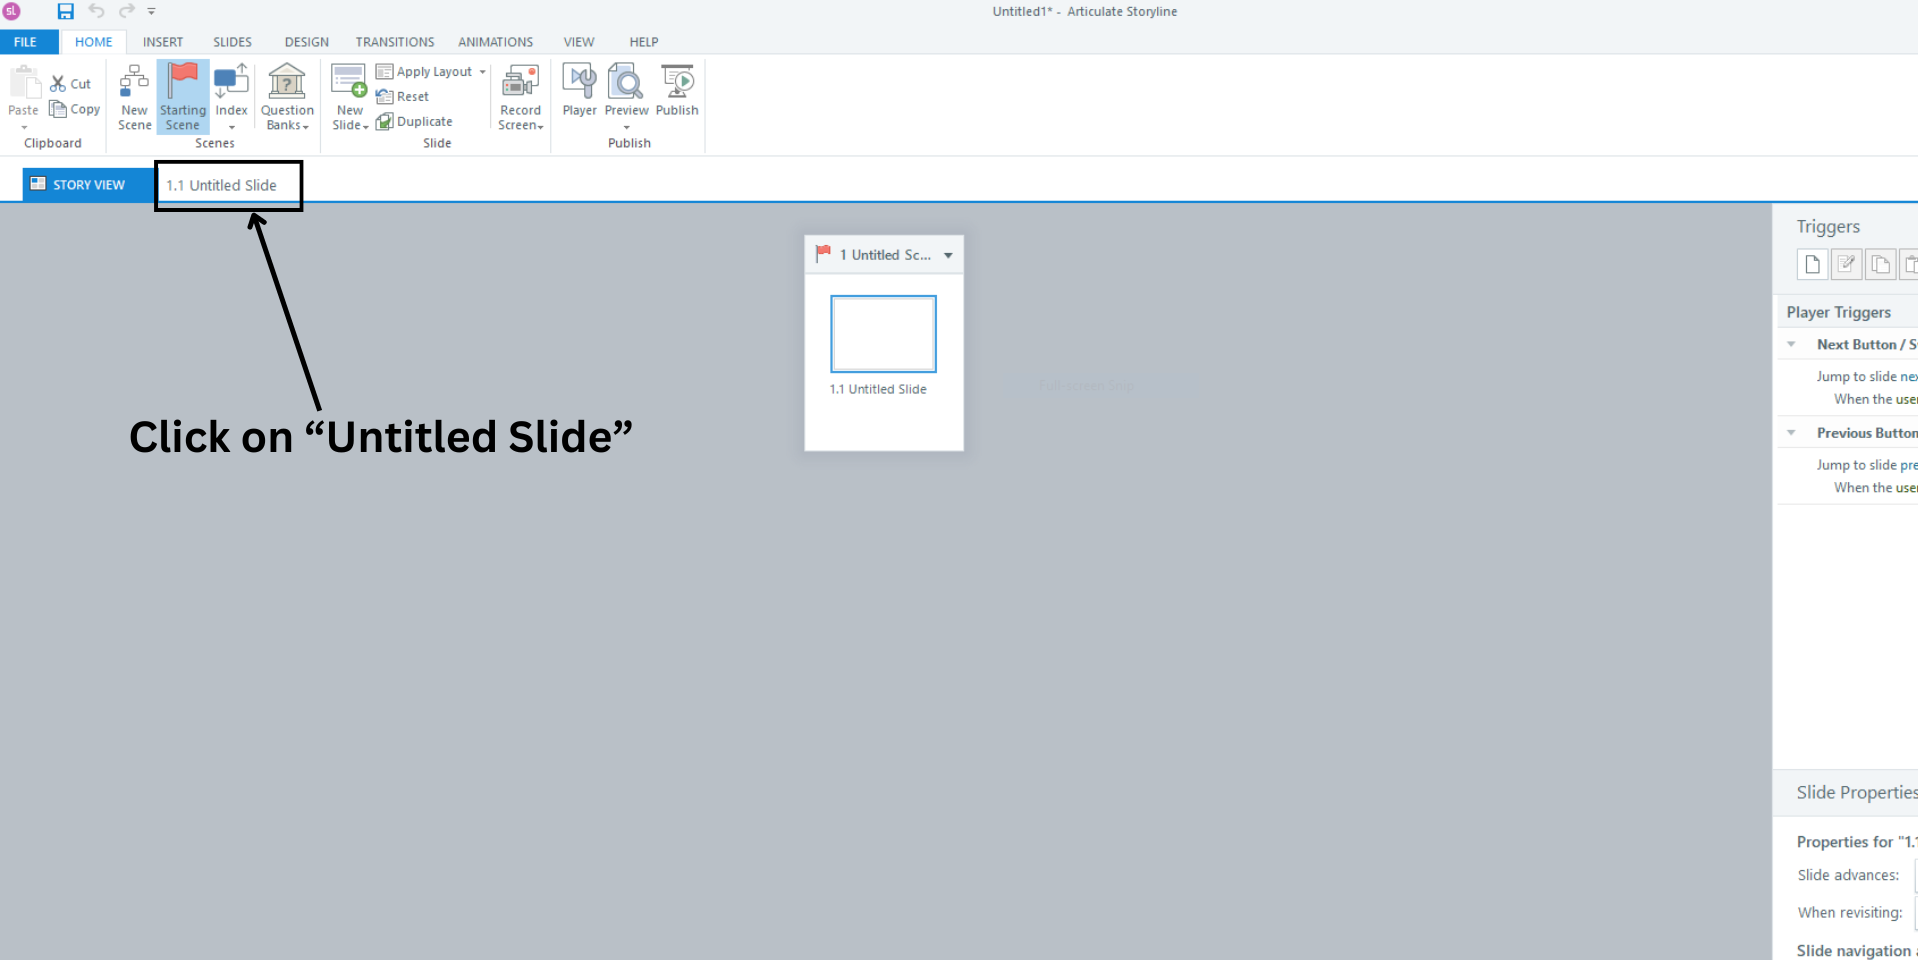
When you open the Articulate Storyline software, you will see the Story View by default.
Click on the Untitled slide tab next to the Story View tab, where we will upload our video.
Here, click on the Insert tab and select the Video option to choose a video file from your computer to add to the slide.
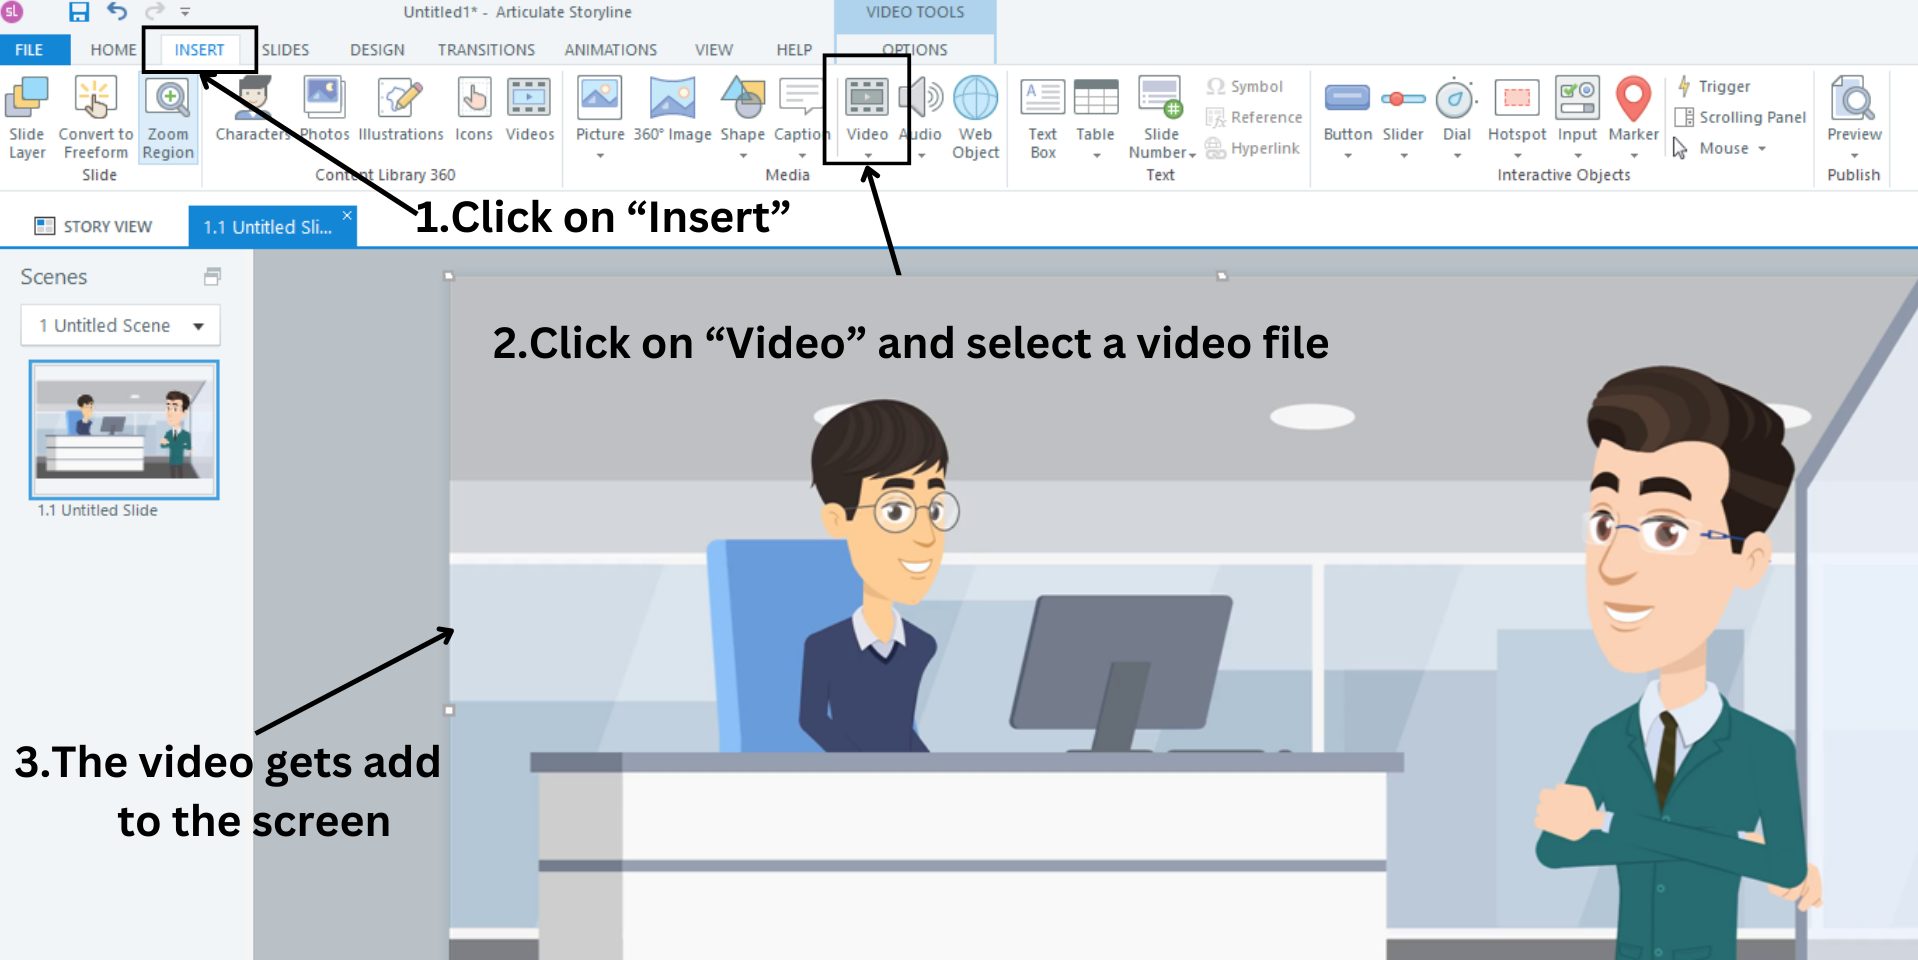
Congratulations, your first slide is complete!
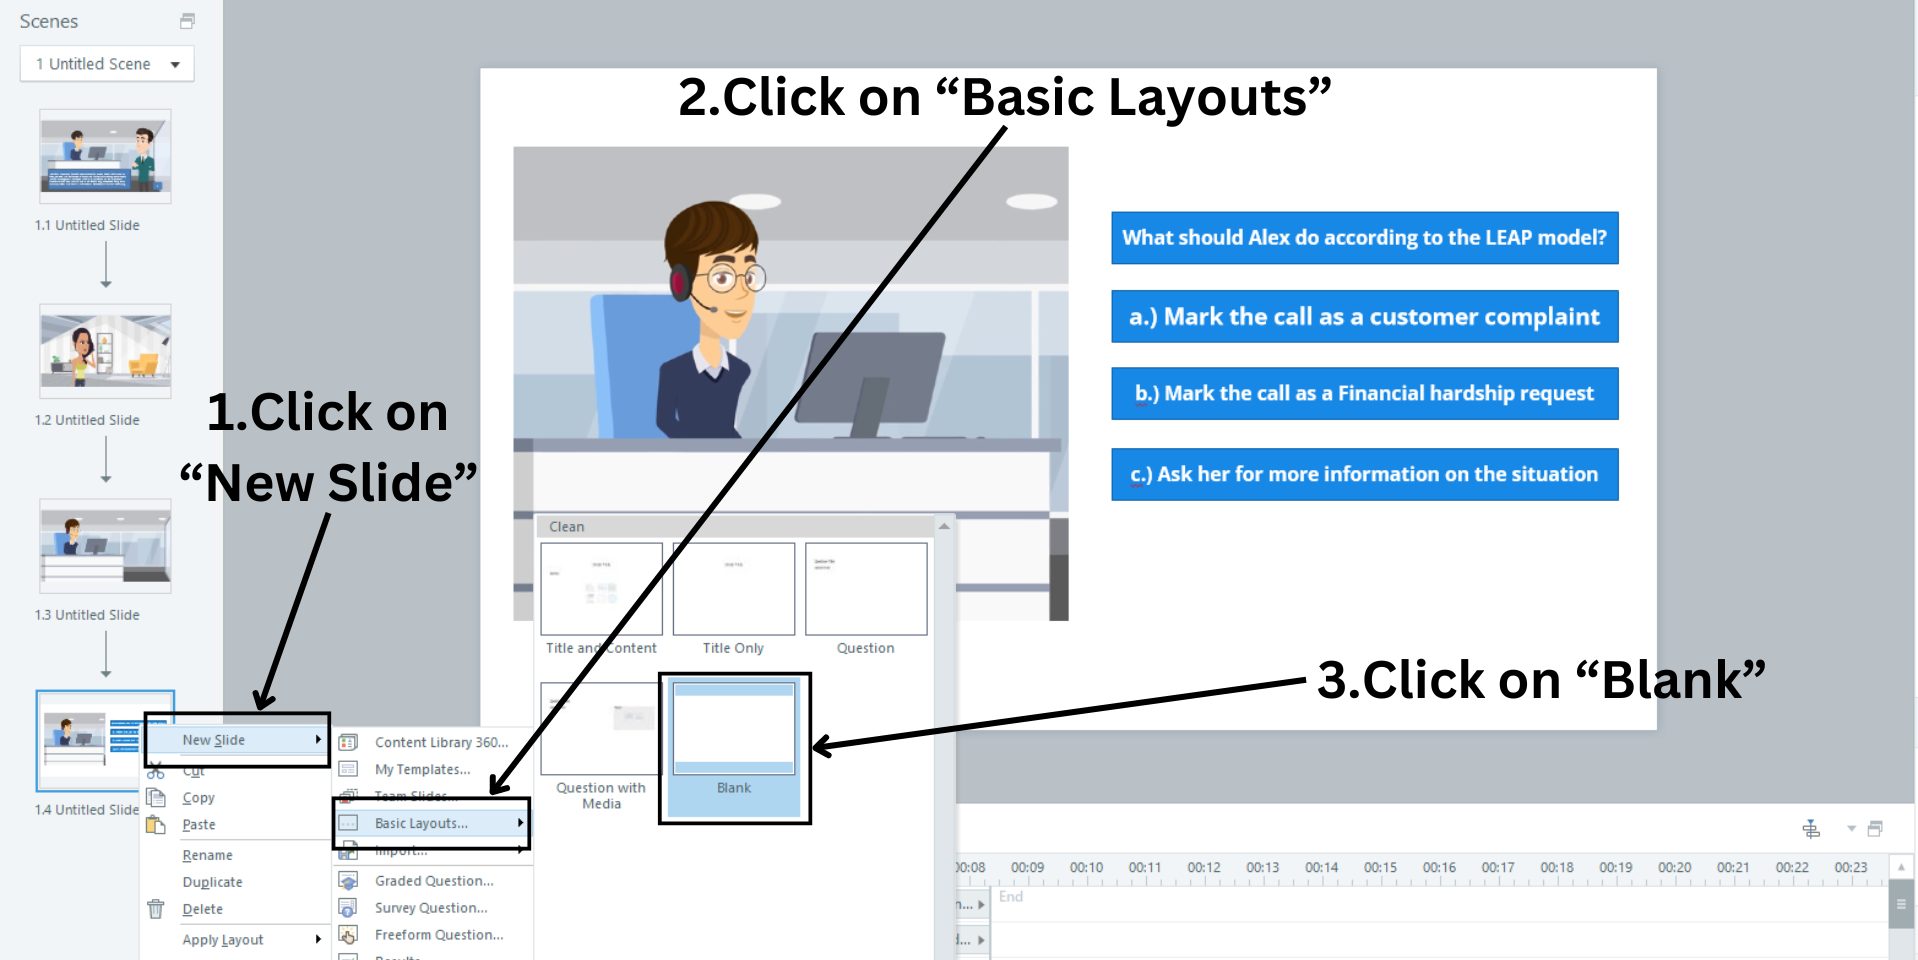
To add a new slide, right-click on the first slide on the left panel. This will reveal several options. Select New Slide > Basic Layouts > Blank.
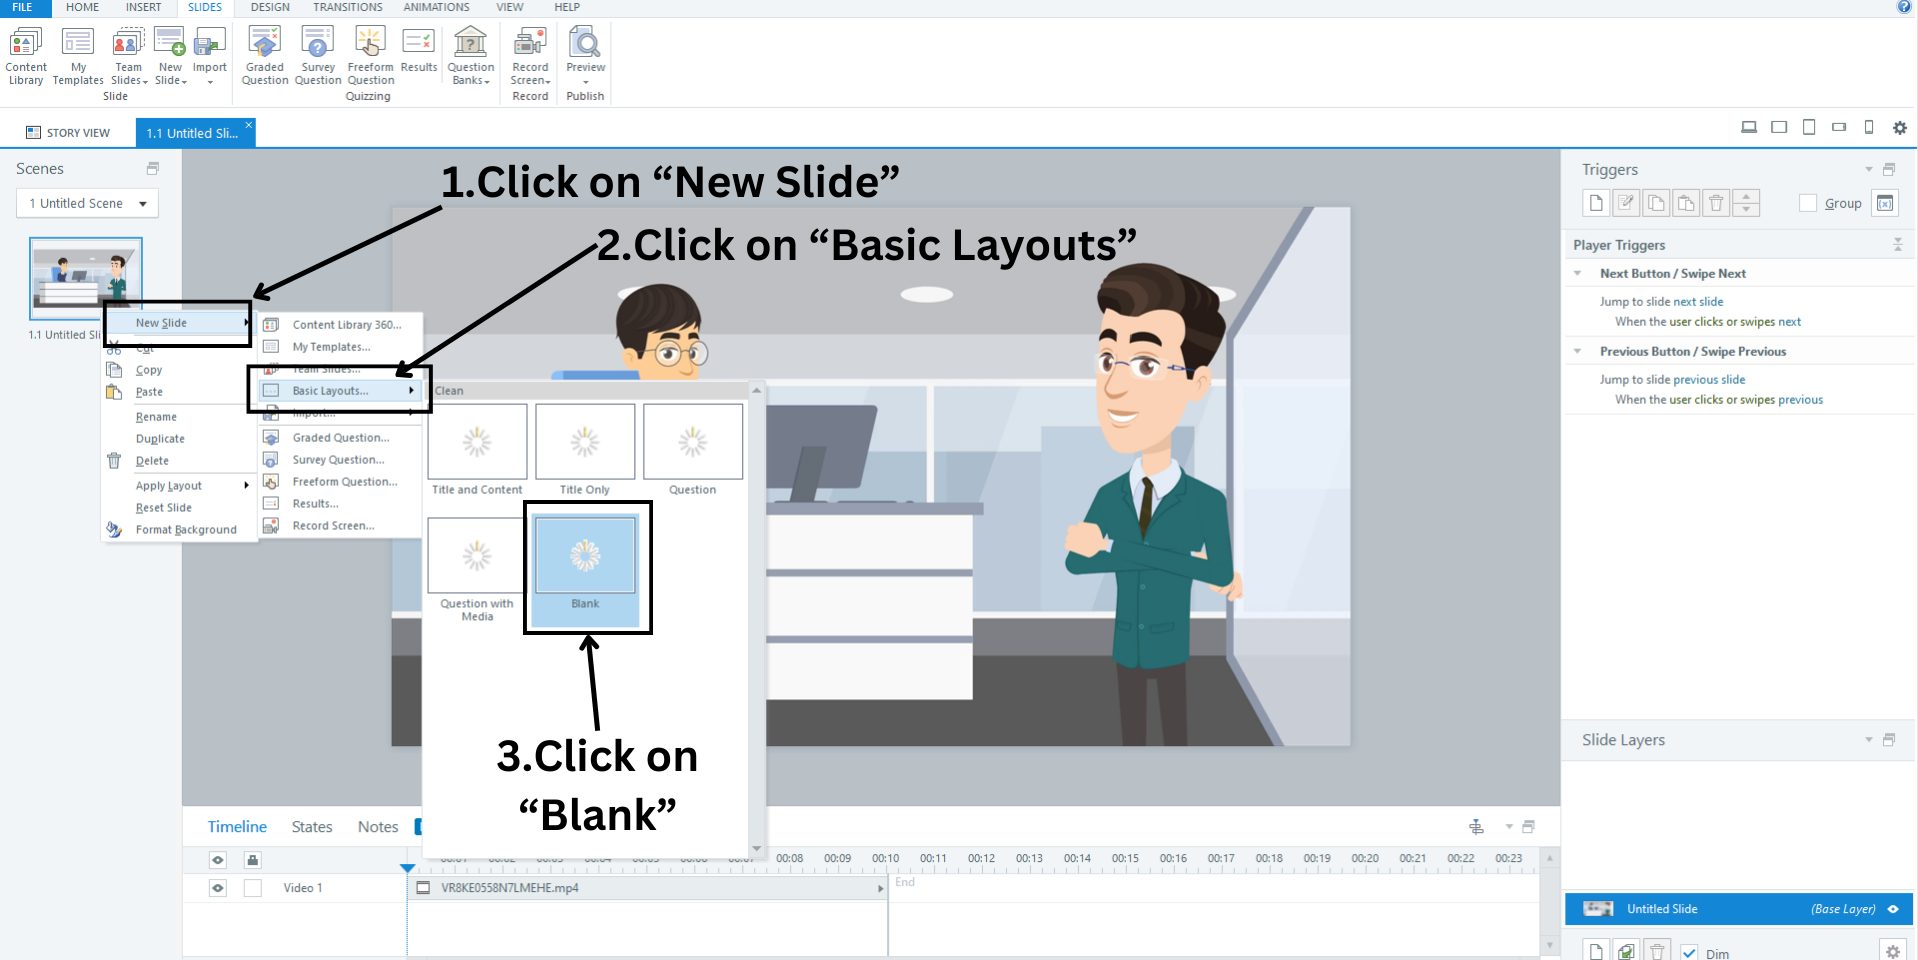
Then, repeat the process of inserting the video into the new slide. This slide should be the one where we are going to introduce the problem and give options.
After inserting the video, we can move to the next step of adding interactivity to create a scenario-based course.
Step 4: Integrate interactivity into the course
Now, it is time to add questions and options for interactivity.
To add text for the question, first click on the Insert tab and then click on Buttons.
Choose a button style from the options, then click and drag to position the button where you’d like it on the slide.
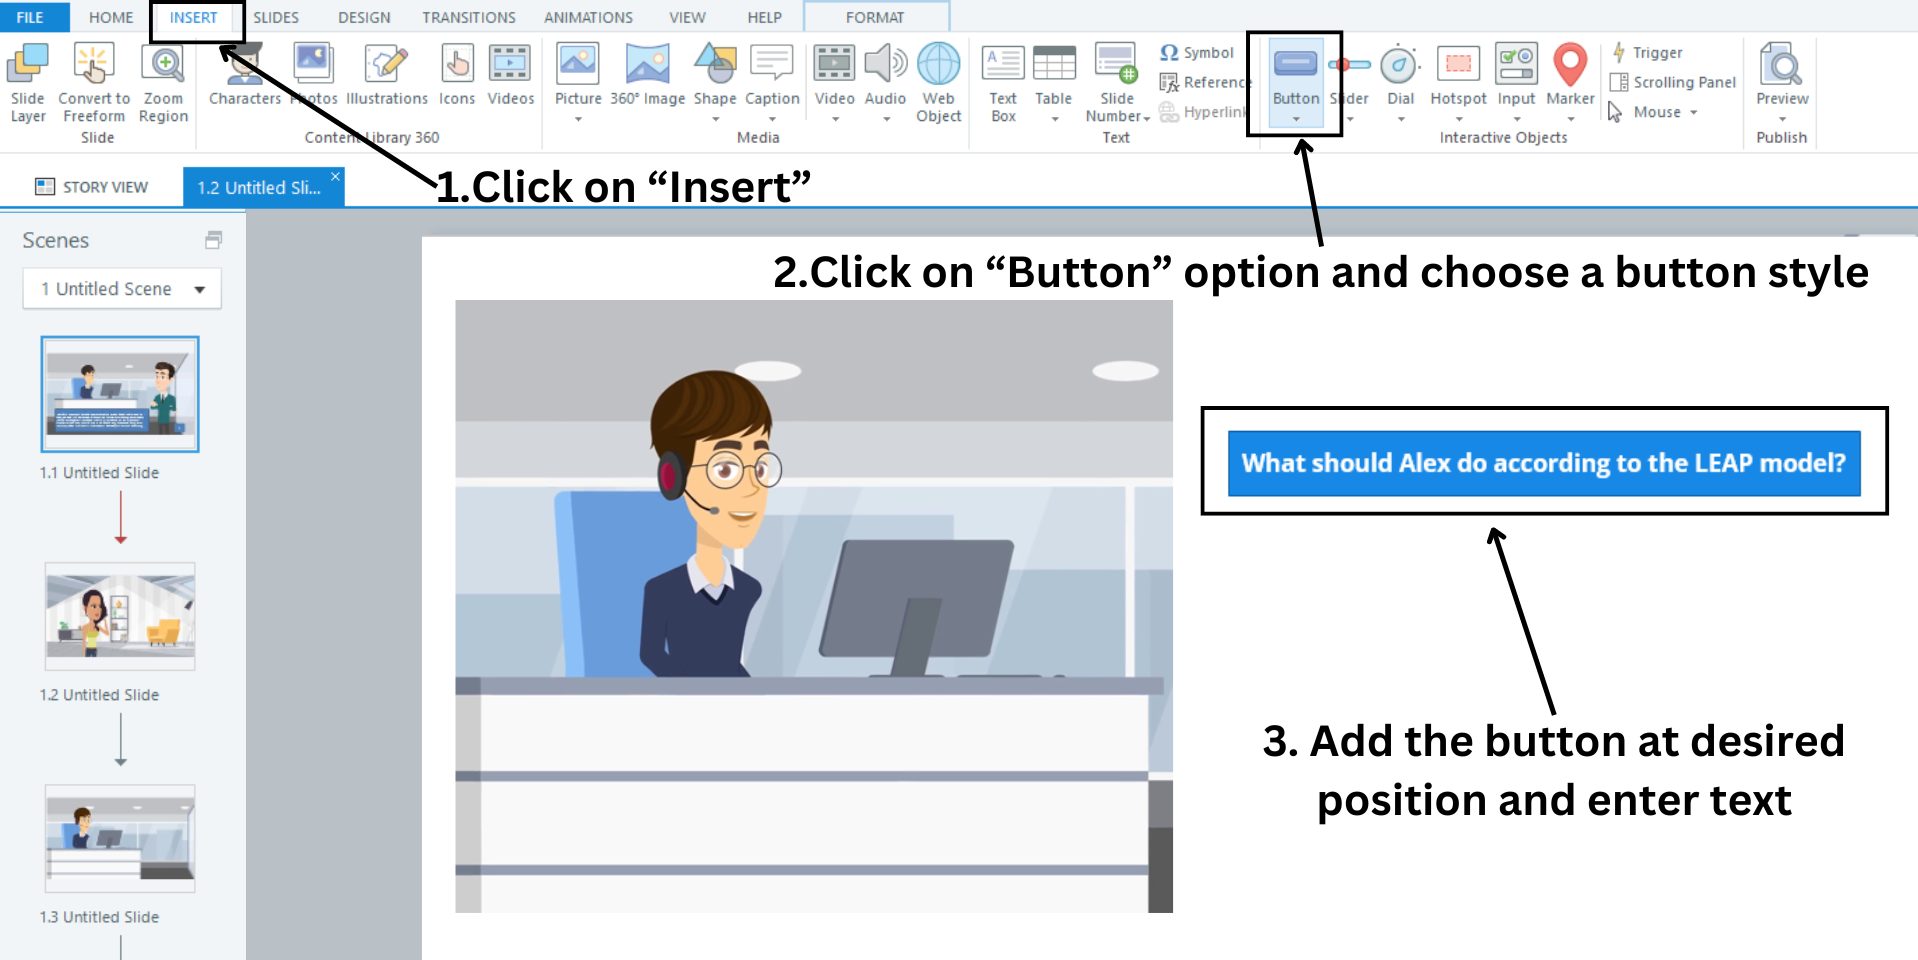
You can type in the text by clicking on the buttons. Similarly, you can add additional buttons for different options related to this question.
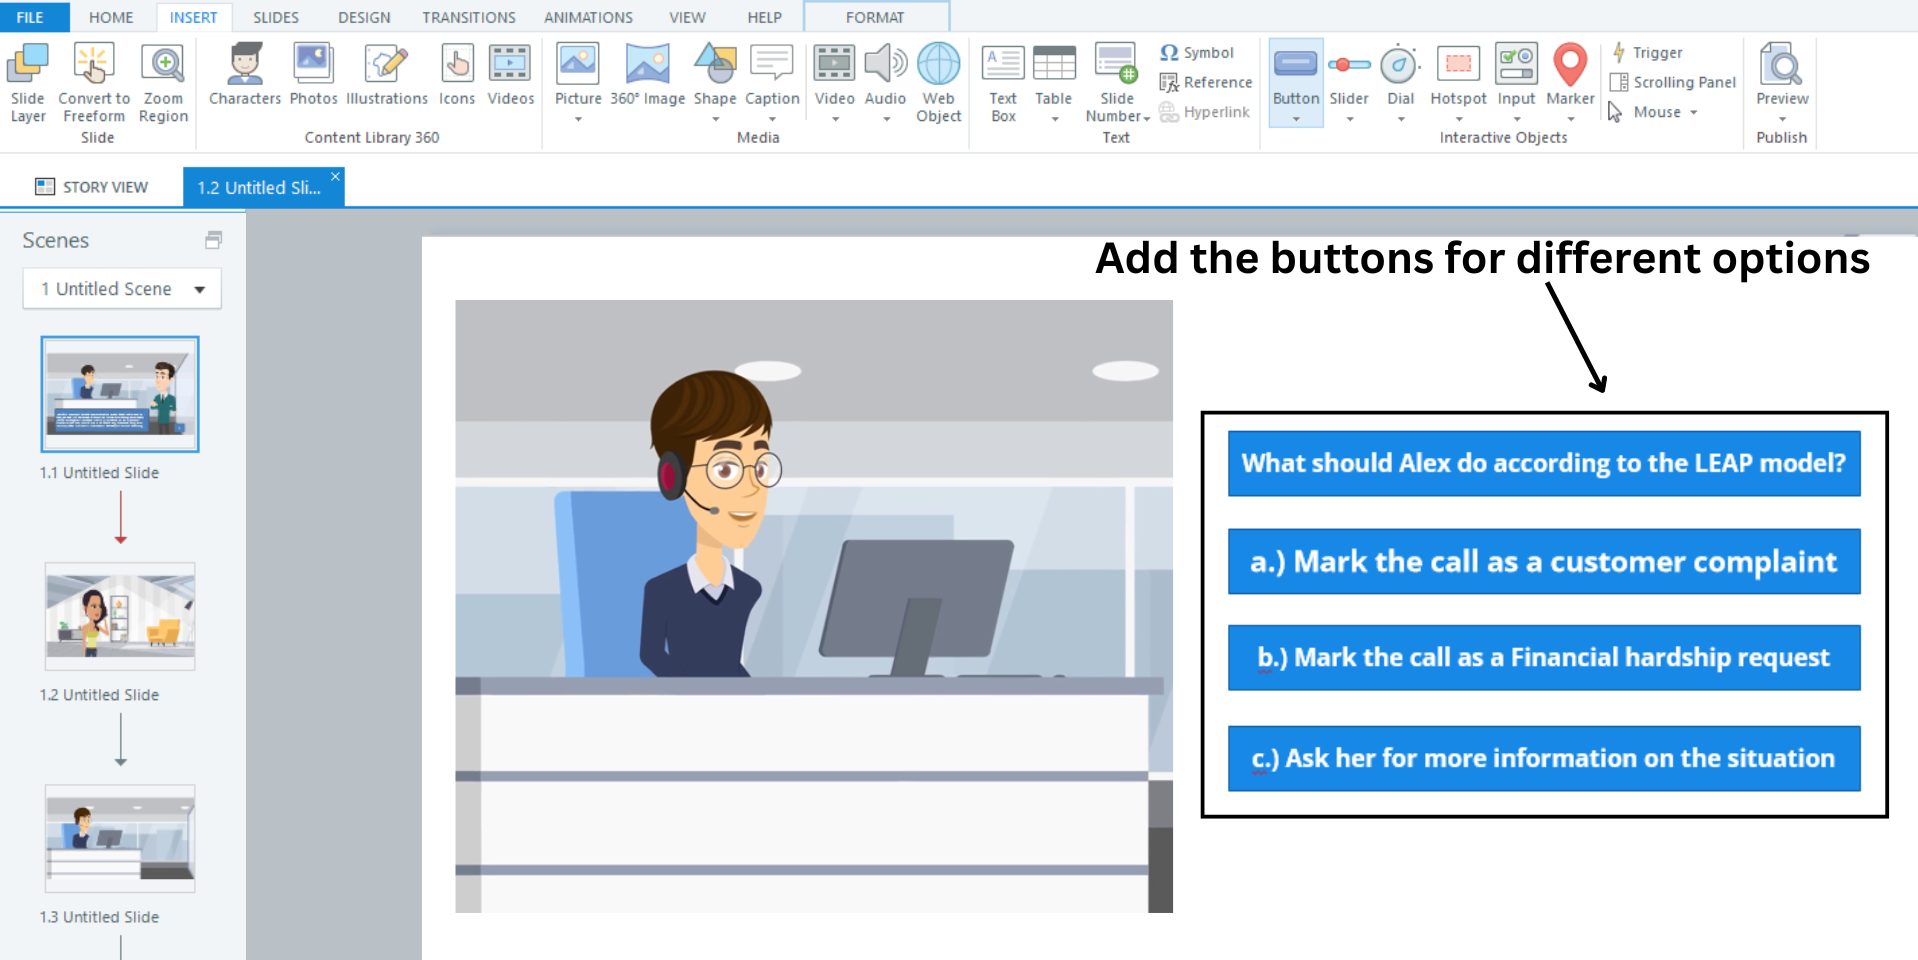
The idea here is to add buttons as options. The result will be different depending on the option selected, therefore giving different scenarios.
We have added three options to the slide, but there are no videos for them yet. Let’s quickly add three more new slides for options A, B, and C.
You can rename the newly added slides for easy reference.
Once you’ve added the videos to the slides, it’s time to set up the triggers. Triggers will dictate which video plays when a learner clicks a particular option.
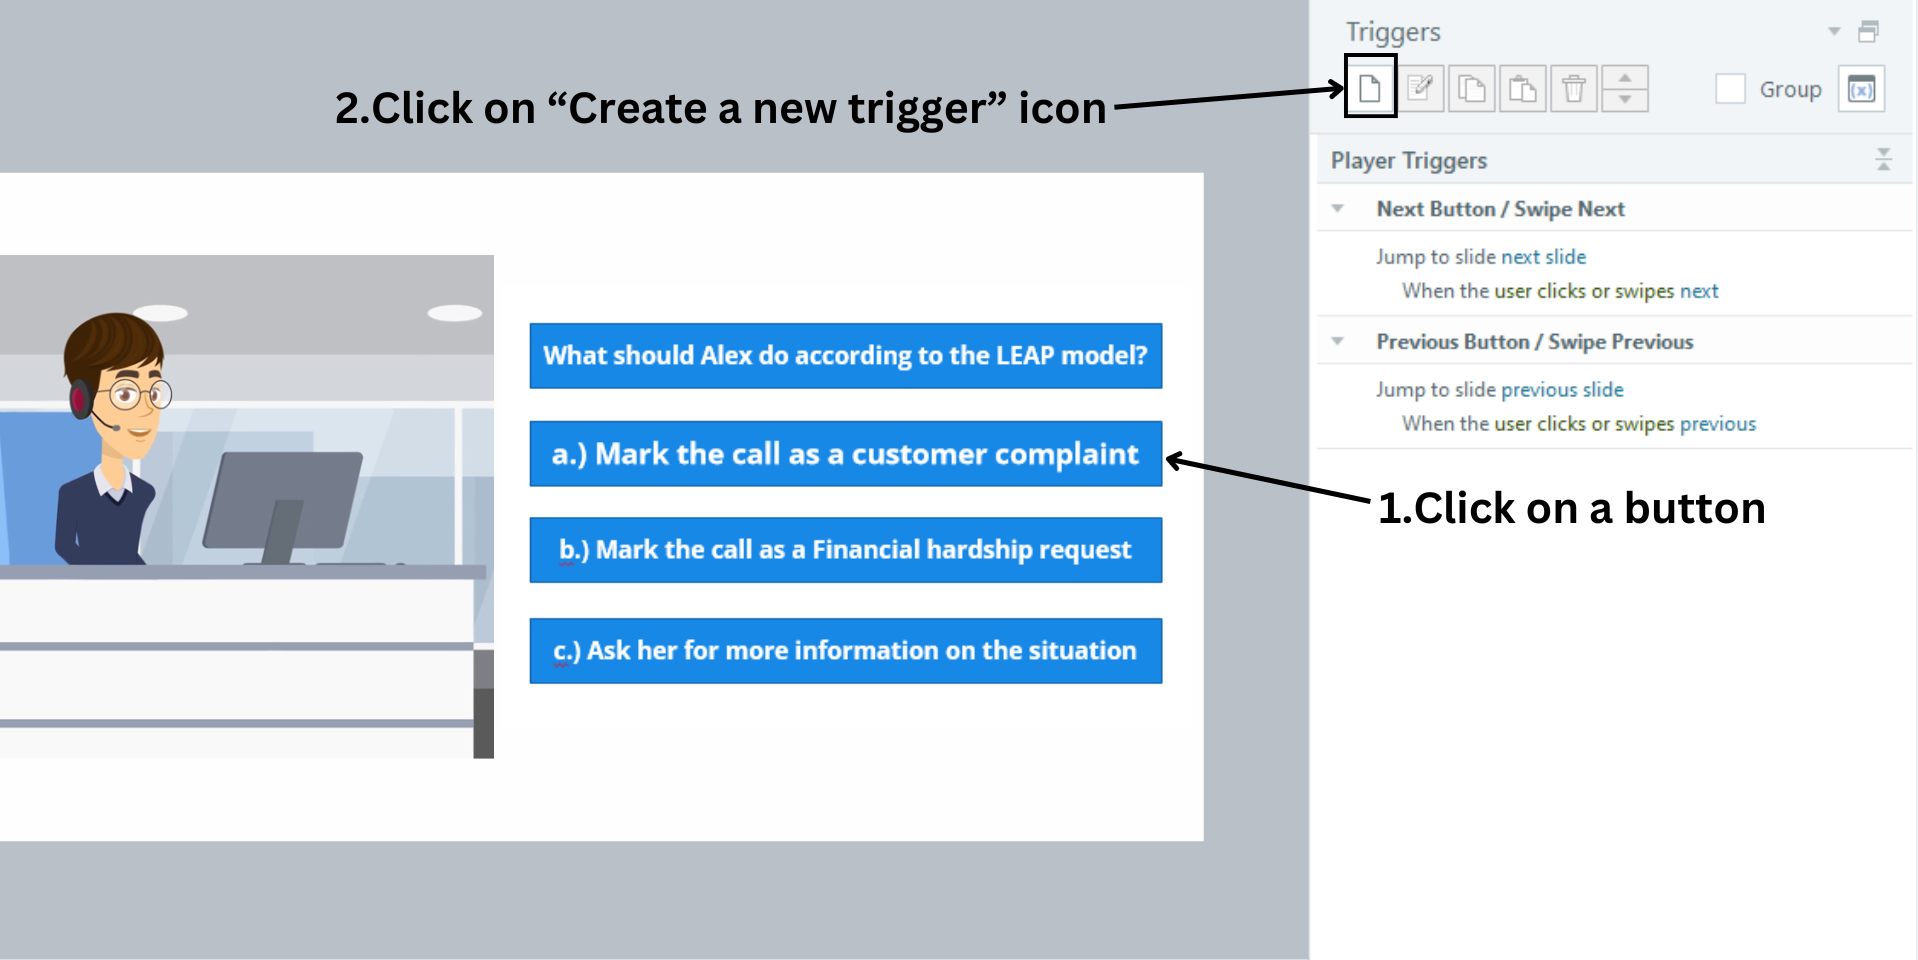
A trigger consists of 2 main parts - 1. What action should take place, and 2. When it should happen?
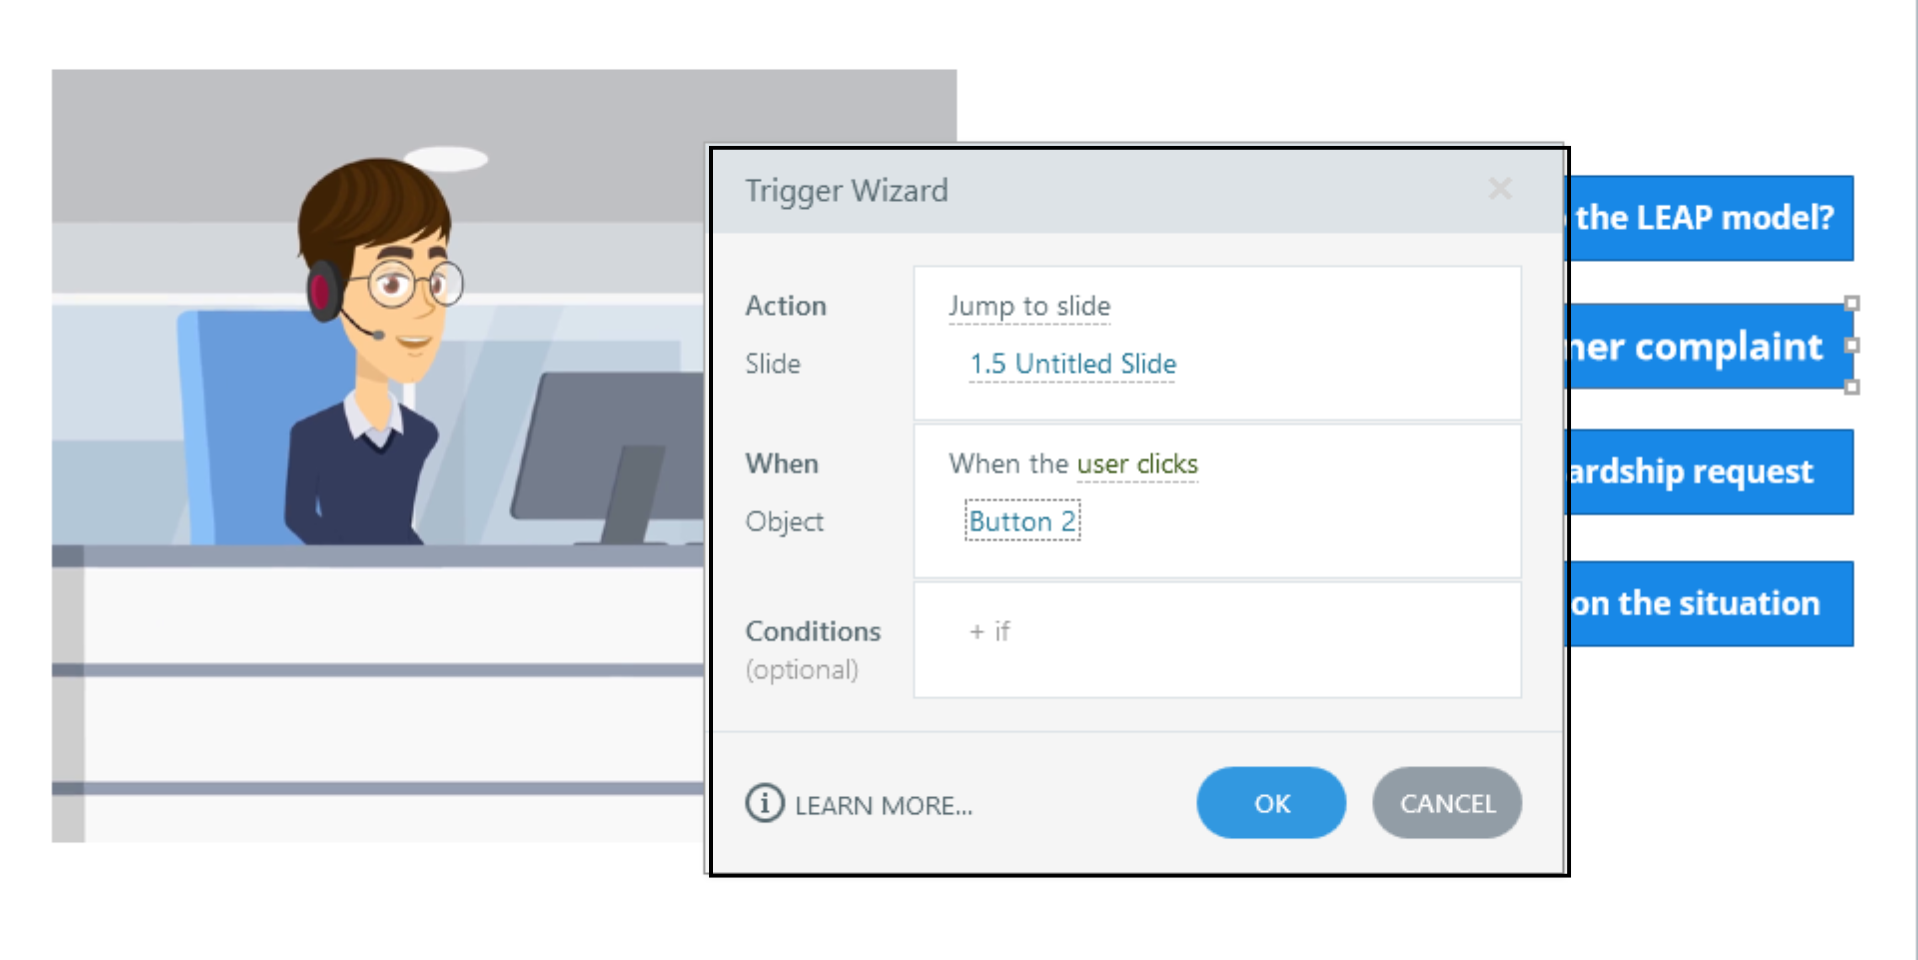
You can click on the Slide option to select the slide that should open when the trigger occurs.

Then, click on Ok to add the trigger.
Repeat this process for the other two options.
This is how you create a scenario-based course, giving different scenarios when a user interacts with the options.
Similarly, you can easily create additional slides featuring new questions and options that lead to various scenarios.
But remember to incorporate feedback slides, as they are crucial in reinforcing learning and motivating learners.
Constructive feedback not only helps clarify misconceptions but also encourages progress, making the learning experience more impactful and engaging.
Once you finish creating your scenario-based eLearning content, it’s time to publish your course.
Step 5: Publish to Review 360
Click on the Publish option in the home tab, which will open a pop-up window. Select Review 360 and check the box to upload your course. Then click Publish.
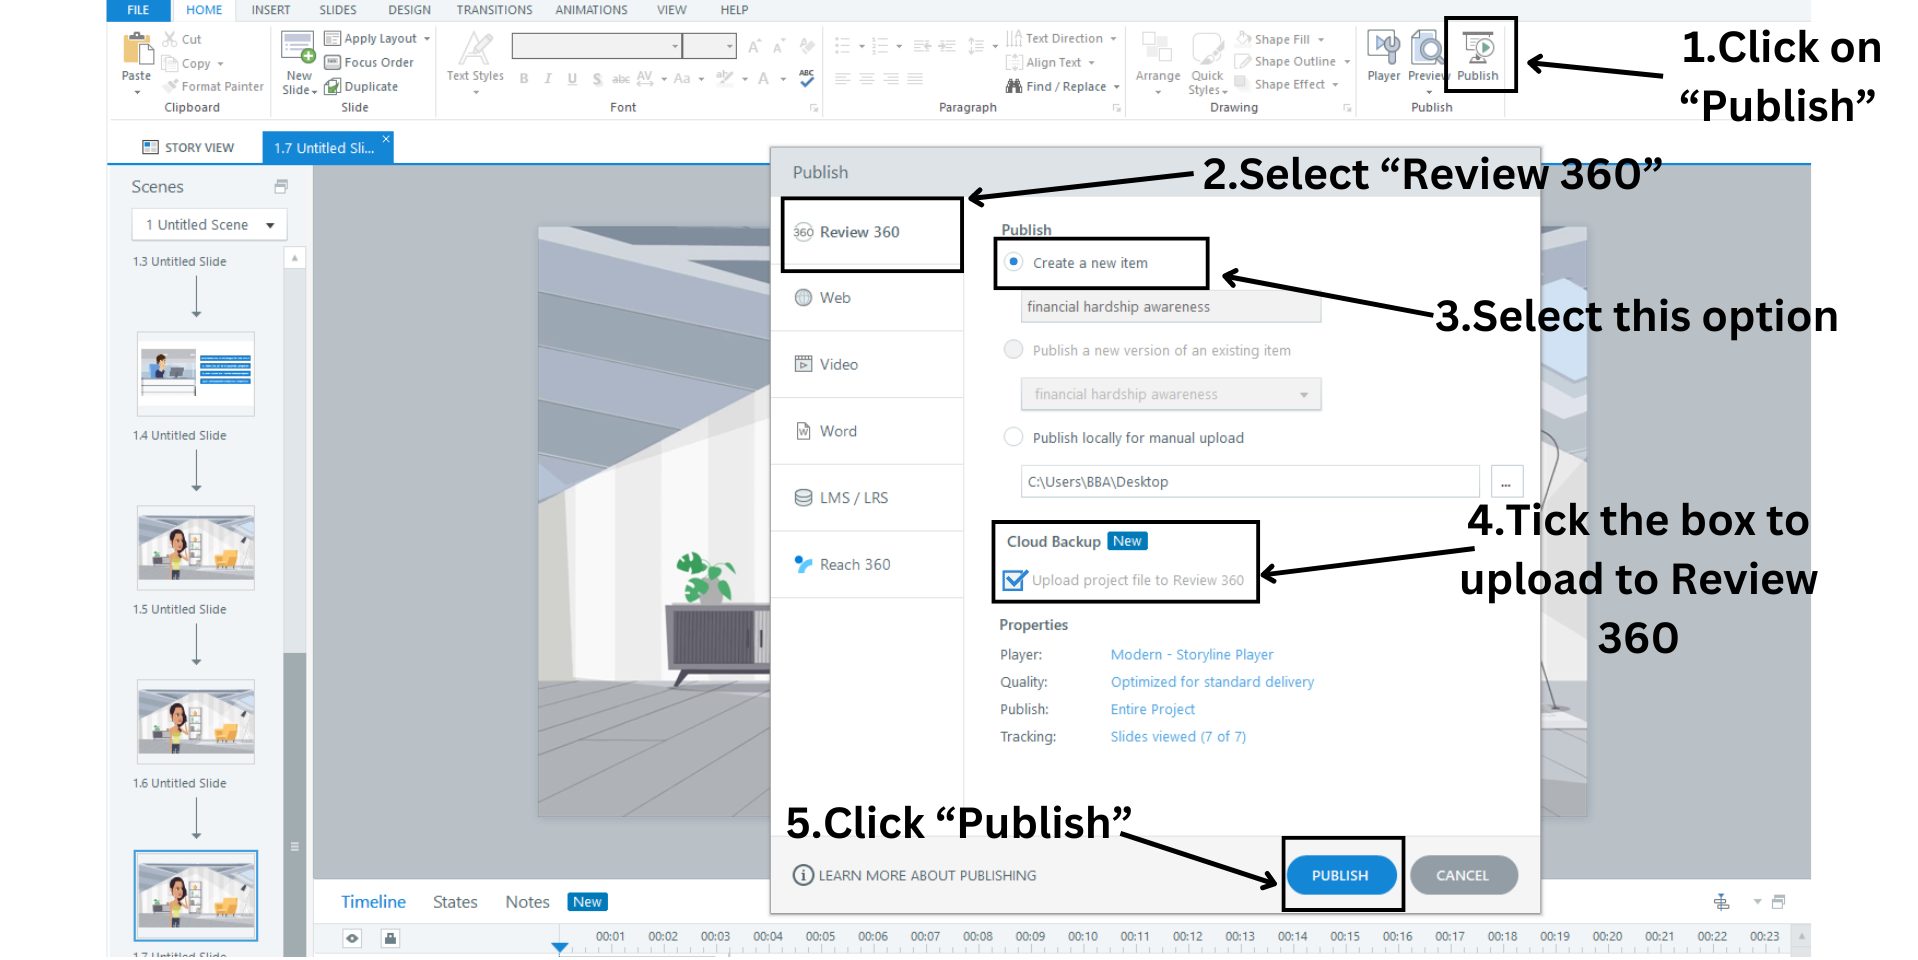
You’ll find your course published in Review 360. Now, let’s see how to have this published course in a Rise 360 course.
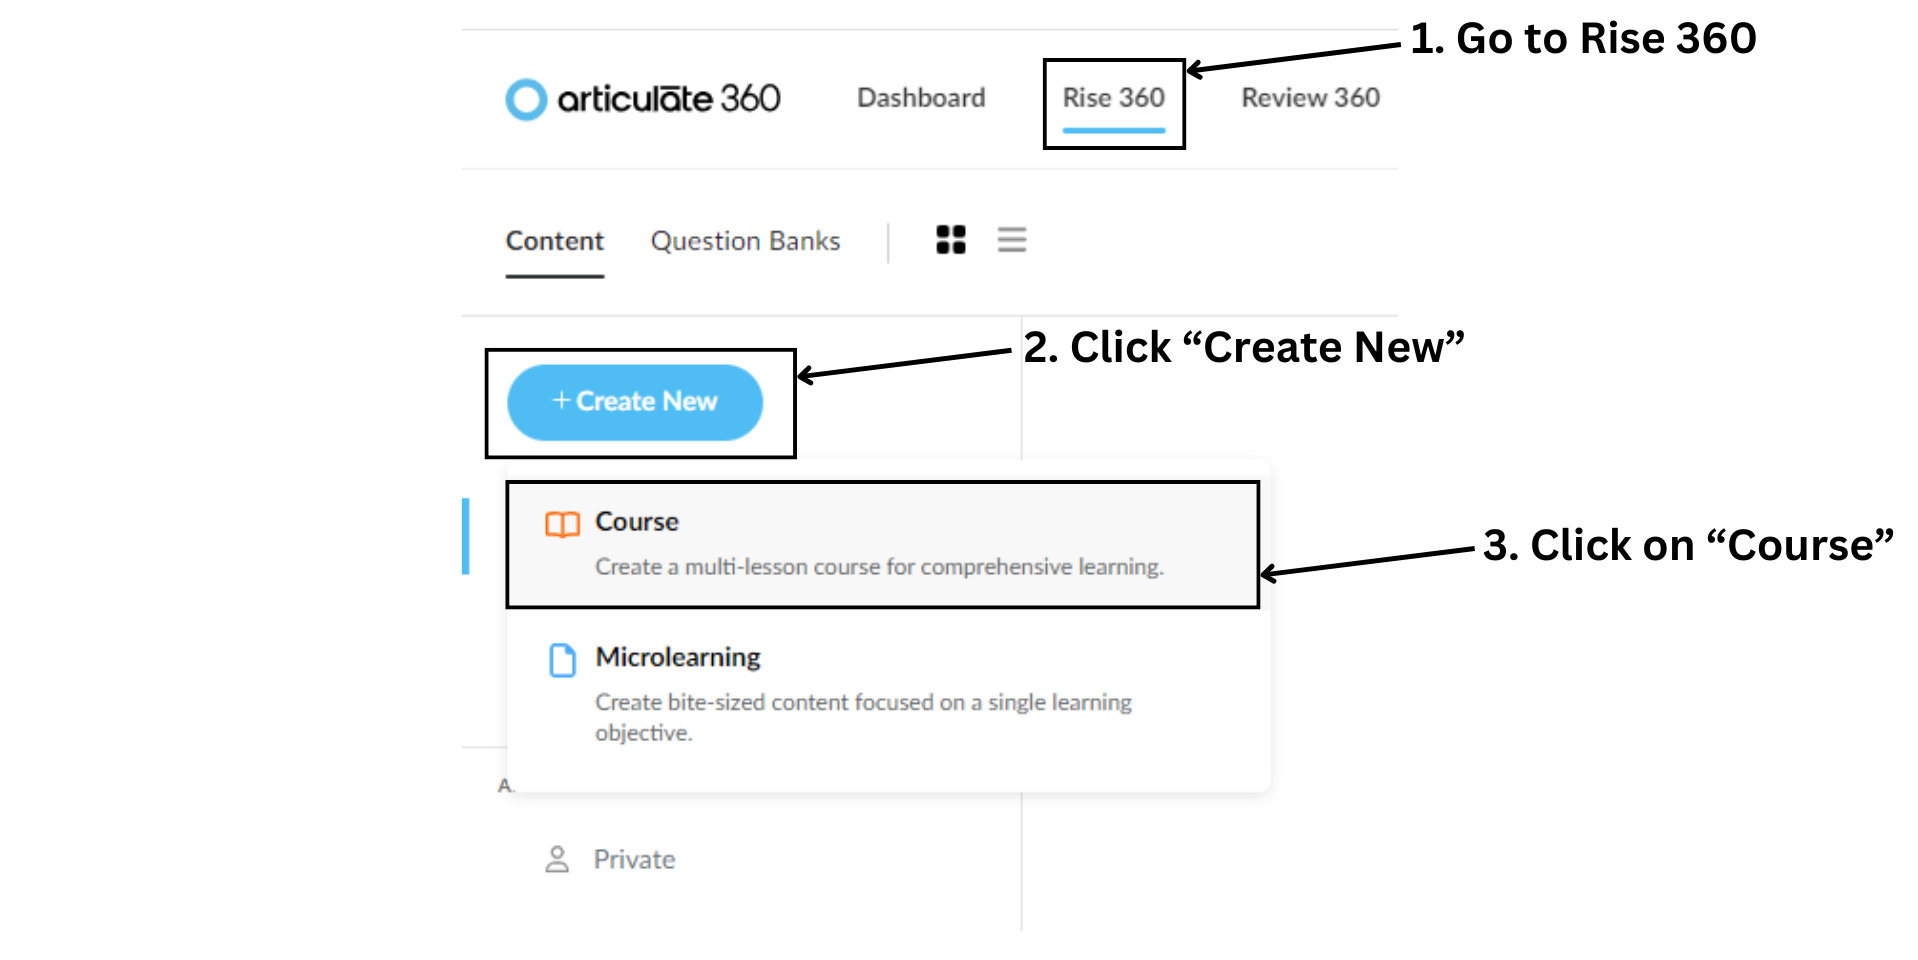
Step 6: Import the course to Rise 360
In Articulate 360, navigate to Rise 360 and click the Create New button. Then select Course.
You can either choose a template or click on Blank Course to start from scratch.
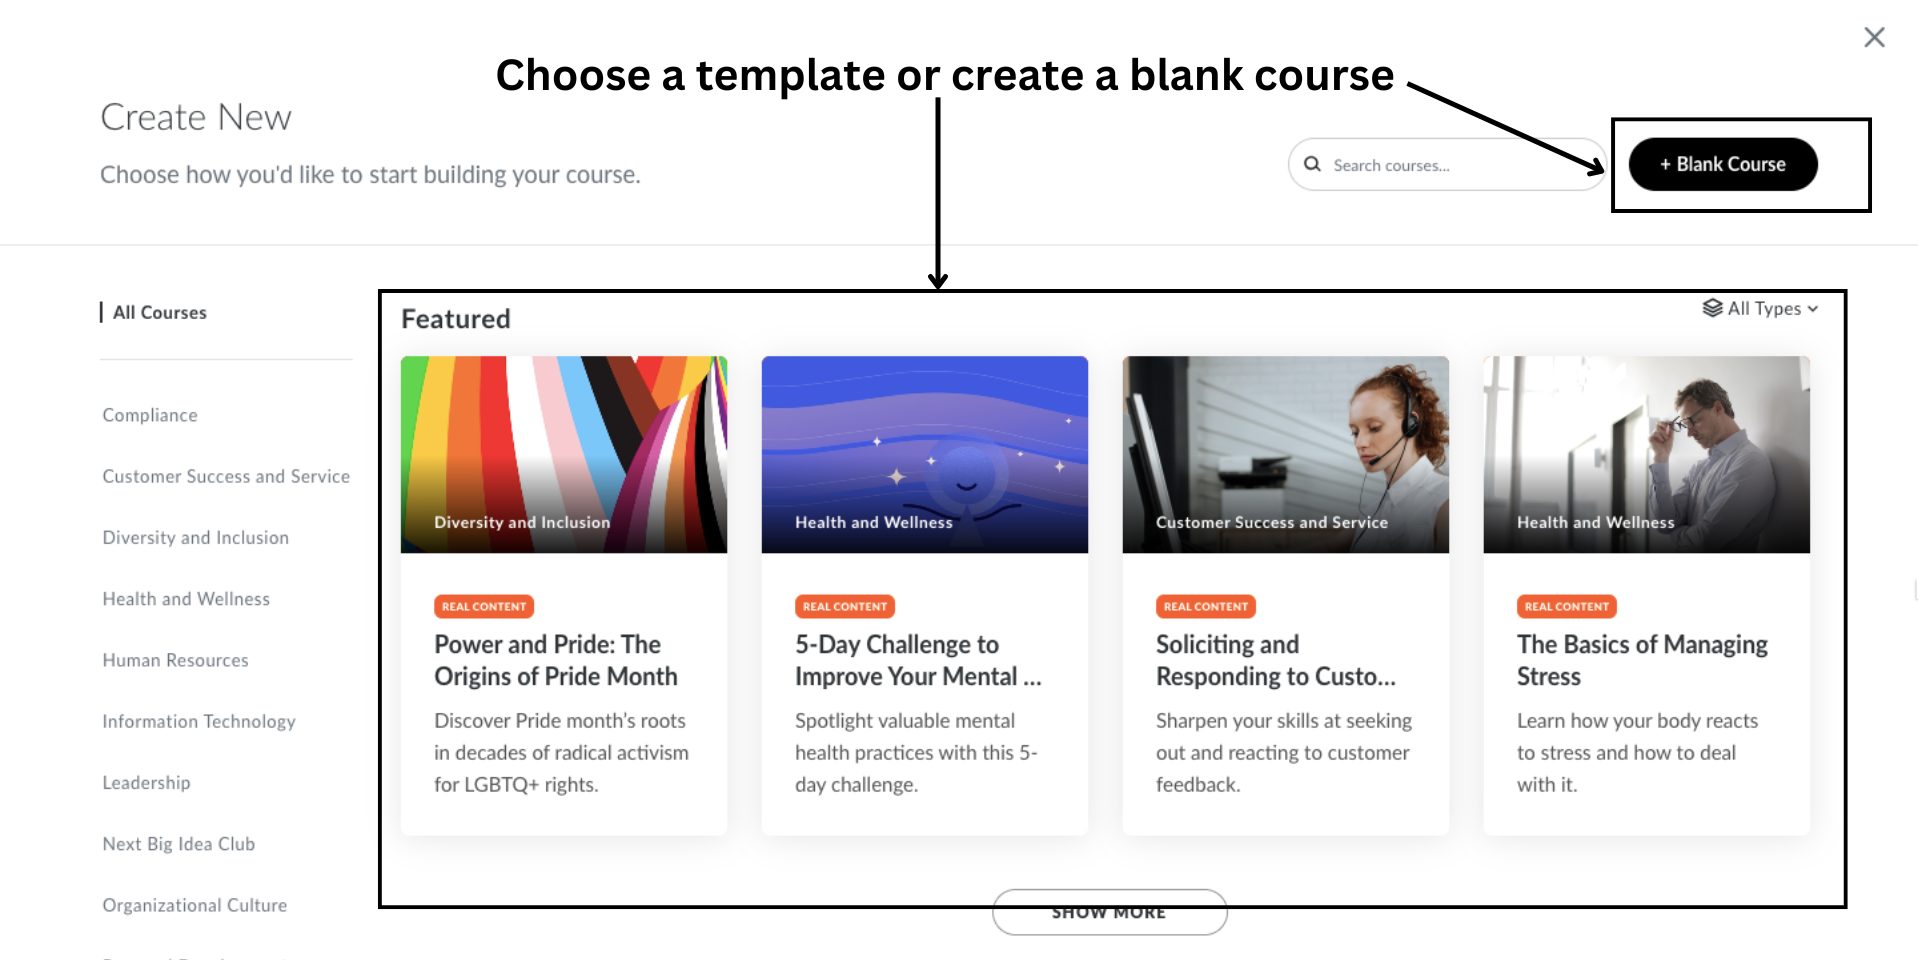
I’m choosing a blank course. Then, type your course title, description, and lesson titles.
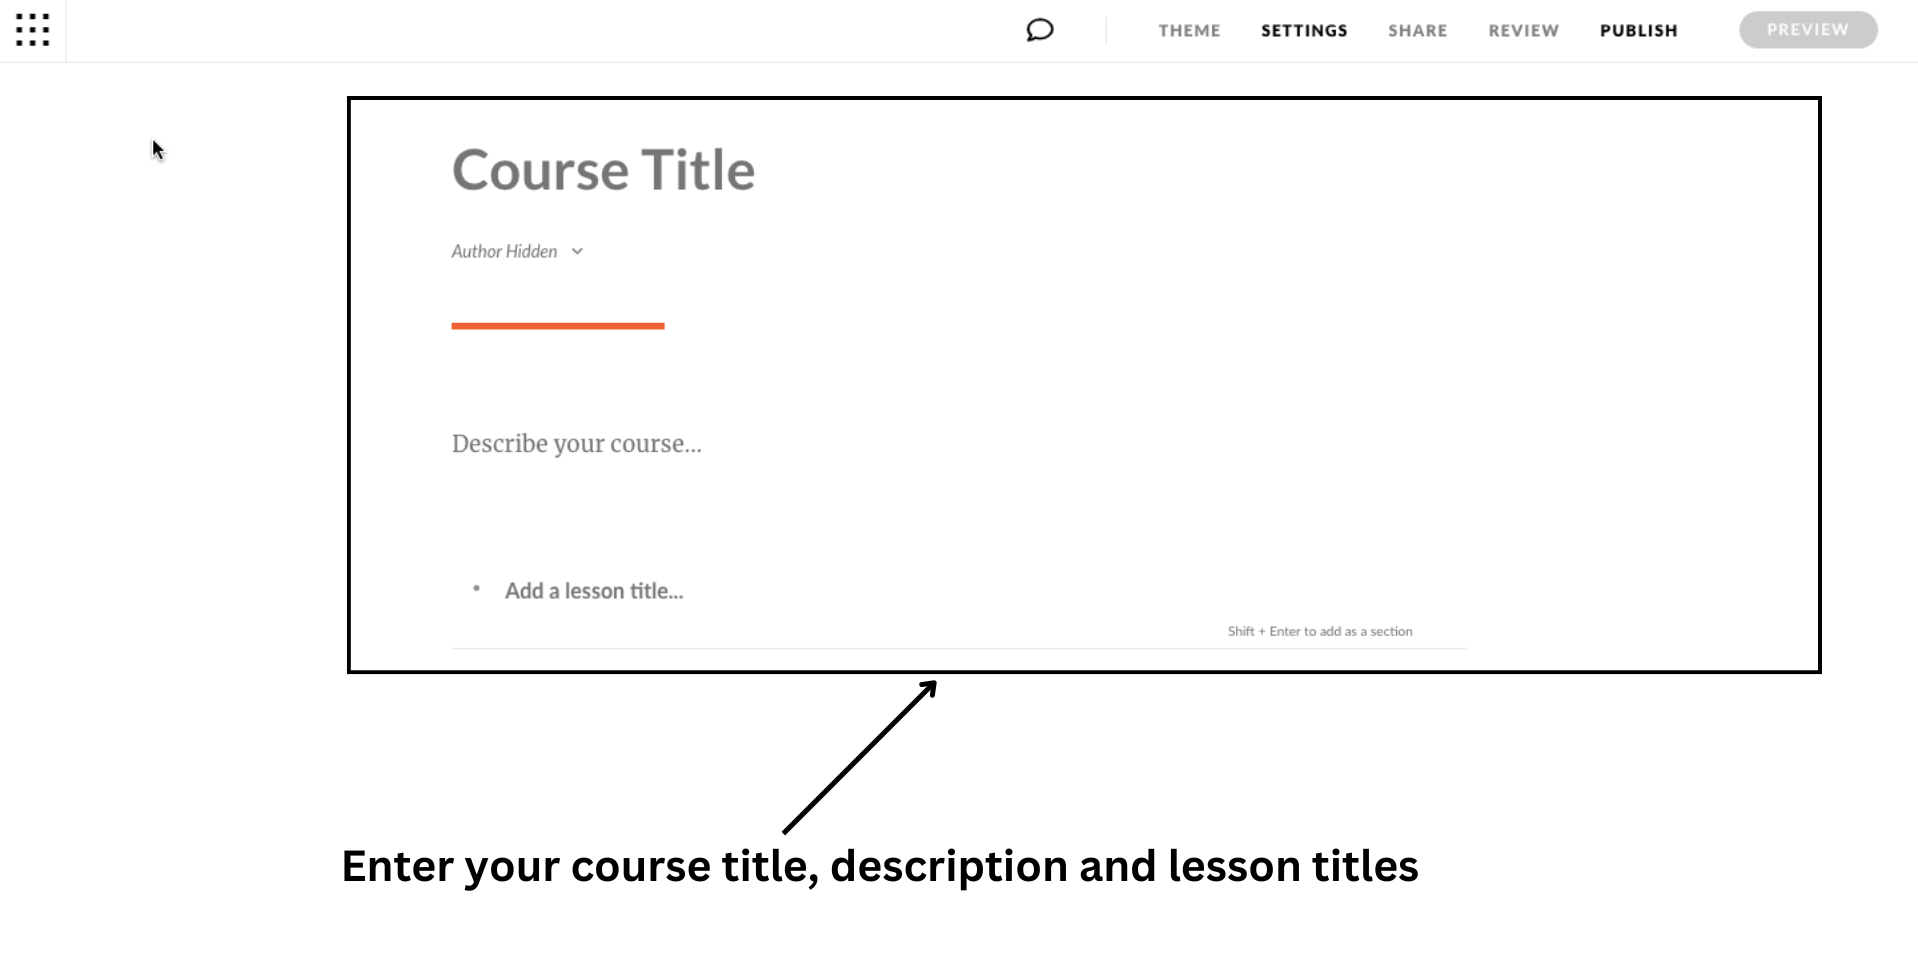
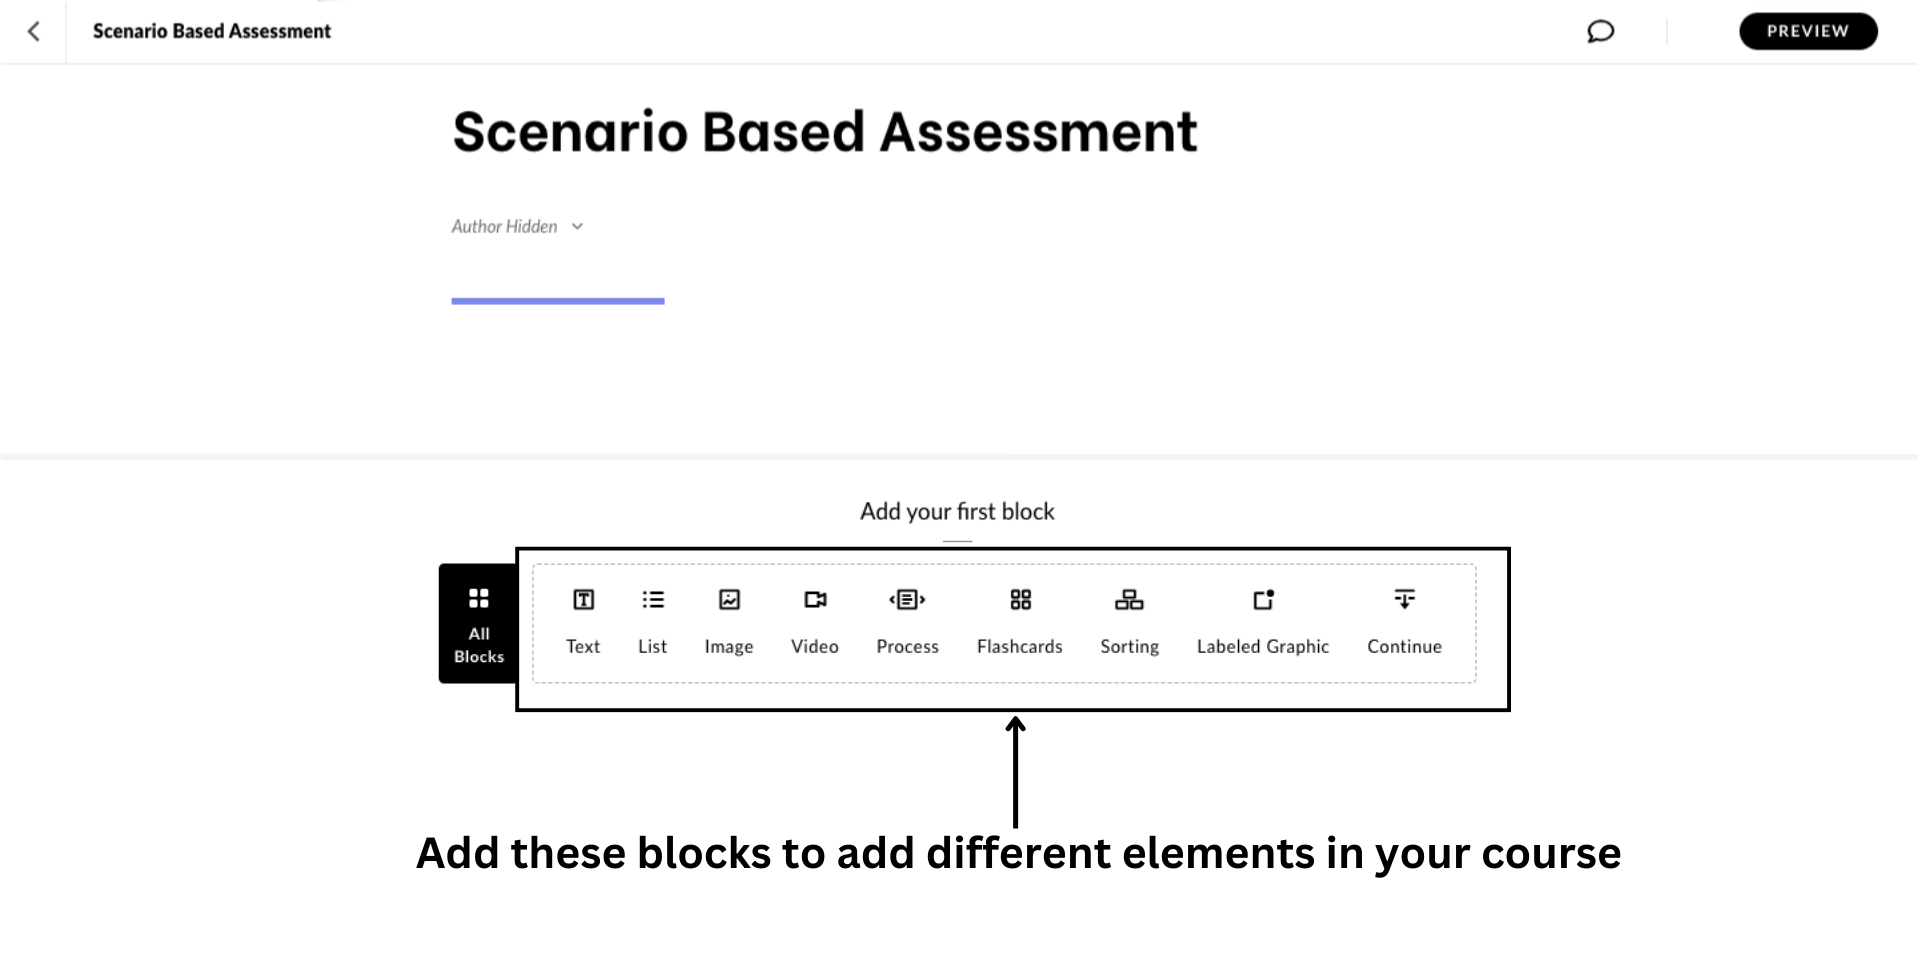
After adding lesson titles, click Add Content and select Blank Lesson to include your course content.
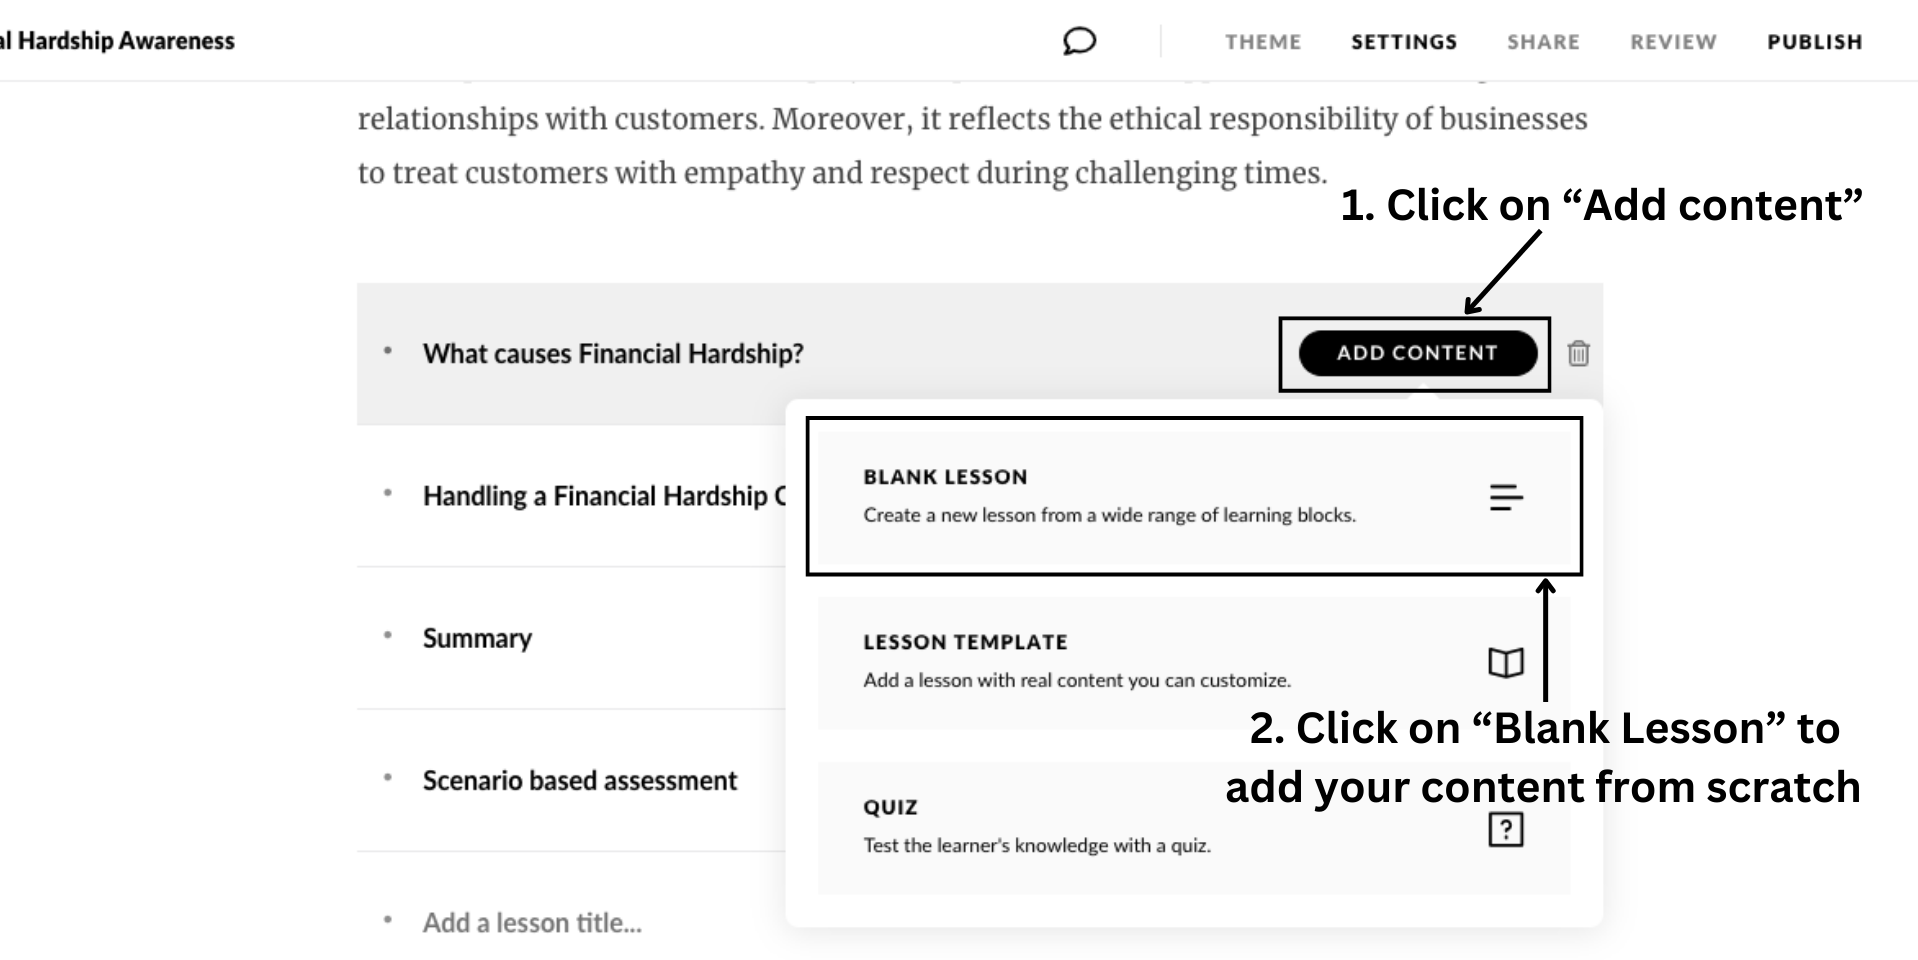
There are various blocks available for adding text, images, videos, etc. Click on a block to add your desired content.
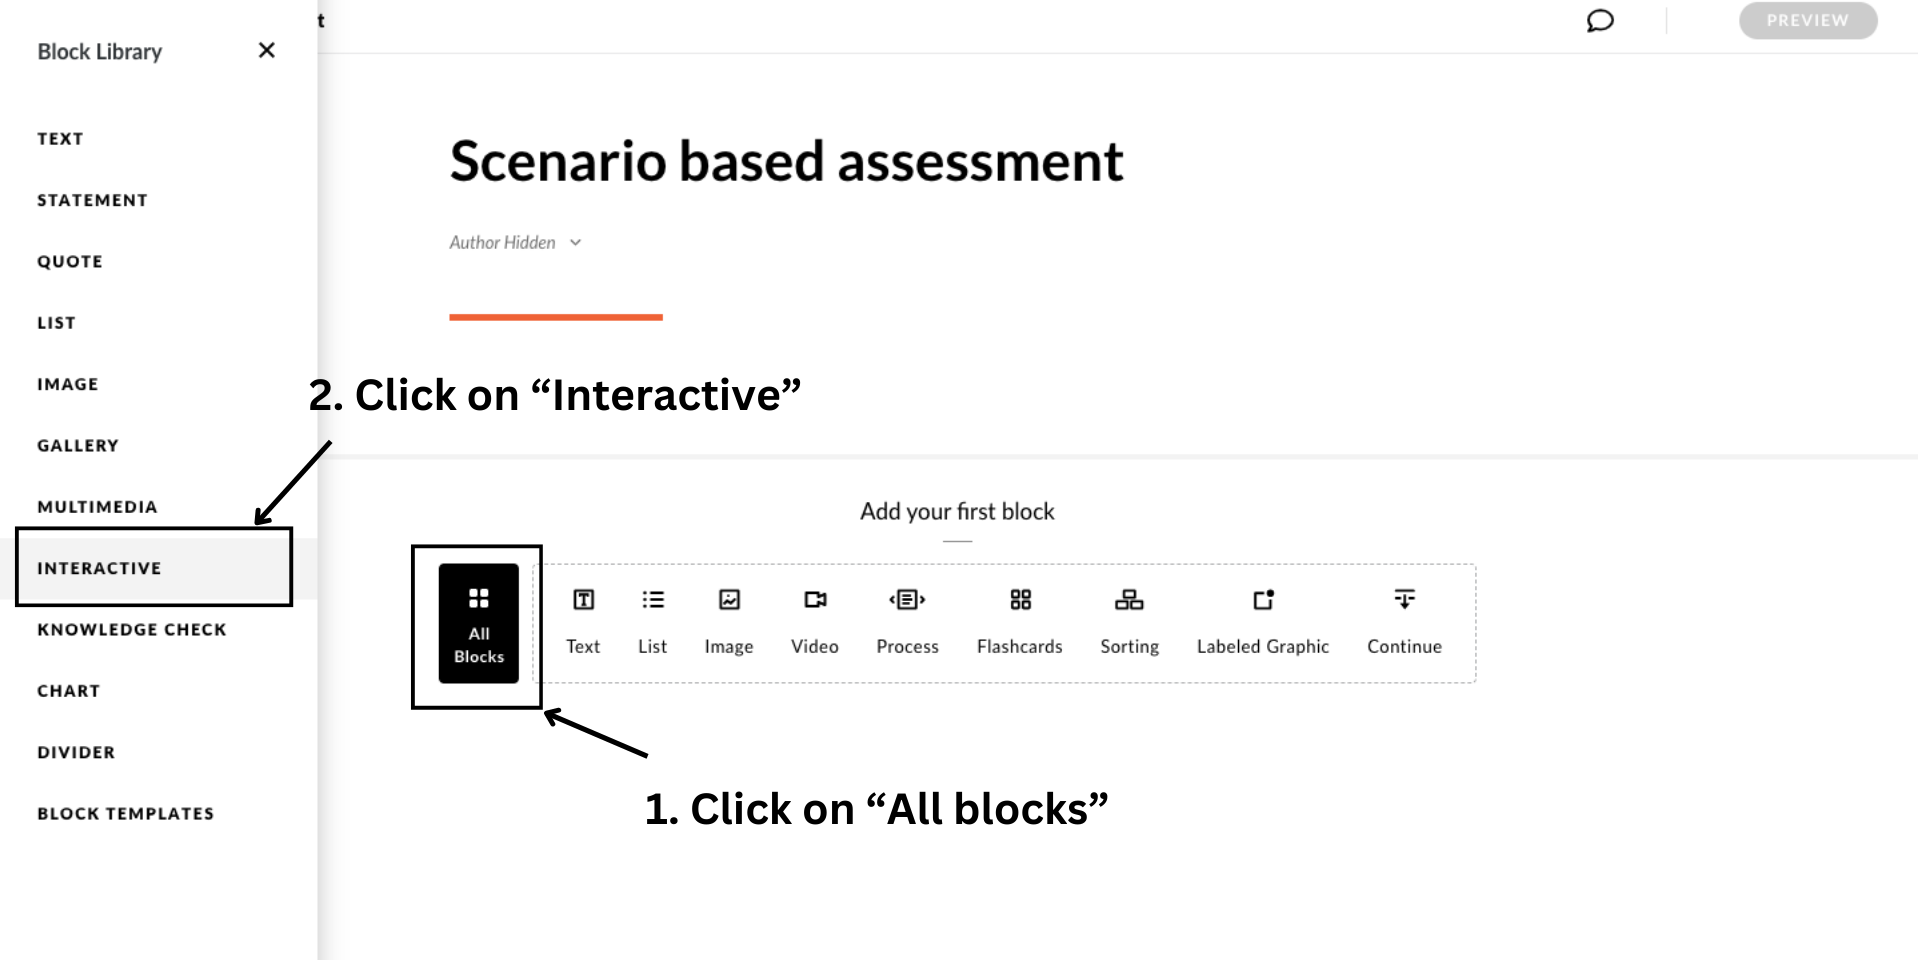
To incorporate your published course from Review 360, click on All Blocks and select the Interactive option from the sidebar.
Scroll down to the end and add the Storyline option. This block will be added to your lesson. Next, click on the Browse Review 360 button to find your uploaded course.
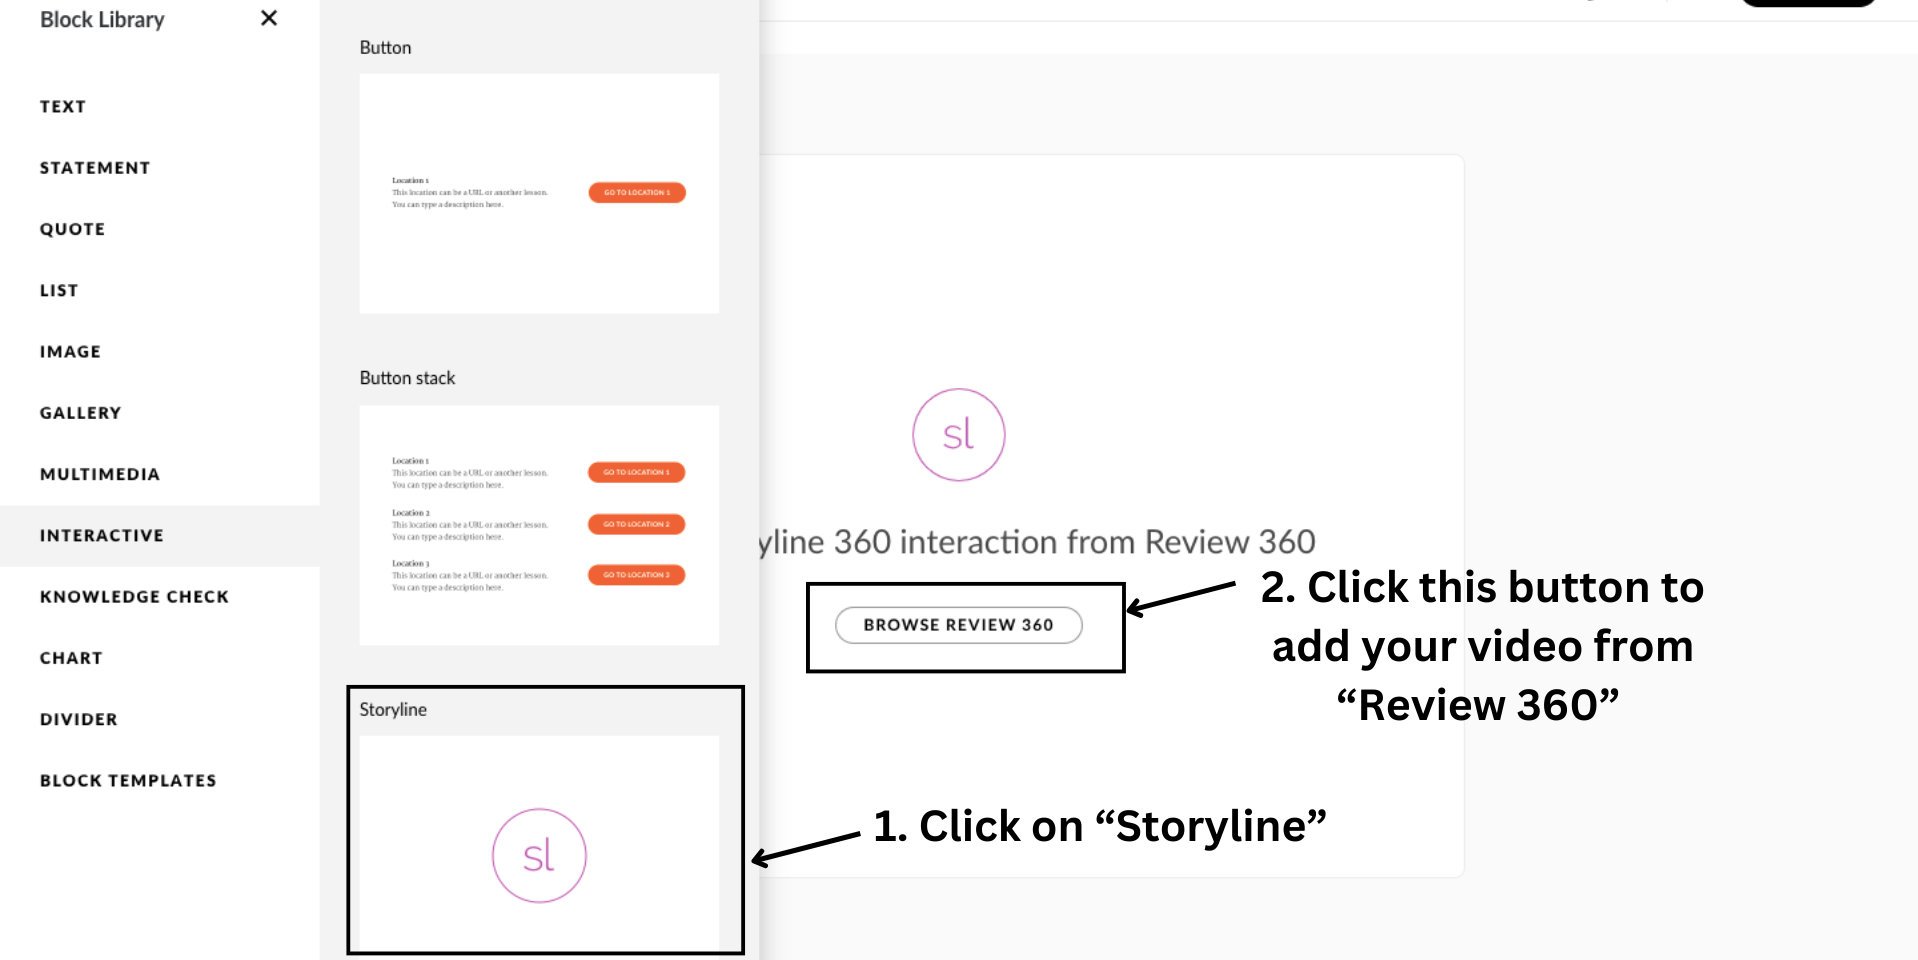
When you click on the uploaded course, it gets added to the lesson.
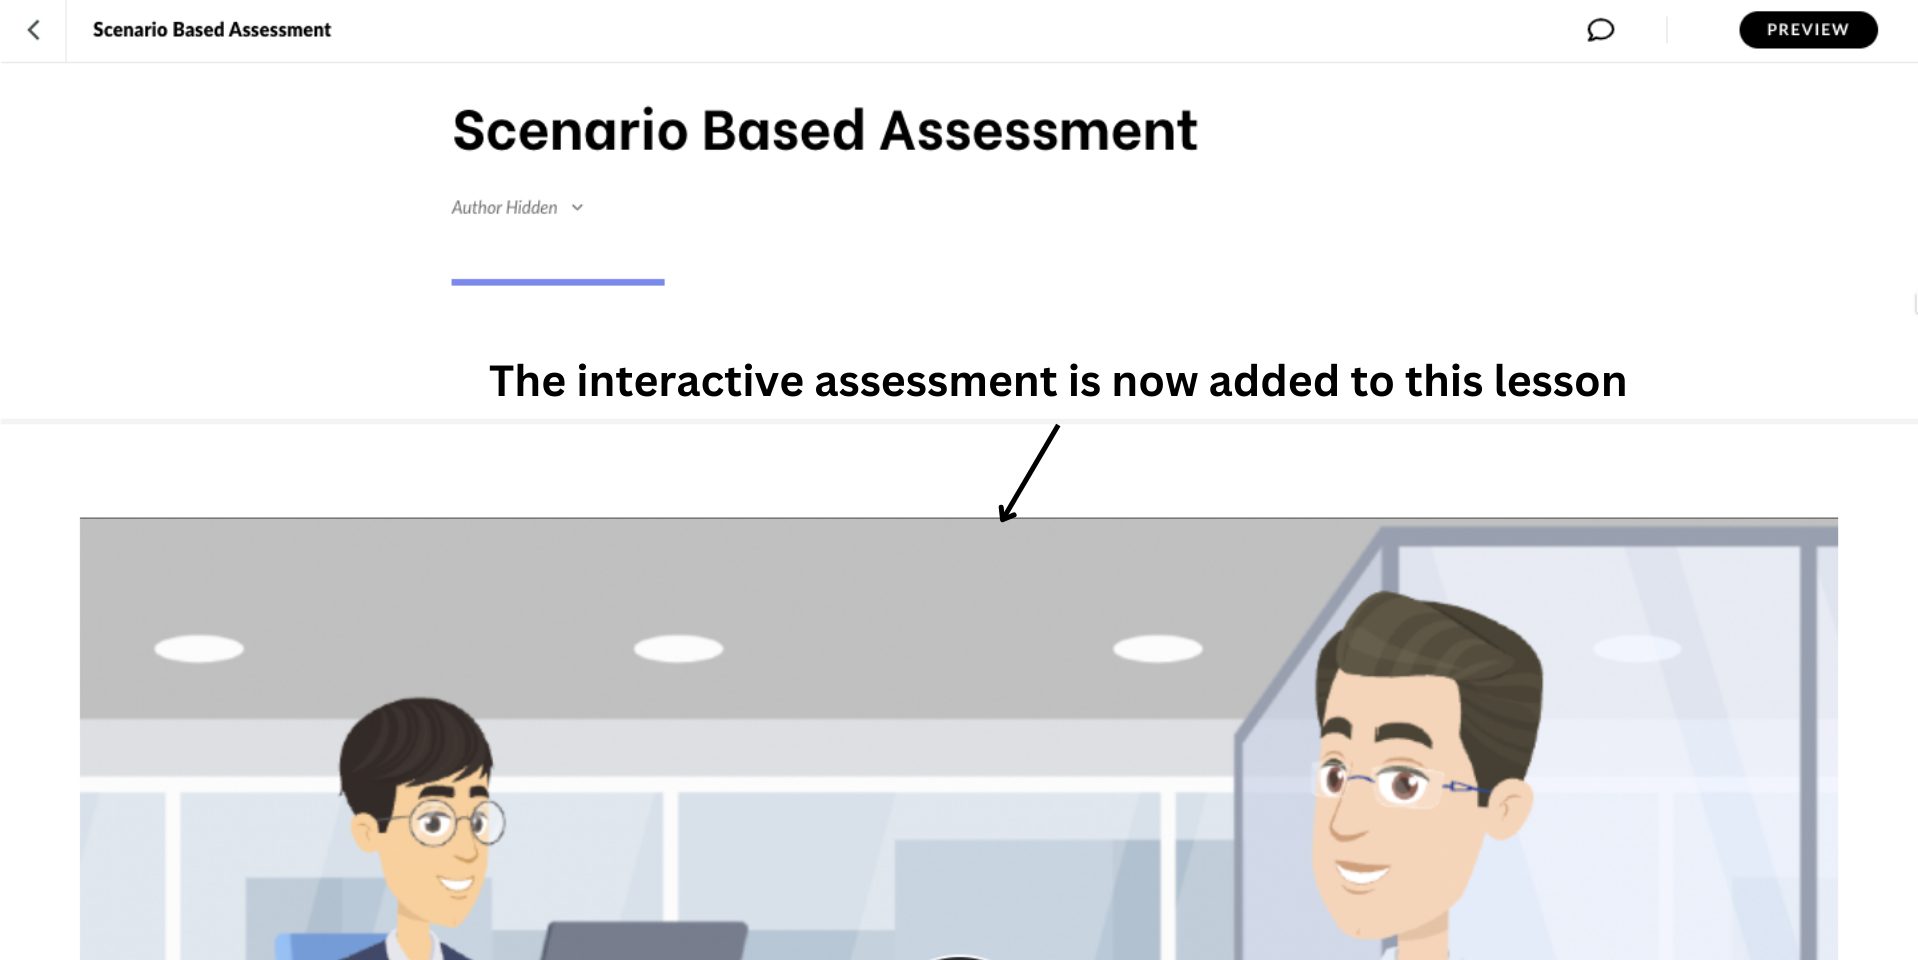
Tada! We created an interactive, scenario-based course in Rise 360!
***
In conclusion, creating a course in Rise 360 offers immense flexibility and ease, allowing you to develop professional eLearning experiences quickly.
However, to truly engage your learners, integrating interactive and animated elements can take your course to the next level, as you have seen with the above example.
By using Animaker, you can create visually appealing and animated scenario-based videos that make your course far more dynamic and engaging than static content alone.
Whether you're developing a straightforward lesson or an advanced scenario-based course, combining Animaker, Storyline, and Rise 360 equips you with everything you need to deliver a truly immersive learning experience.
Now that you know how to create a Rise 360 course, it's time to take your content to the next level and engage your audience with powerful animations.
Click the banner below to connect with our experts at Animaker and discover how we can support your organization’s eLearning goals.