How To Convert PPT to Video? [PPT to MP4, MOV, & 5 other formats!]
Powerpoints!
That very word can make you yawn and fall asleep!
Aren’t we all guilty of dozing off during a boring PowerPoint?

But worry not, because you’re definitely not alone in feeling this way!
To make PowerPoint less boring, we have tried all sorts of things, from embedding videos in powerpoints to creating animated presentations.
In short, anything and everything to make those wretched presentations better!
Whatever is said and done, we MUST accept the fact that videos are WAYYYY better than PowerPoint.
With that in mind, we have created a solution to help improve presentations and make them more impactful.
And that is to… **Drumroll**
Convert it into a video!
Yes!
In this article, we will explore how to convert PPT to video in two sections:
Let’s begin!
1. How to convert PPT to Video Online
For this, we will use Animaker’s new tool, PPT to Video Converter!
If you prefer to watch a video tutorial on converting a PPT into a video, please watch the video below.
Or if you prefer a textual guide, read on!
Converting a PPT to Video using Animaker involves just three steps.
Step 2: Converting PPT into Video
Let’s see how to convert PPT to video using this tool.
Step 1: Uploading a PPT
First, Visit Animaker’s PPT to Video Converter. Here, click on the Call to Action button.

You will be redirected to the login page. Log in if you already have an account. If not, Sign up to create a new account.
Once that’s done, you will be directed to a blank project with the PPT upload window open. Upload your file and make sure it is in PPTX format. Please note that the maximum file size allowed is 50 MB.

Step 2: Converting PPT into Video
Once the file is uploaded, it will look for font compatibility. If the font used in the PPT is available on the app, the tool applies it. If not, it assigns suitable fonts to the text. Now, if you wish to change the font, you have two options.
First, you can choose from the list of over 200 fonts available. Once you select a font, click on the Done button.
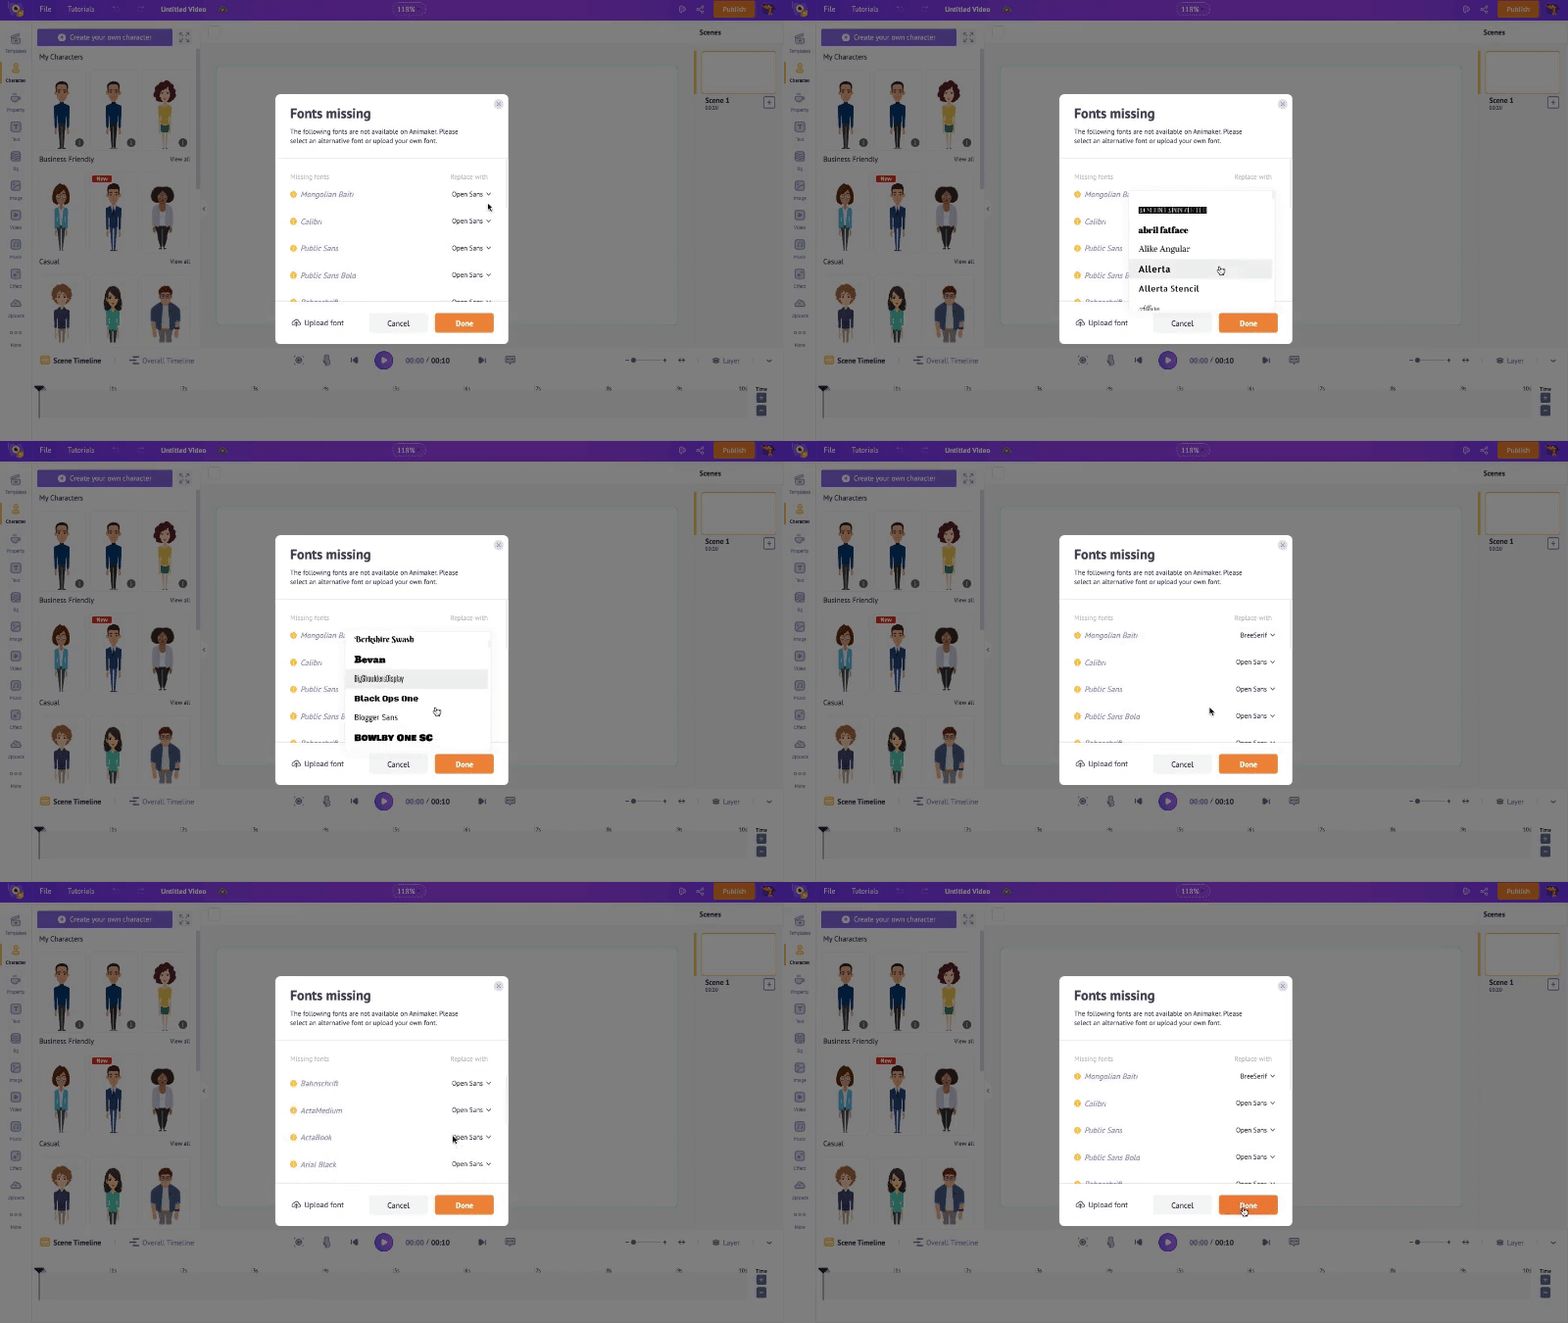
Alternatively, if you prefer a custom font, you can upload the font file by clicking on the Upload Font option. Once the file is uploaded, click on Done.

Next, choose the transition effect from the list of nearly 100 transition effects and click on Apply.

Then, choose the enter and exit effects for the elements in your presentation from the list of 30+ effects. Then click on Apply.


After that, choose a music track for your video. You can choose from over 30,000 music tracks and sound effects available for this. You can preview a track by hovering the cursor over it.

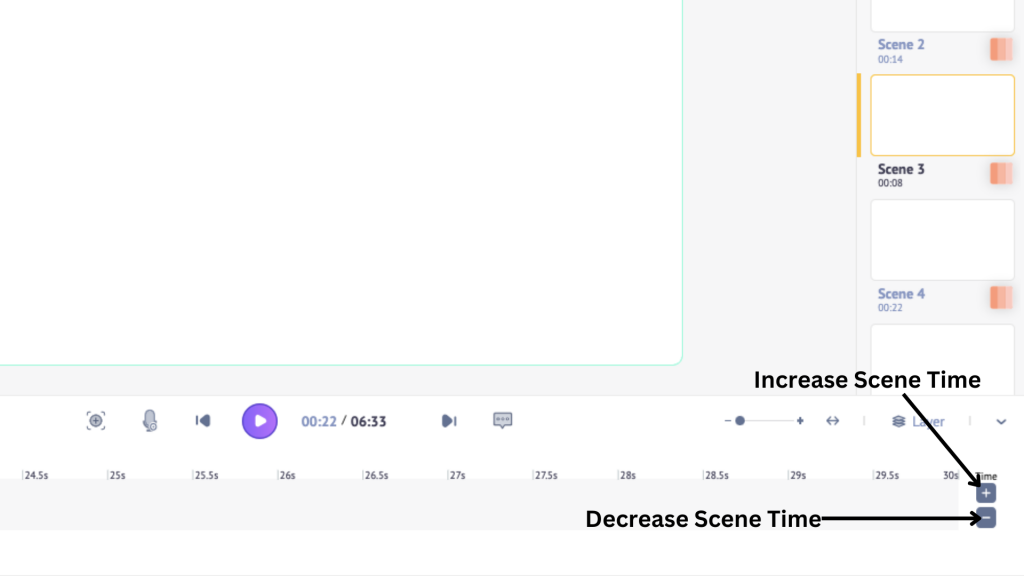
Once all these are applied, your slides will be converted into scenes. You can adjust the duration of each scene to your liking by clicking on the “+” and “-” signs in the scene timeline.
Now that’s how you convert your powerpoint into a video.
However, the scenes in the video look dull and lifeless despite adding transitions and music. Something more is needed to make it exciting and engaging.
Fortunately, many sections are available in the library on the left-hand side.
These include Character, Property, Text, BG, Image, Video, Music, and Effect sections, as well as Apps and Integration.
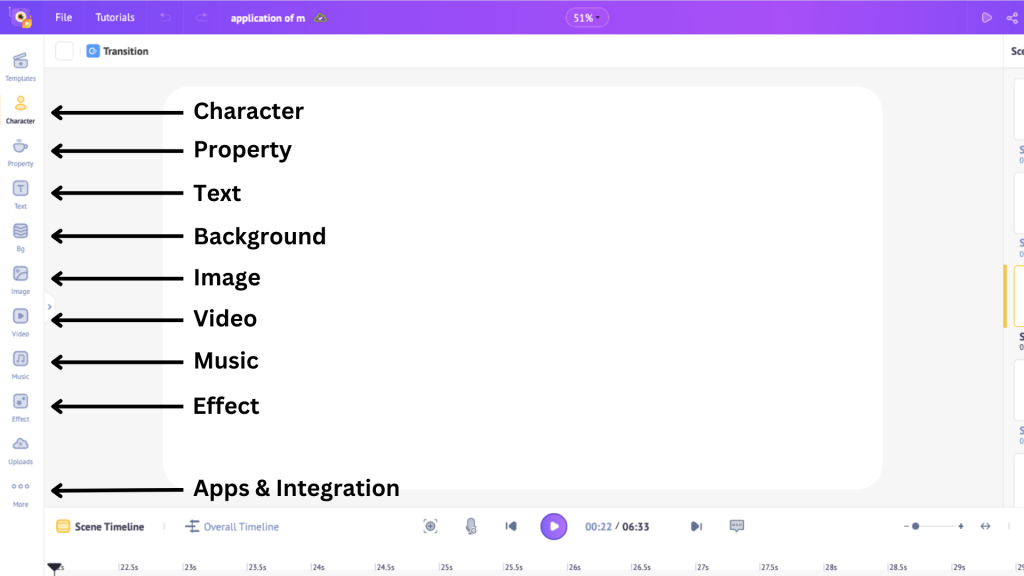
You can utilize these sections to enhance your video and make it lively. For example, you can use characters and lip-sync them to the content in your scenes. Yes, it is possible! To learn how, watch the tutorial below, which provides a step-by-step guide for beginners.
You can also add properties, change the background, and add images and videos.
Look at how I used a character, then animated and lip-synced it for the first scene of my video.

Looks great, doesn't it?
You can repeat the process for all the scenes.
Step 3: Download your Video
After enhancing your video, all there is left to do is download it. To download your video, click on Publish and then select Download Video.

Then, click on Download.

Your video will be rendered and available for download on the exports page.
This is how to convert ppt to video online. Let’s see how to do so offline.
2. How to convert PPT to Video Offline
In this section, we shall see how to convert PPT to video on two different operating systems.
Let’s look at each of these in detail.
1. How to convert PPT to Video in Windows
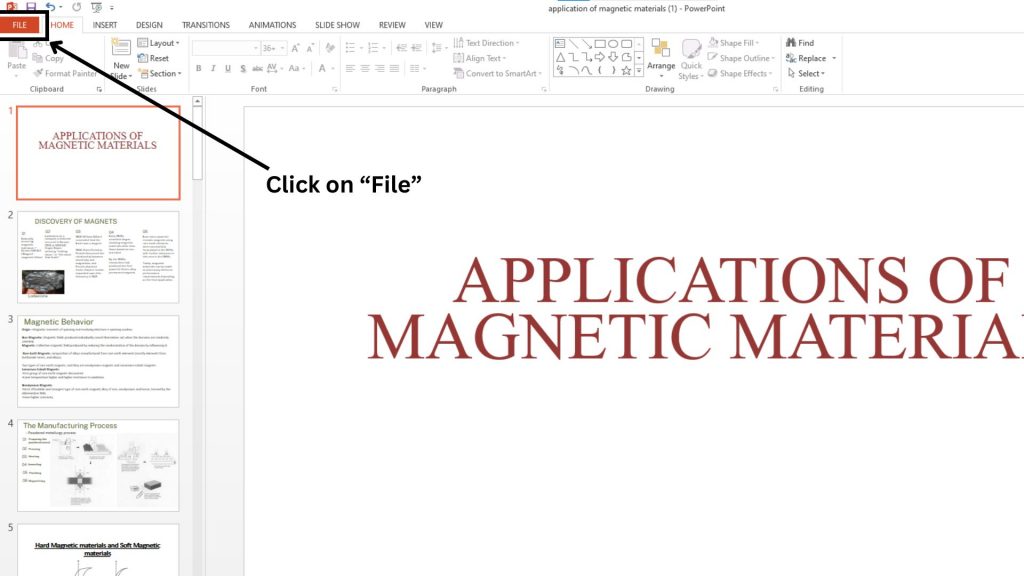
Open Microsoft Powerpoint and open your powerpoint file. Click on the “File” tab on the top menu.
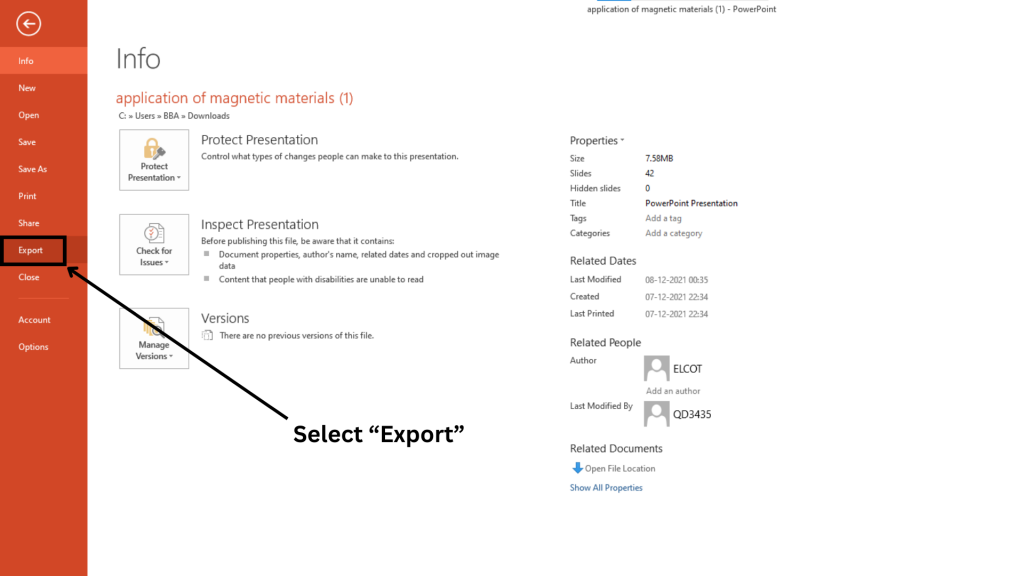
Here, select “Export”.
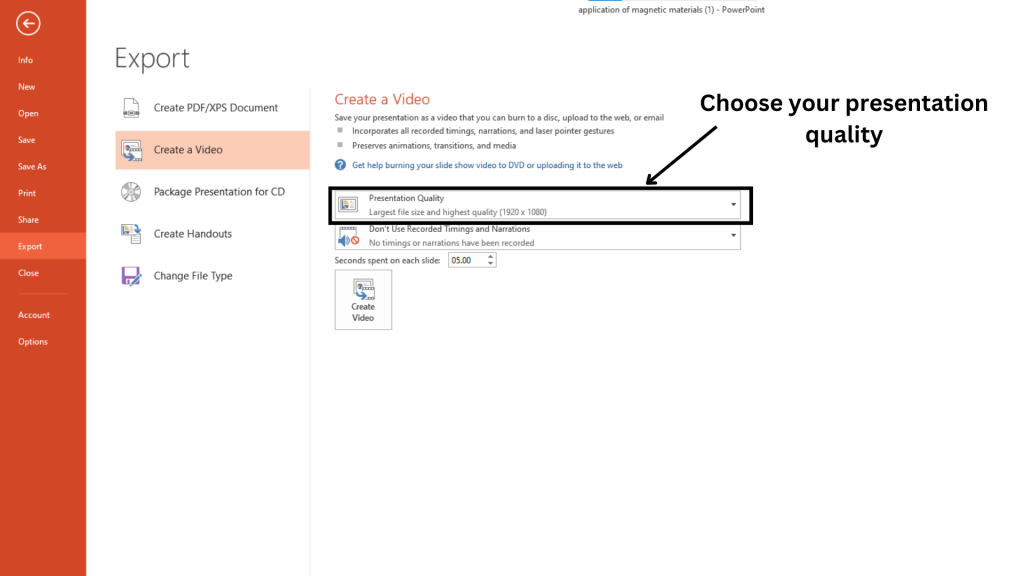
Next, choose the “Create a Video” option.

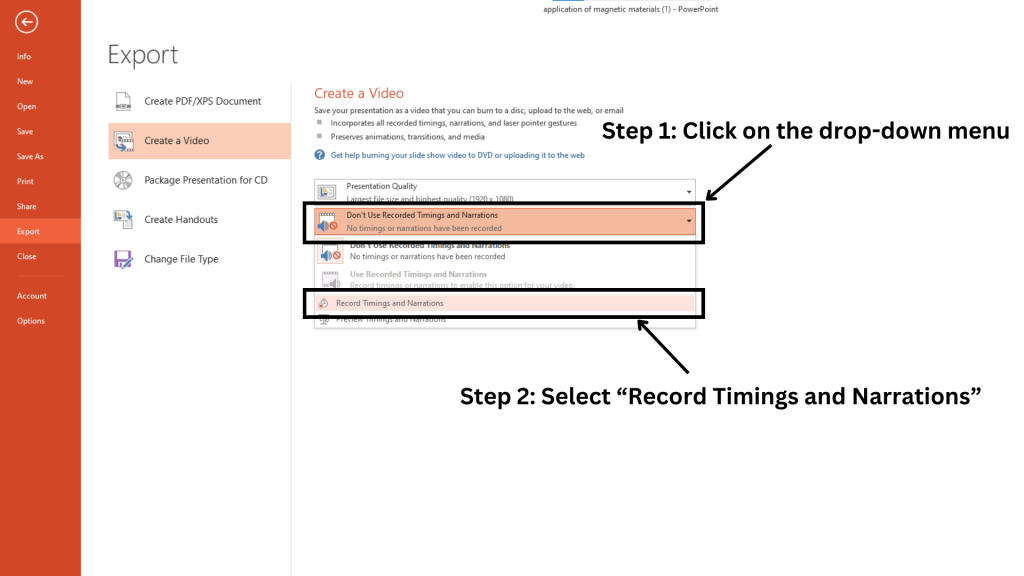
Here, select your preferred presentation quality by clicking on the “Presentation Quality” drop-down menu.
The default timing for each slide is set to 5 seconds. You can change it if you wish.
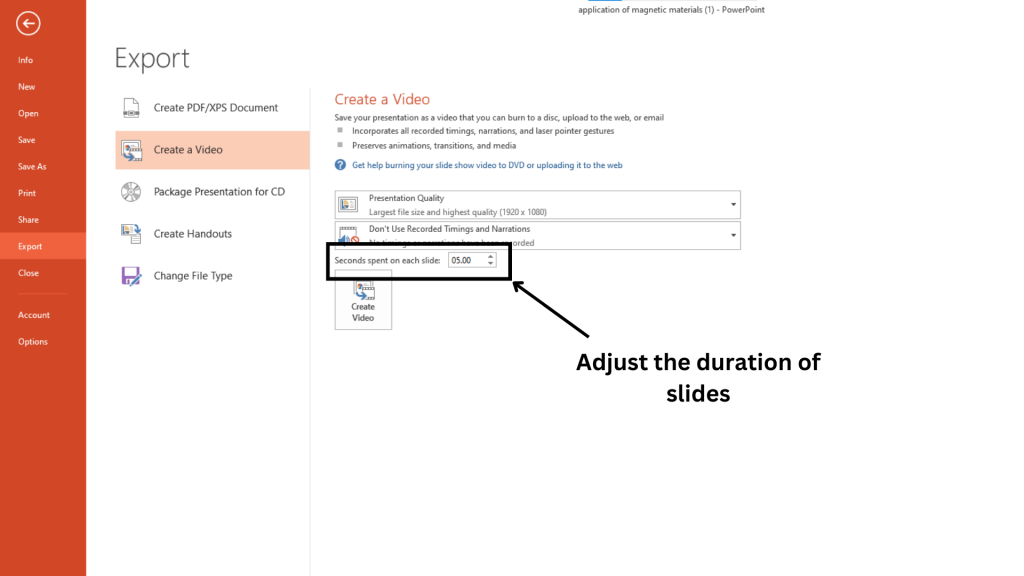
However, this can become an issue if you need to spend more time on a particular slide.
So, if you wish to have a different duration for each slide, click on the second drop-down menu and select the “Record Timings and Narrations” option to record your presentation.
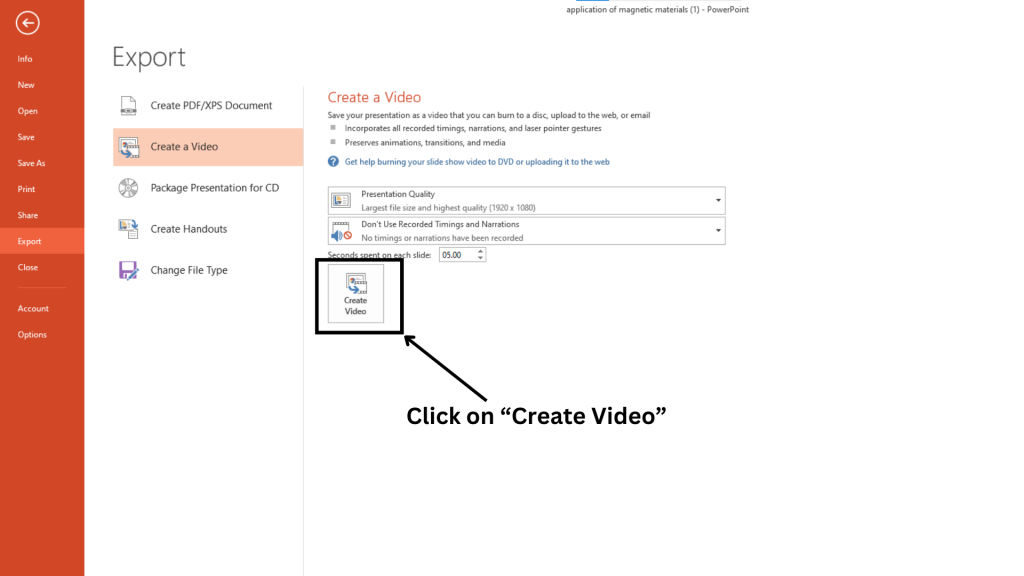
Once recorded, the timings for each slide get set. Then, click on the “Create Video” option.
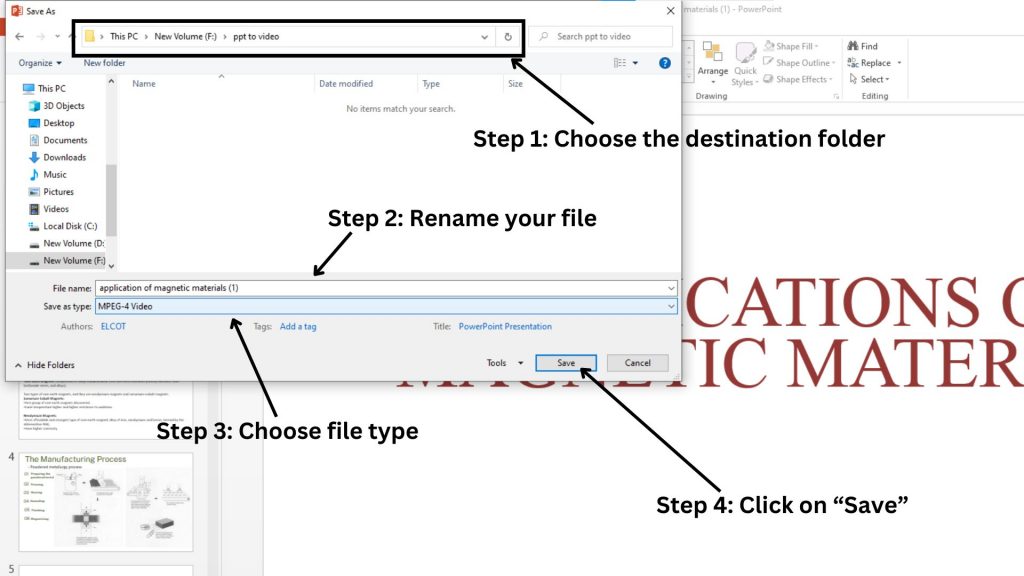
Here, choose the destination folder, rename your file, and choose file type. Then, click on “Save”.
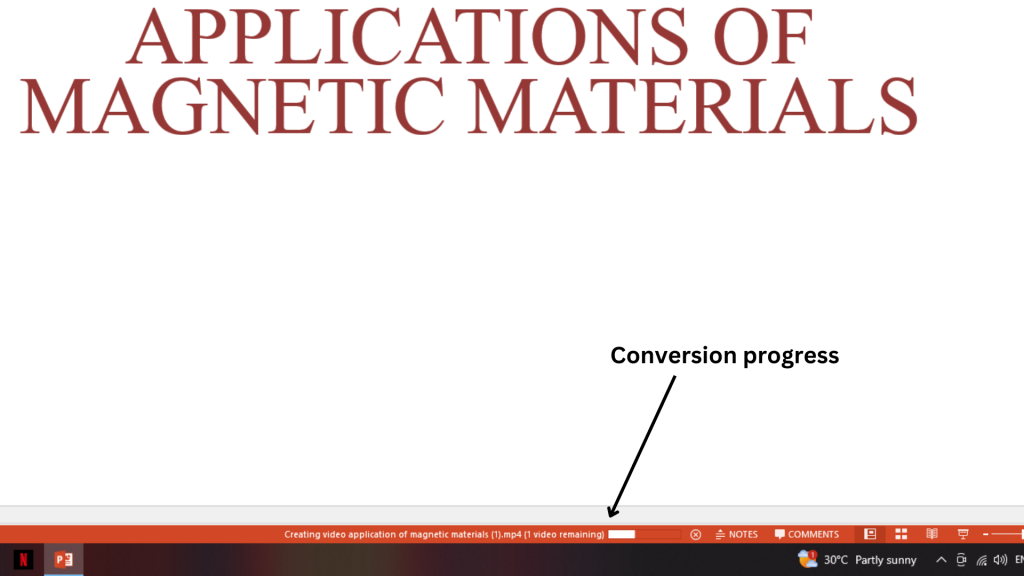
The conversion begins, and you can see the progress below in the powerpoint window.
That’s how you can convert a PPT to video in Windows.
Now, let’s see how to do this on Mac.
2. How to convert PPT to Video on Mac
Open your powerpoint on Keynote and select the “File” tab.
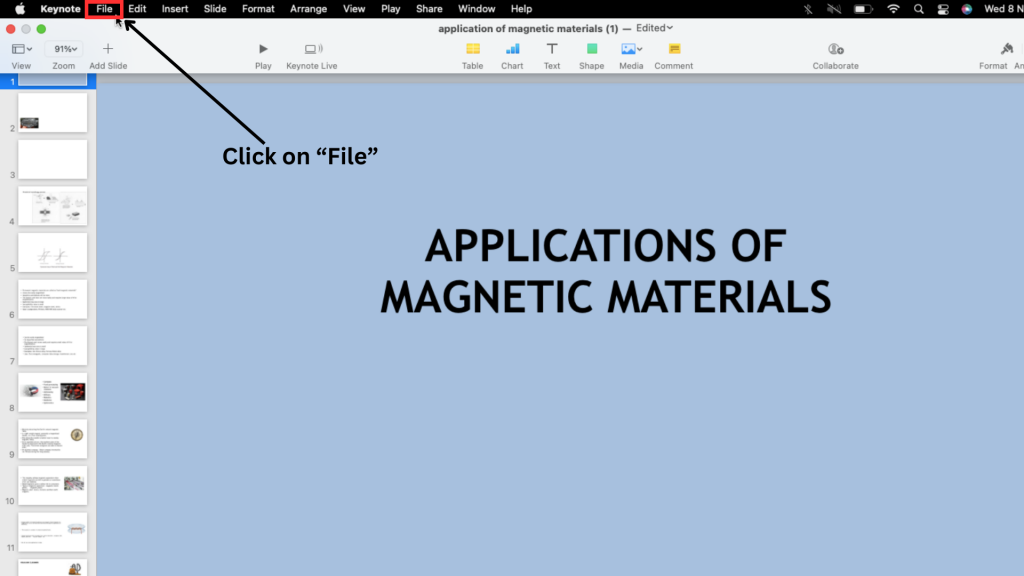
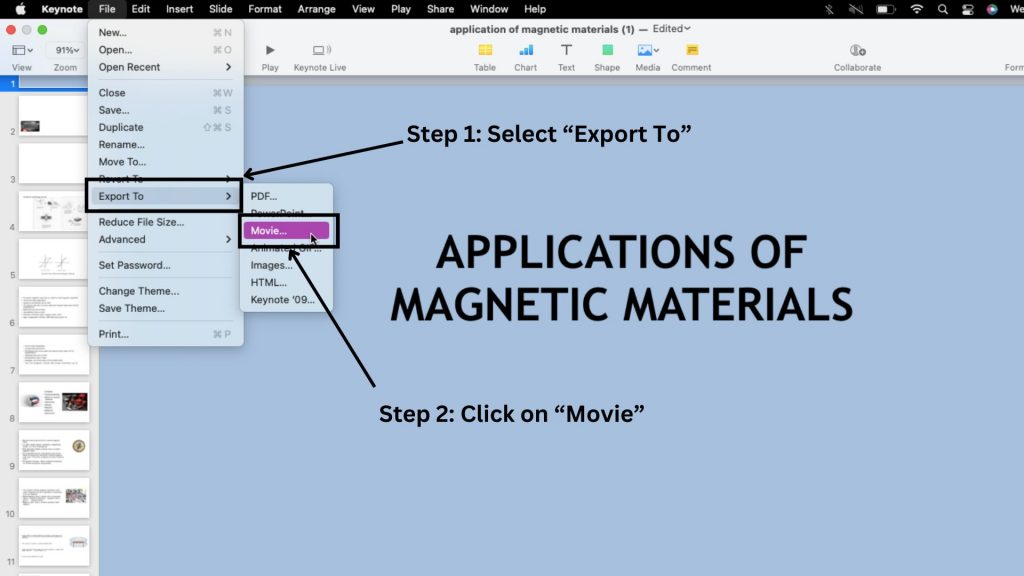
Here, Select “Export to” and click on “Movie.”
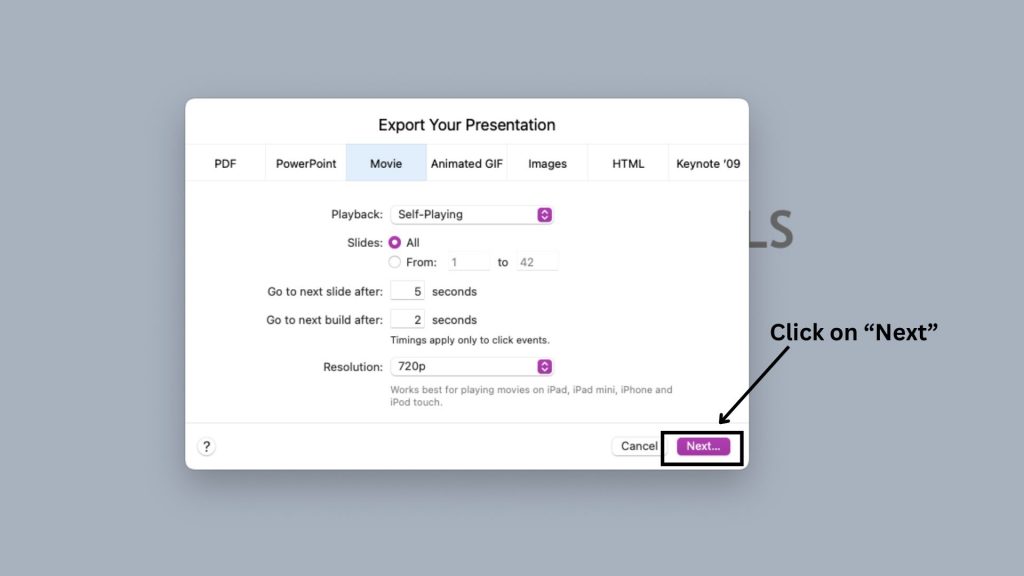
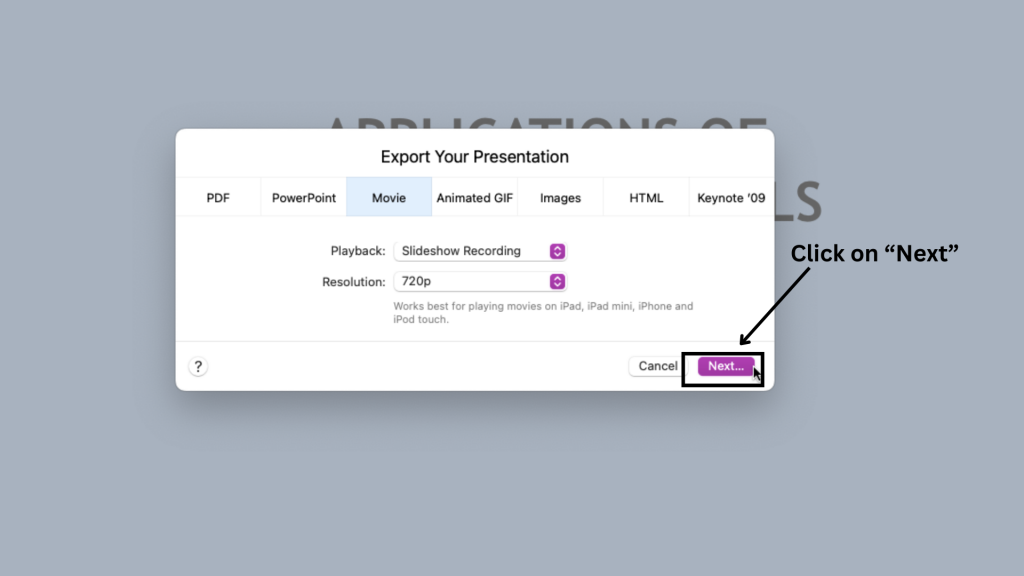
This will open a pop-up window with options including slide duration, video resolution, and the ability to choose a range of slides to convert. Click on “Next” after making the necessary changes.
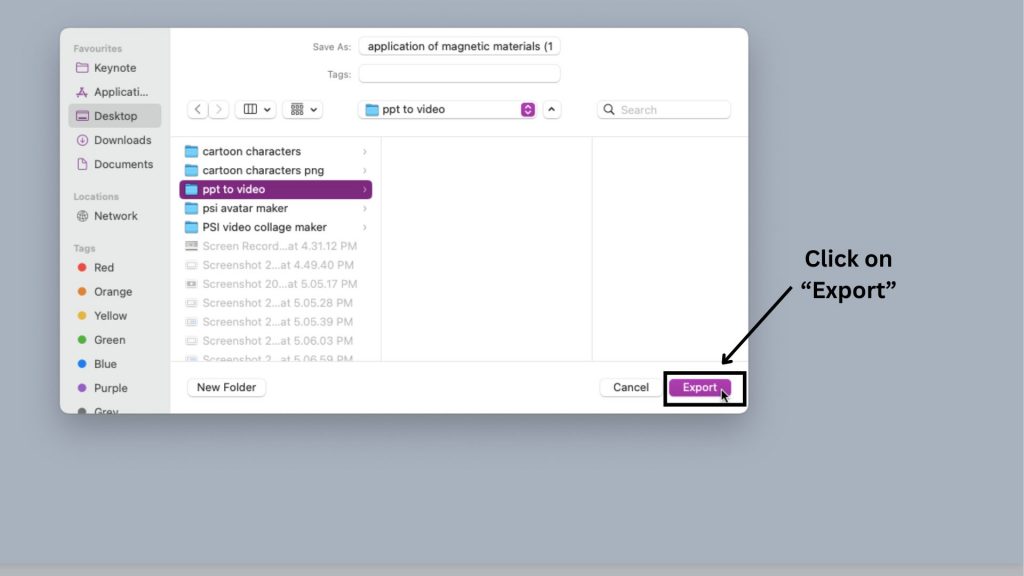
Then, choose a destination folder and click on “Export.”
The conversion process begins.
While the above method involves all the slides having a standard duration, there is a way to record with custom durations. Let me show you how.
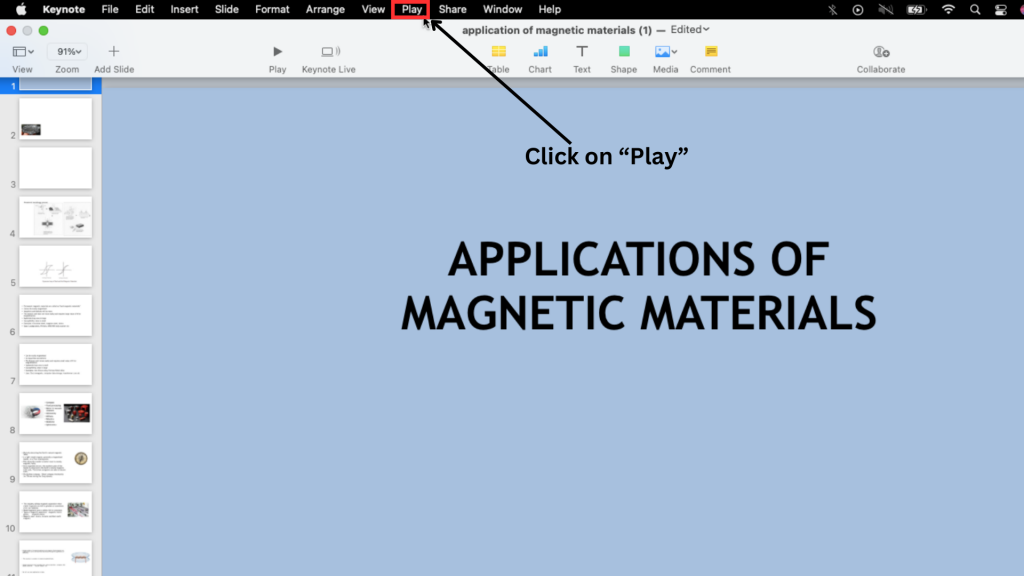
First, open your powerpoint on Keynote and select the “Play” drop-down menu.
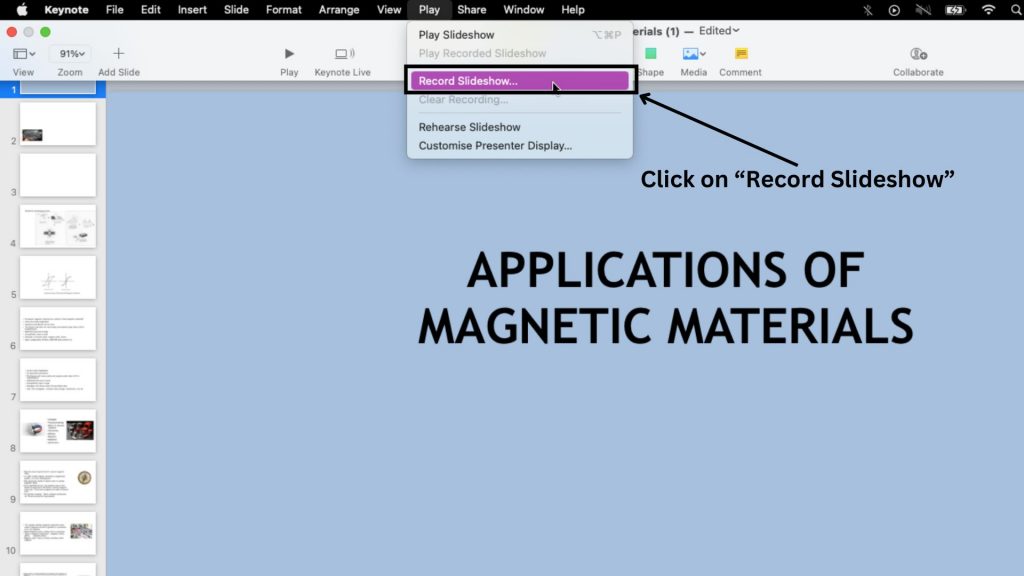
Then, select the “Record Slideshow” option.
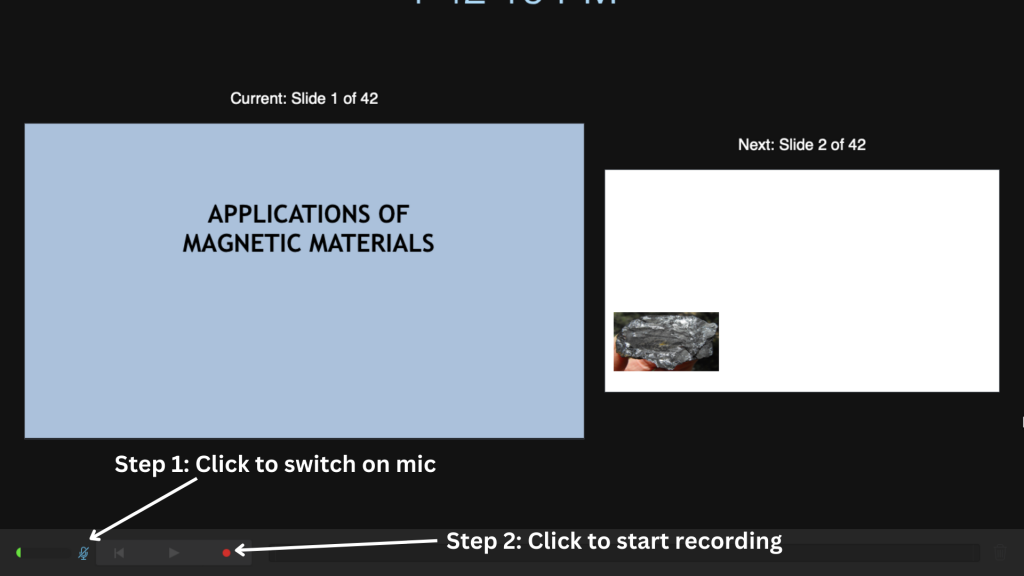
This will open a recording window. If you want to record your voice, click on the microphone icon, then hit the red dot to start recording. Use the arrow keys on your keyboard to move to the next slide.
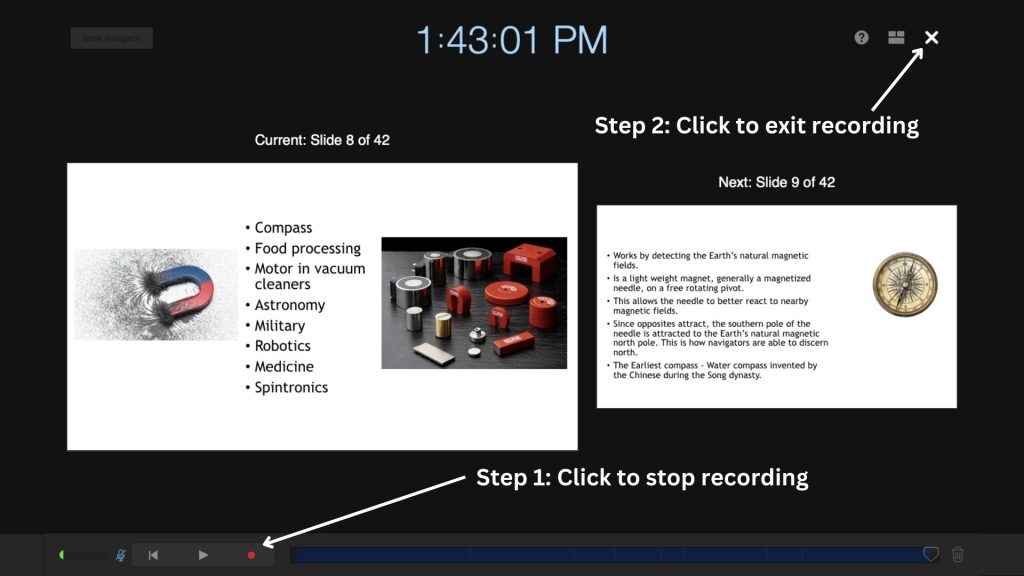
Once you have finished recording, click on the red dot again to stop the recording. To exit the recording window, click on the “X” sign.
Now, to convert the screen-recorded PPT to video, click on the “File” tab just like before.

Then, Select “Export to” and click on “Movie.”

In this pop-up window, you can choose the resolution type. Then, click on “Next”.
Choose a destination folder and click “Export”.

The conversion process begins.
And that’s how you convert a PowerPoint to a video on a Mac.
***
Congratulations! You have found different ways to convert your presentation to a video.
Who would have thought that you could easily convert your PowerPoint to video and improve its overall quality simultaneously?
Don't wait any longer! Head over to Animaker’s PPT to Video Converter now and start converting your PowerPoint presentations into engaging videos.
