How to make animated videos? [The Ultimate Guide for Newbies!]
As a newbie, creating the perfect animation video can sound like a challenging task. But we are here to tell you that, isn’t it! If you had the right know-how and had access to the right tools, creating animations can be as easy as pie. And that’s what we’ll exactly equip you with by the end of this article. We have put together a 3-step guide to help you jump over the hurdles and create animated videos like a pro!
Step 1: Create a stellar script and a storyboard
Creating a Script:
A building’s blueprint is the foundation for its construction. Similarly, the script is the foundation for your video. As the scriptwriter, you should decide what will appear in your video. While this can sound intimidating at first, things can be very easy with a little bit of homework. Before you start writing a script for your video you need to write a solid video brief. This will help you determine your objective, target audience, and the core message of your video. Basically, before scriptwriting, you should have clarity on-
- Why you’re making this animated video?
- What does it need to achieve?
- Who is your target audience?
- What action should viewers take after watching, and
- What is the core message of your video?
Convert your core message into a simple story:
Any animated video you create will have one or more core messages that you want to communicate to your audience. The challenge lies in converting that core message into a simple and short story that will engage your audience. Make sure your story has these 3 elements:-
- The hook: This is the most important part of the script. It’ll be the first 8-10 seconds for a 1-minute video. It will decide whether your viewers will stay or bounce. You should give some compelling reason for them to get hooked.
- The patty: This is the main part of your video. This is where you get to the meat of your video. Make sure it lives up to your hook. Many make the mistake of destroying their video after a great buildup.
- The CTA: This is the final part of your video. If your hook and patty were good, many viewers will reach the CTA part. This is where you lead them to take some action.
Storyboard:
A storyboard plays an essential role in any animation video creation process. It will give collaborators and decision-makers an idea of how your final video might look even before you start creating it. For beginners, creating a storyboard will help predict whether the concept of your video will work or not. In addition, it will allow you to tweak your visuals and script to create the most compelling animation video possible. A storyboard is more like a comic strip of your animation video, and the purpose of creating one helps organize your video scene by scene. A sample storyboard will look like the one below,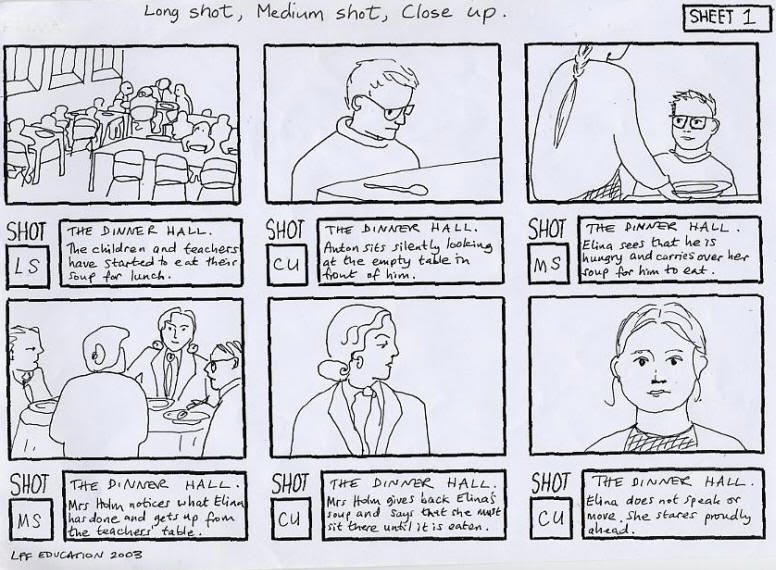
How to create storyboards?
Creating storyboards the traditional way can look messy if your sketching skills are mediocre. There are online alternatives, though. Many use Animaker for this purpose. Though it’s a full-end video-making tool, its simple drag & drop interface makes creating a storyboard a breeze. Here’s a sample storyboard created using Animaker,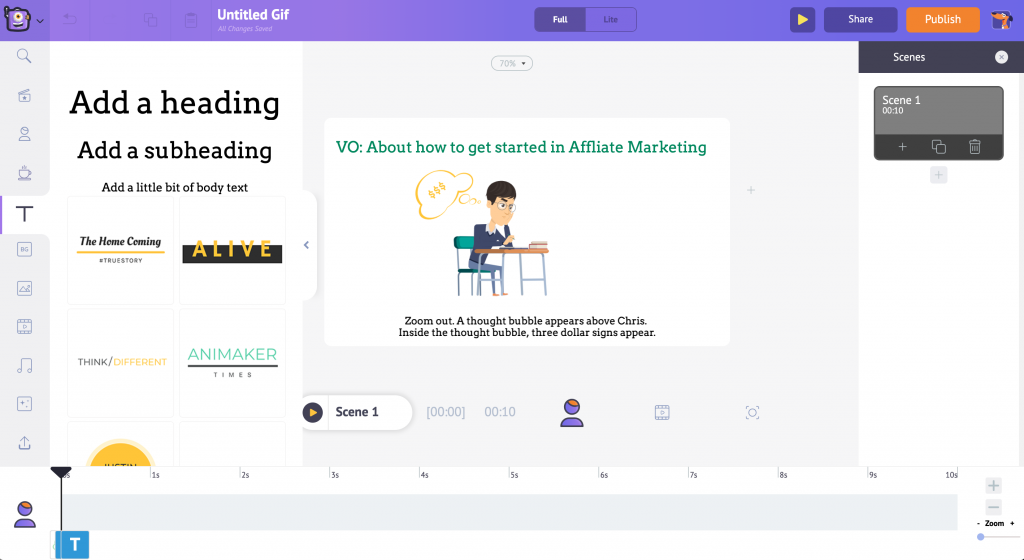
Step 2: Animate your video
Deciding how to animate your video can be a challenge, as there are many options to choose from. In addition, each option has its pros & cons. Here are a few ways by which you can create an animation video,Hire and build an in-house team:
This option will suit your brand best if you plan on making a series of animation videos and have access to a huge marketing budget. Firstly, you’ll need a team of scriptwriters, animators, and voice-over artists. Then you'll have to provide them access to the necessary equipment and software. This can easily cost you tens of thousands of dollars. Moreover, the quality and production time per animation video will solely depend on the capability of your in-house team.Outsource to an animation studio:
Outsourcing will suit you best if you only plan for a one-time animation video project. There again comes the debate of choosing the right animation studio and the question of how much they would charge. Firstly, you'll have to consider the timeline for your project and the budget you have in hand. The quicker you need your video, the more you have to spend when it comes to outsourcing! In this case, the video quality depends on how well you've communicated your idea and how well the studio has understood your brand.Do-it-yourself:
The methods mentioned above can be expensive. When you're on a lean budget but are in dire need of a killer animation video, DIY apps are your best friend! Yes! You can do it on your own. All you need is a PC and access to an internet connection. Simply sign up for a DIY tool like Animaker and start creating animation videos from the comfort of your web browser. With Animaker, you can create all types of videos yourself. You can also use our massive list of templates and the World’s most extensive animation library to create the best possible animation video within minutes. Or, you can even create your own video by starting from scratch. So in this article, we are going to learn how to make animated videos through two methods: If you want to learn how to edit animated templates, read the section below. Or, if you want to learn to create an animated video from scratch, jump to the next section by clicking the link above.How to make animated videos by editing a Template:
Are you in a hurry and do not have enough time to create an animated video from scratch? Do you feel that creating a video from scratch is just not your cup of tea? Well don’t worry; we have created a myriad of templates just to help you out.! Animaker has a collection of 1000+ templates across various categories like Social Media, Birthday, Corporate, etc. Creating videos with this method is as simple as searching and locating an ideal template for your use case, editing it to fit your needs, and then exporting the final output. If you are comfortable learning the steps from a video, check out this tutorial below. Or, if you want to edit a template side-by-side by following the steps below, continue reading.- Step 1: Signup/Login
- Step 2: Exploring Dashboard
- Step 3: Choosing the perfect template
- Step 4: Editing text
- Step 5: Adding/editing the Character
- Step 6: Adjusting Scene duration
- Step 7: Adding/Duplicating/Deleting a scene
- Step 8: Changing the music track
- Step 9: Previewing the video
Step 1: Signup/Login:
Are you new to Animaker? Sign up here. If you are a member already, log in here.Step 2: Exploring dashboard:
You will get redirected to the dashboard, where you can see various templates for different use cases. To preview a template, hover over it and click on the “Preview” option.
Step 3: Choosing the perfect template:
Now, let’s create an explainer video for a business. So, let’s search for the word “explainer” on the search tab.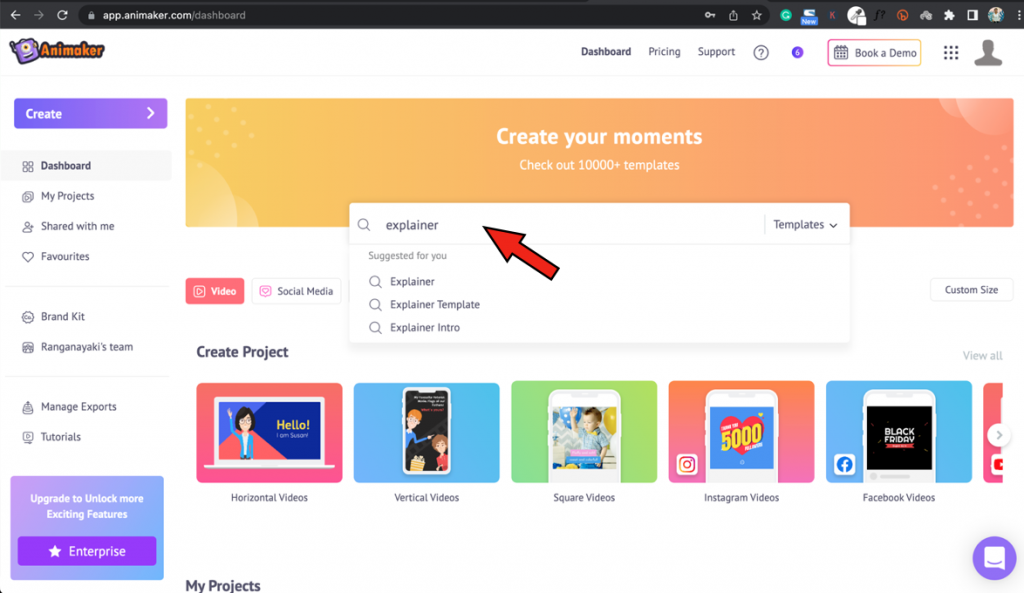 This lists several explainer videos. First, let’s select the template to “Promote your product or service”.
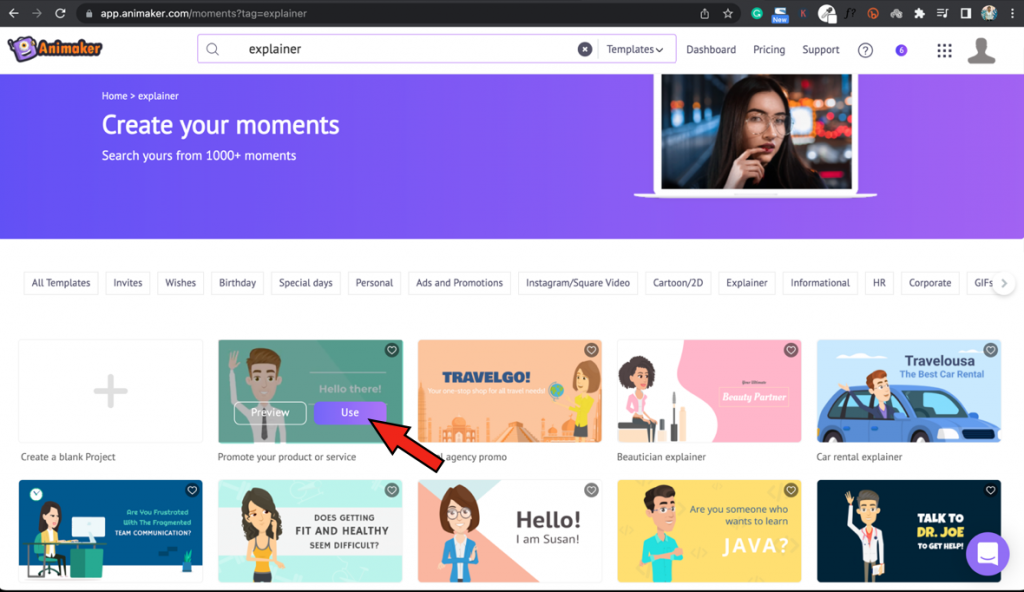 This launches the template as a new project. This is how the interface of Animaker looks.
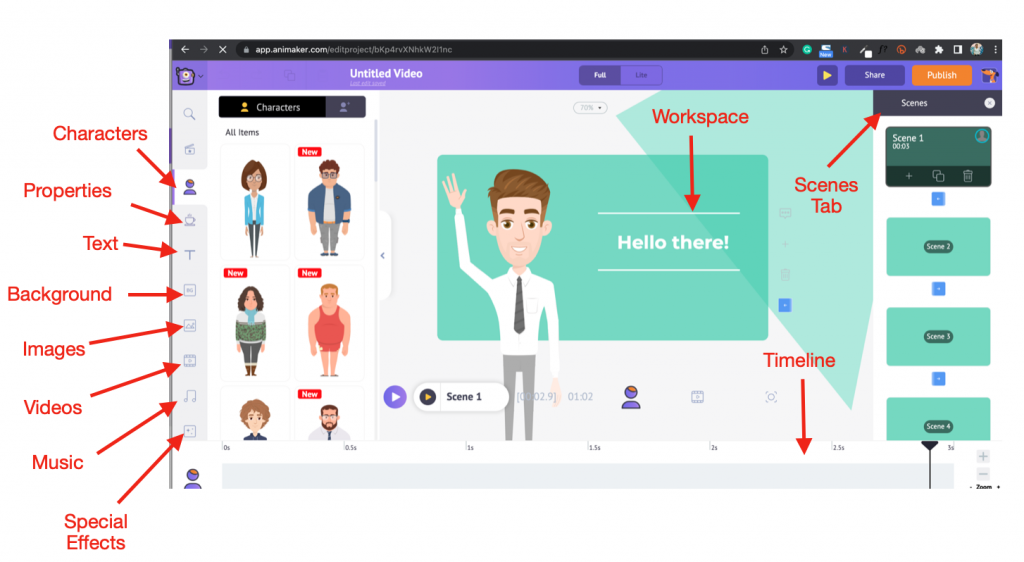 You will notice how the template is filled with everything a video must have, from the content and context to the music. So, all you have to do is swap the elements in it as per your needs and then export it.
Step 4: Editing Text:
Let’s start by editing the text in the scene. To edit it, click on the text and start typing. Once you click the text, you will notice the Text settings tab open. You can change the text settings like font, size, color, transparency, alignment, etc. Now, this is how the changed text looks.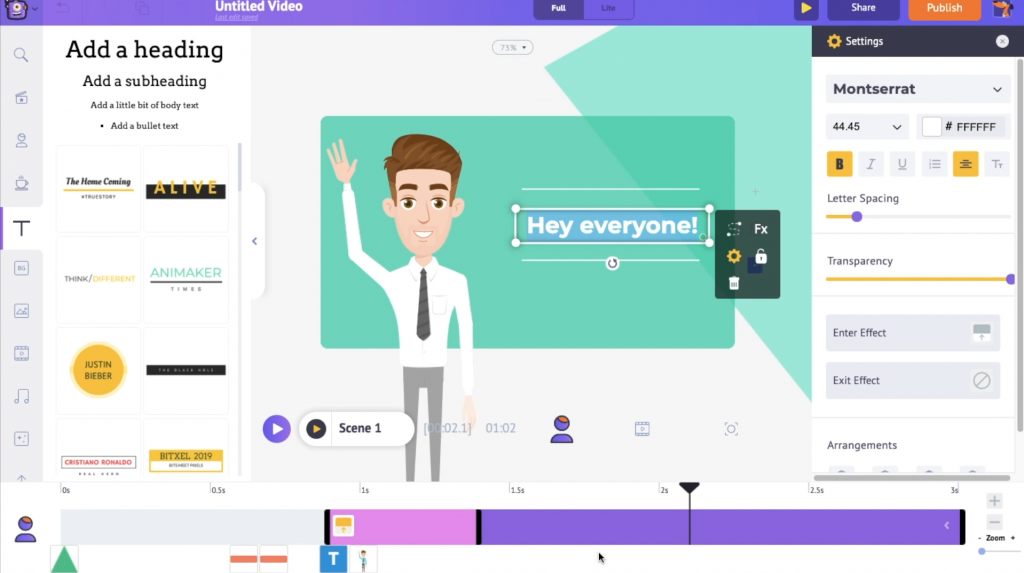 On the timeline, you will notice that the text has two parts: a pink section and a purple section. The pink section indicates the duration of the text effects, and the purple section indicates the duration of the text itself.
You can extend the duration of the text and its effects by using the bars at the end.
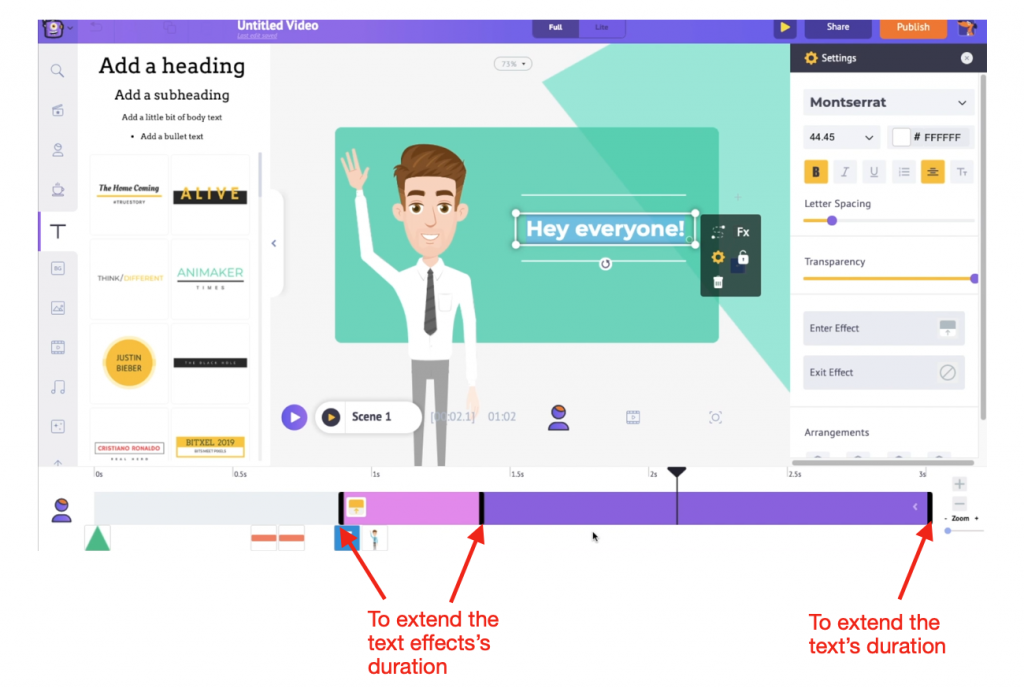 To change the text’s entry and exit effects, go to the Settings Tab and select the enter effect/exit effect options. You will get to see a wide variety of effects that can be readily applied to your text. Click on any effect and change the way your text makes an entry/exit.

Step 5: Adding/Editing the character:
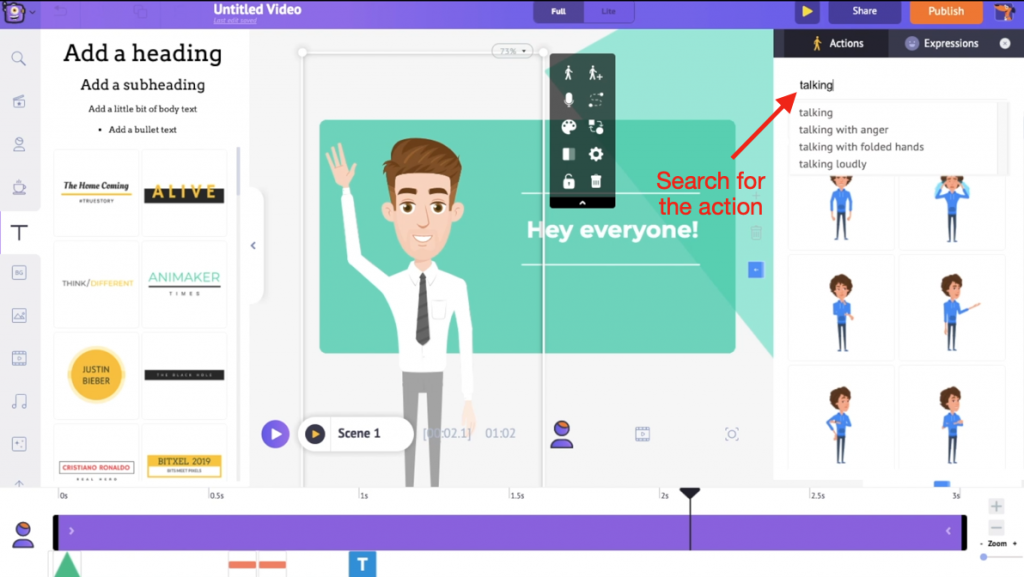
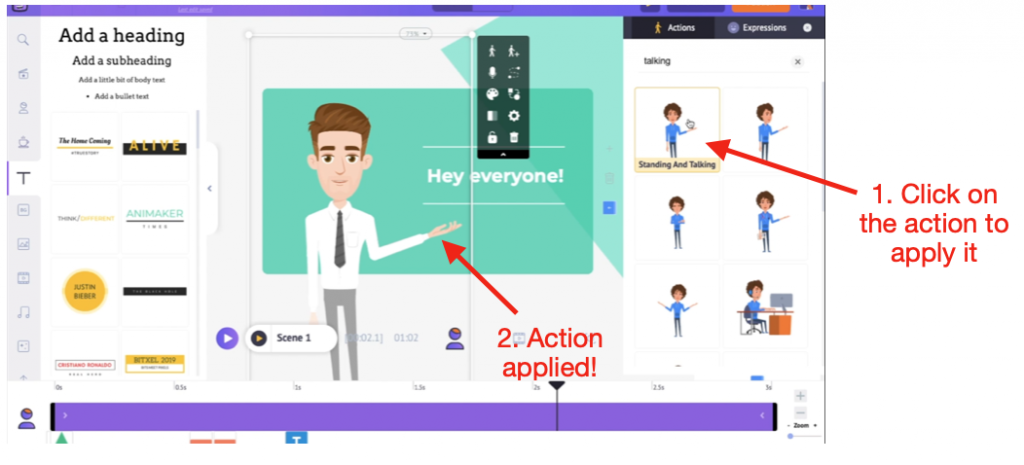
Now, let’s move on to editing the character. Click on the character on the scene. You will notice the Actions Tab open on the right side. This tab has 1000+ actions.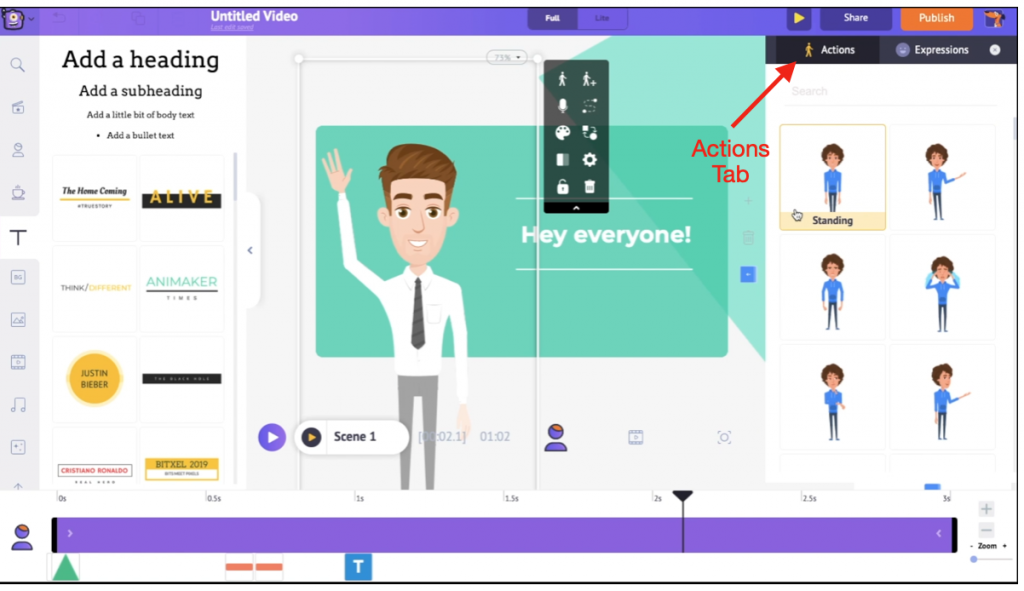 Let’s try changing the action of the character. Simply enter the action you want in the search tab and apply it to the character by clicking on the action. One-click = swish and flick magic!
 Adjacent to the Actions tab is the Expressions tab. You can make your character an expression king/queen/person by selecting from the 20+ expressions!
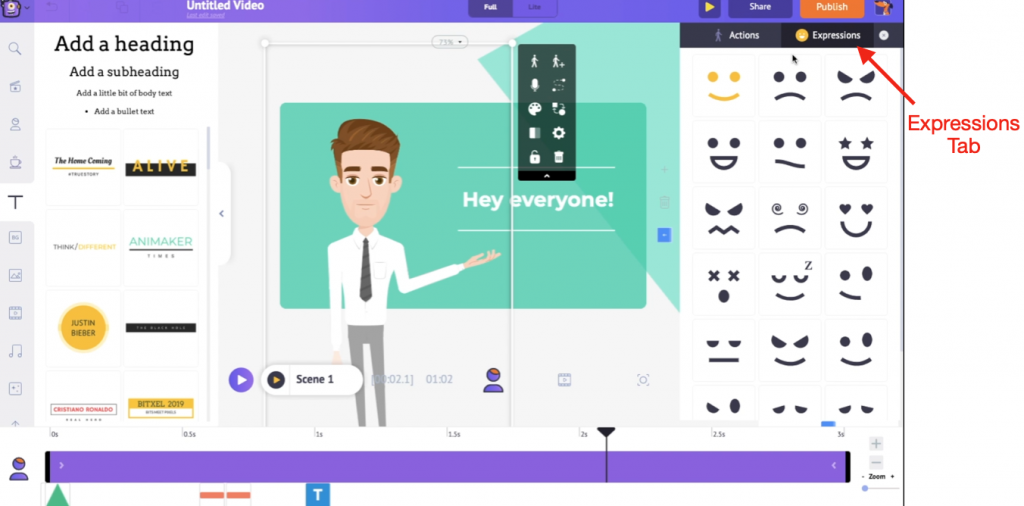
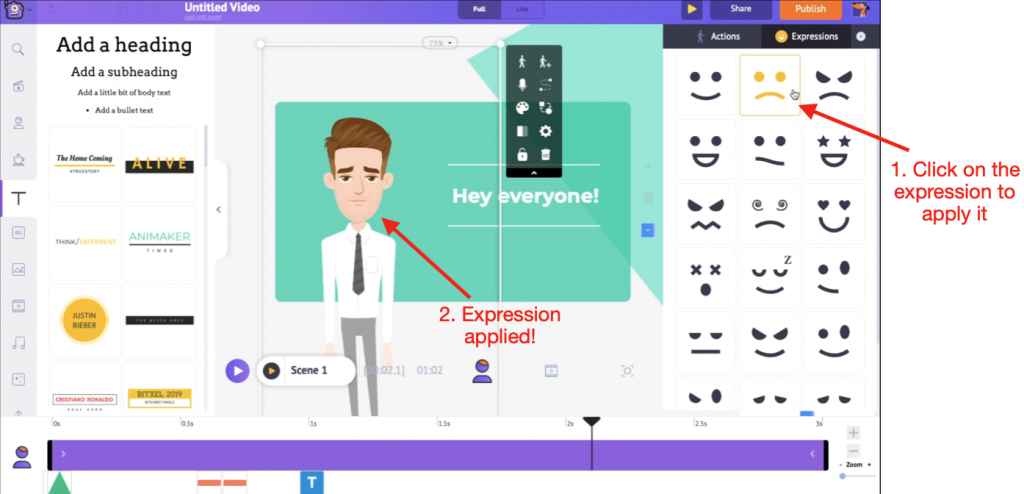 If you want to replace the character, click on it. This opens a small box called the Item Menu. This menu has several options, from which you have to select the Swap option to replace the character.
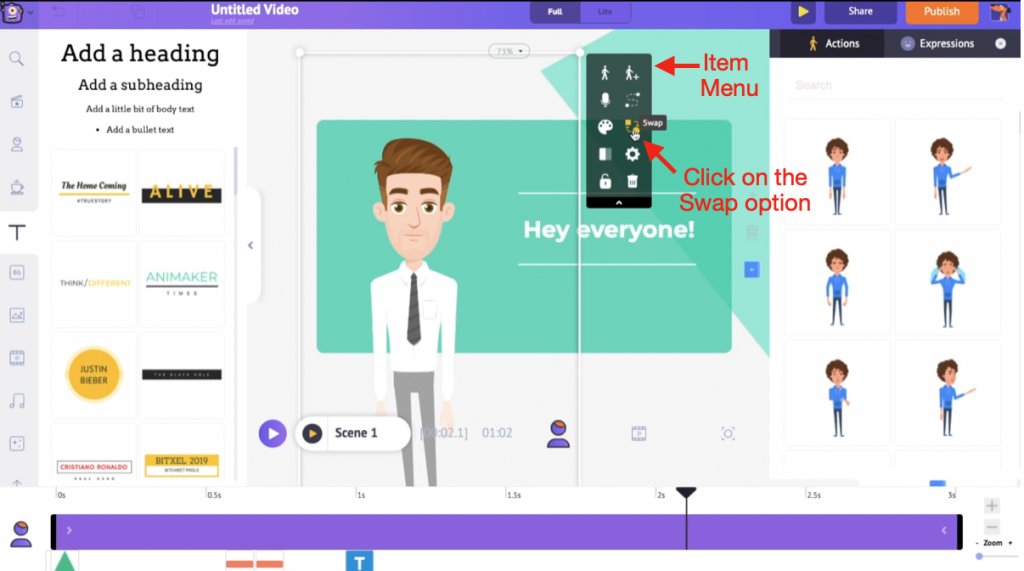 Upon selecting this option, you will notice the Characters tab open. Here, you will see 40+ Kid characters, 50+ Plus-size characters, 50+ regular-size characters, and 20+ Animal characters, each with 1000+ actions. That’s a massive list, isn’t it?
 Take some time later to explore them. Meanwhile, let’s finish swapping the character.
Select the character you want to replace the current character with from the list.
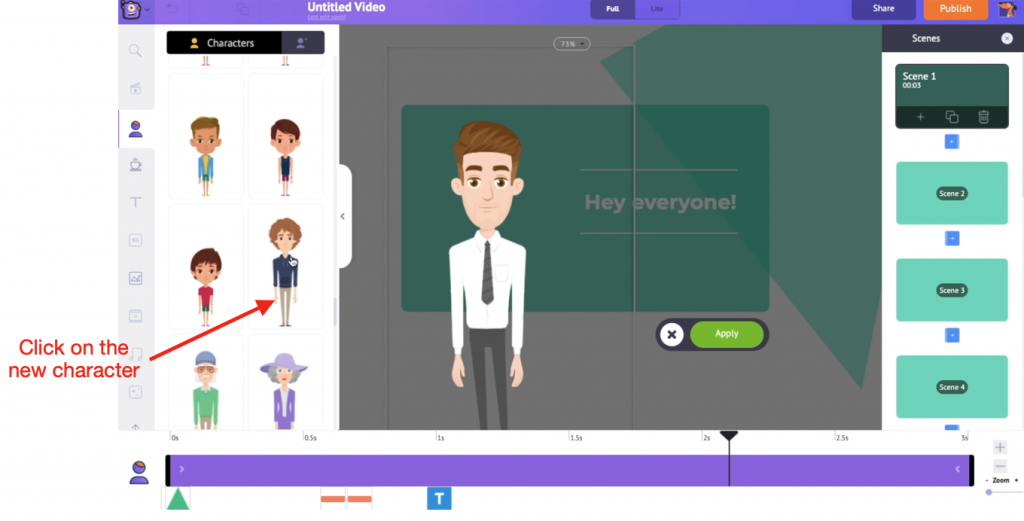 Once you click on the new character, it gets added to the workspace. Click on Apply.
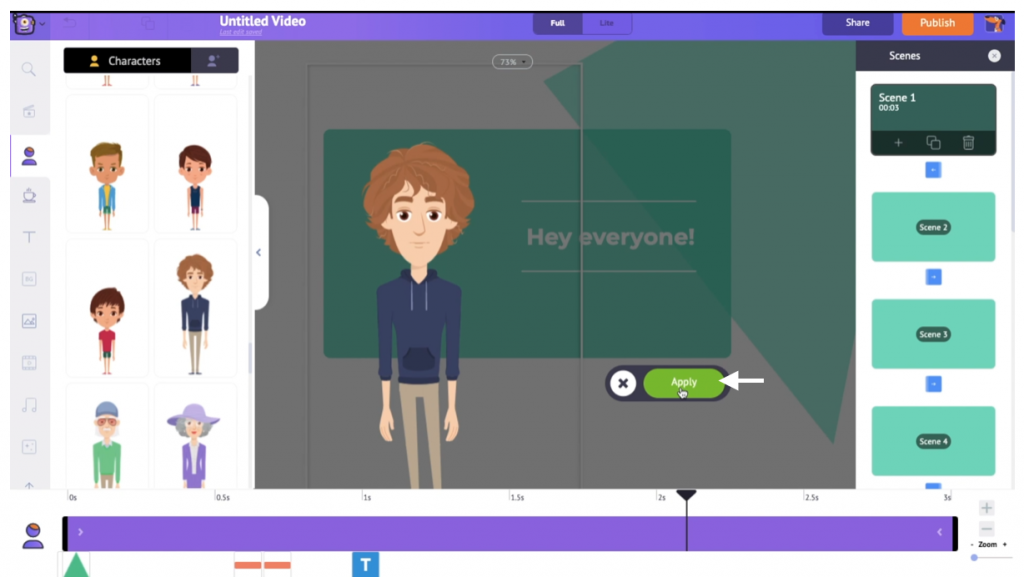 This is how the new character appears in the workspace.
That was easy, wasn’t it? :)
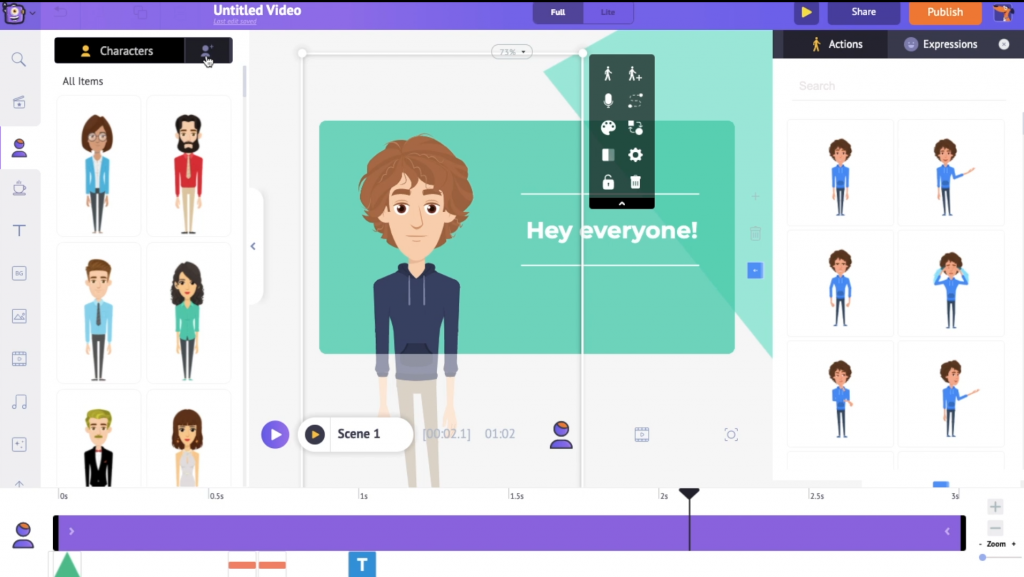 Now what we saw was a way to replace the existing character with a pre-built character from the Animaker library. Alternatively, you can also build your own character from scratch and swap that in the place of the existing character.
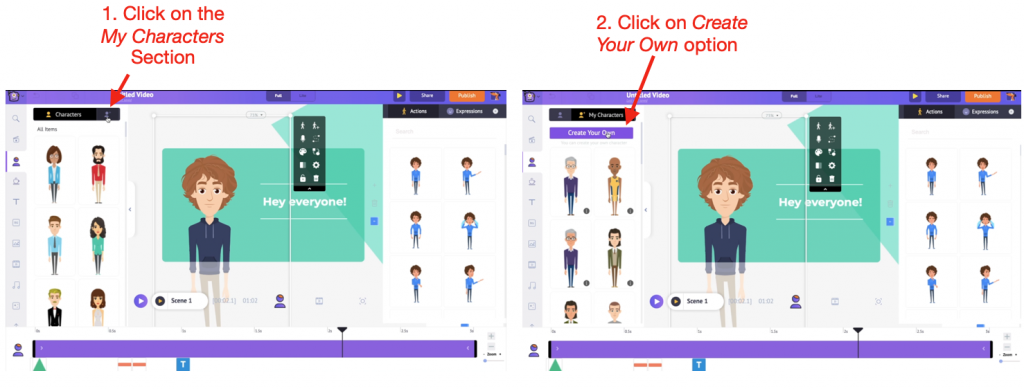
To build a new custom character, first, go to the My Characters section and click on Create your own option.
 This will take you to the Character Builder. Select the gender and the basic character template, to begin with.
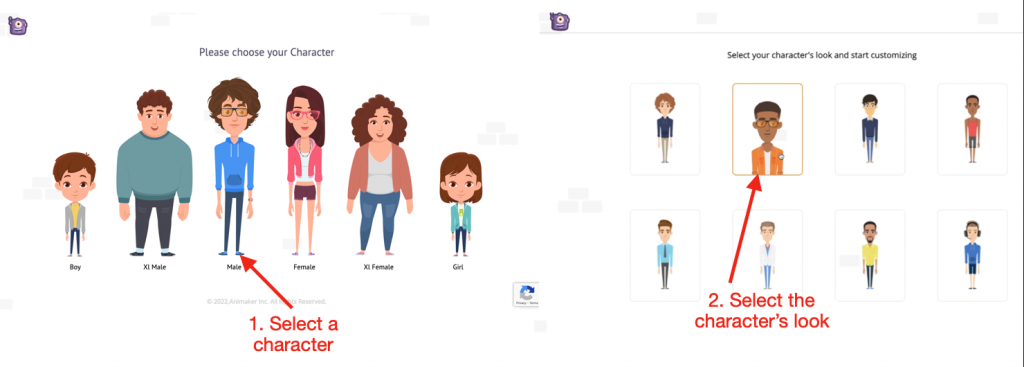 After this, you can change the character’s features like the hair color, hairstyle, eyebrows, outfit, accessories, etc. With different combinations, you can create more than 10K unique characters!
Once you are done customizing the character, click on Save.
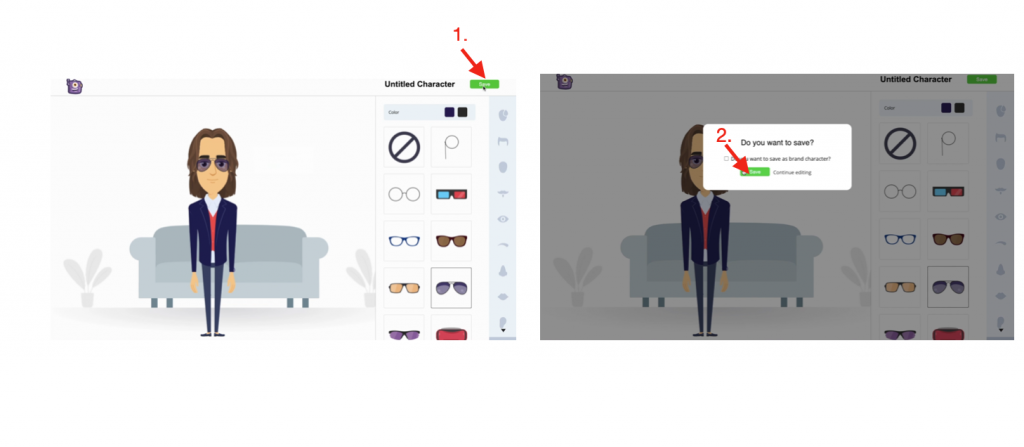 This adds the new character to the My Characters section.
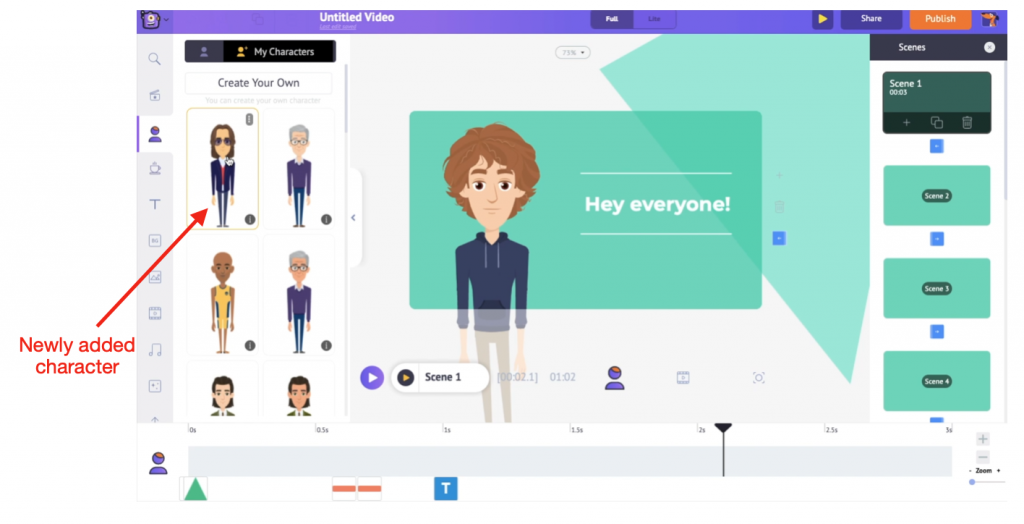 Now, click on the character in the workspace and select the swap option in the Item menu. With one click, replace the existing character with the newly created one!
Step 6: Adjusting Scene duration:
To increase or decrease the scene duration, you can use the + and - options to the right of the timeline. These options increase and decrease the scene duration by 1 second, respectively.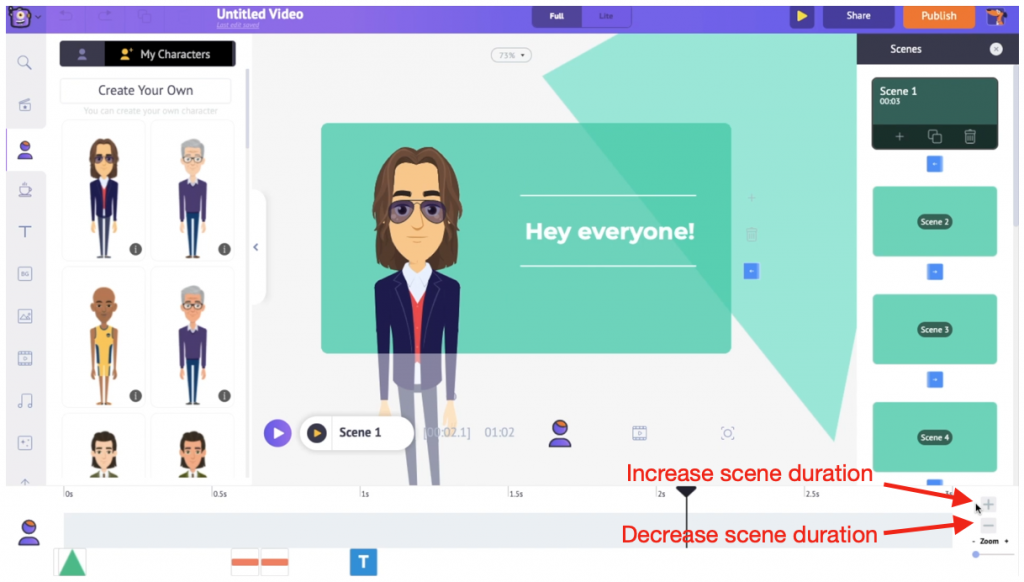
Step 7: Adding/Duplicating/Deleting a scene:
Since this is a template, all scenes are pre-made and all you have to do is make the necessary changes here and there. But if you feel like adding a new scene and designing it from scratch, you can use the add scene option in the scenes tab. Or, if you have made a unique change to a particular scene and want that to be applied to another scene, you can use the duplicate scene option to recreate a scene. If you are not satisfied with a scene, you can remove it by using the delete scene option. Here are the options to add, duplicate, and delete a scene.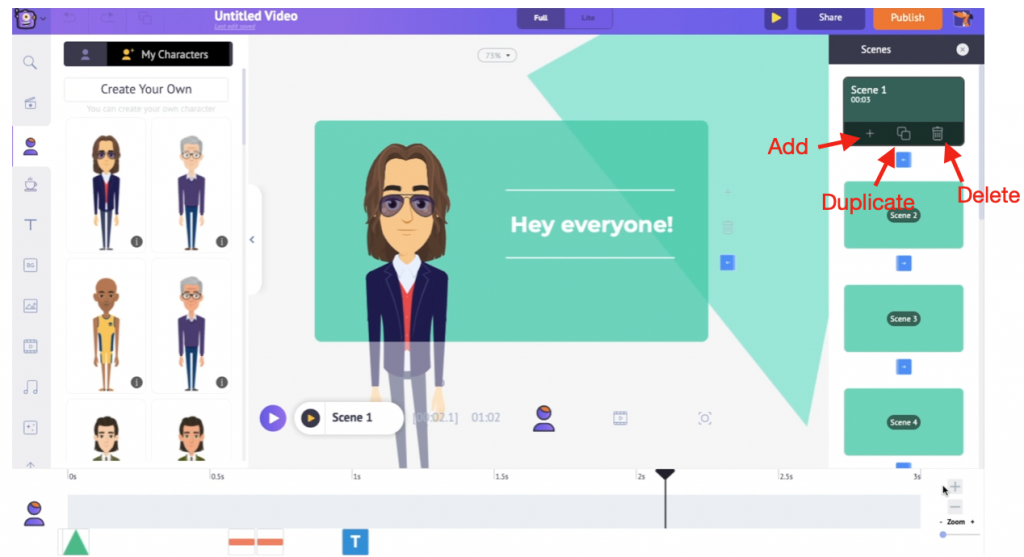
Step 8: Changing the Music Track:
Once you edit all the scenes, the final step is to change the music. Adding background music to your video is like placing a cherry on top of the cake. Without it, something will be missing! So, let’s quickly change the music track of our video. Go to the audio and video timeline. You will notice the music track used in the template. Click on the music track to see some options popping up. You can use these options to preview, adjust the track volume, trim, duplicate, and delete the track.
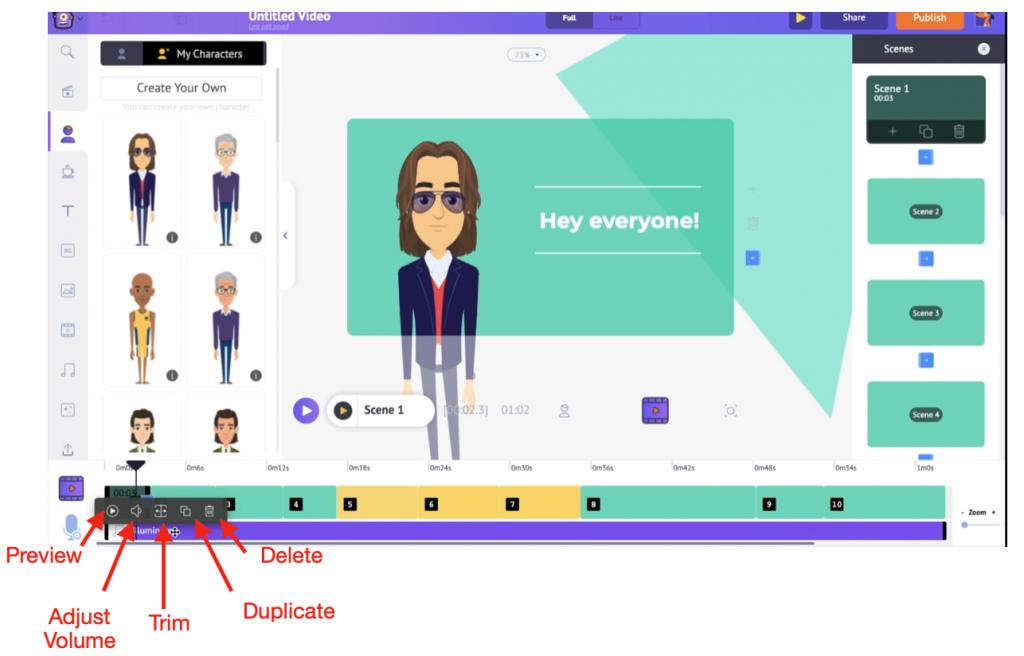 Let’s delete the existing track and replace it with a track from the library! Animaker’s music library is filled with 30K+ royalty-free music tracks. So, we are simply spoilt for choice!
 To access these music tracks, Go to Library -> Music.
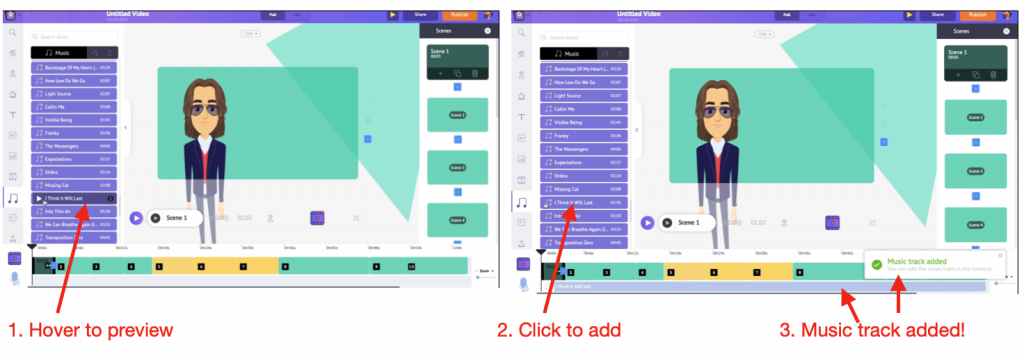
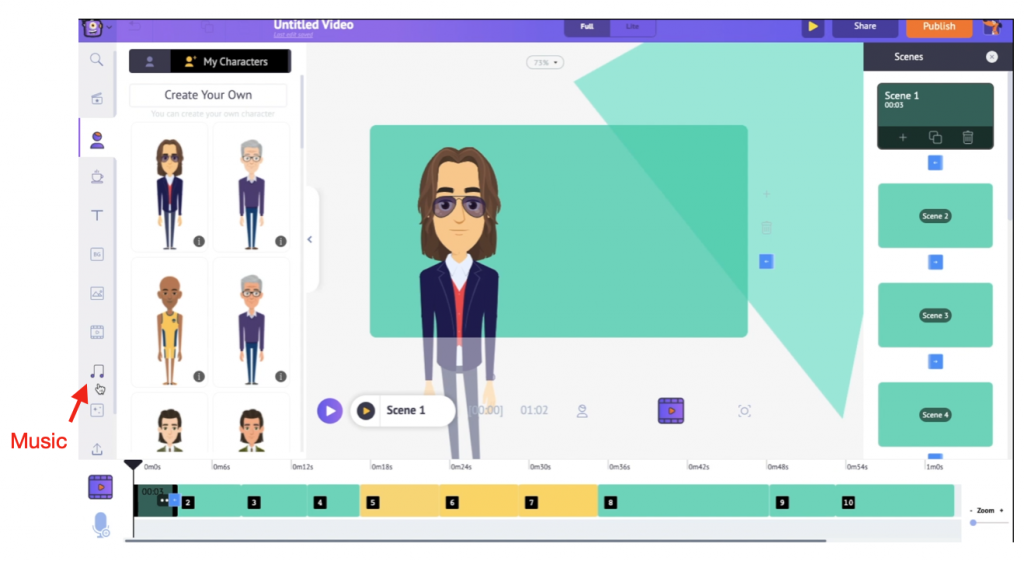 Here, you will get to see the music tracks from different genres. Enter a search term of your choice and access a track. To preview the track, simply hover over it. And to use it, just click it.
Step 9: Previewing the video:
To get an idea of what the full video looks like, you can always preview the video before downloading it. To preview the video, click on this play button.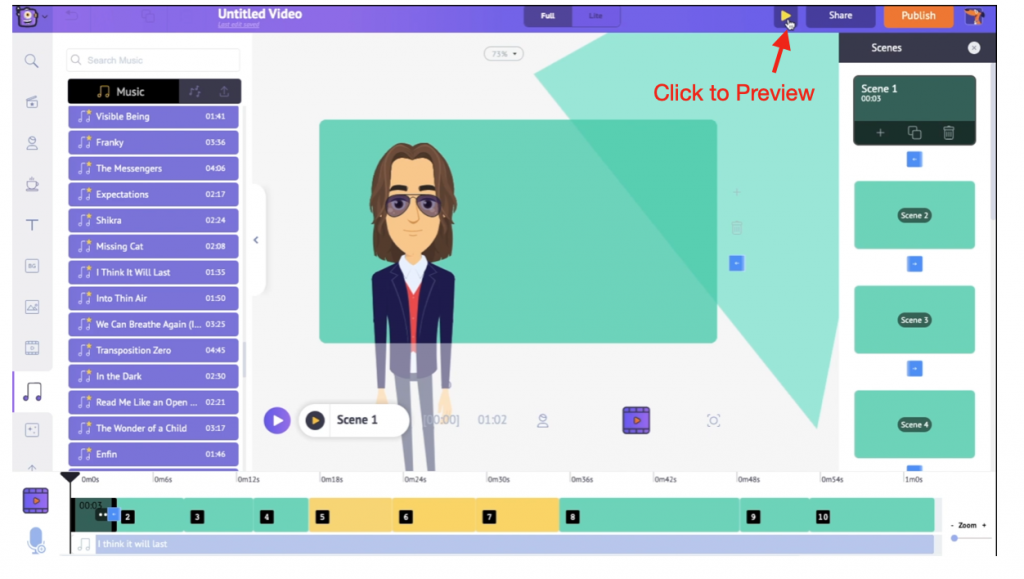 This is the easiest way to make animated videos.
For those on tight deadlines, we learned how to make animated videos by editing a template.
If you are someone who has the liberty to create videos at your own pace, let’s jump into the other method, creating an animated video from scratch.
Since we have Animaker, creating a video from scratch will not be a tough job and doesn’t need you to be a design expert!

How to make animated videos from scratch:
If you are ready to create a video from scratch and do not want to look at templates, well, we have options for that too! If following a step-by-step textual guide is your style, please continue reading. Else, if visual consumption is your style, check out this tutorial video on creating your animated video from scratch using Animaker! Now, our goal is to create an animated self-introduction video. So with no further delay, let’s jump right into creating an animated video from zero! Here are the steps to create an animated video from scratch!- Step 1: Signup/Login
- Step 2: Opening Blank Project
- Step 3: Exploring the Animaker interface
- Step 4: Adding Background
- Step 5: Adding Character
- Step 6: Adding Voice-over
- Step 7: Adjusting Asset/Scene duration
- Step 8: Adding background music
- Step 9: Previewing the video
Step 1: Signup/Login:
If you are new to Animaker, sign up here. Are you a member already? Login here.Step 2: Opening Blank Project:
Upon logging in, you will get redirected to the dashboard. Here, you will get to see different templates for various use-cases. Since we will create a video from scratch, let’s launch a black project. Click on Create -> Create a Video -> Blank Page.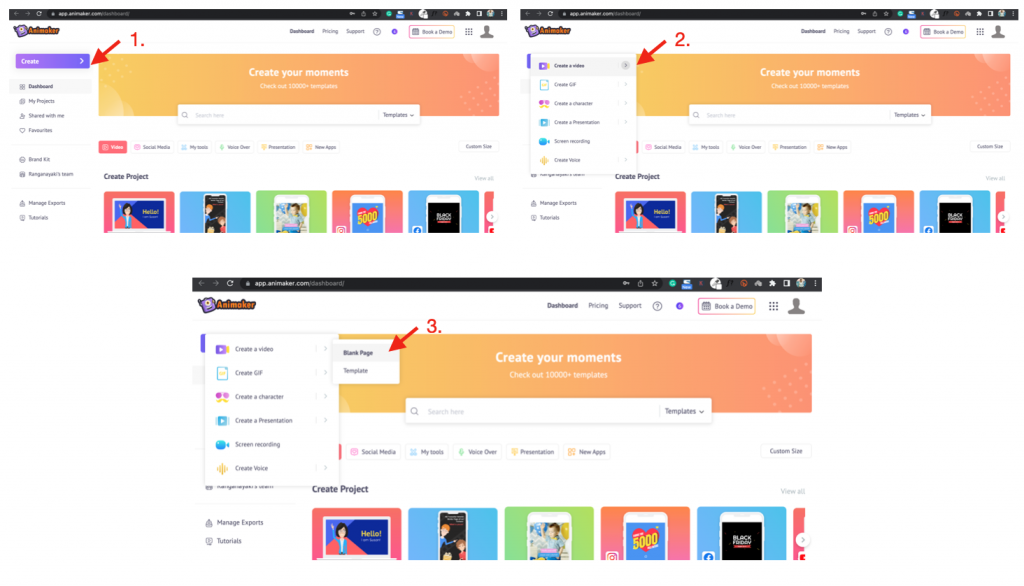
Step 3: Exploring the Animaker interface:
This launches a new Blank Project. First, let’s see what the Animaker interface looks like.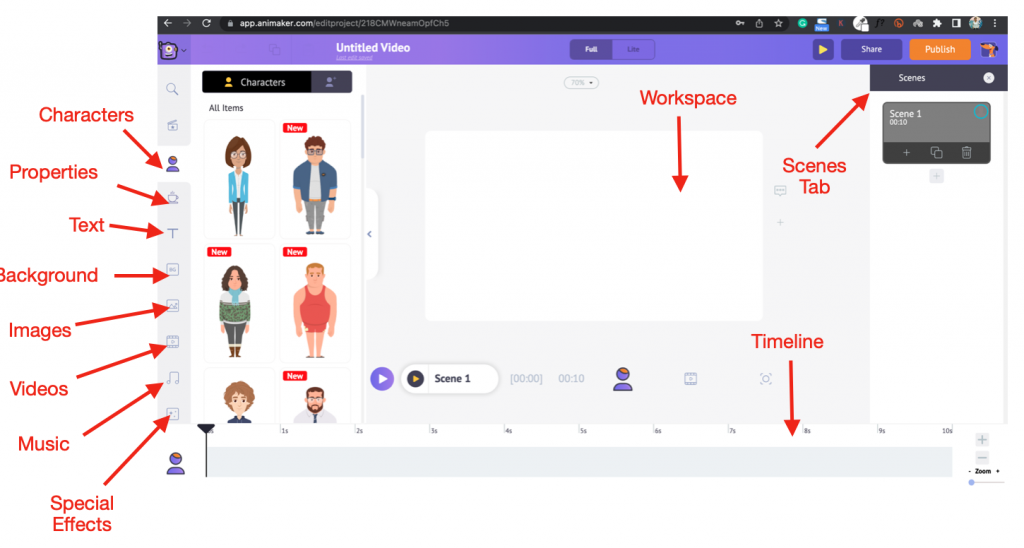
Step 4: Adding Background:
The first step is to add a suitable background to the scene. To select a BG, go to Library -> Background. Since our video will be a self-intro, let’s select a professional-looking, office-like BG. You can either search for the BG by entering the search term or scroll through the list of BGs.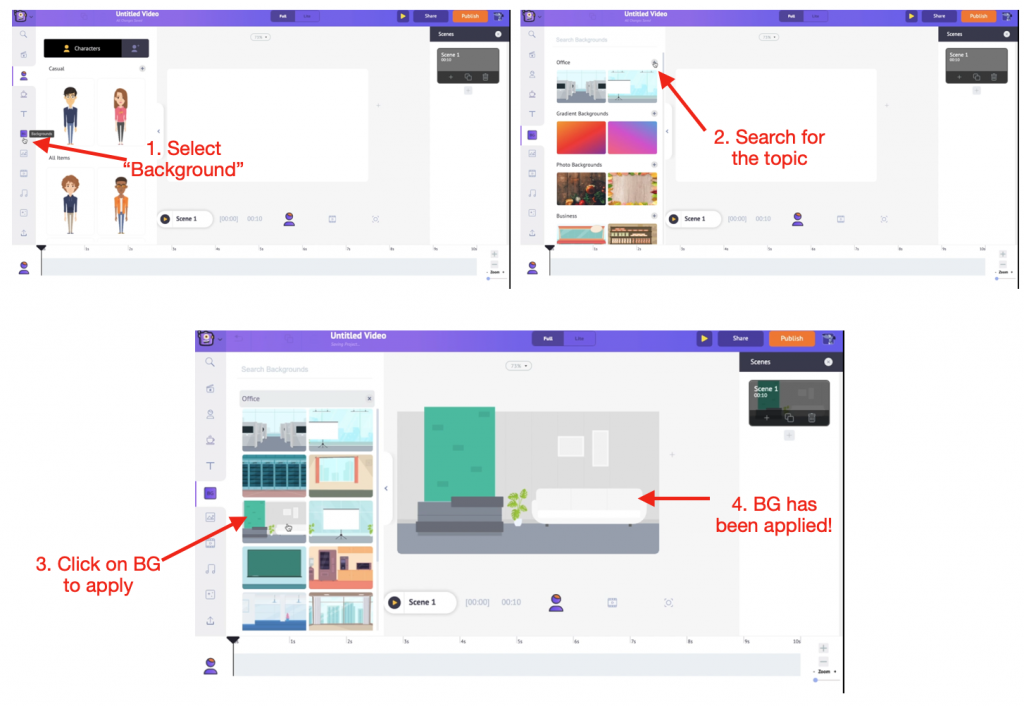
Step 5: Adding Character:
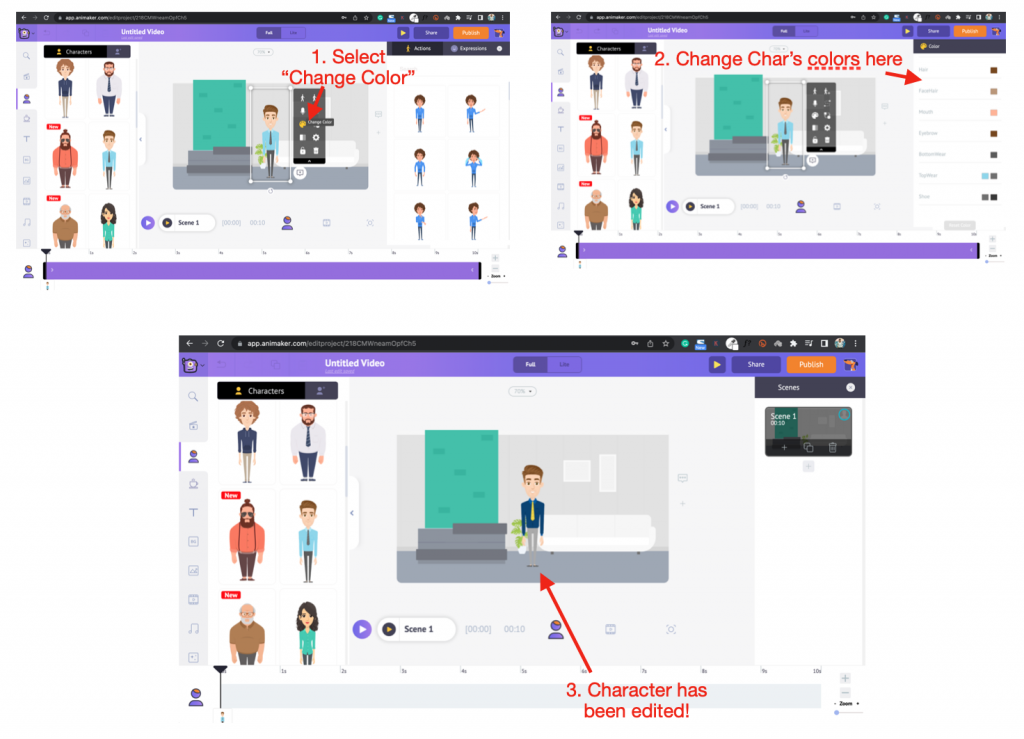
Next, I want to bring a character into the scene. With over 40+ Kid characters, 50+ Plus-size characters, 50+ regular-size characters, and 20+ Animal characters, each with 1000+ actions, Animaker has a vast character collection. In addition to this, you can even customize your characters by changing anything and everything right from frown lines to footwear, hair colors to hats, and whatnot! To add a new character, go to Library -> Character. Choose any pre-made character from this list. Then, click on it to add it to the workspace.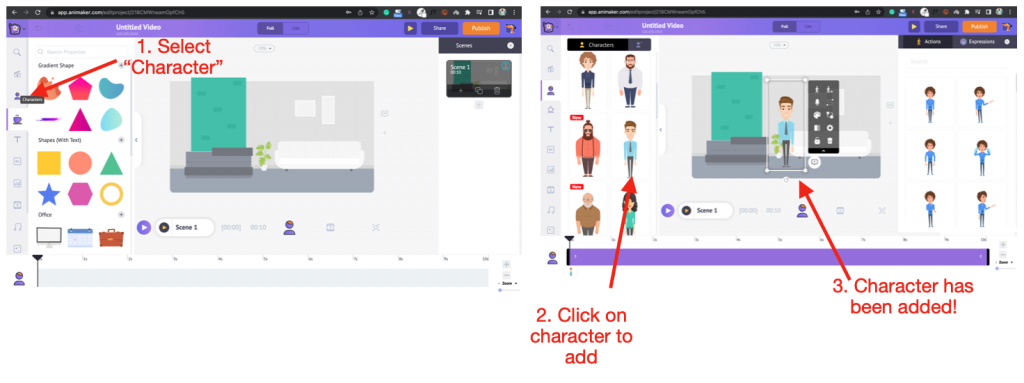 If you want to change the character’s colors, click on it. This opens the Item Menu with several options. In that, select the Change Color option. This opens the Color tab of the character. Here, you can change the skin tone, eyebrow color, colors of the attire, etc. Once you change these attributes, you’ll notice that you have just created a brand new character from a pre-made character!
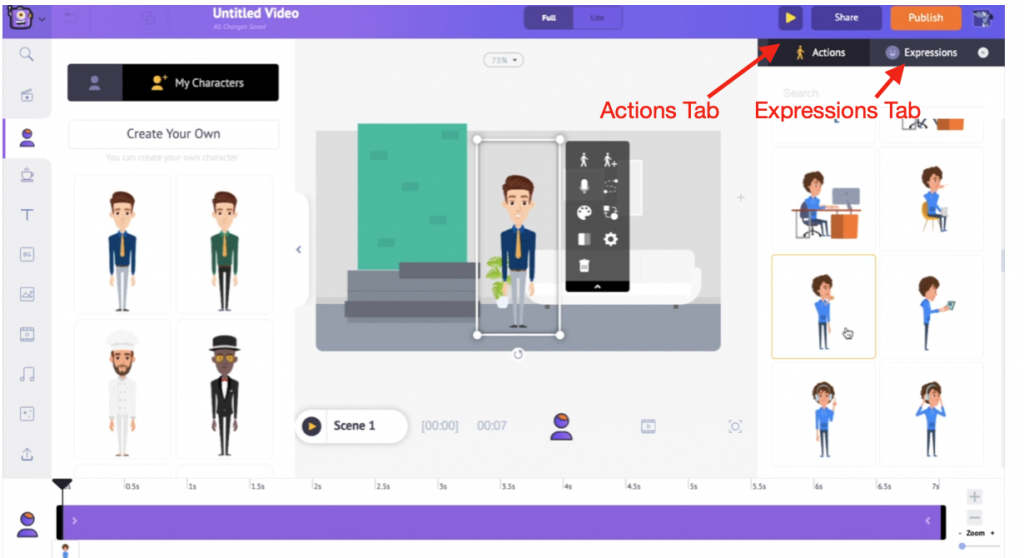
 Let’s make the video more attractive by adding actions to the character. Now, click on the character. This will open the Actions tab, which has 1000+ actions. Adjacent to the Actions tab is the expressions tab with 20+ expressions.
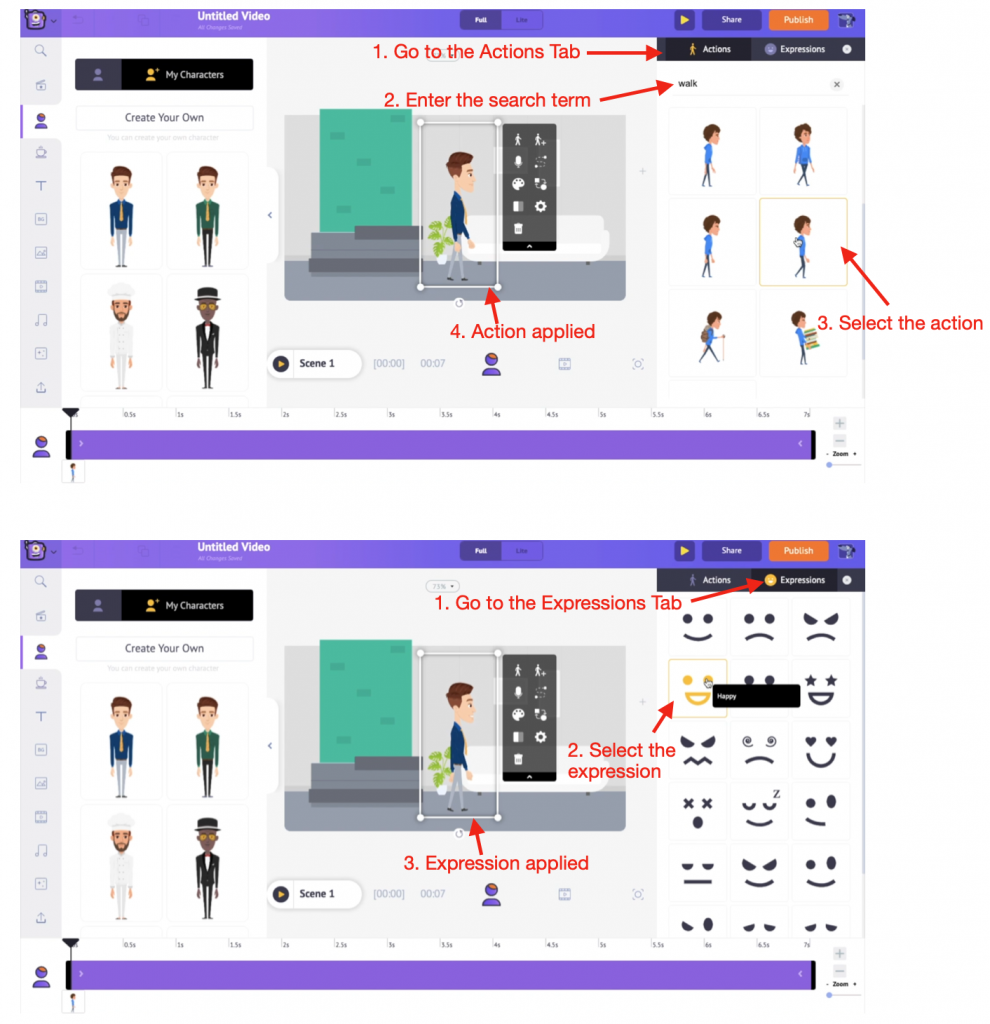
 Let’s make the character walk happily. To do so, search for the term “walk” under the Actions Tab. This lists different walking actions. Select the action of your choice to apply. Then, go to the Expressions tab and select the Happy expression. Our happily walking man is now ready!
 But wait! We are not done yet. The character is stuck to a particular position. So let’s help them move from one point to another. Wanna know how?
Smart move, of course! As the name suggests, you can easily make your assets move from one place to another. Check out this video tutorial to know.
To use the Smart Move option, click on the character. This opens the Item Menu. From here, select the Smart Move option.
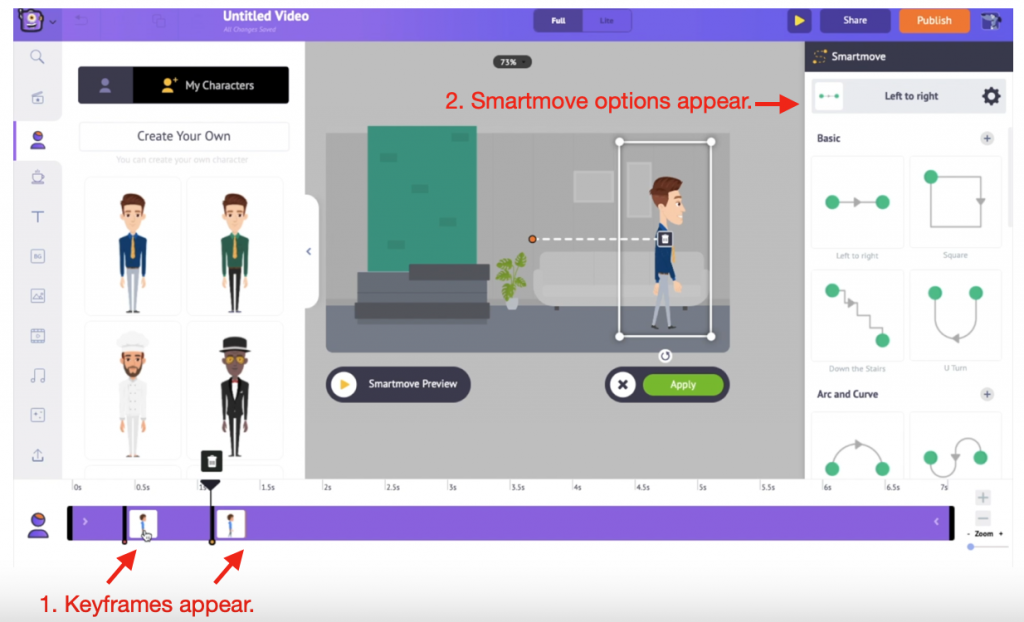
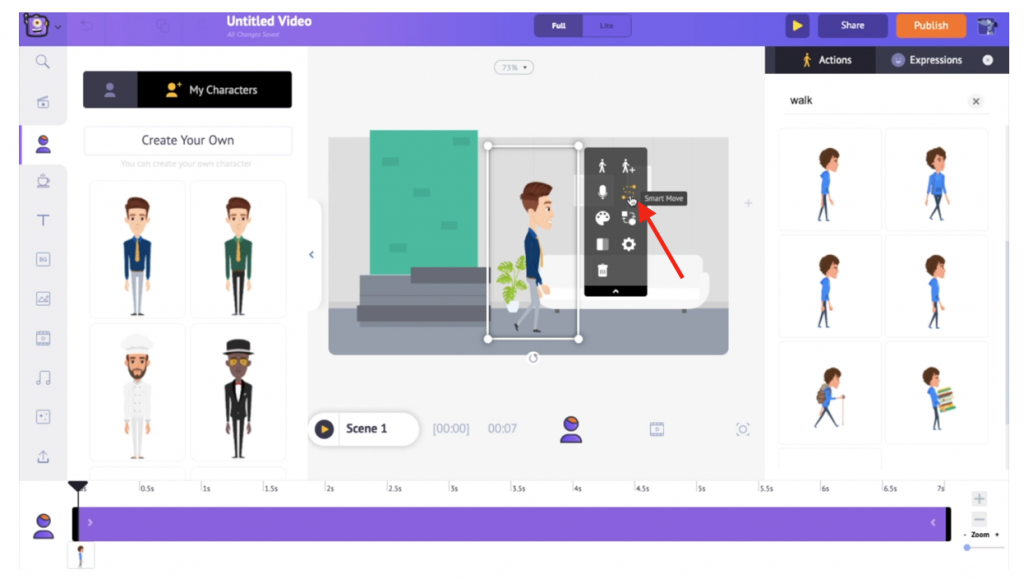 On clicking the Smart move option, two things happen.
- Two keyframes appear on the timeline. These frames denote the start and endpoint of the asset.
- The Smartmove options window opens. Here, you will see the different options to animate your asset.
 Let’s make the character enter the scene, move across it, and then exit the scene. Click on the first keyframe and place the corresponding character frame outside the left scene frame. Then, select the second keyframe and place the corresponding character frame outside the right scene frame.
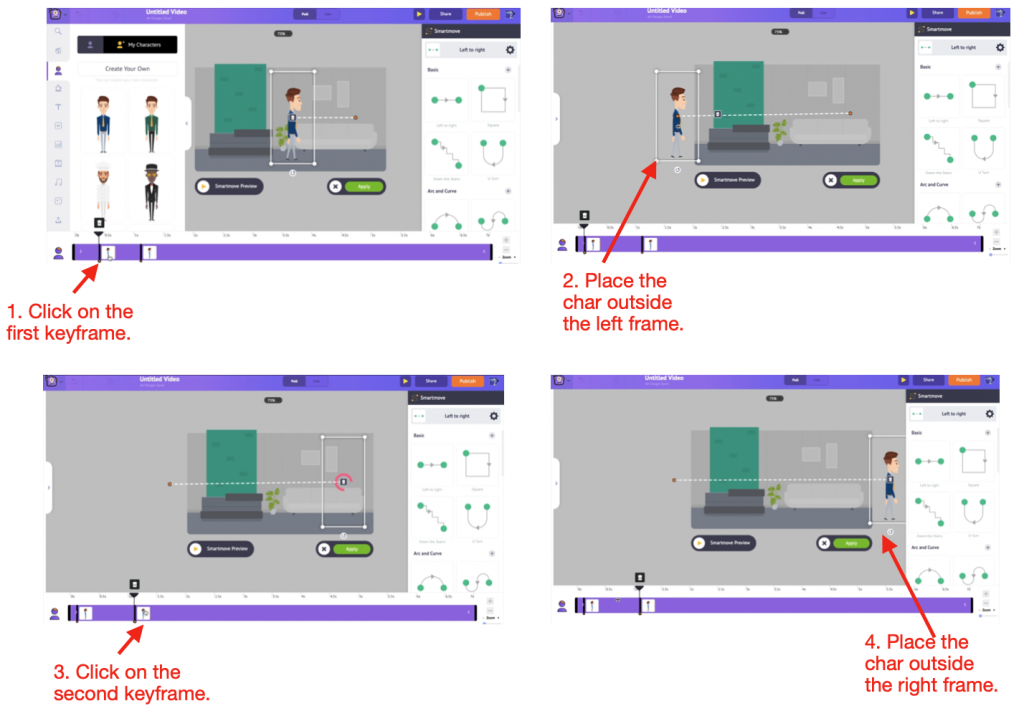 Now, the character must walk across the screen for some time. So, let’s place the keyframes a little away from each other. Let’s make the character enter the scene, walk for 5 seconds, and exit at the 5th second. Place the first keyframe at the 0th second and the second keyframe at the 5th second.
To see how the smartmove works, click on the Smartmove Preview option.
 That was easy, right?
Similarly, if you want your character to do multiple actions, you can use the Action+ option. Click here to learn how.
So, let’s say you want to add a character that enters the scene, stops and waves at us, then stands with his hands folded, like this….
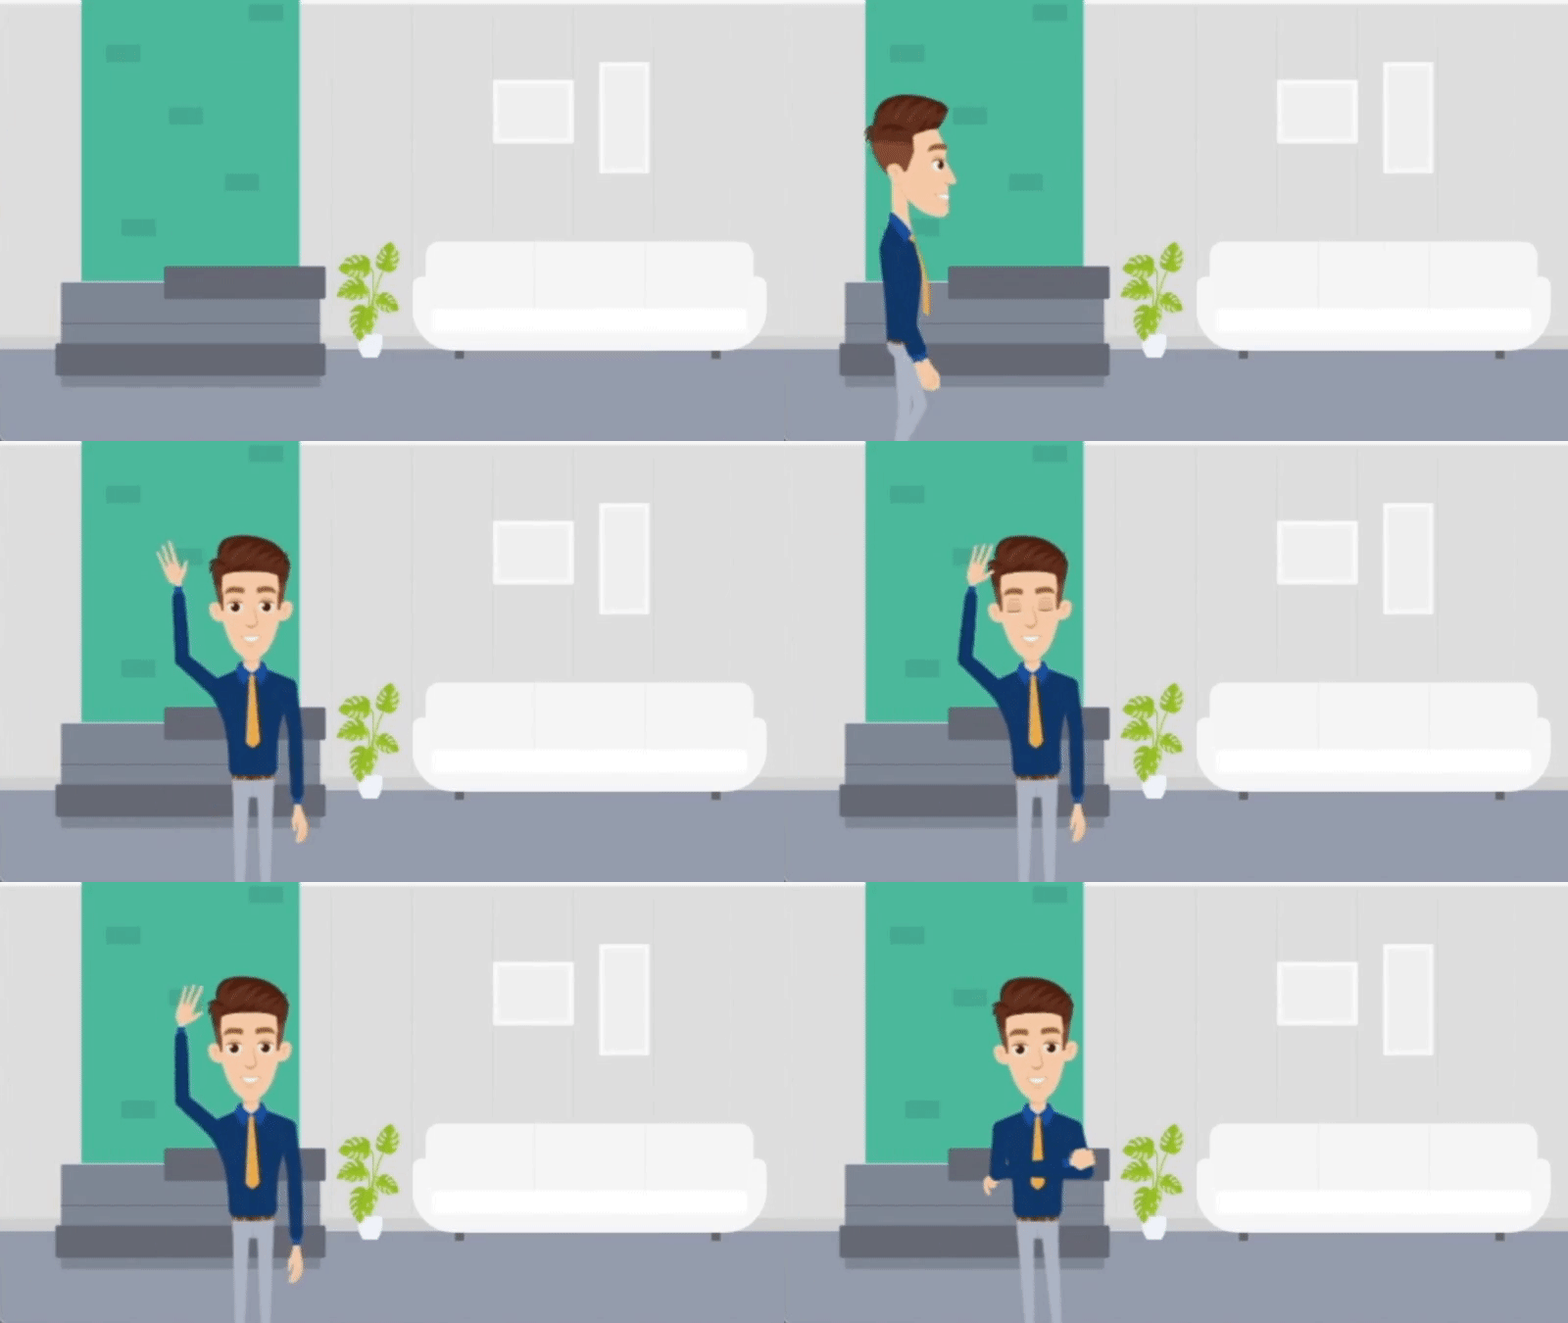 All that might sound very intricate, but Animaker makes it easy as always! So, if you want to try your hands on combining animations and creating an animation sequence, follow these instructions... you will understand how easy it is!
Step 6: Adding voice-over:
Now that we’ve made the character give a grand entry, we need to get to the next step. Since this is a self-introduction video, we’d want the character to say a line or two about themselves. Click on the character and select Voice-over from the Item Menu to add a voice-over. Here, you’ll find three different methods: a. Record Voiceover b. Use Text-to-Speech Engine c. Upload Voiceover Let’s learn how to use them one by one.
A. Record Voice-over:
If you are very confident about your voice, you can directly record a voice-over and sync it with the character. To do so, select the “Record Voice” Option. This opens a new window. Here, click the mike to record the audio. Once you are done recording, you can preview the recording, name it, and click on apply to sync it to the character. If you are not satisfied, there’s even an option to re-record!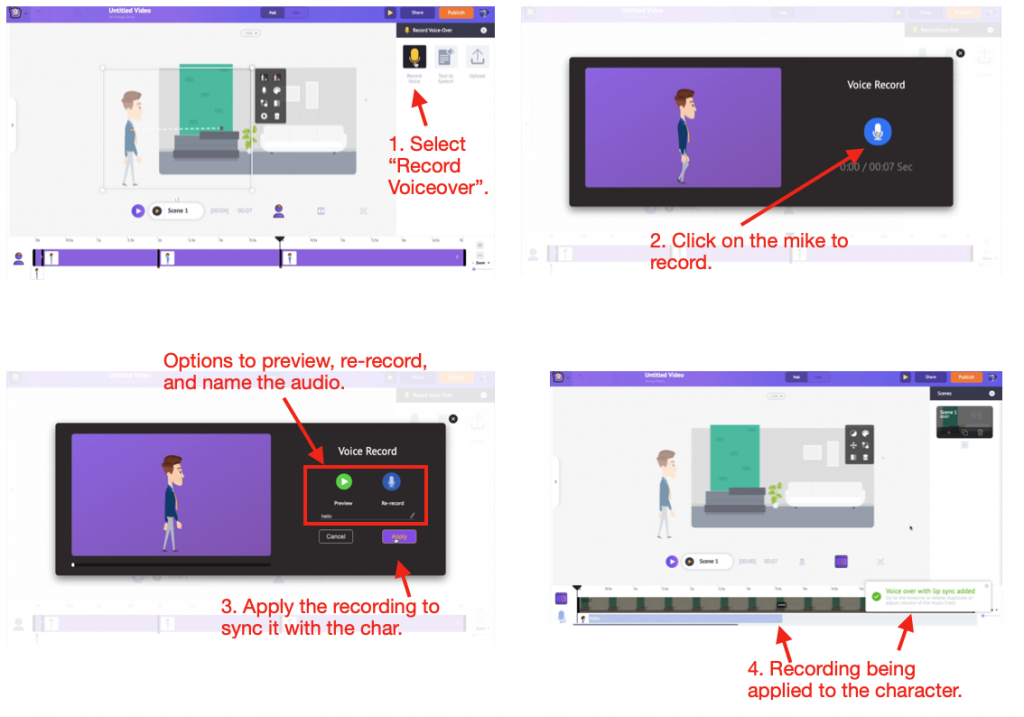
B. Using Text-To-Speech Engine:
This is yet another exciting feature in Animaker. The built-in text-to-speech engine helps to convert your text to speech. All you got to do is, enter your script and sync it with your character. You can explore different features like speed, pitch, volume, breath, and break of this machine. You can also change the gender and accent of the voices. Within accents, there are different voices for you to choose from. There are even options called Auto-enhance and Newscaster. As the name suggests, Auto-enhance is to save you from spending blood, sweat, and tears to make the voice sound human-like! Instead, check this box and finetune the voice in a single click.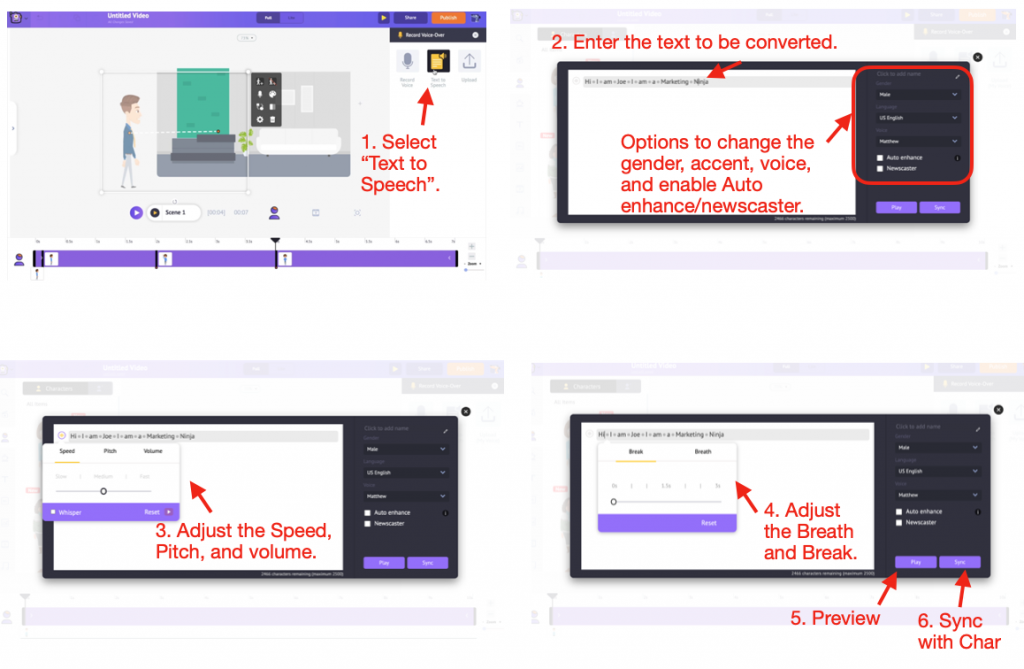 In short, you have all options to make adjustments to prevent the character’s voice from sounding like Terminator’s!

C. Upload Voice-over:
If you have a pre-recorded clip on hand, you can upload it to the Library and sync it with the character. For this, click on the Upload voiceover option. This opens the “Add Lip Sync Audio” tab. Here, click on the “Upload” button. This opens the File Manager. You can select the voice-over you want to add and click on Open. Now, the voiceover gets added to the “Add Lip Sync Audio” tab. From here, you can sync the recording to your character. Since I had already added my recording to the tab, I selected that and apply it.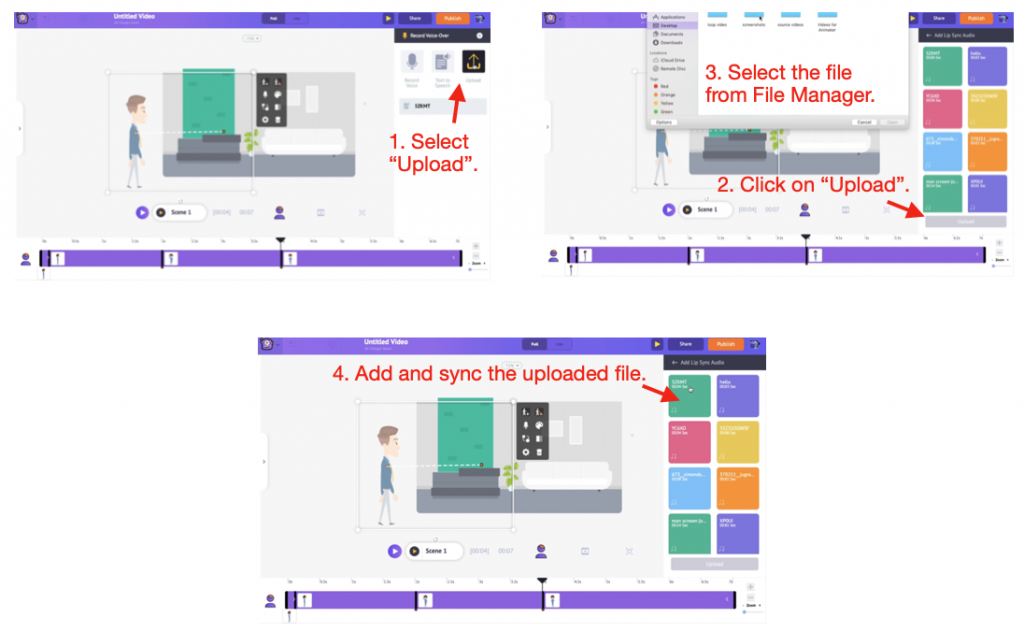 These are the three methods to add a voice-over to your character.
Step 7: Adjusting Asset/Scene duration:
When you select the character, a purple bar appears on the timeline. This indicates the duration of the character. You can adjust the duration by dragging the bars at the end. Similarly, you would have noticed that the scene duration is 10 seconds. This is because, in Animaker, the scene duration is 10 seconds by default. You can increase/decrease the scene duration by using the + and - options to the right of the timeline.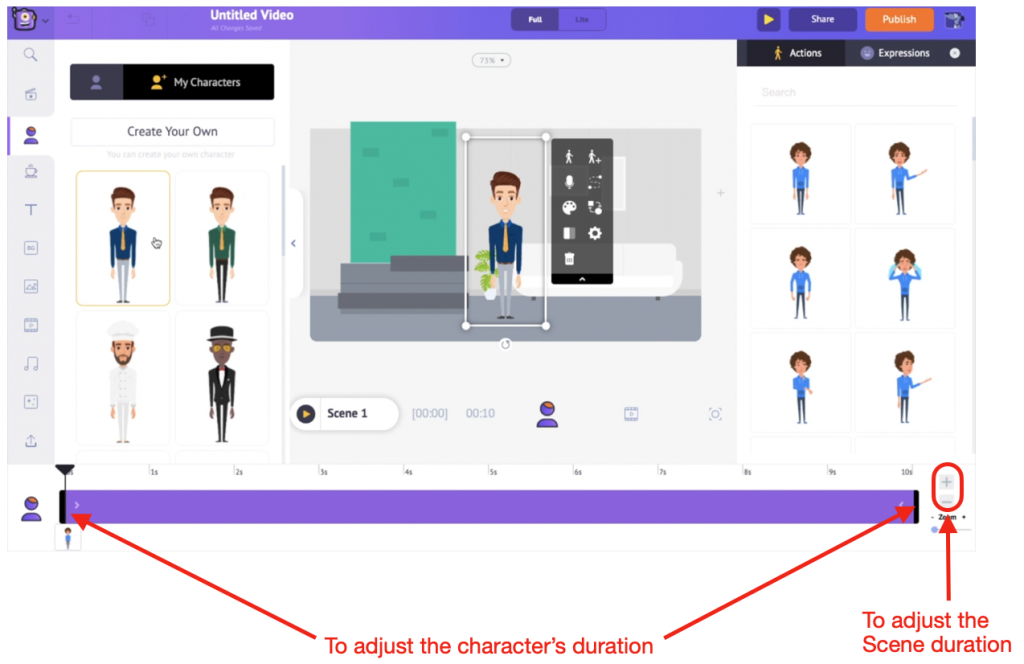 Once you are done constructing a scene perfectly, you need not repeat the same for each scene. All you have to do is, click on the duplicate scene option under the Scenes tab. By this, you can ensure all scenes have a uniform layout.

Step 8: Adding background music:
After you duplicate the scenes and carve each scene carefully, you are left with just one step - Adding background music to the video. Animaker’s music library is filled with 30K+ royalty-free music tracks. To access one among them, go to Library -> Music. Here, you will get to see the music tracks from different genres. Enter a search term of your choice and access a track. To preview the track, simply hover over it. And to use it, just click it.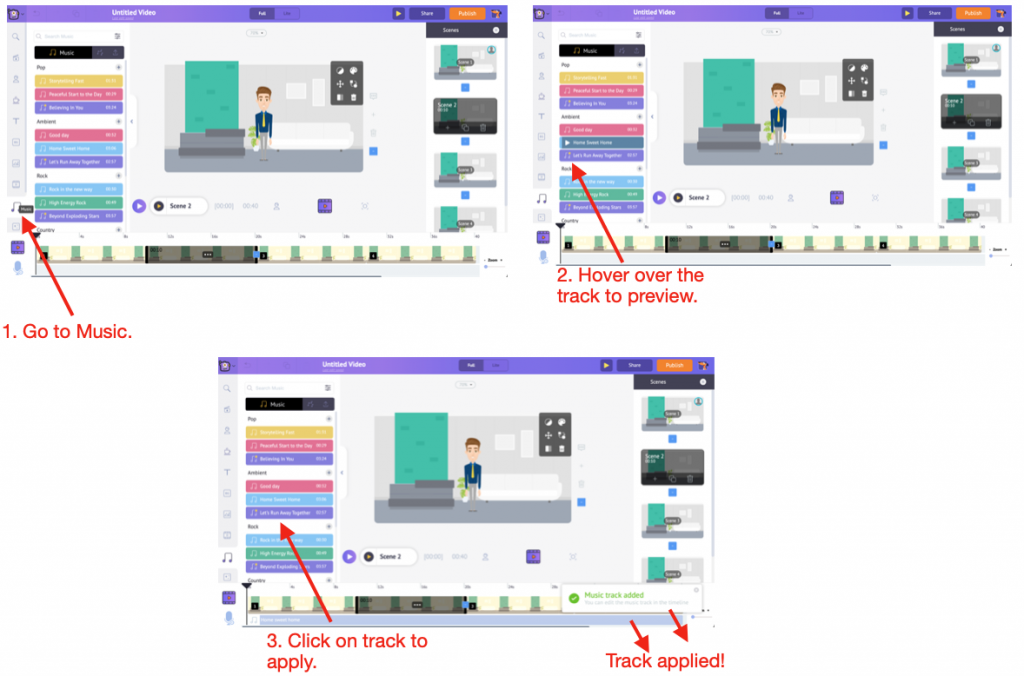
Step 9: Preview the video:
To get an idea of what the full video looks like, you can always preview the video before downloading it. To preview the video, click on this play button on top.
Step 3: Export your video
Once you are satisfied with the preview, it’s time to take the ultimate step! Download the video, of course! To download the video, click on Publish -> Download Video -> Download.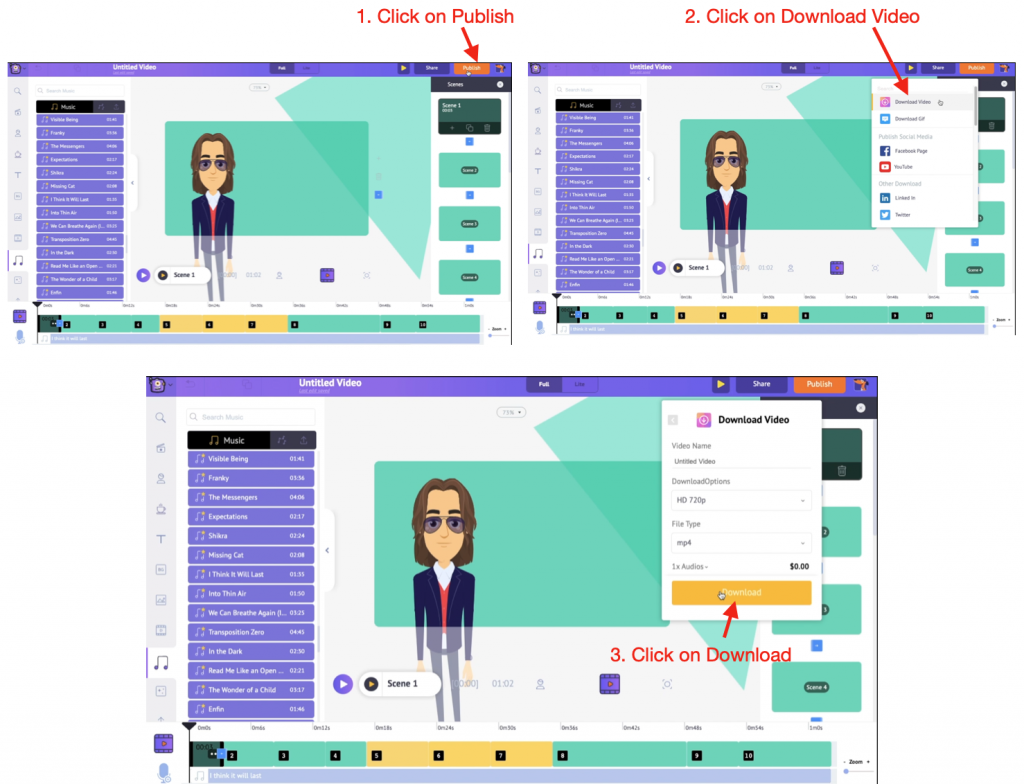 You can also publish the video to social media platforms directly.
These three steps are just to get you started. They have helped our videos outperform all our competitors' videos very easily. We are very confident that it will help you do that too. Once you create many videos, these tips will become second nature.
Creating Cartoon videos has been made easier than ever before, thanks to our 2D animation software. It's high time you started creating your own animated video!
Now that you know everything about creating an animated video, you might want to know how to create a video with pictures and music. Check out our blog by clicking on the link.
Do you have any doubts that haven’t been answered yet? Please shoot your questions in the comment section below - We’d love to help you out!
